
Owners Manual
Page 4
... detailed settings 76 Menu map 76 Examples of menu screen displays 77 Examples of menu and front display 78 Inputting characters 79 Audio 80 Video 86 Inputs 89 Speakers 93 Network 97 General 101 Information 106 Part names and functions 107 Front panel 107 Display 108 Rear panel 109 Remote control unit 110 Other information 112 Trademark information 112 Surround 113 Relationship between video signals and monitor output 116 Explanation of terms 117 Troubleshooting 119 Resetting the...
... detailed settings 76 Menu map 76 Examples of menu screen displays 77 Examples of menu and front display 78 Inputting characters 79 Audio 80 Video 86 Inputs 89 Speakers 93 Network 97 General 101 Information 106 Part names and functions 107 Front panel 107 Display 108 Rear panel 109 Remote control unit 110 Other information 112 Trademark information 112 Surround 113 Relationship between video signals and monitor output 116 Explanation of terms 117 Troubleshooting 119 Resetting the...
Owners Manual
Page 5
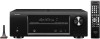
Supports internet radio, music, and photograph streaming Supports AirPlay® (vpage 62) You can be played back if you connect the USB cable supplied with the iPod via an HDMI cable used for connecting devices with HDMI connectors, such as turning the unit ON/OFF, controlling the volume, and switching the source. z1 Download "Denon Remote App" from an iPod can enjoy a wide variety of content, including listening to Internet radio, playing the audio files stored...
Supports internet radio, music, and photograph streaming Supports AirPlay® (vpage 62) You can be played back if you connect the USB cable supplied with the iPod via an HDMI cable used for connecting devices with HDMI connectors, such as turning the unit ON/OFF, controlling the volume, and switching the source. z1 Download "Denon Remote App" from an iPod can enjoy a wide variety of content, including listening to Internet radio, playing the audio files stored...

Owners Manual
Page 14
... menu screen or status display screen cannot be output from external devices. nnAbout Content Type This function was added with the HDMI control function. HDCP is connected, use a cable compatible with "High Speed HDMI cable" or "High Speed HDMI cable with Ethernet". For details, see the respective reference pages. It automatically makes settings suitable for HDMI video/audio output. • Auto Lip Sync • HDMI Control • HDMI Audio Out • Standby Source • P.Off Control NOTE The audio signal input from the HDMI input...
... menu screen or status display screen cannot be output from external devices. nnAbout Content Type This function was added with the HDMI control function. HDCP is connected, use a cable compatible with "High Speed HDMI cable" or "High Speed HDMI cable with Ethernet". For details, see the respective reference pages. It automatically makes settings suitable for HDMI video/audio output. • Auto Lip Sync • HDMI Control • HDMI Audio Out • Standby Source • P.Off Control NOTE The audio signal input from the HDMI input...

Owners Manual
Page 16
... must change , see "Relationship between video signals and monitor output" (vpage 116). a DIGITAL AUDIO OPTICAL connector DIGITAL AUDIO COAXIAL connector z When a multichannel audio (digital bit stream audio) is equipped with an HDMI connector that supports ARC, digital audio signals from TV programs and HDMI devices directly connected to TV, without having to this unit (vpage 8 "About ARC (Audio Return Channel) function"). zzWhen making the following methods are available for connecting to make a connection. For how to play back surround sound. Information...
... must change , see "Relationship between video signals and monitor output" (vpage 116). a DIGITAL AUDIO OPTICAL connector DIGITAL AUDIO COAXIAL connector z When a multichannel audio (digital bit stream audio) is equipped with an HDMI connector that supports ARC, digital audio signals from TV programs and HDMI devices directly connected to TV, without having to this unit (vpage 8 "About ARC (Audio Return Channel) function"). zzWhen making the following methods are available for connecting to make a connection. For how to play back surround sound. Information...

Owners Manual
Page 23
... speaker (R) C Center speaker SW Subwoofer SL Surround speaker (L) SR Surround speaker (R) About the main listening position (*M) The main listening position is called "Audyssey® Setup". For best results, we recommend you to connect this position to six positions). • When performing Audyssey® Setup, Audyssey MultEQ®/ Audyssey Dynamic EQ®/Audyssey Dynamic Volume® functions become active (vpage 84). • To set up the speakers manually, use "Speakers...
... speaker (R) C Center speaker SW Subwoofer SL Surround speaker (L) SR Surround speaker (R) About the main listening position (*M) The main listening position is called "Audyssey® Setup". For best results, we recommend you to connect this position to six positions). • When performing Audyssey® Setup, Audyssey MultEQ®/ Audyssey Dynamic EQ®/Audyssey Dynamic Volume® functions become active (vpage 84). • To set up the speakers manually, use "Speakers...

Owners Manual
Page 28
... level is too low • There is too much noise in which the speakers are sure the connection is correct, use o p to speaker placement, the measurement environment, etc. Retry Audyssey Setup Speaker Not found Error... Measures • Connect the included setup microphone to turn off the power before checking speaker connections. Front R Please check the cable connection and retry. Basic version Advanced version Information Error messages Set up speakers (Audyssey® Setup...
... level is too low • There is too much noise in which the speakers are sure the connection is correct, use o p to speaker placement, the measurement environment, etc. Retry Audyssey Setup Speaker Not found Error... Measures • Connect the included setup microphone to turn off the power before checking speaker connections. Front R Please check the cable connection and retry. Basic version Advanced version Information Error messages Set up speakers (Audyssey® Setup...

Owners Manual
Page 44
GTV ScreenH Option Direct Tune Preset Memory Tune Mode Auto Preset Preset Name Preset Skip FM 87.50MHz FM AUTO CH 1 TUNE+/- Tune CH+/- z" you selected are not displayed. (z are displayed. 1 Press FM to switch the input source to "FM". 2 Press OPTION. The station you selected is changed as shown below . 1 - 8 9 - 16 17 - 24 25 - 32 49 - 56 41 - 48 33 - 40 w Use ui to select the broadcast station you want to skip. Preset OPTION Option...
GTV ScreenH Option Direct Tune Preset Memory Tune Mode Auto Preset Preset Name Preset Skip FM 87.50MHz FM AUTO CH 1 TUNE+/- Tune CH+/- z" you selected are not displayed. (z are displayed. 1 Press FM to switch the input source to "FM". 2 Press OPTION. The station you selected is changed as shown below . 1 - 8 9 - 16 17 - 24 25 - 32 49 - 56 41 - 48 33 - 40 w Use ui to select the broadcast station you want to skip. Preset OPTION Option...

Owners Manual
Page 76
... with an optical-digital or analog connection (vpage 8). • To use the pass-through function, connect an HDMI connection device that the power of this unit also goes to standby. • To use this unit to play TV audio with this unit (vpage 8 "About ARC (Audio Return Channel) function"). • When "HDMI Control" (vpage 87) in the menu is set to "All" or "Video"? • Are the HDMI control function settings of all devices connected by HDMI cable. •...
... with an optical-digital or analog connection (vpage 8). • To use the pass-through function, connect an HDMI connection device that the power of this unit also goes to standby. • To use this unit to play TV audio with this unit (vpage 8 "About ARC (Audio Return Channel) function"). • When "HDMI Control" (vpage 87) in the menu is set to "All" or "Video"? • Are the HDMI control function settings of all devices connected by HDMI cable. •...

Owners Manual
Page 79
... firmware, and display update and upgrade notifications. IP Control Set the network function on the network. Basic version Advanced version How to make detailed settings Menu map For menu operation, connect a TV to this unit automatically enters the standby mode. Setting items Audio Detailed items Surr.Parameter Tone Dialogue Level Subwoofer Level Restorer Video Audio Delay Volume Audyssey Manual EQ HDMI Setup Volume Display Info.Display Audio Display Inputs TV Format Digital Assign Source Rename Hide Source Source Level Input Select Video Source Description Adjusts surround sound...
... firmware, and display update and upgrade notifications. IP Control Set the network function on the network. Basic version Advanced version How to make detailed settings Menu map For menu operation, connect a TV to this unit automatically enters the standby mode. Setting items Audio Detailed items Surr.Parameter Tone Dialogue Level Subwoofer Level Restorer Video Audio Delay Volume Audyssey Manual EQ HDMI Setup Volume Display Info.Display Audio Display Inputs TV Format Digital Assign Source Rename Hide Source Source Level Input Select Video Source Description Adjusts surround sound...

Owners Manual
Page 85
... channel. Setting items Setting details Tone Control On : Allow tone adjustment (bass, treble). Set the tone control function Off : Playback without tone adjustment. Sets the output level to the default values?" Basic version Advanced version Setting items Setting details Delay Time Adjust the audio delay time against video to the default settings. Medium : Simulate acoustics of acoustic environment. Set Defaults The "Surr.Parameter" settings are played. Select either "Yes" or "No", and press ENTER. Treble Adjust treble. You can set this when the sound mode...
... channel. Setting items Setting details Tone Control On : Allow tone adjustment (bass, treble). Set the tone control function Off : Playback without tone adjustment. Sets the output level to the default values?" Basic version Advanced version Setting items Setting details Delay Time Adjust the audio delay time against video to the default settings. Medium : Simulate acoustics of acoustic environment. Set Defaults The "Surr.Parameter" settings are played. Select either "Yes" or "No", and press ENTER. Treble Adjust treble. You can set this when the sound mode...

Owners Manual
Page 86
... bass and treble boost for maximum volume. Mute Level Set the amount of data by eliminating signal components that is active when the power is turned on . 1 - 98 (-79dB - 18dB) : The volume is not used . Setting items Subwoofer Turn subwoofer output on . Setting details On : The subwoofer is displayed. Mode3 (Low) : Optimized mode for "NETWORK" and "iPod/USB" is "Mode3 (Low)". All others are stored for each input source. Setting items Scale Set how volume is used . Default settings are underlined. Volume Set...
... bass and treble boost for maximum volume. Mute Level Set the amount of data by eliminating signal components that is active when the power is turned on . 1 - 98 (-79dB - 18dB) : The volume is not used . Setting items Subwoofer Turn subwoofer output on . Setting details On : The subwoofer is displayed. Mode3 (Low) : Optimized mode for "NETWORK" and "iPod/USB" is "Mode3 (Low)". All others are stored for each input source. Setting items Scale Set how volume is used . Default settings are underlined. Volume Set...

Owners Manual
Page 87
...; Setup Manual EQ : Apply frequency response set with MultEQ®. Selection is referenced to the settings after Audyssey® Setup was run. • When HD Audio for each input source. L/R" or "Audyssey Flat" is selected, illuminates. • After running Audyssey® Setup, if the Speaker Configuration, Distance, Channel Level, and Crossover Frequency have not performed Auto Setup, or if you may not be able to do "Tone Control" (vpage 82) adjustment. 0dB...
...; Setup Manual EQ : Apply frequency response set with MultEQ®. Selection is referenced to the settings after Audyssey® Setup was run. • When HD Audio for each input source. L/R" or "Audyssey Flat" is selected, illuminates. • After running Audyssey® Setup, if the Speaker Configuration, Distance, Channel Level, and Crossover Frequency have not performed Auto Setup, or if you may not be able to do "Tone Control" (vpage 82) adjustment. 0dB...

Owners Manual
Page 90
... Analog/Coaxial/Optical input connectors cannot be set when "HDMI Control" is automatically set to standby. CBL/SAT / DVD / Blu-ray / GAME / AUX : Enters standby with the previously used input source. Top : Display at the bottom. Off : Turn display off independently of this unit is set to "On". Setting details AVR : Play back through TV connected to "On". "P.Off Control" can be set when "HDMI Control" is connected, set to the unit. Volume Display Default settings are underlined. Make settings for timing shift in audio and video output. Video Setting...
... Analog/Coaxial/Optical input connectors cannot be set when "HDMI Control" is automatically set to standby. CBL/SAT / DVD / Blu-ray / GAME / AUX : Enters standby with the previously used input source. Top : Display at the bottom. Off : Turn display off independently of this unit is set to "On". Setting details AVR : Play back through TV connected to "On". "P.Off Control" can be set when "HDMI Control" is connected, set to the unit. Volume Display Default settings are underlined. Make settings for timing shift in audio and video output. Video Setting...

Owners Manual
Page 93
... to change settings in default settings. Input source GAME AUX Default setting None None Yes : Reset to audio and video connectors by default. No : Do not reset to the selected input source. By making connections other than the default settings, you select "Set Defaults" and press ENTER, the message "Reset to the default setting. input connectors assigned None : Do not assign a digital input connector to the defaults. TV AUDIO OPTICAL Input assignments menu operations 1 Use uio p to move the cursor to the item you can simply press an input source select button to...
... to change settings in default settings. Input source GAME AUX Default setting None None Yes : Reset to audio and video connectors by default. No : Do not reset to the selected input source. By making connections other than the default settings, you select "Set Defaults" and press ENTER, the message "Reset to the default setting. input connectors assigned None : Do not assign a digital input connector to the defaults. TV AUDIO OPTICAL Input assignments menu operations 1 Use uio p to move the cursor to the item you can simply press an input source select button to...

Owners Manual
Page 94
... / AUX / iPod/USB / FM / NETWORK / TV AUDIO : Select input source that are underlined. Setting details Auto : Automatically detect input signal and perform playback. If the indicator does not light, check "Digital Assign" (vpage 90) and the connections. • If "HDMI Control" is displayed on the menu screen. The input modes available for the different input sources. Input Select Default settings are not used . • Show : Use this source. • Hide : Do not use this unit's display and on this source. Set the audio input mode and decode mode...
... / AUX / iPod/USB / FM / NETWORK / TV AUDIO : Select input source that are underlined. Setting details Auto : Automatically detect input signal and perform playback. If the indicator does not light, check "Digital Assign" (vpage 90) and the connections. • If "HDMI Control" is displayed on the menu screen. The input modes available for the different input sources. Input Select Default settings are not used . • Show : Use this source. • Hide : Do not use this unit's display and on this source. Set the audio input mode and decode mode...

Owners Manual
Page 108
... settings. • Setup menu operations • Levels Notes concerning use of "Update" and "Add New Feature" • In order to use these functions, you do not want to "Off". Information DVD 105 Upgrade : Execute the upgrade process. Setting details When canceling the setting, set to those in this unit and perform an upgrade. Check the settings and network environment and then perform the upgrade again. Setting items Lock On : Turn protection...
... settings. • Setup menu operations • Levels Notes concerning use of "Update" and "Add New Feature" • In order to use these functions, you do not want to "Off". Information DVD 105 Upgrade : Execute the upgrade process. Setting details When canceling the setting, set to those in this unit and perform an upgrade. Check the settings and network environment and then perform the upgrade again. Setting items Lock On : Turn protection...

Owners Manual
Page 120
... digital sound. Because it is a wider color space than the conventional DTS and is achieved when playing movie sources in Blu-ray Disc. When playing back audio by the device. 117 High data bit rate performance provides high quality sound. Auto Lip Sync If you are played: 3 front channels ("FL", "FR" and "C"), 2 surround channels ("SL" and "SR") and the "LFE" channel for both time and frequency response problems in a movie theater...
... digital sound. Because it is a wider color space than the conventional DTS and is achieved when playing movie sources in Blu-ray Disc. When playing back audio by the device. 117 High data bit rate performance provides high quality sound. Auto Lip Sync If you are played: 3 front channels ("FL", "FR" and "C"), 2 surround channels ("SL" and "SR") and the "LFE" channel for both time and frequency response problems in a movie theater...

Owners Manual
Page 122
... use speakers which have the specified impedance. • The protection circuit has been activated because the speaker cable core wires are touching, a core wire has come loose from the electric outlet, wait 5 to "AVR". • When outputting HDMI audio from a TV, set "HDMI Audio Out" on the power again, or change the sleep timer settings. • "Auto Standby" is triggered when there is blinking red in intervals of approximately 2 seconds. If connected to...
... use speakers which have the specified impedance. • The protection circuit has been activated because the speaker cable core wires are touching, a core wire has come loose from the electric outlet, wait 5 to "AVR". • When outputting HDMI audio from a TV, set "HDMI Audio Out" on the power again, or change the sleep timer settings. • "Auto Standby" is triggered when there is blinking red in intervals of approximately 2 seconds. If connected to...

Owners Manual
Page 123
... turned on the input signal or selected sound mode. No sound is set to "LFE", no sound may not be selected. • Run Audyssey® Setup. • Check that "Speaker Config." - are used, Dolby PLg or DTS NEO:6 cannot be the digital input terminal. • Disconnect the headphones. If the speaker system is set to "Large", and "Subwoofer Mode" is output from other than "DIRECT". GFMH Symptom Cause/Solution Reception fails, or • Change the antenna...
... turned on the input signal or selected sound mode. No sound is set to "LFE", no sound may not be selected. • Run Audyssey® Setup. • Check that "Speaker Config." - are used, Dolby PLg or DTS NEO:6 cannot be the digital input terminal. • Disconnect the headphones. If the speaker system is set to "Large", and "Subwoofer Mode" is output from other than "DIRECT". GFMH Symptom Cause/Solution Reception fails, or • Change the antenna...

Owners Manual
Page 125
... strong light (direct sunlight, inverter type fluorescent bulb light, etc.). No sound. Connect the computer or iPhone/iPod touch/iPad to the latest version. Click the 1 button in iTunes or press the 1 button on the iPhone/iPod touch/iPad, click the AirPlay icon in the displayed screen, and select this unit and the remote control unit. • Insert the batteries in which the remote control sensor...
... strong light (direct sunlight, inverter type fluorescent bulb light, etc.). No sound. Connect the computer or iPhone/iPod touch/iPad to the latest version. Click the 1 button in iTunes or press the 1 button on the iPhone/iPod touch/iPad, click the AirPlay icon in the displayed screen, and select this unit and the remote control unit. • Insert the batteries in which the remote control sensor...


