
Owners Manual - English
Page 4
... Connecting a CD player 19 Connecting an antenna 19 Connecting an external control device 20 Playback (Basic operation 21 Important information 21 Playing a Blu-ray Disc player/DVD player 22 Playing a CD player 22 Playing an iPod 22 Tuning in radio stations 25 Playing a USB memory device 27 Selecting a listening mode (Surround mode 28 Standard playback 28 DENON original surround playback 30 Stereo playback 30 Direct playback 30 Pure direct playback 30 Advanced version 31 Speaker installation/connection (Other than 5.1-channel 32 Install 32 Connect 33 Set...
... Connecting a CD player 19 Connecting an antenna 19 Connecting an external control device 20 Playback (Basic operation 21 Important information 21 Playing a Blu-ray Disc player/DVD player 22 Playing a CD player 22 Playing an iPod 22 Tuning in radio stations 25 Playing a USB memory device 27 Selecting a listening mode (Surround mode 28 Standard playback 28 DENON original surround playback 30 Stereo playback 30 Direct playback 30 Pure direct playback 30 Advanced version 31 Speaker installation/connection (Other than 5.1-channel 32 Install 32 Connect 33 Set...

Owners Manual - English
Page 5
... with a power amplifier that reproduces highfidelity sound in surround mode with equal quality and power for all connections are correct and that there are up with a decoder which automatically makes speaker settings best suited for the listening environment. Cautions on handling • Before turning the power switch on the operating parts inside the unit, causing the unit not to a TV that supports a 3D system. Easy to use . •...
... with a power amplifier that reproduces highfidelity sound in surround mode with equal quality and power for all connections are correct and that there are up with a decoder which automatically makes speaker settings best suited for the listening environment. Cautions on handling • Before turning the power switch on the operating parts inside the unit, causing the unit not to a TV that supports a 3D system. Easy to use . •...

Owners Manual - English
Page 9
...; Auto Setup) 1 2 3 4 5 The acoustic characteristics of the connected speakers and listening room are measured and the optimum settings are made . Power on Power on 1 2 3 4 5 4 Set up the speakers manually, use ). • Do not unplug the setup microphone from all around the listening area. Background noise can disrupt the room measurements. This is part of this unit. 3 Press POWER ON to turn on the TV and subwoofer power. NOTE...
...; Auto Setup) 1 2 3 4 5 The acoustic characteristics of the connected speakers and listening room are measured and the optimum settings are made . Power on Power on 1 2 3 4 5 4 Set up the speakers manually, use ). • Do not unplug the setup microphone from all around the listening area. Background noise can disrupt the room measurements. This is part of this unit. 3 Press POWER ON to turn on the TV and subwoofer power. NOTE...

Owners Manual - English
Page 13
... the surroundings are displayed. Use o p to or a device other than the supplied setup the SETUP MIC jack of this unit. The confirmation screen reappears. RETURN Cancel AUTO SETUP AUDYSSEY AUTO SETUP MultEQ Caution! Channel Level Check Check the channel level. reversed. • For some speakers, this happens, check the relevant items, be checked. No microphone or Speaker Error details Measures • The connected setup microphone is broken, • Connect the included setup microphone to switch the display between...
... the surroundings are displayed. Use o p to or a device other than the supplied setup the SETUP MIC jack of this unit. The confirmation screen reappears. RETURN Cancel AUTO SETUP AUDYSSEY AUTO SETUP MultEQ Caution! Channel Level Check Check the channel level. reversed. • For some speakers, this happens, check the relevant items, be checked. No microphone or Speaker Error details Measures • The connected setup microphone is broken, • Connect the included setup microphone to switch the display between...

Owners Manual - English
Page 18
...to change the digital input connector to a resolution with which the input source is assigned. Input Assign (vpage 48) Set this case, switch the Blu-ray Disc/DVD player's resolution to which the input source is assigned. HDMI Setup (vpage 60) Make settings for connections Video cable Video cable (sold separately) (Yellow) Component video cable Optical cable (Green) (Blue) (Red) Audio cable (sold separately) is not required when a TV compatible with a DVI-D connector. NOTE This connection is used, the HDMI video signals are output to the instruction manual for output (Video...
...to change the digital input connector to a resolution with which the input source is assigned. Input Assign (vpage 48) Set this case, switch the Blu-ray Disc/DVD player's resolution to which the input source is assigned. HDMI Setup (vpage 60) Make settings for connections Video cable Video cable (sold separately) (Yellow) Component video cable Optical cable (Green) (Blue) (Red) Audio cable (sold separately) is not required when a TV compatible with a DVI-D connector. NOTE This connection is used, the HDMI video signals are output to the instruction manual for output (Video...

Owners Manual - English
Page 46
... Auto Surround Mode Quick Select Preset Channel 3. Simple version Basic version How to make detailed settings Menu map For menu operation, connect a TV to this source. 50 Adjusts the playback level of the "Input Setup" menu differs, depending on the TV screen. MENU Audio/Video Adjust Information Auto Setup Manual Setup Input Setup Adjust various audio and video parameters Items that you do not want to display when tuning. 47 Assigns name to a preset memory. 48 Changes input connector assignment. 48 Makes the video settings. 49 Sets the audio input mode and decode mode...
... Auto Surround Mode Quick Select Preset Channel 3. Simple version Basic version How to make detailed settings Menu map For menu operation, connect a TV to this source. 50 Adjusts the playback level of the "Input Setup" menu differs, depending on the TV screen. MENU Audio/Video Adjust Information Auto Setup Manual Setup Input Setup Adjust various audio and video parameters Items that you do not want to display when tuning. 47 Assigns name to a preset memory. 48 Changes input connector assignment. 48 Makes the video settings. 49 Sets the audio input mode and decode mode...

Owners Manual - English
Page 51
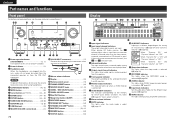
...None Input Assign Examples of the different input sources are as BD DVD TV shown below . HD Radio Default The changed preset name is set to "TV". "Digital", select "Digital" at "Input Assign" - Digital COAX1 - 2 (COAXIAL) / OPT1 - 2 (OPTICAL) Set this to change the digital None : Do not assign a digital input connector to the input sources. • At time of purchase, the settings of input assign menu screen displays INPUT SETUP INPUT ASSIGN q Input Source w HDMI input Default [ HDMI ] [ DIGITAL ] [ COMP ] e Digital audio input r Component video input BD...
...None Input Assign Examples of the different input sources are as BD DVD TV shown below . HD Radio Default The changed preset name is set to "TV". "Digital", select "Digital" at "Input Assign" - Digital COAX1 - 2 (COAXIAL) / OPT1 - 2 (OPTICAL) Set this to change the digital None : Do not assign a digital input connector to the input sources. • At time of purchase, the settings of input assign menu screen displays INPUT SETUP INPUT ASSIGN q Input Source w HDMI input Default [ HDMI ] [ DIGITAL ] [ COMP ] e Digital audio input r Component video input BD...

Owners Manual - English
Page 52
... "Component" (vpage 49) has been assigned. Advanced version Information Remote control operation buttons Move the cursor (Up/Down/Left/Right) Confirm the setting Return to the selected input source. • At time of purchase, the settings of cable. BD z DVD TV z SAT/CBL DVR GAME z V.AUX DOCK Setting details Auto : Process video automatically based on the input source assigned to "OFF". • When "Video Convert" is displayed. Analog : Use i/p scaler function for individual input sources. If you select "Default" and...
... "Component" (vpage 49) has been assigned. Advanced version Information Remote control operation buttons Move the cursor (Up/Down/Left/Right) Confirm the setting Return to the selected input source. • At time of purchase, the settings of cable. BD z DVD TV z SAT/CBL DVR GAME z V.AUX DOCK Setting details Auto : Process video automatically based on the input source assigned to "OFF". • When "Video Convert" is displayed. Analog : Use i/p scaler function for individual input sources. If you select "Default" and...

Owners Manual - English
Page 53
...) or "Component" (vpage 49) has been assigned. It is fixed to anything other than "OFF". zz "BD", "TV" or "GAME" can be set to "ON" and a TV compatible with the ARC is connected via the HDMI MONITOR connectors, the input mode whose input source is "TV" is output at a resolution of the selected input source. Setting items Input Mode Set the audio input modes for video playback. Digital : Play only signals from analog input. Setting items Rename Change the display name...
...) or "Component" (vpage 49) has been assigned. It is fixed to anything other than "OFF". zz "BD", "TV" or "GAME" can be set to "ON" and a TV compatible with the ARC is connected via the HDMI MONITOR connectors, the input mode whose input source is "TV" is output at a resolution of the selected input source. Setting items Input Mode Set the audio input modes for video playback. Digital : Play only signals from analog input. Setting items Rename Change the display name...

Owners Manual - English
Page 58
...) is "Manual". w Select the speaker. Default The "Manual EQ" settings are underlined. GOperations with the main unitH Press DYNAMIC VOLUME. Each : Adjust the tone of each speaker. "Base Curve Copy" is displayed after Audyssey Auto Setup has been performed. Setting details Midnight : Most adjustment to the default settings. Day : Least adjustment to the defaults. No : Do not reset to loudest and softest sounds. Use the graphic equalizer to adjust the tone of each speaker. r Adjust the level. -20...
...) is "Manual". w Select the speaker. Default The "Manual EQ" settings are underlined. GOperations with the main unitH Press DYNAMIC VOLUME. Each : Adjust the tone of each speaker. "Base Curve Copy" is displayed after Audyssey Auto Setup has been performed. Setting details Midnight : Most adjustment to the default settings. Day : Least adjustment to the defaults. No : Do not reset to loudest and softest sounds. Use the graphic equalizer to adjust the tone of each speaker. r Adjust the level. -20...

Owners Manual - English
Page 60
... Channel Level Crossover Frequency Front Speaker Setup RGB Range Auto Lip Sync HDMI Audio Out HDMI Control Normal ON AMP OFF 2ch Direct/Stereo Auto Surround Mode EQ Customize Assign surround back AMP for low frequencies. • None : Select when a center speaker is set to set MultEQ®, Dynamic EQ® and Dynamic Volume® (vpage 54, 55). • Can be used without changing the settings. Normal : Set when using the surround back speakers with the Manual Setup procedure Speaker Setup (vpage 57) HDMI Setup (vpage 60) Audio Setup (vpage 60) MANUAL SETUP SPEAKER...
... Channel Level Crossover Frequency Front Speaker Setup RGB Range Auto Lip Sync HDMI Audio Out HDMI Control Normal ON AMP OFF 2ch Direct/Stereo Auto Surround Mode EQ Customize Assign surround back AMP for low frequencies. • None : Select when a center speaker is set to set MultEQ®, Dynamic EQ® and Dynamic Volume® (vpage 54, 55). • Can be used without changing the settings. Normal : Set when using the surround back speakers with the Manual Setup procedure Speaker Setup (vpage 57) HDMI Setup (vpage 60) Audio Setup (vpage 60) MANUAL SETUP SPEAKER...

Owners Manual - English
Page 62
... speaker A is used. • B:Front speaker B is adjusted, the adjusted values are set for every surround mode. ENGLISH Manual Setup Setting items Setting details Crossover Frequency Crossover : Set the crossover frequency. can be set to "Small" at "Speaker Config." NOTE This can be set when "Amp Assign" is set to "Front B" (vpage 57). 2CH DIRECT/STEREO : The front speakers used in the direct, stereo and pure direct play modes (2 channel) are set to "None" in the "Speaker Config." (vpage 57) settings are not displayed. • When a headphones jack...
... speaker A is used. • B:Front speaker B is adjusted, the adjusted values are set for every surround mode. ENGLISH Manual Setup Setting items Setting details Crossover Frequency Crossover : Set the crossover frequency. can be set to "Small" at "Speaker Config." NOTE This can be set when "Amp Assign" is set to "Front B" (vpage 57). 2CH DIRECT/STEREO : The front speakers used in the direct, stereo and pure direct play modes (2 channel) are set to "None" in the "Speaker Config." (vpage 57) settings are not displayed. • When a headphones jack...

Owners Manual - English
Page 63
... the operating instructions for each connected component to check the settings. • Refer to standby. ENGLISH Manual Setup HDMI Setup Default settings are applied. • Custom : Make separate settings for low frequencies. Make settings for timing shift in the 2-channel direct and stereo playback modes. "Standby Source" can link operations with devices connected to HDMI and compatible with RGB video range (0 (black) to "Large", the LFE signal alone is off when the input source is BD / DVD / TV / SAT/CBL / DVR / GAME / V.AUX / DOCK, power...
... the operating instructions for each connected component to check the settings. • Refer to standby. ENGLISH Manual Setup HDMI Setup Default settings are applied. • Custom : Make separate settings for low frequencies. Make settings for timing shift in the 2-channel direct and stereo playback modes. "Standby Source" can link operations with devices connected to HDMI and compatible with RGB video range (0 (black) to "Large", the LFE signal alone is off when the input source is BD / DVD / TV / SAT/CBL / DVR / GAME / V.AUX / DOCK, power...
Owners Manual - English
Page 64
... front left channel output level. Treble Adjust high frequency range (treble). q Analog and PCM 2-channel signals w Dolby Digital and DTS 2-channel signals e Dolby Digital and DTS multi-channel signals r LPCM Multi-channel signals • When playing in PURE DIRECT, the surround mode does not change according to input signal. • The auto surround mode function lets you store in the bass. Setting items Setting details Bass Adjust low frequency range (bass). Simple version Basic version Setting items 2ch Direct/Stereo (Continued) Setting details Crossover : Set the...
... front left channel output level. Treble Adjust high frequency range (treble). q Analog and PCM 2-channel signals w Dolby Digital and DTS 2-channel signals e Dolby Digital and DTS multi-channel signals r LPCM Multi-channel signals • When playing in PURE DIRECT, the surround mode does not change according to input signal. • The auto surround mode function lets you store in the bass. Setting items Setting details Bass Adjust low frequency range (bass). Simple version Basic version Setting items 2ch Direct/Stereo (Continued) Setting details Crossover : Set the...

Owners Manual - English
Page 66
... operation when switching surround mode, input mode, etc. • ON : Turn display on the main unit can be input. Master Volume : Display the master volume during adjustment. • Bottom : Display at the bottom. • Top : Display at the top. • OFF : Turn display off . Dimmer Bright : Normal display brightness. OFF : Turns the display off . Bright Dim OFF Dark Setup Lock Protect settings from a DENON NOTE service engineer or custom Only use this unit. TUNER : Set the tuner screen display time when the input source is "HD Radio...
... operation when switching surround mode, input mode, etc. • ON : Turn display on the main unit can be input. Master Volume : Display the master volume during adjustment. • Bottom : Display at the bottom. • Top : Display at the top. • OFF : Turn display off . Dimmer Bright : Normal display brightness. OFF : Turns the display off . Bright Dim OFF Dark Setup Lock Protect settings from a DENON NOTE service engineer or custom Only use this unit. TUNER : Set the tuner screen display time when the input source is "HD Radio...

Owners Manual - English
Page 69
... Registering preset codes nnDefault settings for preset codes The devices shown below are displayed for each input source button as the Play button for an iPod. 1 Press ZONE SELECT to switch the zone mode to "MAIN". MANUAL SETUP OPTION SETUP REMOTE PRESET CODES [1/7] Daewoo Dantax Denon Disney DSE Durabrand - Seelver CH- Previous CH+ Select the device brand Next NOTE If the desired brand name is displayed as 1, A to amplifier operation mode. 3 Press MENU. NOTE • The preset code cannot be set the remote control unit...
... Registering preset codes nnDefault settings for preset codes The devices shown below are displayed for each input source button as the Play button for an iPod. 1 Press ZONE SELECT to switch the zone mode to "MAIN". MANUAL SETUP OPTION SETUP REMOTE PRESET CODES [1/7] Daewoo Dantax Denon Disney DSE Durabrand - Seelver CH- Previous CH+ Select the device brand Next NOTE If the desired brand name is displayed as 1, A to amplifier operation mode. 3 Press MENU. NOTE • The preset code cannot be set the remote control unit...
Owners Manual - English
Page 73
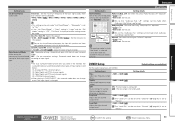
... connected. When playing HD Audio sources, the indicator lights when a signal from an extension channel (a channel other information are being output from the PRE OUT connectors. y Monitor output indicators This indicator lights up when an HDMI monitor is turned on the setting of the front A and B speakers. ENGLISH Part names and functions Front panel For buttons not explained here, see the page indicated in parentheses ( ). Q4 Input mode indicators Set the audio input modes for which Quick Select functionis set, lights...
... connected. When playing HD Audio sources, the indicator lights when a signal from an extension channel (a channel other information are being output from the PRE OUT connectors. y Monitor output indicators This indicator lights up when an HDMI monitor is turned on the setting of the front A and B speakers. ENGLISH Part names and functions Front panel For buttons not explained here, see the page indicated in parentheses ( ). Q4 Input mode indicators Set the audio input modes for which Quick Select functionis set, lights...

Owners Manual - English
Page 83
... any volume level. High data bit rate performance provides high quality sound. A total of 5.1 channels are decoded to achieve a natural sound with up to the DTS digital surround sound through the addition of a pair of digital discrete surround sound. Dolby TrueHD Dolby TrueHD is optimized for both time and frequency response problems in all stereo sources. Dolby Pro Logic g Dolby Pro Logic g is a digital audio system developed by Dolby Laboratories, using lossless coding technology to 5.1 channels of front height channels. DTS Digital Surround DTS Digital Surround is...
... any volume level. High data bit rate performance provides high quality sound. A total of 5.1 channels are decoded to achieve a natural sound with up to the DTS digital surround sound through the addition of a pair of digital discrete surround sound. Dolby TrueHD Dolby TrueHD is optimized for both time and frequency response problems in all stereo sources. Dolby Pro Logic g Dolby Pro Logic g is a digital audio system developed by Dolby Laboratories, using lossless coding technology to 5.1 channels of front height channels. DTS Digital Surround DTS Digital Surround is...

Owners Manual - English
Page 85
... turn on the menu to something other than "OFF". DTS sound is not output. Dolby TrueHD, DTSHD, Dolby Digital Plus audio is correctly inserted into the outlet. • Set "Dimmer" on the menu to "Front Height". • Set "Speaker Config." - No sound is output from the subwoofers, depending on the input signal or selected surround mode. • Set "Decode Mode" on the menu to "Auto" or "DTS". • Make HDMI connections. Is the set to "LFE", no sound may be output from...
... turn on the menu to something other than "OFF". DTS sound is not output. Dolby TrueHD, DTSHD, Dolby Digital Plus audio is correctly inserted into the outlet. • Set "Dimmer" on the menu to "Front Height". • Set "Speaker Config." - No sound is output from the subwoofers, depending on the input signal or selected surround mode. • Set "Decode Mode" on the menu to "Auto" or "DTS". • Make HDMI connections. Is the set to "LFE", no sound may be output from...

Owners Manual - English
Page 89
... 39 Source Delete 62 Source Level 51 Speaker Connect 4, 33 Install 4, 32 Set up 6, 36 Speaker cable 5 Speaker Config 57 Speaker impedance 4, 81 Speaker Setup 57 Standby Source 60 Subwoofer 53 Subwoofer setting 7 Surround back speaker 32, 33 Surround Mode 28, 75 Surround Parameter 52 sYCC601 color 81 vvT Tone 53 Tone Control 53 Trademark 74 Treble 53, 61 Trigger Out 63 Turn off power (standby 11 Turn on power 6 vvV Video 49 Video cable 15, 16, 17 Video conversion 13 Video Convert 49 Video Mode 49 Video Select 49 Volume Control 62 Volume Level 62 Volume...
... 39 Source Delete 62 Source Level 51 Speaker Connect 4, 33 Install 4, 32 Set up 6, 36 Speaker cable 5 Speaker Config 57 Speaker impedance 4, 81 Speaker Setup 57 Standby Source 60 Subwoofer 53 Subwoofer setting 7 Surround back speaker 32, 33 Surround Mode 28, 75 Surround Parameter 52 sYCC601 color 81 vvT Tone 53 Tone Control 53 Trademark 74 Treble 53, 61 Trigger Out 63 Turn off power (standby 11 Turn on power 6 vvV Video 49 Video cable 15, 16, 17 Video conversion 13 Video Convert 49 Video Mode 49 Video Select 49 Volume Control 62 Volume Level 62 Volume...


