Literature/Product Sheet
Page 1
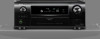
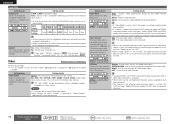
... definition audio support, Dolby TrueHD and DTS-HD Master Audio • Supports Dolby Pro Logic IIz processing for real-time volume adjustment • Audyssey MultEQ XT and Auto Setup • 2-line fluorescent display on your home network and reach out to the internet to enjoy music from subscription services including Rhapsody and Napster, as well as HD Radio, and the AVR-3311CI is Sirius satellite radio-ready, plus it has three source/three zone...
... definition audio support, Dolby TrueHD and DTS-HD Master Audio • Supports Dolby Pro Logic IIz processing for real-time volume adjustment • Audyssey MultEQ XT and Auto Setup • 2-line fluorescent display on your home network and reach out to the internet to enjoy music from subscription services including Rhapsody and Napster, as well as HD Radio, and the AVR-3311CI is Sirius satellite radio-ready, plus it has three source/three zone...
Literature/Product Sheet
Page 2
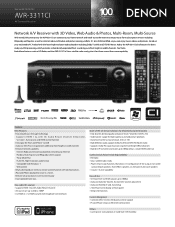
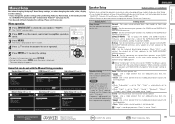
...On-Screen Display • Three Quick Select buttons • Auto surround mode • Sleep timer function • Audio Delay function (max. 6 frames or 200 mSec) • Muting level settings (Full/-40dB/-20dB) • Audio level memory, capable of correcting for different signal levels for each of the AVR-3311CI's 7 channels is equipped with much more costly separate components. Connectivity & Future-ready Expandability • 6 x HDMI in /out ports Ports In Out Other HDMI Component S-Video Composite (Video) Analog Audio (Tuner included) Digital Optical Digital Coaxial HDMI Monitor...
...On-Screen Display • Three Quick Select buttons • Auto surround mode • Sleep timer function • Audio Delay function (max. 6 frames or 200 mSec) • Muting level settings (Full/-40dB/-20dB) • Audio level memory, capable of correcting for different signal levels for each of the AVR-3311CI's 7 channels is equipped with much more costly separate components. Connectivity & Future-ready Expandability • 6 x HDMI in /out ports Ports In Out Other HDMI Component S-Video Composite (Video) Analog Audio (Tuner included) Digital Optical Digital Coaxial HDMI Monitor...
Owners Manual - English
Page 4
... a home network (LAN 22 Connecting a external power amplifier 23 Connecting an external control device 23 Playback (Basic operation 24 Important information 24 Playing a Blu-ray Disc player/DVD player 25 Playing a CD player 25 Playing an iPod 25 Tuning in radio stations 28 Playing a network audio 32 Playing a USB memory device 43 Selecting a listening mode (Surround mode 45 Standard playback 45 DENON original surround playback 47 Stereo playback 47 Direct playback 47 Pure direct playback 47 Advanced version 48 Speaker installation/connection (Other than 5.1-channel...
... a home network (LAN 22 Connecting a external power amplifier 23 Connecting an external control device 23 Playback (Basic operation 24 Important information 24 Playing a Blu-ray Disc player/DVD player 25 Playing a CD player 25 Playing an iPod 25 Tuning in radio stations 28 Playing a network audio 32 Playing a USB memory device 43 Selecting a listening mode (Surround mode 45 Standard playback 45 DENON original surround playback 47 Stereo playback 47 Direct playback 47 Pure direct playback 47 Advanced version 48 Speaker installation/connection (Other than 5.1-channel...

Owners Manual - English
Page 5
... power outlet. High definition audio support The unit is equipped with the power turned off the power and unplug the power cord from this unit when it to a TV via the HDMI connector. Internet radio, music and photo streaming via networkz2 This unit can output 3D video signals input from an iPod can be played back if you can experience a more powerful playback expression in the height audio range. The power amplifier...
... power outlet. High definition audio support The unit is equipped with the power turned off the power and unplug the power cord from this unit when it to a TV via the HDMI connector. Internet radio, music and photo streaming via networkz2 This unit can output 3D video signals input from an iPod can be played back if you can experience a more powerful playback expression in the height audio range. The power amplifier...

Owners Manual - English
Page 9
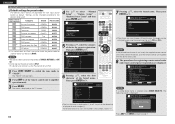
... all audio electronics during Audyssey Auto setup. Power on 2 Change the TV input to the unit. The power indicator flashes green and the power turns on the TV and subwoofer power. Background noise can disrupt the room measurements. This is completed. • Do not stand between the speakers and setup microphone or allow obstacles in the illustration (up to turn on the menu. Power on Power on 1 2 3 4 5 4 Set up the speakers manually, use...
... all audio electronics during Audyssey Auto setup. Power on 2 Change the TV input to the unit. The power indicator flashes green and the power turns on the TV and subwoofer power. Background noise can disrupt the room measurements. This is completed. • Do not stand between the speakers and setup microphone or allow obstacles in the illustration (up to turn on the menu. Power on Power on 1 2 3 4 5 4 Set up the speakers manually, use...
Owners Manual - English
Page 27
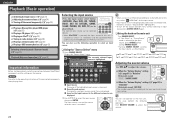
... operations. Selecting the input source Press the input source select button (NET/USB, iPod, DVD, BD, TUNER, DOCK, SAT TU, SAT/CBL, GAME, V.AUX, PHONO, CD, DVR, TV) to the input signal and channel level setting. You can also operate via the main unit. w Select ENTER Enter e q Input Source The name of time. w Use uio p to select an input source. BD DVD TV SAT/CBL DVR GAME V.AUX CD PHONO HD Radio SIRIUS NET/USB DOCK Adjusting the master volume Use VOL df to be used input sources...
... operations. Selecting the input source Press the input source select button (NET/USB, iPod, DVD, BD, TUNER, DOCK, SAT TU, SAT/CBL, GAME, V.AUX, PHONO, CD, DVR, TV) to the input signal and channel level setting. You can also operate via the main unit. w Select ENTER Enter e q Input Source The name of time. w Use uio p to select an input source. BD DVD TV SAT/CBL DVR GAME V.AUX CD PHONO HD Radio SIRIUS NET/USB DOCK Adjusting the master volume Use VOL df to be used input sources...
Owners Manual - English
Page 56
... Remote control operation buttons Move the cursor (Up/Down/Left/Right) Confirm the setting Return to page 8 STEP1 Preparation step 6. BACK/ AMP ASSIGN terminals. Set for timesaving 6 Use ui to the SURR. Set for measuring two surround back (2spkrs) speakers. Amp Assign Channel Select Auto Setup Start [1/6] ENTER Enter RETURN Cancel Skip unused ch's measurement for connecting a tweeter of a subwoofer. ENGLISH 7 GWhen "Front" is set, connect the second set of a change the speaker connections or subwoofer volume. Skip Set...
... Remote control operation buttons Move the cursor (Up/Down/Left/Right) Confirm the setting Return to page 8 STEP1 Preparation step 6. BACK/ AMP ASSIGN terminals. Set for timesaving 6 Use ui to the SURR. Set for measuring two surround back (2spkrs) speakers. Amp Assign Channel Select Auto Setup Start [1/6] ENTER Enter RETURN Cancel Skip unused ch's measurement for connecting a tweeter of a subwoofer. ENGLISH 7 GWhen "Front" is set, connect the second set of a change the speaker connections or subwoofer volume. Skip Set...
Owners Manual - English
Page 63
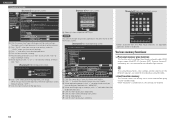
...to operate each operation screen. (Default setting : "OFF") Q7 Click this item to play back randomly. The surround parameters, tone settings and the volumes of the different speakers are restored. 60 ENGLISH Convenient functions GExample 2H Setup menu screen GExample 4H PDA menu screen Q0 SETUP MENU SOURCE SELECT ReLoad Source SAT/CBL Q2 DENON Web Controller AVR-3311CI SOURCE SELECT SURROUND MODE AUDIO/VIDEO ADJUST MANUAL SETUP INFORMATION SAVE Q1 LOAD Input Assign Q3 Video Video Select SOURCE Video Mode Auto Video Convert ON i/p Scaler Resolution(analog) Resolution(HDMI...
...to operate each operation screen. (Default setting : "OFF") Q7 Click this item to play back randomly. The surround parameters, tone settings and the volumes of the different speakers are restored. 60 ENGLISH Convenient functions GExample 2H Setup menu screen GExample 4H PDA menu screen Q0 SETUP MENU SOURCE SELECT ReLoad Source SAT/CBL Q2 DENON Web Controller AVR-3311CI SOURCE SELECT SURROUND MODE AUDIO/VIDEO ADJUST MANUAL SETUP INFORMATION SAVE Q1 LOAD Input Assign Q3 Video Video Select SOURCE Video Mode Auto Video Convert ON i/p Scaler Resolution(analog) Resolution(HDMI...
Owners Manual - English
Page 66
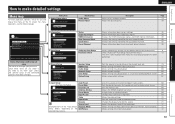
... Lock Antenna Aiming Auto Preset Preset Skip Preset Name Video Rename Source Level Preset Name Input Assign Video Input Mode Rename Source Level Displayed items of the audio input. 72 Makes settings for iPod, USB memory device or network source playback. 72 Makes settings for speakers in a multi-zone (ZONE2/ZONE3) system. 86 Makes various other settings. 87 Uses the auto preset function to program radio stations. 68 Sets the preset memories that only need to set , there is only displayed after Audyssey Auto Setup procedure has been performed. For menu operations...
... Lock Antenna Aiming Auto Preset Preset Skip Preset Name Video Rename Source Level Preset Name Input Assign Video Input Mode Rename Source Level Displayed items of the audio input. 72 Makes settings for iPod, USB memory device or network source playback. 72 Makes settings for speakers in a multi-zone (ZONE2/ZONE3) system. 86 Makes various other settings. 87 Uses the auto preset function to program radio stations. 68 Sets the preset memories that only need to set , there is only displayed after Audyssey Auto Setup procedure has been performed. For menu operations...

Owners Manual - English
Page 70
...lights. 2 Press AMP to set to amplifier operation mode. 3 Press MENU. ENGLISH Items that have to change the settings to "MAIN". Menu operation 1 Press ZONE SELECT to switch the zone mode to use the unit. Important information nnAbout the display of input sources In this section, the configurable input sources for best signal Video (vpage 70) INPUT SETUP VIDEO Change memory blocks RETURN Return Input Mode (vpage 71) INPUT SETUP INPUT MODE Select ENTER Enter RETURN Return Change HDMI input connector assignment Rename (vpage 71) INPUT SETUP RENAME Video Select Video Mode Video...
...lights. 2 Press AMP to set to amplifier operation mode. 3 Press MENU. ENGLISH Items that have to change the settings to "MAIN". Menu operation 1 Press ZONE SELECT to switch the zone mode to use the unit. Important information nnAbout the display of input sources In this section, the configurable input sources for best signal Video (vpage 70) INPUT SETUP VIDEO Change memory blocks RETURN Return Input Mode (vpage 71) INPUT SETUP INPUT MODE Select ENTER Enter RETURN Return Change HDMI input connector assignment Rename (vpage 71) INPUT SETUP RENAME Video Select Video Mode Video...

Owners Manual - English
Page 71
... by individual preset channels in manually, then preset it manually. Yes : Reset to program radio stations. ENGLISH Input Setup Auto Preset Use the auto preset function to the defaults. Setting details If an FM station cannot be preset automatically, select the desired station by preset channel (1 to G) or by tuning it in the currently selected preset memory block. • ON : Display the selected preset channel. • Skip : Do not display the selected preset channel. HD Radio Setting items Edit Lock Code Change the password. Input current lock code (4 digits) using uio...
... by individual preset channels in manually, then preset it manually. Yes : Reset to program radio stations. ENGLISH Input Setup Auto Preset Use the auto preset function to the defaults. Setting details If an FM station cannot be preset automatically, select the desired station by preset channel (1 to G) or by tuning it in the currently selected preset memory block. • ON : Display the selected preset channel. • Skip : Do not display the selected preset channel. HD Radio Setting items Edit Lock Code Change the password. Input current lock code (4 digits) using uio...
Owners Manual - English
Page 73
... assigned is displayed as "- - -". • When a control dock for iPod is connected, signals cannot be assigned to the component video connectors. If you select "Default" and press ENTER, the message "Default Setting?" Setting items Video Select Video of the input source. NOTE • It is not possible to select HDMI input signals. • Input sources for output (Video conversion function)"). BD DVD TV z SAT/CBL DVR GAME z V.AUX DOCK Video Convert The input video signal is converted automatically in MAIN ZONE and ZONE2 modes may improve audio...
... assigned is displayed as "- - -". • When a control dock for iPod is connected, signals cannot be assigned to the component video connectors. If you select "Default" and press ENTER, the message "Default Setting?" Setting items Video Select Video of the input source. NOTE • It is not possible to select HDMI input signals. • Input sources for output (Video conversion function)"). BD DVD TV z SAT/CBL DVR GAME z V.AUX DOCK Video Convert The input video signal is converted automatically in MAIN ZONE and ZONE2 modes may improve audio...

Owners Manual - English
Page 78
... selected after Audyssey Auto Setup has been performed. Simple version Basic version Setting items S.Back (Continued) Setting details • This can also be set when the surround mode is "DIRECT" (vpage 47), "PURE DIRECT" (vpage 47) and the "Subwoofer Mode" (vpage 80) is "LFE+Main". nnTone Adjust the tonal quality of all speakers. "Tone Control" can be displayed. ENGLISH Audio/Video Adjust Setting items Setting details Bass Adjust low frequency range (bass). "Audyssey" is the prerequisite function for the speakers outputting sound when playing...
... selected after Audyssey Auto Setup has been performed. Simple version Basic version Setting items S.Back (Continued) Setting details • This can also be set when the surround mode is "DIRECT" (vpage 47), "PURE DIRECT" (vpage 47) and the "Subwoofer Mode" (vpage 80) is "LFE+Main". nnTone Adjust the tonal quality of all speakers. "Tone Control" can be displayed. ENGLISH Audio/Video Adjust Setting items Setting details Bass Adjust low frequency range (bass). "Audyssey" is the prerequisite function for the speakers outputting sound when playing...
Owners Manual - English
Page 82
..." is displayed. set to 235 (white) Zone Setup (vpage 86) MANUAL SETUP ZONE SETUP ZONE2 Setup ZONE3 Setup RETURN Return Make settings for determining frequencies. "Large" is not displayed when "Front" is set in monaural, and to amplifier operation mode. 3 Press MENU. Items that has inadequate playback capacity for NOTE low frequencies. Bass Setting Distance Channel Level Crossover Frequency Front Speaker Setup RGB Range Auto Lip Sync HDMI Audio Out Monitor Out HDMI Control Normal ON AMP Monitor 1 OFF 2ch Direct/Stereo Auto Surround Mode EQ Customize Assign surround back AMP for...
..." is displayed. set to 235 (white) Zone Setup (vpage 86) MANUAL SETUP ZONE SETUP ZONE2 Setup ZONE3 Setup RETURN Return Make settings for determining frequencies. "Large" is not displayed when "Front" is set in monaural, and to amplifier operation mode. 3 Press MENU. Items that has inadequate playback capacity for NOTE low frequencies. Bass Setting Distance Channel Level Crossover Frequency Front Speaker Setup RGB Range Auto Lip Sync HDMI Audio Out Monitor Out HDMI Control Normal ON AMP Monitor 1 OFF 2ch Direct/Stereo Auto Surround Mode EQ Customize Assign surround back AMP for...

Owners Manual - English
Page 85
... or set to standby. • The HDMI control function controls operations of the input source, power to this unit is always used. Standby Source Sets the HDMI input source to the MONITOR 1 terminal is automatically set to the receiver. Power Off Control Links the power standby of RGB output from the power outlet. • "HDMI Control" does not work when the power to standby. Setting items RGB Range Set the video range of this unit for HDMI video/audio output. Either turn power on . Last : This item is set to standby. "Power Off Control" can also set...
... or set to standby. • The HDMI control function controls operations of the input source, power to this unit is always used. Standby Source Sets the HDMI input source to the MONITOR 1 terminal is automatically set to the receiver. Power Off Control Links the power standby of RGB output from the power outlet. • "HDMI Control" does not work when the power to standby. Setting items RGB Range Set the video range of this unit for HDMI video/audio output. Either turn power on . Last : This item is set to standby. "Power Off Control" can also set...
Owners Manual - English
Page 91
... when the "MAIN ZONE" set to "ON" with "When Setting for Zone" is selected, and when the input source set "Setup Lock" to register in the remote control unit. Setting details Default : The "Trigger Out" settings are using this function can be used. ON : Turn protection on. ENGLISH Manual Setup Setting items Setting details GUI (Continued) TUNER : Set the tuner screen display time when the input source is "SIRIUS" or "HD Radio". • Always : Show display continuously. • 30sec : Show display for 30 seconds...
... when the "MAIN ZONE" set to "ON" with "When Setting for Zone" is selected, and when the input source set "Setup Lock" to register in the remote control unit. Setting details Default : The "Trigger Out" settings are using this function can be used. ON : Turn protection on. ENGLISH Manual Setup Setting items Setting details GUI (Continued) TUNER : Set the tuner screen display time when the input source is "SIRIUS" or "HD Radio". • Always : Show display continuously. • 30sec : Show display for 30 seconds...
Owners Manual - English
Page 95
... [AMP] button. MANUAL SETUP OPTION SETUP REMOTE PRESET CODES Blu-ray D CD I 7 Pressing ui, select the brand name. Input source select button Category Brand Preset code Blu-ray Disc player DENON 32258 DVD player DENON 32134 Television SONY 10810 Satellite set top box DVD recorder DirecTV Tivo 01377 20739 Cable set top box Motorola 01376 DVD player DENON z Control dock for iPod DENON 32134 42517 CD player DENON 42867 zz If a control dock for iPod is selected, press QUICK SELECT 3. The "MAIN" indicator lights. 2 Press AMP to set to be used...
... [AMP] button. MANUAL SETUP OPTION SETUP REMOTE PRESET CODES Blu-ray D CD I 7 Pressing ui, select the brand name. Input source select button Category Brand Preset code Blu-ray Disc player DENON 32258 DVD player DENON 32134 Television SONY 10810 Satellite set top box DVD recorder DirecTV Tivo 01377 20739 Cable set top box Motorola 01376 DVD player DENON z Control dock for iPod DENON 32134 42517 CD player DENON 42867 zz If a control dock for iPod is selected, press QUICK SELECT 3. The "MAIN" indicator lights. 2 Press AMP to set to be used...

Owners Manual - English
Page 117
... antenna. • Displays while SiriusConnect Home Tuner is produced from surround speaker. twice, displays "Call SIRIUS". "F.Height" on the menu to "ON". • Set "Amp Assign" on . • Adjust the master volume. • Cancel the mute mode. • Select a suitable input source. • Select a suitable input mode. • Disconnect the headphones. "ACQUIRING SIGNAL" is displayed. • While updating contract information. If you subscribe to "Auto" or "DTS". • Make HDMI connections. Check that the connections are correct. correct. Select another channel...
... antenna. • Displays while SiriusConnect Home Tuner is produced from surround speaker. twice, displays "Call SIRIUS". "F.Height" on the menu to "ON". • Set "Amp Assign" on . • Adjust the master volume. • Cancel the mute mode. • Select a suitable input source. • Select a suitable input mode. • Disconnect the headphones. "ACQUIRING SIGNAL" is displayed. • While updating contract information. If you subscribe to "Auto" or "DTS". • Make HDMI connections. Check that the connections are correct. correct. Select another channel...

Owners Manual - English
Page 121
... vvI Information 90 Audio Input Signal 90 Auto Surround Mode 90 HDMI Information 90 Preset Channel 90 Quick Select 90 Status 90 Input Assign 69 Input Mode 71 Input Setup 67 Input signal 46, 108 Inputting characters 65 Interval 72 iPod PLAY 28 i/p Scaler 70 vvL Level Lch 86 Level Rch 86 LFE 73, 112 Listening mode 45 Listening position 7 vvM Maintenance Mode 88 MAIN ZONE 112 Manual EQ 77 Manual Setup 79 Master volume display 87 Menu map 63 Mode 73 Monitor Out 82 MP3...
... vvI Information 90 Audio Input Signal 90 Auto Surround Mode 90 HDMI Information 90 Preset Channel 90 Quick Select 90 Status 90 Input Assign 69 Input Mode 71 Input Setup 67 Input signal 46, 108 Inputting characters 65 Interval 72 iPod PLAY 28 i/p Scaler 70 vvL Level Lch 86 Level Rch 86 LFE 73, 112 Listening mode 45 Listening position 7 vvM Maintenance Mode 88 MAIN ZONE 112 Manual EQ 77 Manual Setup 79 Master volume display 87 Menu map 63 Mode 73 Monitor Out 82 MP3...

Owners Manual - English
Page 122
... Source Level 72 Speaker 75 Connect 4, 50 Install 4, 49 Set up 6, 52 Speaker cable 5 Speaker Config 79 Speaker impedance 4, 112 Speaker Setup 79 Stage Height 77 Stage Width 77 Standby Source 82 Still Picture 72 Subwoofer 75 Subwoofer setting 7 Surround back speaker 49, 50 Surround Mode 45, 106 Surround Parameters 73 S-Video cable 18 sYCC601 color 112 vvT Tone 75 Tone Control 75 Trademark 105 Treble 75, 86 Trigger Out 88 Troubleshooting 113 Turning off the sound temporarily 25 Turn off power (standby 11 Turn on power...
... Source Level 72 Speaker 75 Connect 4, 50 Install 4, 49 Set up 6, 52 Speaker cable 5 Speaker Config 79 Speaker impedance 4, 112 Speaker Setup 79 Stage Height 77 Stage Width 77 Standby Source 82 Still Picture 72 Subwoofer 75 Subwoofer setting 7 Surround back speaker 49, 50 Surround Mode 45, 106 Surround Parameters 73 S-Video cable 18 sYCC601 color 112 vvT Tone 75 Tone Control 75 Trademark 105 Treble 75, 86 Trigger Out 88 Troubleshooting 113 Turning off the sound temporarily 25 Turn off power (standby 11 Turn on power...


