

Literature/Product Sheet
Page 2
...MARKHAM ONTARIO, CANADA L3R 1B5 TEL: 905-475-4085 www.denon.ca (*1) Note on Movie mode: On DENON A/V receivers, this Movie mode is displayed as "MODE CINEMA". *Design and specifications are subject to -Analog Recording The AVR-4802 lets you can purchase the optional RC-8001ST charger base ... output *THD figures are trademarks of Dolby. s Personal Memory Plus s On Screen Display s RS-232C Port (Third-party system controls only) s Includes RC-8000 remote controller with large LCD touch panel The AVR-4802's RC-8000 remote controller lets you enjoy pure 2-channel stereo sound as your ...
...MARKHAM ONTARIO, CANADA L3R 1B5 TEL: 905-475-4085 www.denon.ca (*1) Note on Movie mode: On DENON A/V receivers, this Movie mode is displayed as "MODE CINEMA". *Design and specifications are subject to -Analog Recording The AVR-4802 lets you can purchase the optional RC-8001ST charger base ... output *THD figures are trademarks of Dolby. s Personal Memory Plus s On Screen Display s RS-232C Port (Third-party system controls only) s Includes RC-8000 remote controller with large LCD touch panel The AVR-4802's RC-8000 remote controller lets you enjoy pure 2-channel stereo sound as your ...
Owners Manual
Page 8
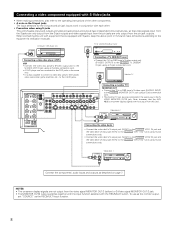
...This unit's S-jacks (input and output) and video pin jacks (input and output) have independent circuit structures, so that the AVR4802's on-screen display signals are not output from this unit with equipment that is also possible to connect a video disc player, DVD player, video camcorder, game ...machine, etc., to the V.AUX jacks. To use as the monitor output, set "SOURCE" as described on -screen display signals are not output from the video signal MONITOR OUT-2 (yellow) or S-Video signal MONITOR OUT-2 jack. • The MONITOR OUT-2 output switches ...
...This unit's S-jacks (input and output) and video pin jacks (input and output) have independent circuit structures, so that the AVR4802's on-screen display signals are not output from this unit with equipment that is also possible to connect a video disc player, DVD player, video camcorder, game ...machine, etc., to the V.AUX jacks. To use as the monitor output, set "SOURCE" as described on -screen display signals are not output from the video signal MONITOR OUT-2 (yellow) or S-Video signal MONITOR OUT-2 jack. • The MONITOR OUT-2 output switches ...
Owners Manual
Page 9
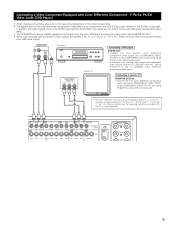
...; Some video sources with component video outputs such as a TV, DBS/SAT tuner, etc., can be indicated differently on -screen display signals are not output to the color difference (component) video jacks. • The AVR-4802's on some TVs, monitors or video components ("Pr, Pb and Y", "R-Y, B-Y and Y", "Cr, Cb and Y", etc.). Connecting a monitor TV...
...; Some video sources with component video outputs such as a TV, DBS/SAT tuner, etc., can be indicated differently on -screen display signals are not output to the color difference (component) video jacks. • The AVR-4802's on some TVs, monitors or video components ("Pr, Pb and Y", "R-Y, B-Y and Y", "Cr, Cb and Y", etc.). Connecting a monitor TV...
Owners Manual
Page 14
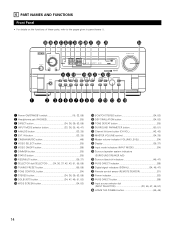
...59) !5 TONE CONTROL button 34) !6 STEREO button 34, 36, 39, 53, 59) !7 DOLBY/DTS button 34, 47, 49, 51, 53) !8 WIDE SCREEN button 34, 53) !9 5CH/7CH STEREO button 34, 53) @0 DSP SIMULATION button 34, 53) @1 TONE DEFEAT button 35) @2 SURROUND PARAMETER button 50, 51)... @3 Channel Volume button (CH VOL 42, 43) @4 MASTER VOLUME control 34, 35) @5 Master volume indicator (VOLUME LEVEL 34) @6 Display 36, 37) @7 Input mode indicators (INPUT MODE 34) @8 Surround speaker system indicators (SURROUND SPEAKER A/B) @9 Surround back ch indicators 46, 47) #0 PURE DIRECT...
...59) !5 TONE CONTROL button 34) !6 STEREO button 34, 36, 39, 53, 59) !7 DOLBY/DTS button 34, 47, 49, 51, 53) !8 WIDE SCREEN button 34, 53) !9 5CH/7CH STEREO button 34, 53) @0 DSP SIMULATION button 34, 53) @1 TONE DEFEAT button 35) @2 SURROUND PARAMETER button 50, 51)... @3 Channel Volume button (CH VOL 42, 43) @4 MASTER VOLUME control 34, 35) @5 Master volume indicator (VOLUME LEVEL 34) @6 Display 36, 37) @7 Input mode indicators (INPUT MODE 34) @8 Surround speaker system indicators (SURROUND SPEAKER A/B) @9 Surround back ch indicators 46, 47) #0 PURE DIRECT...

Owners Manual
Page 16
...Zone-1 This sets the output level for the different channels in "CONNECTIONS" (see pages 6 to display the on-screen display that appears on the monitor screen when the controls on -screen display function. Center Sp. Use this to switch the surround back channel's power amplifier for use for detecting... set up the system: Screen while icons are received automatically and stored in your system and their corresponding sizes (SMALL for regular speakers, LARGE for fullsize, full-range) to automatically set up the listening room's AV system centered around the AVR-4802. • Use the...
...Zone-1 This sets the output level for the different channels in "CONNECTIONS" (see pages 6 to display the on-screen display that appears on the monitor screen when the controls on -screen display function. Center Sp. Use this to switch the surround back channel's power amplifier for use for detecting... set up the system: Screen while icons are received automatically and stored in your system and their corresponding sizes (SMALL for regular speakers, LARGE for fullsize, full-range) to automatically set up the listening room's AV system centered around the AVR-4802. • Use the...
Owners Manual
Page 17
... jacks and signals are input to the AVR-4802 from the MONITOR OUT-2 output jack or the color difference (component) video signal (MONITOR OUT) jacks. • The on-screen display signals are output with priority to read small characters on -screen display signals are output with priority to achieve ... monitor output jack, do not connect a cord to the S-VIDEO MONITOR OUT jack. (For details, see page 31.) • The AVR-4802's on-screen display function is designed for use the surround speaker selector function to choose the best layout for a variety of sources and surround modes. •...
... jacks and signals are input to the AVR-4802 from the MONITOR OUT-2 output jack or the color difference (component) video signal (MONITOR OUT) jacks. • The on-screen display signals are output with priority to read small characters on -screen display signals are output with priority to achieve ... monitor output jack, do not connect a cord to the S-VIDEO MONITOR OUT jack. (For details, see page 31.) • The AVR-4802's on-screen display function is designed for use the surround speaker selector function to choose the best layout for a variety of sources and surround modes. •...
Owners Manual
Page 18
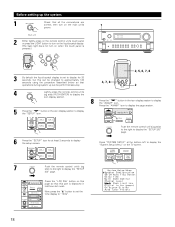
...pressed.) 3 By default the liquid crystal display is displayed in the icon display section to display the "AVAMP" icon. Now press the "•" button to set to display for at the bottom left to display the "System Setup Menu" on the TV screen. 7 Push the remote control unit's jog... "SETUP 3/5" page. Push the remote control unit's jog stick to the right to display the "SETUP 4/4" page. Press "SYSTEM SETUP" at least 3 seconds to display the setup screen. Before setting up can be changed to approximately 120 seconds using the procedure described below so that operations ...
...pressed.) 3 By default the liquid crystal display is displayed in the icon display section to display the "AVAMP" icon. Now press the "•" button to set to display for at the bottom left to display the "System Setup Menu" on the TV screen. 7 Push the remote control unit's jog... "SETUP 3/5" page. Push the remote control unit's jog stick to the right to display the "SETUP 4/4" page. Press "SYSTEM SETUP" at least 3 seconds to display the setup screen. Before setting up can be changed to approximately 120 seconds using the procedure described below so that operations ...
Owners Manual
Page 19
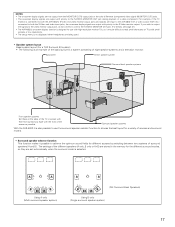
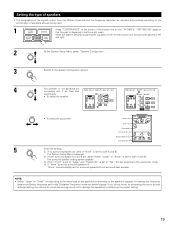
... surround speakers A and B are used (if either "Large" or "Small" is displayed in half-tone dot mesh. Setting the type of speakers • The composition of ... 2 At the System Setup Menu select "Speaker Configuration". 3 Switch to the speaker configuration screen. 4 Set whether or not speakers are used (if "None" is automatically set for both A and B): The surround speaker... setting screen appears. NOTE: • Select "Large" or "Small" not according to the subwoofer mode. If ...
... surround speakers A and B are used (if either "Large" or "Small" is displayed in half-tone dot mesh. Setting the type of speakers • The composition of ... 2 At the System Setup Menu select "Speaker Configuration". 3 Switch to the speaker configuration screen. 4 Set whether or not speakers are used (if "None" is automatically set for both A and B): The surround speaker... setting screen appears. NOTE: • Select "Large" or "Small" not according to the subwoofer mode. If ...
Owners Manual
Page 22
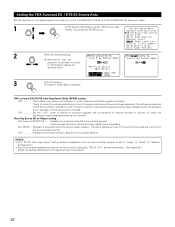
... speaker. The System Setup Menu reappears. OFF Set the "OFF" mode to be played. 22 NOTES: • The "SB CH Auto Flag Detect" setting screen is displayed when the surround back speaker is not recorded. THX surround EX/DTS ES Auto Flag Detect Mode (AFDM) setting ON This function only works with...
... speaker. The System Setup Menu reappears. OFF Set the "OFF" mode to be played. 22 NOTES: • The "SB CH Auto Flag Detect" setting screen is displayed when the surround back speaker is not recorded. THX surround EX/DTS ES Auto Flag Detect Mode (AFDM) setting ON This function only works with...
Owners Manual
Page 25
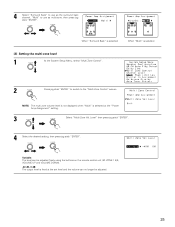
... desired setting, then press jog stick "ENTER". 4 Select "Surround Back" to use as the surround back channel, "Multi" to the "Multi Zone Control" screen. Variable: The level can no longer be adjusted freely using the buttons on the remote control unit (M. NOTE: The multi zone volume level is not... displayed when "Multi" is fixed at the "Power Amp Assignment" setting. 3 Select "Multi Zone Vol. ZONE 1 4/5, VOLUME UP and VOLUME DOWN). -40 dB, 0...
... desired setting, then press jog stick "ENTER". 4 Select "Surround Back" to use as the surround back channel, "Multi" to the "Multi Zone Control" screen. Variable: The level can no longer be adjusted freely using the buttons on the remote control unit (M. NOTE: The multi zone volume level is not... displayed when "Multi" is fixed at the "Power Amp Assignment" setting. 3 Select "Multi Zone Vol. ZONE 1 4/5, VOLUME UP and VOLUME DOWN). -40 dB, 0...
Owners Manual
Page 30
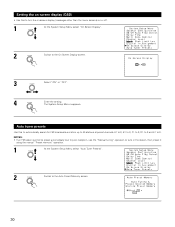
Auto tuner presets Use this to turn the on-screen display (messages other than the menu screens) on or off. 1 At the System Setup Menu select "On Screen Display". 2 Switch to the On Screen Display screen. 3 Select "ON" or "OFF". 4 Enter the setting. Setting the on-screen display (OSD) • Use this to automatically search for FM broadcasts and store up... station, then preset it using the manual "Preset memory" operation. 1 At the System Setup Menu select "Auto Tuner Presets". 2 Switch to the Auto Preset Memory screen. 30 The System Setup Menu reappears.
Auto tuner presets Use this to turn the on-screen display (messages other than the menu screens) on or off. 1 At the System Setup Menu select "On Screen Display". 2 Switch to the On Screen Display screen. 3 Select "ON" or "OFF". 4 Enter the setting. Setting the on-screen display (OSD) • Use this to automatically search for FM broadcasts and store up... station, then preset it using the manual "Preset memory" operation. 1 At the System Setup Menu select "Auto Tuner Presets". 2 Switch to the Auto Preset Memory screen. 30 The System Setup Menu reappears.

Owners Manual
Page 31
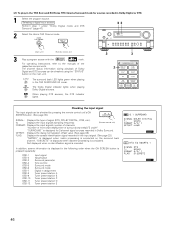
... non-DENON remote control compatible video components. • For details, refer to operate not only the AVR-4802 but this distance will be shorter if there are obstacles in the way or if the remote control unit is displayed on the TV screen, press...that is short but long enough that operation is possible. • On-screen display signals Signals input to the AVR-4802 VIDEO signal input jack (yellow) S-video signal input jack 1 E E 2 C E 3 E C 4 C C (C: Signal E: No signal) On-screen display signal output VIDEO MONITOR OUT-1 video signal output jack (yellow) S-video...
... non-DENON remote control compatible video components. • For details, refer to operate not only the AVR-4802 but this distance will be shorter if there are obstacles in the way or if the remote control unit is displayed on the TV screen, press...that is short but long enough that operation is possible. • On-screen display signals Signals input to the AVR-4802 VIDEO signal input jack (yellow) S-video signal input jack 1 E E 2 C E 3 E C 4 C C (C: Signal E: No signal) On-screen display signal output VIDEO MONITOR OUT-1 video signal output jack (yellow) S-video...

Owners Manual
Page 32
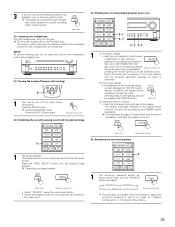
...several seconds, after which the unit operates normally. • When pressed again, the power turns off, the standby mode is set and the display turns off. • Whenever the ON/STANDBY button is in half-tone dot mesh, the joystick operates as the cursor up /down and ...stick Lightly press "ENTER" to display the icons. 2 Press the " " button on the icon display section to display the "AVAMP" icon. 1 Refer to "CONNECTIONS" (pages 6 to 13) and check that all connections are correct. 2 To operate with the remote control unit, set the remote control unit's screen to the AC line voltage....
...several seconds, after which the unit operates normally. • When pressed again, the power turns off, the standby mode is set and the display turns off. • Whenever the ON/STANDBY button is in half-tone dot mesh, the joystick operates as the cursor up /down and ...stick Lightly press "ENTER" to display the icons. 2 Press the " " button on the icon display section to display the "AVAMP" icon. 1 Refer to "CONNECTIONS" (pages 6 to 13) and check that all connections are correct. 2 To operate with the remote control unit, set the remote control unit's screen to the AC line voltage....
Owners Manual
Page 35
... is pressed, and finally the display turns off. Press the VIDEO SELECT button until the desired image appears. Also, the unit's operating status can be adjusted, turn off ) by (Remote control unit) pressing the remote control unit's ON SCREEN button. STATUS (Main unit) ...) [4] Combining the currently playing sound with the desired image [5] Checking the currently playing program source, etc. 1-q 1-e 1-e 1-w 1 q On screen display • Each time an operation is automatically turned off temporarily (muting) 1 1 Use this to the PHONES jack. In addition, the...
... is pressed, and finally the display turns off. Press the VIDEO SELECT button until the desired image appears. Also, the unit's operating status can be adjusted, turn off ) by (Remote control unit) pressing the remote control unit's ON SCREEN button. STATUS (Main unit) ...) [4] Combining the currently playing sound with the desired image [5] Checking the currently playing program source, etc. 1-q 1-e 1-e 1-w 1 q On screen display • Each time an operation is automatically turned off temporarily (muting) 1 1 Use this to the PHONES jack. In addition, the...
Owners Manual
Page 46
... be checked by pressing the remote control unit's ON SCREEN button. (See page 35.) SIGNAL: Displays the type of surround channels/LFE on the surround back channel, "DISCRETE" is displayed when discrete processing is displayed for sources recorded in Dolby Digital or DTS 1 Select... respective components. "Number of front channels/Number of signal (DTS, DOLBY DIGITAL, PCM, etc.). In addition, screen information is displayed in the following order when the ON SCREEN button is recorded. Selecting a digital input source Perform step 1 under "Dolby Digital mode and DTS Surround" (...
... be checked by pressing the remote control unit's ON SCREEN button. (See page 35.) SIGNAL: Displays the type of surround channels/LFE on the surround back channel, "DISCRETE" is displayed when discrete processing is displayed for sources recorded in Dolby Digital or DTS 1 Select... respective components. "Number of front channels/Number of signal (DTS, DOLBY DIGITAL, PCM, etc.). In addition, screen information is displayed in the following order when the ON SCREEN button is recorded. Selecting a digital input source Perform step 1 under "Dolby Digital mode and DTS Surround" (...
Owners Manual
Page 48
...of the signals which are recorded at night, or whenever the maximum sound level is displayed only when playing compatible sources in the Dolby Pro Logic, Dolby Digital, DTS Surround and Wide Screen modes. For listening late at different levels for overly-bright sounding motion picture soundtracks. LFE...Digital. Set to OFF for correct DTS playback. TONE: This adjusts the tone control. (See "Surround parameters r" on the main unit's display: DIAL.NORM OFFSET + 4dB The number indicates the normalization level when the currently playing program is too bright. This function only works in ...
...of the signals which are recorded at night, or whenever the maximum sound level is displayed only when playing compatible sources in the Dolby Pro Logic, Dolby Digital, DTS Surround and Wide Screen modes. For listening late at different levels for overly-bright sounding motion picture soundtracks. LFE...Digital. Set to OFF for correct DTS playback. TONE: This adjusts the tone control. (See "Surround parameters r" on the main unit's display: DIAL.NORM OFFSET + 4dB The number indicates the normalization level when the currently playing program is too bright. This function only works in ...
Owners Manual
Page 53
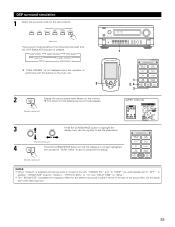
...surround modes in the following order each time the DSP SIMULATION button is pressed: WIDE SCREEN SUPER STADIUM ROCK ARENA JAZZ CLUB MATRIX CLASSIC CONCERT MONO MOVIE "WIDE SCREEN" is not displayed when the operation is no longer highlighted, then press the "SURR. COMP." In ... Press the CURSOR/PAGE button so that the display is performed with the buttons on the main unit. 3 2 Display the surround parameter screen on the monitor. and "D. The screen for the input channel. DIRECT STEREO DOLBY / DTS SURROUND MODE WIDE SCREEN 5CH / 7CH STEREO DSP SIMULATION (Main unit)...
...surround modes in the following order each time the DSP SIMULATION button is pressed: WIDE SCREEN SUPER STADIUM ROCK ARENA JAZZ CLUB MATRIX CLASSIC CONCERT MONO MOVIE "WIDE SCREEN" is not displayed when the operation is no longer highlighted, then press the "SURR. COMP." In ... Press the CURSOR/PAGE button so that the display is performed with the buttons on the main unit. 3 2 Display the surround parameter screen on the monitor. and "D. The screen for the input channel. DIRECT STEREO DOLBY / DTS SURROUND MODE WIDE SCREEN 5CH / 7CH STEREO DSP SIMULATION (Main unit)...
Owners Manual
Page 54
... control from the main unit. 1 TONE CONTROL The tone switches as desired. 1 Display the surround parameter screen on the monitor. "TONE" cannot be decreased up to the Tone Control screen. (Remote control unit) 2, 3, 4, 5 1, 6 6 4 B To select Bass or Treble. The surround menu screen re-appears. (Remote control unit) (Remote control unit) 6 Press the CURSOR/PAGE...
... control from the main unit. 1 TONE CONTROL The tone switches as desired. 1 Display the surround parameter screen on the monitor. "TONE" cannot be decreased up to the Tone Control screen. (Remote control unit) 2, 3, 4, 5 1, 6 6 4 B To select Bass or Treble. The surround menu screen re-appears. (Remote control unit) (Remote control unit) 6 Press the CURSOR/PAGE...
Owners Manual
Page 58
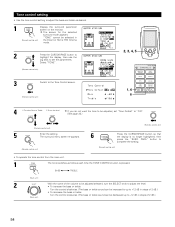
...preset - 8 stations (channels 1 to 8) in each of 40 broadcast stations can be checked on the on screen display. 1 Press the ON SCREEN button repeatedly until "TUNER PRESET" appears on screen display. (Remote control unit) 1 58 Remote control unit: Press the SHIFT button and select the desired memory block (A...Press the MEMORY button. (Remote control unit) 3 Main unit: Press the MODE SELECT button until the "Tuner Preset Stations" screen appears on the on the set's display. Remote control unit: Press the PRESET UP or DOWN button to select the desired preset channel (1 to E.
...preset - 8 stations (channels 1 to 8) in each of 40 broadcast stations can be checked on the on screen display. 1 Press the ON SCREEN button repeatedly until "TUNER PRESET" appears on screen display. (Remote control unit) 1 58 Remote control unit: Press the SHIFT button and select the desired memory block (A...Press the MEMORY button. (Remote control unit) 3 Main unit: Press the MODE SELECT button until the "Tuner Preset Stations" screen appears on the on the set's display. Remote control unit: Press the PRESET UP or DOWN button to select the desired preset channel (1 to E.

Owners Manual
Page 69
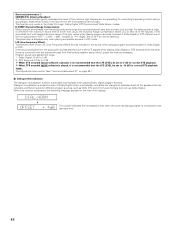
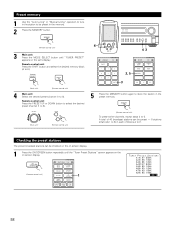
...Auto Flag Detect e Delay Time r Multi Zone Control t Channel Level Subwoofer y Peak Limit Lev u Digital In Assignment i On Screen Display Use this to switch the surround back channel's power amplifier for use for the different channels in order to the center rear with conventional...Back R 0 dB Subwoofer 0 dB Peak Limitter = OFF Input This assigns the digital input jacks for playing deep bass signals. With the AVR-4802, the signals further undergo Home THX Cinema processing to the speakers' bass playback ability. Front Sp. Small Subwoofer Yes Surround Sp. IN ...
...Auto Flag Detect e Delay Time r Multi Zone Control t Channel Level Subwoofer y Peak Limit Lev u Digital In Assignment i On Screen Display Use this to switch the surround back channel's power amplifier for use for the different channels in order to the center rear with conventional...Back R 0 dB Subwoofer 0 dB Peak Limitter = OFF Input This assigns the digital input jacks for playing deep bass signals. With the AVR-4802, the signals further undergo Home THX Cinema processing to the speakers' bass playback ability. Front Sp. Small Subwoofer Yes Surround Sp. IN ...


