

Literature/Product Sheet
Page 1
...Digital decoding 5. Dolby Pro Logic II decoding With the AVR-4802, you enjoy 2-channel analog, PCM, and Dolby Digital 2-channel sources in full 6.1-channel surround sound. 4. s AL 24 Processing The AVR-4802 includes Denon's renowned 24-bit ALPHA processing technology that is a...AT I O N A/V Surround Receiver AVR-4802 World's First 7-channel A/V Surround Receiver with DTS-ES Discrete 6.1 + THX Post Processing The AVR-4802 is the first in the world to come equipped with a DTS 96/24 decoder. Denon's AVR-4802 A/V receiver is the first 7-channel A/V surround receiver in the world to ...
...Digital decoding 5. Dolby Pro Logic II decoding With the AVR-4802, you enjoy 2-channel analog, PCM, and Dolby Digital 2-channel sources in full 6.1-channel surround sound. 4. s AL 24 Processing The AVR-4802 includes Denon's renowned 24-bit ALPHA processing technology that is a...AT I O N A/V Surround Receiver AVR-4802 World's First 7-channel A/V Surround Receiver with DTS-ES Discrete 6.1 + THX Post Processing The AVR-4802 is the first in the world to come equipped with a DTS 96/24 decoder. Denon's AVR-4802 A/V receiver is the first 7-channel A/V surround receiver in the world to ...

Literature/Product Sheet
Page 2
...Port (Third-party system controls only) s Includes RC-8000 remote controller with large LCD touch panel The AVR-4802's RC-8000 remote controller lets you enjoy pure 2-channel stereo sound as well through its Pure Direct mode. s Frequency Synthesis Tuning • 40-station AM...DIRECT MODE) Signal-to control your TV and DVD player. DENON ELECTRONICS DIVISION OF DENON CORPORATION (USA) 19 CHAPIN ROAD, P.O. With the AVR-4802's Power Amplifier Assign function, you can be selected for Multi Zone Configurations With the AVR-4802's Multi Zone Output and Select functions, you make analog ...
...Port (Third-party system controls only) s Includes RC-8000 remote controller with large LCD touch panel The AVR-4802's RC-8000 remote controller lets you enjoy pure 2-channel stereo sound as well through its Pure Direct mode. s Frequency Synthesis Tuning • 40-station AM...DIRECT MODE) Signal-to control your TV and DVD player. DENON ELECTRONICS DIVISION OF DENON CORPORATION (USA) 19 CHAPIN ROAD, P.O. With the AVR-4802's Power Amplifier Assign function, you can be selected for Multi Zone Configurations With the AVR-4802's Multi Zone Output and Select functions, you make analog ...

Owners Manual
Page 5
...of surround back speakers, even with DTS-ES Extended Surround, a new multi-channel format developed by Digital Theater Systems Inc. and audio equipment manufacturers. The result is changed. The DENON AVR-4802 provides the ability to connect two different sets of surround speakers, and place ... ANALOG DEVICES DACs, for top performance with a minimum of onaxis localization (dipolar dispersion). THX Surround EX The AVR-4802 is in the multi-channel mode on the AVR-4802 with a full set -up to another source (audio). 14.Seven Identical Power Amplifiers Featuring discrete high current ...
...of surround back speakers, even with DTS-ES Extended Surround, a new multi-channel format developed by Digital Theater Systems Inc. and audio equipment manufacturers. The result is changed. The DENON AVR-4802 provides the ability to connect two different sets of surround speakers, and place ... ANALOG DEVICES DACs, for top performance with a minimum of onaxis localization (dipolar dispersion). THX Surround EX The AVR-4802 is in the multi-channel mode on the AVR-4802 with a full set -up to another source (audio). 14.Seven Identical Power Amplifiers Featuring discrete high current ...

Owners Manual
Page 6
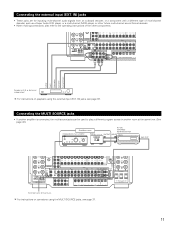
... recording input jacks (LINE IN or REC) to this unit. Do not use Ground wire Connecting a turntable Connect the turntable's output cord to the AVR-4802's PHONO jacks, the L (left) plug to the L jack, the R (right) plug to audio equipment with digital output. AV 120V 60Hz ...DIGITAL jacks Use these outlets when this unit's tape playback (IN) jacks using pin plug cords. Connections for connection to connect the left and right channels properly (left with right). • Insert the plugs securely. AUX VCR-1 VCR-2 VCR-3 VCR-1 VCR-2 VCR-3 1-MONITOR-2 SAT VIDEO AC ...
... recording input jacks (LINE IN or REC) to this unit. Do not use Ground wire Connecting a turntable Connect the turntable's output cord to the AVR-4802's PHONO jacks, the L (left) plug to the L jack, the R (right) plug to audio equipment with digital output. AV 120V 60Hz ...DIGITAL jacks Use these outlets when this unit's tape playback (IN) jacks using pin plug cords. Connections for connection to connect the left and right channels properly (left with right). • Insert the plugs securely. AUX VCR-1 VCR-2 VCR-3 VCR-1 VCR-2 VCR-3 1-MONITOR-2 SAT VIDEO AC ...
Owners Manual
Page 11
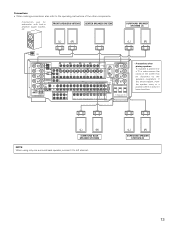
... • If another amplifier is connected, the multi-source jacks can be used to the operating instructions of the other future multi-channel sound format decoder. • When making connections, also refer to play a different program source in another room at the same time... SBL CD DVD VDP S-VIDEO TV DBS/ SAT IN DBS/ TV SAT V. SURROUND -A R DVD VDP TV DBS/ V. AV 120V 60Hz Extension jacks for inputting multi-channel audio signals from an outboard decoder, or a component with 8- AUX VCR-1 V. IN FRONT CENTER SURROUND SB L L L R R SW R DIGITAL IN 1 2 3 1 2...
... • If another amplifier is connected, the multi-source jacks can be used to the operating instructions of the other future multi-channel sound format decoder. • When making connections, also refer to play a different program source in another room at the same time... SBL CD DVD VDP S-VIDEO TV DBS/ SAT IN DBS/ TV SAT V. SURROUND -A R DVD VDP TV DBS/ V. AV 120V 60Hz Extension jacks for inputting multi-channel audio signals from an outboard decoder, or a component with 8- AUX VCR-1 V. IN FRONT CENTER SURROUND SB L L L R R SW R DIGITAL IN 1 2 3 1 2...
Owners Manual
Page 13
... using only one surround back speaker, connect it to the operating instructions of the other components. Connections • When making connections, also refer to left channel. (L) (R) SURROUND SPEAKER SYSTEMS (B) 13
... using only one surround back speaker, connect it to the operating instructions of the other components. Connections • When making connections, also refer to left channel. (L) (R) SURROUND SPEAKER SYSTEMS (B) 13
Owners Manual
Page 14
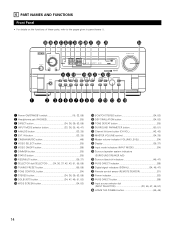
...) !8 WIDE SCREEN button 34, 53) !9 5CH/7CH STEREO button 34, 53) @0 DSP SIMULATION button 34, 53) @1 TONE DEFEAT button 35) @2 SURROUND PARAMETER button 50, 51) @3 Channel Volume button (CH VOL 42, 43) @4 MASTER VOLUME control 34, 35) @5 Master volume indicator (VOLUME LEVEL 34) @6 Display 36, 37) @7 Input mode indicators (INPUT MODE...
...) !8 WIDE SCREEN button 34, 53) !9 5CH/7CH STEREO button 34, 53) @0 DSP SIMULATION button 34, 53) @1 TONE DEFEAT button 35) @2 SURROUND PARAMETER button 50, 51) @3 Channel Volume button (CH VOL 42, 43) @4 MASTER VOLUME control 34, 35) @5 Master volume indicator (VOLUME LEVEL 34) @6 Display 36, 37) @7 Input mode indicators (INPUT MODE...
Owners Manual
Page 15
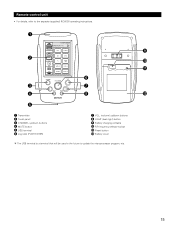
q o w !0 !1 y e u r i !2 t q Transmitter w Touch panel e CHANNEL up/down buttons r MUTE button t USB terminal y Jog stick (PUSH ENTER) u VOL. (volume) up/down buttons i LIGHT (back light) button o Battery charging contacts !0 RF frequency selector switch !1 Reset button !2 Battery cover The USB terminal is a terminal that will be used in the future to the separate (supplied) RC-8000 operating instructions. Remote control unit • For details, refer to update the microprocessor program, etc. 15
q o w !0 !1 y e u r i !2 t q Transmitter w Touch panel e CHANNEL up/down buttons r MUTE button t USB terminal y Jog stick (PUSH ENTER) u VOL. (volume) up/down buttons i LIGHT (back light) button o Battery charging contacts !0 RF frequency selector switch !1 Reset button !2 Battery cover The USB terminal is a terminal that will be used in the future to the separate (supplied) RC-8000 operating instructions. Remote control unit • For details, refer to update the microprocessor program, etc. 15

Owners Manual
Page 16
...to set up the listening room's AV system centered around the AVR-4802. • Use the following buttons to set up the system: Screen while icons are displayed Transmission codes of independent buttons CHANNEL• : Tuner preset CHANNELª : Tuner preset VOL• : Main volume of...AMP Assignment Set this function when using multiple surround speaker combinations for the different channels in "CONNECTIONS" (see pages 6 to 13), make the various settings described below on the monitor screen using the AVR-4802's on the remote control unit or main unit are operated (from MONITOR 1...
...to set up the listening room's AV system centered around the AVR-4802. • Use the following buttons to set up the system: Screen while icons are displayed Transmission codes of independent buttons CHANNEL• : Tuner preset CHANNELª : Tuner preset VOL• : Main volume of...AMP Assignment Set this function when using multiple surround speaker combinations for the different channels in "CONNECTIONS" (see pages 6 to 13), make the various settings described below on the monitor screen using the AVR-4802's on the remote control unit or main unit are operated (from MONITOR 1...
Owners Manual
Page 19
... frequency set for both A and B): The System Setup Menu reappears. Setting the type of speakers • The composition of the signals output from the different channels and the frequency response are adjusted automatically according to the combination of speakers actually being used. 1 Press "CURSOR/PAGE" at both surround speakers A and B are...
... frequency set for both A and B): The System Setup Menu reappears. Setting the type of speakers • The composition of the signals output from the different channels and the frequency response are adjusted automatically according to the combination of speakers actually being used. 1 Press "CURSOR/PAGE" at both surround speakers A and B are...
Owners Manual
Page 20
... reproducing bass sound below the frequency set for both speakers A and B on the System Setup Menu (when using the SMALL setting for the surround back channel. To select the Crossover Frequency. 20 Select the surround speakers to be used in the different surround modes. • To select the surround mode •...
... reproducing bass sound below the frequency set for both speakers A and B on the System Setup Menu (when using the SMALL setting for the surround back channel. To select the Crossover Frequency. 20 Select the surround speakers to be used in the different surround modes. • To select the surround mode •...

Owners Manual
Page 21
... setting is only valid when "Large" is set for the front speakers and "Yes" is set to "Large" are played from those channels and the subwoofer channel. Therefore, the low frequency signal range that bass interference is set to 80 Hz in the HOME THX CINEMA mode. • We recommend...subwoofer or speakers which are set to "Large". • This crossover frequency mode is valid when "Subwoofer" is selected, the low frequency signal range of channels set to "Small" in the room. • Select the play the low frequency signal range of low frequency signal range - • The only signals...
... setting is only valid when "Large" is set for the front speakers and "Yes" is set to "Large" are played from those channels and the subwoofer channel. Therefore, the low frequency signal range that bass interference is set to 80 Hz in the HOME THX CINEMA mode. • We recommend...subwoofer or speakers which are set to "Large". • This crossover frequency mode is valid when "Subwoofer" is selected, the low frequency signal range of channels set to "Small" in the room. • Select the play the low frequency signal range of low frequency signal range - • The only signals...
Owners Manual
Page 22
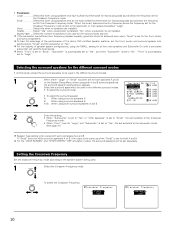
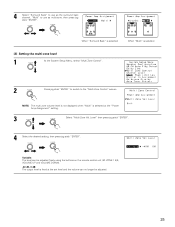
... using the surround back speakers if the software is recorded in THX Surround EX or DTS-ES or in the normal 5.1-channel mode without using the "SB CH OUT" surround parameter. (See pages 55.) Select the setting according to the program source to "Large" or "Small" at "...Speaker Configuration". • The surround back speakers can also be turned on which no identification signals are output from the surround back channel. Non-Flag Source SB ch Output setting THX surround EX/DTS ES..........Playback is set to be played. 22 OFF Playback is set . 3 Enter the...
... using the surround back speakers if the software is recorded in THX Surround EX or DTS-ES or in the normal 5.1-channel mode without using the "SB CH OUT" surround parameter. (See pages 55.) Select the setting according to the program source to "Large" or "Small" at "...Speaker Configuration". • The surround back speakers can also be turned on which no identification signals are output from the surround back channel. Non-Flag Source SB ch Output setting THX surround EX/DTS ES..........Playback is set to be played. 22 OFF Playback is set . 3 Enter the...
Owners Manual
Page 24
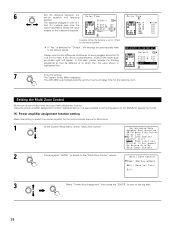
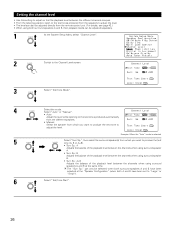
... Menu reappears. 6 Set the distance between the center speaker and listening position. In this setting to switch the power amplifier for the surround back channel to Multi-zone. 1 At the System Setup Menu, select "Multi Zone Control". 2 Press jog stick "ENTER" to switch to the measured ...that the difference of 1 foot (0.1 meters) each time the button is selected for every speaker should be 15 ft (4.5 m) or less. The AVR-4802 automatically sets the optimum surround delay time for the center speaker If "Yes" is pressed. Select the value closest to the "Multi Zone Control" ...
... Menu reappears. 6 Set the distance between the center speaker and listening position. In this setting to switch the power amplifier for the surround back channel to Multi-zone. 1 At the System Setup Menu, select "Multi Zone Control". 2 Press jog stick "ENTER" to switch to the measured ...that the difference of 1 foot (0.1 meters) each time the button is selected for every speaker should be 15 ft (4.5 m) or less. The AVR-4802 automatically sets the optimum surround delay time for the center speaker If "Yes" is pressed. Select the value closest to the "Multi Zone Control" ...
Owners Manual
Page 25
...: The level can no longer be adjusted freely using the buttons on the remote control unit (M. 4 Select "Surround Back" to use as the surround back channel, "Multi" to the "Multi Zone Control" screen. ZONE 1 4/5, VOLUME UP and VOLUME DOWN). -40 dB, 0 dB: The output level is fixed at the "Power Amp...
...: The level can no longer be adjusted freely using the buttons on the remote control unit (M. 4 Select "Surround Back" to use as the surround back channel, "Multi" to the "Multi Zone Control" screen. ZONE 1 4/5, VOLUME UP and VOLUME DOWN). -40 dB, 0 dB: The output level is fixed at the "Power Amp...
Owners Manual
Page 26
...from which you want to produce the test tone to adjust the level. Sp.: B Adjusts the balance of the playback level between the channels when using both surround speakers A and B, their playback levels can be adjusted separately. 1 At the System Setup Menu select...and B at the "Speaker Configuration" (when both A and B have been selected at the same time. Setting the channel level • Use this setting to adjust so that the playback level between the different channels is selected 5 Select "Surr. Select "Auto" or "Manual". • Auto: Adjust the level while listening to ...
...from which you want to produce the test tone to adjust the level. Sp.: B Adjusts the balance of the playback level between the channels when using both surround speakers A and B, their playback levels can be adjusted separately. 1 At the System Setup Menu select...and B at the "Speaker Configuration" (when both A and B have been selected at the same time. Setting the channel level • Use this setting to adjust so that the playback level between the different channels is selected 5 Select "Surr. Select "Auto" or "Manual". • Auto: Adjust the level while listening to ...
Owners Manual
Page 27
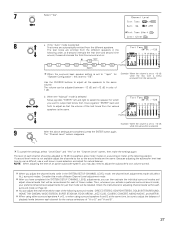
...subwoofer b. NOTE: When adjusting the level of "A or B" and "A and B". 27 Then, whenever you activate a particular surround sound mode, your preferred channel level adjustments for each surround mode on a sound level meter at the listening position. To cancel the settings, select "Level Clear" and "Yes" on... speakers A and B at 4-second intervals the first time and second time around, 2-second intervals the third time around and on the "Channel Level" screen, then make the settings again. Use the CURSOR buttons to adjust all the speakers to -12 dB while the subwoofer is ...
...subwoofer b. NOTE: When adjusting the level of "A or B" and "A and B". 27 Then, whenever you activate a particular surround sound mode, your preferred channel level adjustments for each surround mode on a sound level meter at the listening position. To cancel the settings, select "Level Clear" and "Yes" on... speakers A and B at 4-second intervals the first time and second time around, 2-second intervals the third time around and on the "Channel Level" screen, then make the settings again. Use the CURSOR buttons to adjust all the speakers to -12 dB while the subwoofer is ...
Owners Manual
Page 29
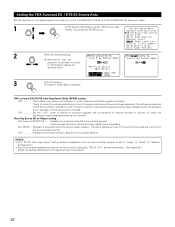
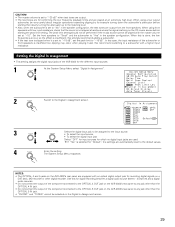
...output jack for digital recording between a digital audio source (stereo - 2 channel) and a digital audio recorder. • Do not connect the output of the component connected to the OPTICAL 4 OUT jack on the AVR-4802's rear panel to "No" in the speaker configuration. The System Setup Menu... reappears. Setting the Digital In Assignment • This setting assigns the digital input jacks of the AVR-4802 for the different input sources. 1 At the System Setup Menu select "Digital In Assignment". 2 Switch to the Digital In Assignment screen....
...output jack for digital recording between a digital audio source (stereo - 2 channel) and a digital audio recorder. • Do not connect the output of the component connected to the OPTICAL 4 OUT jack on the AVR-4802's rear panel to "No" in the speaker configuration. The System Setup Menu... reappears. Setting the Digital In Assignment • This setting assigns the digital input jacks of the AVR-4802 for the different input sources. 1 At the System Setup Menu select "Digital In Assignment". 2 Switch to the Digital In Assignment screen....
Owners Manual
Page 30
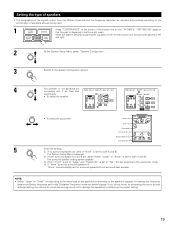
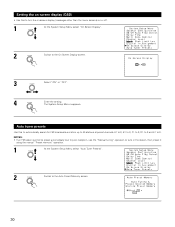
... than the menu screens) on -screen display (OSD) • Use this to automatically search for FM broadcasts and store up to 40 stations at preset channels A1 to 8, B1 to 8, C1 to 8, D1 to 8 and E1 to 8. The System Setup Menu reappears. Setting the on or off. 1 At the System Setup...
... than the menu screens) on -screen display (OSD) • Use this to automatically search for FM broadcasts and store up to 40 stations at preset channels A1 to 8, B1 to 8, C1 to 8, D1 to 8 and E1 to 8. The System Setup Menu reappears. Setting the on or off. 1 At the System Setup...

Owners Manual
Page 33
...only performed when PCM signals are being input to the external decoder input jacks are detected and the program in DTS, Dolby Digital or PCM (2 channel stereo) format. t EXT. IN (external decoder input jack selection mode) The signals being input. Note on playing a source encorded with DTS &#... mode switches as shown below each time the INPUT MODE button is being input, the analog input jacks are performed automatically in the AVR-4802's surround decoder is selected automatically upon playback. The presence or absence of digital signals is detected, the signals input to the digital ...
...only performed when PCM signals are being input to the external decoder input jacks are detected and the program in DTS, Dolby Digital or PCM (2 channel stereo) format. t EXT. IN (external decoder input jack selection mode) The signals being input. Note on playing a source encorded with DTS &#... mode switches as shown below each time the INPUT MODE button is being input, the analog input jacks are performed automatically in the AVR-4802's surround decoder is selected automatically upon playback. The presence or absence of digital signals is detected, the signals input to the digital ...


