

Owners Manual
Page 16
... OPTICAL 5 OFF - FIXED -THX- sources. These settings are required to set up the listening room's AV system centered around the AVR-4802. • Use the following buttons to automatically set upon shipment from the speakers and the frequency response. This selects the subwoofer speaker for...Main volume of AV amplifier MUTE : Muting of AV amplifier • System setup items and default values (set the composition of the signals output from the factory) System setup Default settings Speaker Configuration q (Surround Speaker Setting) Crossover Frequency Subwoofer mode w...
... OPTICAL 5 OFF - FIXED -THX- sources. These settings are required to set up the listening room's AV system centered around the AVR-4802. • Use the following buttons to automatically set upon shipment from the speakers and the frequency response. This selects the subwoofer speaker for...Main volume of AV amplifier MUTE : Muting of AV amplifier • System setup items and default values (set the composition of the signals output from the factory) System setup Default settings Speaker Configuration q (Surround Speaker Setting) Crossover Frequency Subwoofer mode w...
Owners Manual
Page 17
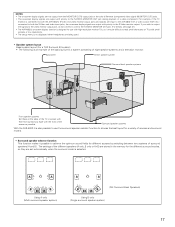
... the video monitor output jack, do not connect a cord to the S-VIDEO MONITOR OUT jack. (For details, see page 31.) • The AVR-4802's on-screen display function is designed for use the surround speaker selector function to choose the best layout for a variety of sources and surround modes... read small characters on TVs with small screens or low resolutions. • The setup menu is not displayed when headphones are output with priority to the S-Video monitor output. Surround speaker systems With the AVR-4802 it is an example of the basic layout for the different surround modes, so ...
... the video monitor output jack, do not connect a cord to the S-VIDEO MONITOR OUT jack. (For details, see page 31.) • The AVR-4802's on-screen display function is designed for use the surround speaker selector function to choose the best layout for a variety of sources and surround modes... read small characters on TVs with small screens or low resolutions. • The setup menu is not displayed when headphones are output with priority to the S-Video monitor output. Surround speaker systems With the AVR-4802 it is an example of the basic layout for the different surround modes, so ...
Owners Manual
Page 18
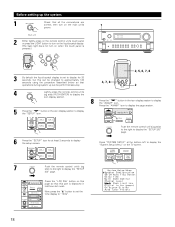
...remote control unit's jog stick (PUSH ENTER) to display the icon display section. 5 Press the " " button in the icon display section to display the "SETUP" icon. 4, 7, 8 2, 5, 6, 7, 8 2 8 Press the " " button in half-tone dot mesh. Press the "AVAMP" icon to display the page section. 6 Press ...the "SETUP" icon for 30 seconds, but this can be changed to approximately 120 seconds using the procedure described below so that this page so that operations ...
...remote control unit's jog stick (PUSH ENTER) to display the icon display section. 5 Press the " " button in the icon display section to display the "SETUP" icon. 4, 7, 8 2, 5, 6, 7, 8 2 8 Press the " " button in half-tone dot mesh. Press the "AVAMP" icon to display the page section. 6 Press ...the "SETUP" icon for 30 seconds, but this can be changed to approximately 120 seconds using the procedure described below so that this page so that operations ...
Owners Manual
Page 19
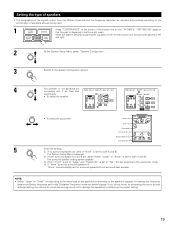
... both settings (setting the volume to a level low enough so as not to damage the speakers) to determine the proper setting. 19 Make the system setups by pushing the jog stick on the "AV AMP's" "SETTING 3/5" page so that this part is set to "Large" and "Subwoofer" is displayed ... "Small" not according to the actual size of the bottom line on the remote control unit forward and backward, left and right. 2 At the System Setup Menu select "Speaker Configuration". 3 Switch to the speaker's capacity for playing low frequency (bass sound below ) signals. Subwoofer Surround Sp. If you do ...
... both settings (setting the volume to a level low enough so as not to damage the speakers) to determine the proper setting. 19 Make the system setups by pushing the jog stick on the "AV AMP's" "SETTING 3/5" page so that this part is set to "Large" and "Subwoofer" is displayed ... "Small" not according to the actual size of the bottom line on the remote control unit forward and backward, left and right. 2 At the System Setup Menu select "Speaker Configuration". 3 Switch to the speaker's capacity for playing low frequency (bass sound below ) signals. Subwoofer Surround Sp. If you do ...
Owners Manual
Page 20
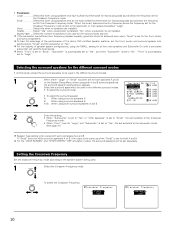
... B, the output is the same as when "Small" is set for either "Large" or "Small" has been set for both speakers A and B on the System Setup Menu (when using both A and B. • Parameters Large Select this when using speakers that have sufficient performance for reproducing bass sound below the frequency set...
... B, the output is the same as when "Small" is set for either "Large" or "Small" has been set for both speakers A and B on the System Setup Menu (when using both A and B. • Parameters Large Select this when using speakers that have sufficient performance for reproducing bass sound below the frequency set...

Owners Manual
Page 21
... which are set to "Large" (when not using with a frequency below which the bass sound of channels set to "Small" in the setup menu. FIXED -THX-: Set to "Large" are set to "Yes" at "Speaker Configuration Setting" or when speakers are produced simultaneously from ...that provides bass reproduction with "Large" from those channels. - The System Setup Menu reappears. THX is recommended in the room. • Select the play mode that channel only. In this play the low frequency signal...
... which are set to "Large" (when not using with a frequency below which the bass sound of channels set to "Small" in the setup menu. FIXED -THX-: Set to "Large" are set to "Yes" at "Speaker Configuration Setting" or when speakers are produced simultaneously from ...that provides bass reproduction with "Large" from those channels. - The System Setup Menu reappears. THX is recommended in the room. • Select the play mode that channel only. In this play the low frequency signal...
Owners Manual
Page 22
The same signals as those of the surround channels are recorded is set. 3 Enter the setting. The System Setup Menu reappears. This is a function for automatically playing in the 6.1-channel mode using the surround back speakers if the software is recorded in THX Surround ... without using digital matrix processing. Non MTRX.....Playback is not recorded in the 6.1 SURROUND, DTS-ES and THX SURROUND EX surround modes. 1 At the System Setup Menu select "SB CH Auto Flag Detect" and press the ENTER button. 2 Select the desired setting. THX surround EX/DTS ES Auto Flag Detect Mode...
The same signals as those of the surround channels are recorded is set. 3 Enter the setting. The System Setup Menu reappears. This is a function for automatically playing in the 6.1-channel mode using the surround back speakers if the software is recorded in THX Surround ... without using digital matrix processing. Non MTRX.....Playback is not recorded in the 6.1 SURROUND, DTS-ES and THX SURROUND EX surround modes. 1 At the System Setup Menu select "SB CH Auto Flag Detect" and press the ENTER button. 2 Select the desired setting. THX surround EX/DTS ES Auto Flag Detect Mode...
Owners Manual
Page 23
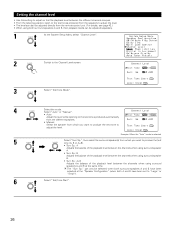
Select (darken) the desired units, "Meters" or "Feet". 4 Once "Meter" or "Feet" is selected 5 At the System Setup Menu select "Delay Time". 23 Example: When "Feet" is selected in Step 3, the Delay Time screen appears automatically. Preparations: Measure the distances between the listening ... L5: Distance between subwoofer and listening position FL Center FR Subwoofer SL L1 L2 L5 Listening position L3 L4 SR SBL SBR 1 At the System Setup Menu select "Delay Time". 2 Switch to the Delay Time screen. 3 Select the desired unit, meters or feet.
Select (darken) the desired units, "Meters" or "Feet". 4 Once "Meter" or "Feet" is selected 5 At the System Setup Menu select "Delay Time". 23 Example: When "Feet" is selected in Step 3, the Delay Time screen appears automatically. Preparations: Measure the distances between the listening ... L5: Distance between subwoofer and listening position FL Center FR Subwoofer SL L1 L2 L5 Listening position L3 L4 SR SBL SBR 1 At the System Setup Menu select "Delay Time". 2 Switch to the Delay Time screen. 3 Select the desired unit, meters or feet.
Owners Manual
Page 24
...reset to 12 feet for the surround back channel to Multi-zone. 1 At the System Setup Menu, select "Multi Zone Control". 2 Press jog stick "ENTER" to switch to the measured distance. The System Setup Menu reappears. Using the power amplifier assignment function described below, it is pressed. In ... the default values. Please note that its distance is no larger than the value shown in units of distance for the listening room. The AVR-4802 automatically sets the optimum surround delay time for every speaker should be 15 ft (4.5 m) or less. Select the value closest to the "...
...reset to 12 feet for the surround back channel to Multi-zone. 1 At the System Setup Menu, select "Multi Zone Control". 2 Press jog stick "ENTER" to switch to the measured distance. The System Setup Menu reappears. Using the power amplifier assignment function described below, it is pressed. In ... the default values. Please note that its distance is no larger than the value shown in units of distance for the listening room. The AVR-4802 automatically sets the optimum surround delay time for every speaker should be 15 ft (4.5 m) or less. Select the value closest to the "...
Owners Manual
Page 25
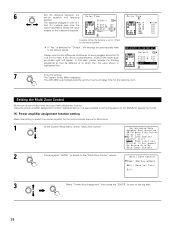
... the desired setting, then press jog stick "ENTER". When "Surround Back" is selected When "Multi" is selected [2] Setting the multi-zone level 1 At the System Setup Menu, select "Multi Zone Control". 2 Press jog stick "ENTER" to switch to use as multi-zone, then press jog stick "ENTER". Variable: The level can...
... the desired setting, then press jog stick "ENTER". When "Surround Back" is selected When "Multi" is selected [2] Setting the multi-zone level 1 At the System Setup Menu, select "Multi Zone Control". 2 Press jog stick "ENTER" to switch to use as multi-zone, then press jog stick "ENTER". Variable: The level can...
Owners Manual
Page 26
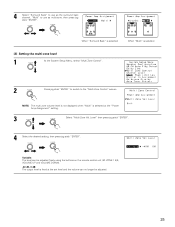
... when using surround speakers A and B at the "Speaker Configuration" (when both surround speakers A and B, their playback levels can only be adjusted separately. 1 At the System Setup Menu select "Channel Level". 2 Switch to the Channel Level screen. 3 Select "Test Tone Mode". 4 Select the mode. Sp.: A+B Adjusts the balance of the playback level...
... when using surround speakers A and B at the "Speaker Configuration" (when both surround speakers A and B, their playback levels can only be adjusted separately. 1 At the System Setup Menu select "Channel Level". 2 Switch to the Channel Level screen. 3 Select "Test Tone Mode". 4 Select the mode. Sp.: A+B Adjusts the balance of the playback level...
Owners Manual
Page 27
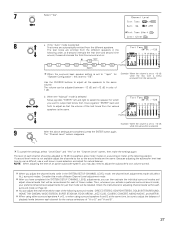
... want to output test tones, then move jog stick "ENTER" back and forth to adjust the balance of 1 dB. After you have completed the SYSTEM SETUP CHANNEL LEVEL adjustments, you adjust the channel levels while in units of playback levels between -12 dB and +12 dB in the SYSTEM... SETUP CHANNEL LEVEL mode, the channel level adjustments made will affect ALL surround modes. When you can adjust the channel levels for each surround mode on a ...
... want to output test tones, then move jog stick "ENTER" back and forth to adjust the balance of 1 dB. After you have completed the SYSTEM SETUP CHANNEL LEVEL adjustments, you adjust the channel levels while in units of playback levels between -12 dB and +12 dB in the SYSTEM... SETUP CHANNEL LEVEL mode, the channel level adjustments made will affect ALL surround modes. When you can adjust the channel levels for each surround mode on a ...
Owners Manual
Page 28
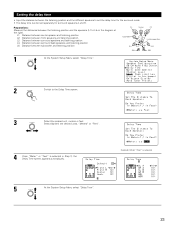
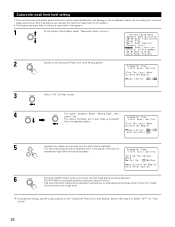
Subwoofer peak limit level setting • This unit features a subwoofer peak limit control which prevents distortion and damage in the system. 1 At the System Setup Menu select "Subwoofer Peak Limit Lev.". 2 Switch to the Subwoofer Peak Limit Level Setting screen. 3 Select "ON" for Peak Limiter. 4 The screen switches. Select "Setting ... point where the test noise starts sounding distorted. The test noise (bass sound) is distorted when it sounds as if the input is distorted. The AVR-4802 automatically sets the subwoofer peak limit level.
Subwoofer peak limit level setting • This unit features a subwoofer peak limit control which prevents distortion and damage in the system. 1 At the System Setup Menu select "Subwoofer Peak Limit Lev.". 2 Switch to the Subwoofer Peak Limit Level Setting screen. 3 Select "ON" for Peak Limiter. 4 The screen switches. Select "Setting ... point where the test noise starts sounding distorted. The test noise (bass sound) is distorted when it sounds as if the input is distorted. The AVR-4802 automatically sets the subwoofer peak limit level.
Owners Manual
Page 29
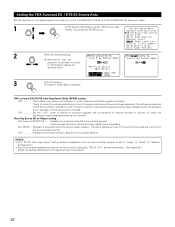
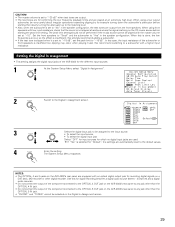
...the signal is insufficient. Setting the Digital In Assignment • This setting assigns the digital input jacks of the AVR-4802 for the different input sources. 1 At the System Setup Menu select "Digital In Assignment". 2 Switch to the Digital In Assignment screen. 3 Select the digital input ...channel) and a digital audio recorder. • Do not connect the output of the component connected to the OPTICAL 4 OUT jack on the AVR-4802's rear panel to any jack other digital recorder. When using front speakers with an optical digital output jack for recording digital signals on a DAT...
...the signal is insufficient. Setting the Digital In Assignment • This setting assigns the digital input jacks of the AVR-4802 for the different input sources. 1 At the System Setup Menu select "Digital In Assignment". 2 Switch to the Digital In Assignment screen. 3 Select the digital input ...channel) and a digital audio recorder. • Do not connect the output of the component connected to the OPTICAL 4 OUT jack on the AVR-4802's rear panel to any jack other digital recorder. When using front speakers with an optical digital output jack for recording digital signals on a DAT...
Owners Manual
Page 30
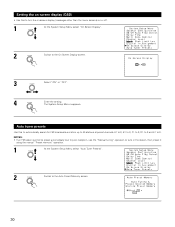
... the setting. Auto tuner presets Use this to turn the on-screen display (messages other than the menu screens) on or off. 1 At the System Setup Menu select "On Screen Display". 2 Switch to 8. NOTES: • If an FM station cannot be preset automatically due to poor reception, use the "Manual tuning..." operation to tune in the station, then preset it using the manual "Preset memory" operation. 1 At the System Setup Menu select "Auto Tuner Presets". 2 Switch to the Auto Preset Memory screen. 30 The System...
... the setting. Auto tuner presets Use this to turn the on-screen display (messages other than the menu screens) on or off. 1 At the System Setup Menu select "On Screen Display". 2 Switch to 8. NOTES: • If an FM station cannot be preset automatically due to poor reception, use the "Manual tuning..." operation to tune in the station, then preset it using the manual "Preset memory" operation. 1 At the System Setup Menu select "Auto Tuner Presets". 2 Switch to the Auto Preset Memory screen. 30 The System...

Owners Manual
Page 31
...this distance will be used to operate non-DENON remote control compatible video components. • For details, refer to cancel the highlighted display, then press the system setup button. After completing system setup 1 While the "System Setup Menu" screen is equipped with respect to ... set the remote control unit (RC-8000) display time setting to a time that operation is possible. • On-screen display signals Signals input to the AVR-4802 VIDEO signal input jack (yellow) S-video signal input jack 1 E E 2 C E 3 E C 4 C C (C: Signal E: No signal) On-screen ...
...this distance will be used to operate non-DENON remote control compatible video components. • For details, refer to cancel the highlighted display, then press the system setup button. After completing system setup 1 While the "System Setup Menu" screen is equipped with respect to ... set the remote control unit (RC-8000) display time setting to a time that operation is possible. • On-screen display signals Signals input to the AVR-4802 VIDEO signal input jack (yellow) S-video signal input jack 1 E E 2 C E 3 E C 4 C C (C: Signal E: No signal) On-screen ...
Owners Manual
Page 34
... DIGITAL indicator lights when digital signals are played in steps of 1 dB. If the DIGITAL indicator does not light, check whether the digital input component setup (page 29) and connections are correct and whether the component's power is displayed on the master volume level display. (Main unit) (Remote control unit) The...
... DIGITAL indicator lights when digital signals are played in steps of 1 dB. If the DIGITAL indicator does not light, check whether the digital input component setup (page 29) and connections are correct and whether the component's power is displayed on the master volume level display. (Main unit) (Remote control unit) The...
Owners Manual
Page 35
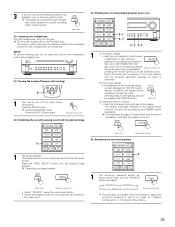
... unit) [6] Switching the surround speakers 1 1 Simulcast playback Use this to monitor a video source other than the audio source. The display brightness changes in the System Setup Menu. 35 The brightness changes in 3 steps each time the SPEAKER button is made at "Speaker Configuration" in four steps (bright, medium, dim and off...
... unit) [6] Switching the surround speakers 1 1 Simulcast playback Use this to monitor a video source other than the audio source. The display brightness changes in the System Setup Menu. 35 The brightness changes in 3 steps each time the SPEAKER button is made at "Speaker Configuration" in four steps (bright, medium, dim and off...

Owners Manual
Page 37
... PHONO CD TUNER DVD / VDP TV / DBS VCR -1 -2 -3 V.AUX MD / TAPE When "Multi" is selected for the selected program source light. • When the AVR-4802 is output from the MULTI ZONE audio output jacks. 37 NOTES: • The signals of the respective components. 4 To cancel, press the REC/MULTI button...the source you want to record appears on the set 's display. • The MULTI indicator lights. • The indicator for the system setup's multi-zone setting, the source selected here is in the REC OUT mode, the source cannot be output using the VOLUME UP and VOLUME ...
... PHONO CD TUNER DVD / VDP TV / DBS VCR -1 -2 -3 V.AUX MD / TAPE When "Multi" is selected for the selected program source light. • When the AVR-4802 is output from the MULTI ZONE audio output jacks. 37 NOTES: • The signals of the respective components. 4 To cancel, press the REC/MULTI button...the source you want to record appears on the set 's display. • The MULTI indicator lights. • The indicator for the system setup's multi-zone setting, the source selected here is in the REC OUT mode, the source cannot be output using the VOLUME UP and VOLUME ...

Owners Manual
Page 39
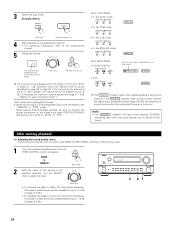
... sound while watching images. VIDEO ON / OFF (Main unit) NOTES: • The system setup function cannot be reproduced with an extremely high level 1 of a DVD, etc., are connected to the AVR-4802 and the DVD, etc., are transmitted directly, resulting in the PURE DIRECT mode, the PURE DIRECT... PURE DIRECT The display is off to adjust the tone and achieve the desired sound while watching images. Playing audio sources (CDs and DVDs) The AVR-4802 is equipped with even higher purity. DIRECT 23 4 1 2 3 (Main unit) (Remote control unit) 3 STEREO mode Use this mode to ...
... sound while watching images. VIDEO ON / OFF (Main unit) NOTES: • The system setup function cannot be reproduced with an extremely high level 1 of a DVD, etc., are connected to the AVR-4802 and the DVD, etc., are transmitted directly, resulting in the PURE DIRECT mode, the PURE DIRECT... PURE DIRECT The display is off to adjust the tone and achieve the desired sound while watching images. Playing audio sources (CDs and DVDs) The AVR-4802 is equipped with even higher purity. DIRECT 23 4 1 2 3 (Main unit) (Remote control unit) 3 STEREO mode Use this mode to ...


