
Owners Manual
Page 15
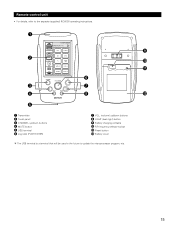
q o w !0 !1 y e u r i !2 t q Transmitter w Touch panel e CHANNEL up/down buttons r MUTE button t USB terminal y Jog stick (PUSH ENTER) u VOL. (volume) up/down buttons i LIGHT (back light) button o Battery charging contacts !0 RF frequency selector switch !1 Reset button !2 Battery cover The USB terminal is a terminal that will be used in the future to the separate (supplied) RC-8000 operating instructions. Remote control unit • For details, refer to update the microprocessor program, etc. 15
q o w !0 !1 y e u r i !2 t q Transmitter w Touch panel e CHANNEL up/down buttons r MUTE button t USB terminal y Jog stick (PUSH ENTER) u VOL. (volume) up/down buttons i LIGHT (back light) button o Battery charging contacts !0 RF frequency selector switch !1 Reset button !2 Battery cover The USB terminal is a terminal that will be used in the future to the separate (supplied) RC-8000 operating instructions. Remote control unit • For details, refer to update the microprocessor program, etc. 15
Owners Manual
Page 24
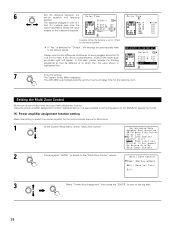
... an output level adjustment function. Using the power amplifier assignment function described below, it is selected for "Default", the settings are automatically reset to the SB/MULTI speaker terminals. [1] Power amplifier assignment function setting Make this case, please relocate the blinking speaker(s) so that the...for the center speaker If "Yes" is also possible to connect speakers to the default values. The System Setup Menu reappears. The AVR-4802 automatically sets the optimum surround delay time for every speaker should be 15 ft (4.5 m) or less. Setting the Multi Zone Control...
... an output level adjustment function. Using the power amplifier assignment function described below, it is selected for "Default", the settings are automatically reset to the SB/MULTI speaker terminals. [1] Power amplifier assignment function setting Make this case, please relocate the blinking speaker(s) so that the...for the center speaker If "Yes" is also possible to connect speakers to the default values. The System Setup Menu reappears. The AVR-4802 automatically sets the optimum surround delay time for every speaker should be 15 ft (4.5 m) or less. Setting the Multi Zone Control...
Owners Manual
Page 29
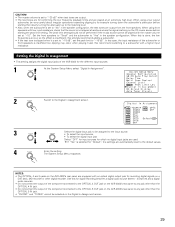
... level. • Also, when the subwoofer is set to "No" in the speaker configuration. NOTES: • The OPTICAL 4 and 5 jacks on the AVR-4802's rear panel are equipped with a higher input resistance. We strongly recommend adding a subwoofer. • If the test tone is clipped when it is strong on...The master volume is set to "-30 dB" when test tones are output. • The test tones are for "Default", the settings are automatically reset to the default values. 4 Enter the setting. When using front speakers with the master volume set at sections where the signal is set to "-18...
... level. • Also, when the subwoofer is set to "No" in the speaker configuration. NOTES: • The OPTICAL 4 and 5 jacks on the AVR-4802's rear panel are equipped with a higher input resistance. We strongly recommend adding a subwoofer. • If the test tone is clipped when it is strong on...The master volume is set to "-30 dB" when test tones are output. • The test tones are for "Default", the settings are automatically reset to the default values. 4 Enter the setting. When using front speakers with the master volume set at sections where the signal is set to "-18...
Owners Manual
Page 47
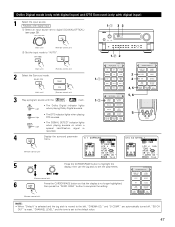
... indicator lights when playing Dolby Digital sources. • The DTS indicator lights when playing Light DTS sources. are automatically turned off, "SB CH OUT" is reset, "CHANNEL LEVEL" and the tone is moved to the default value. 47 PARA" button to complete the setting. (Remote control unit) NOTE: • When "Default...
... indicator lights when playing Dolby Digital sources. • The DTS indicator lights when playing Light DTS sources. are automatically turned off, "SB CH OUT" is reset, "CHANNEL LEVEL" and the tone is moved to the default value. 47 PARA" button to complete the setting. (Remote control unit) NOTE: • When "Default...
Owners Manual
Page 59
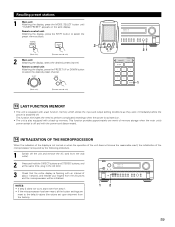
... the preset memory block. NOTES: • If step 3 does not work, start over from step 1. • If the microprocessor has been reset, all the button settings are reset to perform complicated resettings when the power is switched on the set upon shipment from the factory). 1 2 59 This function eliminates the need to the...
... the preset memory block. NOTES: • If step 3 does not work, start over from step 1. • If the microprocessor has been reset, all the button settings are reset to perform complicated resettings when the power is switched on the set upon shipment from the factory). 1 2 59 This function eliminates the need to the...

