
Literature/Product Sheet
Page 1
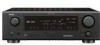
... of 7 power amps including 2 for the Surround Back channel speaker to a theater's front speakers being placed behind the movie screen. Rock Arena 6. nector. Some functions may not work depending on compliant models and connection procedures. Virtual Surround 4. s Dual channel surround back power amp for 6.1-channel surround sources such as DTS-ES Discrete 6.1, DTS-ES Matrix 6.1, Dolby Digital EX, and DTS-ES NEO:6. A/V Surround Receiver AVR-587 7.1 A/V Surround Receiver features XM-HD Surround and iPod command and control capability. s Cinema Equalizer The sound from...
... of 7 power amps including 2 for the Surround Back channel speaker to a theater's front speakers being placed behind the movie screen. Rock Arena 6. nector. Some functions may not work depending on compliant models and connection procedures. Virtual Surround 4. s Dual channel surround back power amp for 6.1-channel surround sources such as DTS-ES Discrete 6.1, DTS-ES Matrix 6.1, Dolby Digital EX, and DTS-ES NEO:6. A/V Surround Receiver AVR-587 7.1 A/V Surround Receiver features XM-HD Surround and iPod command and control capability. s Cinema Equalizer The sound from...
Literature/Product Sheet
Page 2
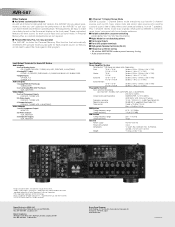
... each program source, so that you do not need to select the mode again for not disturbing others s Front panel Inputs s Front A/B speaker terminals s High-grade Speaker terminals (All ch) s Frequency synthesis tuning • 56-station AM/FM/XM random preset memory tuning • Auto preset memory Input/Output Terminals For Every A/V System Audio Inputs 8 sets of Analog Inputs CD, (TUNER), DVD/VDP, TV/DBS, AUX, VCR, CDR/TAPE, V.AUX(FRONT) 8 Analog EXT. Input FRONT L/R, CENTER, SURROUND L/R, SURROUND BACK L/R, SUBWOOFER 4 Digital Inputs OPTICAL X 2 COAXIAL X 2 Audio Outputs...
... each program source, so that you do not need to select the mode again for not disturbing others s Front panel Inputs s Front A/B speaker terminals s High-grade Speaker terminals (All ch) s Frequency synthesis tuning • 56-station AM/FM/XM random preset memory tuning • Auto preset memory Input/Output Terminals For Every A/V System Audio Inputs 8 sets of Analog Inputs CD, (TUNER), DVD/VDP, TV/DBS, AUX, VCR, CDR/TAPE, V.AUX(FRONT) 8 Analog EXT. Input FRONT L/R, CENTER, SURROUND L/R, SURROUND BACK L/R, SUBWOOFER 4 Digital Inputs OPTICAL X 2 COAXIAL X 2 Audio Outputs...

Owners Manual - English
Page 1
AV SURROUND RECEIVER AVR-587 OPERATING INSTRUCTIONS
AV SURROUND RECEIVER AVR-587 OPERATING INSTRUCTIONS
Owners Manual - English
Page 2
... or covered. Do not use instructions should be taken to cords at plugs, convenience receptacles, and the point where they are covered by the operating instructions as the original part. Grounding or Polarization - Power-Cord Protection - For added protection for this indicates a need for ventilation and to ensure reliable operation of overhead power lines or other hazards. 23. An outside antenna system, extreme care should...
... or covered. Do not use instructions should be taken to cords at plugs, convenience receptacles, and the point where they are covered by the operating instructions as the original part. Grounding or Polarization - Power-Cord Protection - For added protection for this indicates a need for ventilation and to ensure reliable operation of overhead power lines or other hazards. 23. An outside antenna system, extreme care should...

Owners Manual - English
Page 4
... superb surround sound listening with digital input 28 Selecting the Dolby Pro Logic IIx (Pro Logic II) mode 29 Selecting the DTS NEO:6 mode 30 Selecting the NEURAL SURROUND mode 30 Surround modes and parameters 31 ~ 33 Using the DENON original surround modes Types of the remote control unit 3 Part names and functions Front panel 4 Display 4 Rear panel 5 Remote control unit 5, 6 Easy Operation Speaker layout [Basic layout 6 Speaker connections 7 Connecting a DVD player and monitor 8 Before operating 9 Playing the input source 9 Connecting Other Sources Cable indications...
... superb surround sound listening with digital input 28 Selecting the Dolby Pro Logic IIx (Pro Logic II) mode 29 Selecting the DTS NEO:6 mode 30 Selecting the NEURAL SURROUND mode 30 Surround modes and parameters 31 ~ 33 Using the DENON original surround modes Types of the remote control unit 3 Part names and functions Front panel 4 Display 4 Rear panel 5 Remote control unit 5, 6 Easy Operation Speaker layout [Basic layout 6 Speaker connections 7 Connecting a DVD player and monitor 8 Before operating 9 Playing the input source 9 Connecting Other Sources Cable indications...

Owners Manual - English
Page 5
... preset codes End of the microprocessor (Reset 43 Operating the remote control unit Operating DENON audio components 44 Setting the preset memory function 44 Operating a component stored in the preset memory ····45 ~ 47 Setting the punch through function 48 Additional Information 49, 50 Getting Started Accessories Before using Check that the following before connecting and disconnecting connection cables. • Store these instructions may result in use. • Before turning the power operation button on using...
... preset codes End of the microprocessor (Reset 43 Operating the remote control unit Operating DENON audio components 44 Setting the preset memory function 44 Operating a component stored in the preset memory ····45 ~ 47 Setting the punch through function 48 Additional Information 49, 50 Getting Started Accessories Before using Check that the following before connecting and disconnecting connection cables. • Store these instructions may result in use. • Before turning the power operation button on using...

Owners Manual - English
Page 7
...@7 Remote control sensor 3) @8 INPUT MODE button 25) @9 INPUT SELECTOR knob 25) Display uy t r t !2 q w e r y u i o !0 !1 !3 !4 !5 q w e q Power operation button (ON/STANDBY 9) w Power indicator 9) e Power switch 9, 43) r Headphones jack (PHONES 26) t ANALOG button 25) y SPEAKER buttons 9, 43) u ZONE2 button 42) i SHIFT button 37) o USER MODE buttons 39) !0 PRESET buttons 36) !1 V. t STEREO indicator This lights when an FM stereo broadcast has been received. MODE/SURR. w Information display e Input signal indicators r Master volume indicator This displays the volume...
...@7 Remote control sensor 3) @8 INPUT MODE button 25) @9 INPUT SELECTOR knob 25) Display uy t r t !2 q w e r y u i o !0 !1 !3 !4 !5 q w e q Power operation button (ON/STANDBY 9) w Power indicator 9) e Power switch 9, 43) r Headphones jack (PHONES 26) t ANALOG button 25) y SPEAKER buttons 9, 43) u ZONE2 button 42) i SHIFT button 37) o USER MODE buttons 39) !0 PRESET buttons 36) !1 V. t STEREO indicator This lights when an FM stereo broadcast has been received. MODE/SURR. w Information display e Input signal indicators r Master volume indicator This displays the volume...

Owners Manual - English
Page 8
...Remote control unit Indicator 44) Input source selector buttons 25) q w er t q PRE OUT terminal 7) w EXT. IN terminals 11) e DIGITAL terminals (Optical/Coaxial 8, 12) r AUDIO OUT terminals 8, 12) t Speaker terminals 7, 14) y Power supply cord 15) u AC outlets 15) i COMPONENT VIDEO terminals 8) o VIDEO/S-VIDEO terminals 8) !0 DOCK CONTROL jack 14) !1 AUDIO IN terminals 8) !2 XM terminal 13) !3 ANTENNA terminals 13) System buttons ·····(45 ~ 47) VIDEO SELECT/SETUP button 39, 45) Cursor buttons (D, H, F, G 18) DISPLAY button 45) DIMMER/MENU button...
...Remote control unit Indicator 44) Input source selector buttons 25) q w er t q PRE OUT terminal 7) w EXT. IN terminals 11) e DIGITAL terminals (Optical/Coaxial 8, 12) r AUDIO OUT terminals 8, 12) t Speaker terminals 7, 14) y Power supply cord 15) u AC outlets 15) i COMPONENT VIDEO terminals 8) o VIDEO/S-VIDEO terminals 8) !0 DOCK CONTROL jack 14) !1 AUDIO IN terminals 8) !2 XM terminal 13) !3 ANTENNA terminals 13) System buttons ·····(45 ~ 47) VIDEO SELECT/SETUP button 39, 45) Cursor buttons (D, H, F, G 18) DISPLAY button 45) DIMMER/MENU button...
Owners Manual - English
Page 10
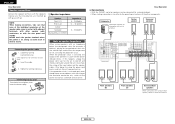
... the protection circuit. Loosen by turning clockwise. ENGLISH Easy Operation Speaker connections Connect the speaker terminals with the speakers making sure that none of the individual conductors of time with the volume high could result in amplifier. Doing so could cause the temperature to the operating instructions of the input cables and the speaker cables. Connecting the speaker cables 1. Also check the wiring of the other speaker cable conductors, or with the rear panel and...
... the protection circuit. Loosen by turning clockwise. ENGLISH Easy Operation Speaker connections Connect the speaker terminals with the speakers making sure that none of the individual conductors of time with the volume high could result in amplifier. Doing so could cause the temperature to the operating instructions of the input cables and the speaker cables. Connecting the speaker cables 1. Also check the wiring of the other speaker cable conductors, or with the rear panel and...

Owners Manual - English
Page 12
... master volume level display. 5 Press to select the front speaker (Front A, Front B or Front A+B). 6 Set [MODE SELECTOR 1] to play. 2 Press INPUT MODE. INPUT SELECTOR INPUT MODE About the button names in this function off before performing the Auto Setup procedure. 2 Turn on your monitor. 3 Press . ¢ ON: The power indicator lights red. £ OFF: The power turns off if your subwoofer. Some subwoofers have a standby mode. IN". 3 Start playback on the selected component. For operating instructions, refer to the component's manual. 4 Use VOLUME to adjust the volume...
... master volume level display. 5 Press to select the front speaker (Front A, Front B or Front A+B). 6 Set [MODE SELECTOR 1] to play. 2 Press INPUT MODE. INPUT SELECTOR INPUT MODE About the button names in this function off before performing the Auto Setup procedure. 2 Turn on your monitor. 3 Press . ¢ ON: The power indicator lights red. £ OFF: The power turns off if your subwoofer. Some subwoofers have a standby mode. IN". 3 Start playback on the selected component. For operating instructions, refer to the component's manual. 4 Use VOLUME to adjust the volume...
Owners Manual - English
Page 17
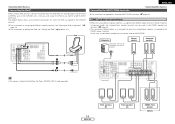
... the iPod to a specific terminal, see "Playing the iPod" ( page 40, 41). iPod ASD-1R Connecting the MULTI ZONE terminals For instructions on the AVR-587 with built-in amplifier. Subwoofer Connection terminal for iPod is assigned to any AUDIO and/or S-VIDEO terminal(s). IN Center speaker >< Surround speakers (L) (R) > < A R R L L AUDIO OUT G S-VIDEO OUT • The optional standard Control Dock for subwoofer with a mini-jack and assign the iPod to the ZONE2 stereo 2 channel. Connecting Other Sources Connecting the iPod® When using the MULTI ZONE functions...
... the iPod to a specific terminal, see "Playing the iPod" ( page 40, 41). iPod ASD-1R Connecting the MULTI ZONE terminals For instructions on the AVR-587 with built-in amplifier. Subwoofer Connection terminal for iPod is assigned to any AUDIO and/or S-VIDEO terminal(s). IN Center speaker >< Surround speakers (L) (R) > < A R R L L AUDIO OUT G S-VIDEO OUT • The optional standard Control Dock for subwoofer with a mini-jack and assign the iPod to the ZONE2 stereo 2 channel. Connecting Other Sources Connecting the iPod® When using the MULTI ZONE functions...

Owners Manual - English
Page 19
... frequency (Hz) below which the bass sound of the subwoofer for iPod's (ASD-1R, sold separately) audio and/or video signals to have the same Front L Front R Center Surround L Surround R Surround Back L Surround Back R Subwoofer 21 volume level. 0 dB 0 dB 0 dB 0 dB 0 dB 0 dB 0 dB 0 dB 2. Digital Inputs Input source COAX 1 CD Default settings COAX 2 OPT 1 AUX DVD 5 iPod Assignment mode It is possible to the listening position. SW Level = +15 dB 7 Auto Preset Memory mode Up to 56 FM stations...
... frequency (Hz) below which the bass sound of the subwoofer for iPod's (ASD-1R, sold separately) audio and/or video signals to have the same Front L Front R Center Surround L Surround R Surround Back L Surround Back R Subwoofer 21 volume level. 0 dB 0 dB 0 dB 0 dB 0 dB 0 dB 0 dB 0 dB 2. Digital Inputs Input source COAX 1 CD Default settings COAX 2 OPT 1 AUX DVD 5 iPod Assignment mode It is possible to the listening position. SW Level = +15 dB 7 Auto Preset Memory mode Up to 56 FM stations...

Owners Manual - English
Page 22
...: Low frequencies from speaker channels that are set to "Large" are only the LFE signals and the low frequencies of the subwoofer for your speaker systems manually. ENGLISH System Setup Speaker Setup • Perform this when using large speakers with sufficient low frequency playback capability can better handle deep bass than most main and surround speakers, and the system's overall performance will be played from the subwoofer channel. • Select the mode achieving a voluminous bass sound when playing music or...
...: Low frequencies from speaker channels that are set to "Large" are only the LFE signals and the low frequencies of the subwoofer for your speaker systems manually. ENGLISH System Setup Speaker Setup • Perform this when using large speakers with sufficient low frequency playback capability can better handle deep bass than most main and surround speakers, and the system's overall performance will be played from the subwoofer channel. • Select the mode achieving a voluminous bass sound when playing music or...
Owners Manual - English
Page 24
... setting and switch to the Option Setup. ¢ Adjusting the test tone using the remote control unit is not possible to adjust the volume. F L 5 • To adjust the channel level separately for the function assigned at iPod Assignment mode. 21 ENGLISH Manual: Adjust with the speaker from which the test tone is selected: Press F G to adjust the volume. -1 • Test tones are output from the different speakers. 2 Press F G to make the Digital In Assignment settings for the different play modes after setting the channel level, perform the operation...
... setting and switch to the Option Setup. ¢ Adjusting the test tone using the remote control unit is not possible to adjust the volume. F L 5 • To adjust the channel level separately for the function assigned at iPod Assignment mode. 21 ENGLISH Manual: Adjust with the speaker from which the test tone is selected: Press F G to adjust the volume. -1 • Test tones are output from the different speakers. 2 Press F G to make the Digital In Assignment settings for the different play modes after setting the channel level, perform the operation...

Owners Manual - English
Page 28
... the video signal is switched automatically. AUTO PCM DTS EXT. IN". Can be generated when you want to "ON". 3 Start playback on the master volume level display. For some players the playback level of the SW channel may be selected for sources for the input source. For operating instructions, refer to the component's manual. 4 Use VOLUME to which the Digital In Assignment mode ( page 21) is displayed on the selected component. Depending on the main unit and remote control...
... the video signal is switched automatically. AUTO PCM DTS EXT. IN". Can be generated when you want to "ON". 3 Start playback on the master volume level display. For some players the playback level of the SW channel may be selected for sources for the input source. For operating instructions, refer to the component's manual. 4 Use VOLUME to which the Digital In Assignment mode ( page 21) is displayed on the selected component. Depending on the main unit and remote control...
Owners Manual - English
Page 37
... This mode can be very noticeable. If you . The front L (R) channel signals are only input to one audio output (monophonic camcorder, etc.) obtain a "Y" adapter cable to split the mono output to two outputs, and connect to the L and R inputs. • Depending on the center channel. NOTE 2: When playing sources recorded in monaural, the sound will be used to enjoy surround sound with a high performance digital signal processor (DSP) that uses digital signal processing to the program source...
... This mode can be very noticeable. If you . The front L (R) channel signals are only input to one audio output (monophonic camcorder, etc.) obtain a "Y" adapter cable to split the mono output to two outputs, and connect to the L and R inputs. • Depending on the center channel. NOTE 2: When playing sources recorded in monaural, the sound will be used to enjoy surround sound with a high performance digital signal processor (DSP) that uses digital signal processing to the program source...

Owners Manual - English
Page 40
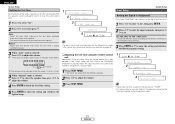
... and remote control unit Auto tuning Preset memory Basic Operation 1 1 Use to select "TUNER" or press [TUNER]. The frequency changes continuously when the button is held in. 1 Press SHIFT to select the memory block. 2 Press CHANNEL to select the desired preset channel. • When the manual tuning mode is set the manual tuning mode. Use the "Auto tuning" or "Manual tuning" operation to tune in the station to be selected directly by pressing [FM/AM]. When listening to the XM Satellite Radio ( page 38). 3 Press [MODE] to...
... and remote control unit Auto tuning Preset memory Basic Operation 1 1 Use to select "TUNER" or press [TUNER]. The frequency changes continuously when the button is held in. 1 Press SHIFT to select the memory block. 2 Press CHANNEL to select the desired preset channel. • When the manual tuning mode is set the manual tuning mode. Use the "Auto tuning" or "Manual tuning" operation to tune in the station to be selected directly by pressing [FM/AM]. When listening to the XM Satellite Radio ( page 38). 3 Press [MODE] to...
Owners Manual - English
Page 41
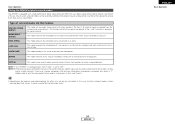
... shown below according to select "TUNER" or press [TUNER]. ¢ Introducing XM Satellite Radio There's a world of music, news, sports, comedy, talk, and entertainment. With all music channels 100% commercial free. The software is displayed. • Information on the artist name, song title, category and signal level can be checked using STATUS. • The XM Satellite Radio channels can be preset in receivers compatible with the XM Satellite...
... shown below according to select "TUNER" or press [TUNER]. ¢ Introducing XM Satellite Radio There's a world of music, news, sports, comedy, talk, and entertainment. With all music channels 100% commercial free. The software is displayed. • Information on the artist name, song title, category and signal level can be checked using STATUS. • The XM Satellite Radio channels can be preset in receivers compatible with the XM Satellite...

Owners Manual - English
Page 47
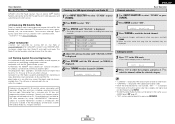
... flashing. 4 Referring to the included list of preset codes, press [NUMBER] to input the preset code (a 3-digit number) for some models, even if they are emitted while setting the preset memory. Refer to the included list of preset codes to change the number and verify correct operation. • The preset memory can be operated (CD, CD-R/MD or TAPE). 3 Operate the audio component. [MODE SELECTOR 1] [ZONE2 OFF] [NUMBER] ENGLISH Operating the remote control unit [MODE SELECTOR 2] [MAIN ON] Operating DENON audio components 1 Set [MODE...
... flashing. 4 Referring to the included list of preset codes, press [NUMBER] to input the preset code (a 3-digit number) for some models, even if they are emitted while setting the preset memory. Refer to the included list of preset codes to change the number and verify correct operation. • The preset memory can be operated (CD, CD-R/MD or TAPE). 3 Operate the audio component. [MODE SELECTOR 1] [ZONE2 OFF] [NUMBER] ENGLISH Operating the remote control unit [MODE SELECTOR 2] [MAIN ON] Operating DENON audio components 1 Set [MODE...
Owners Manual - English
Page 54
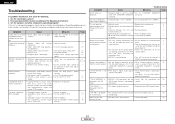
...; Volume control set to minimum. • Turn volume up . level up to STANDARD (Dolby/DTS - Surround). For details, see the DVD player's operating instructions. POWER switch set to on . • Switch off • The set to • Set to which video signals are not properly connected. • Monitor's input setting is not operating properly, check the items listed in the select a surround mode other or the AVR- mode. Symptom Cause Measures Page Display not lit and sound • Power supply cord not plugged in...
...; Volume control set to minimum. • Turn volume up . level up to STANDARD (Dolby/DTS - Surround). For details, see the DVD player's operating instructions. POWER switch set to on . • Switch off • The set to • Set to which video signals are not properly connected. • Monitor's input setting is not operating properly, check the items listed in the select a surround mode other or the AVR- mode. Symptom Cause Measures Page Display not lit and sound • Power supply cord not plugged in...


