
Owners Manual - English
Page 3
...the ventilation holes. • Never disassemble or modify the apparatus in contact with the instructions, may void your authority, granted by DENON may cause harmful interference to provide reasonable protection against harmful interference in a rack. These limits are designed to radio communications. Allow ... by turning the product OFF and ON, the user is encouraged to try to which the receiver is no guarantee that may not cause harmful interference, and (2) this manual, meets FCC requirements. This Class B digital apparatus complies with Part 15 of the FCC Rules...
...the ventilation holes. • Never disassemble or modify the apparatus in contact with the instructions, may void your authority, granted by DENON may cause harmful interference to provide reasonable protection against harmful interference in a rack. These limits are designed to radio communications. Allow ... by turning the product OFF and ON, the user is encouraged to try to which the receiver is no guarantee that may not cause harmful interference, and (2) this manual, meets FCC requirements. This Class B digital apparatus complies with Part 15 of the FCC Rules...

Owners Manual - English
Page 4
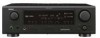
...control unit 5, 6 Easy Setup Procedure Easy to music in the Browse mode 34 Viewing still pictures and videos (only for choosing the DENON AVR-687 AV Surround Receiver. As this product is provided with an immense array of features, we recommend that before proceeding. IN) terminals 14 Connecting a CD ... source 36 Recording the program source (recording the source currently being monitored 37 About the memory functions 37 Initialization of this manual before you begin hookup and operation that you for iPods equipped with the desired image (VIDEO SELECT function 33 Personal memory ...
...control unit 5, 6 Easy Setup Procedure Easy to music in the Browse mode 34 Viewing still pictures and videos (only for choosing the DENON AVR-687 AV Surround Receiver. As this product is provided with an immense array of features, we recommend that before proceeding. IN) terminals 14 Connecting a CD ... source 36 Recording the program source (recording the source currently being monitored 37 About the memory functions 37 Initialization of this manual before you begin hookup and operation that you for iPods equipped with the desired image (VIDEO SELECT function 33 Personal memory ...

Owners Manual - English
Page 5
...Setup 46 Setting the Distance 46, 47 Setting the Crossover Frequency 47 Setting the Test Tone 47 Operating the remote control unit Operating DENON audio components 48 Setting the preset memory function 48 Operating a component stored in a safe place. Check once again that all other...Store these instructions may result in use. • Before turning the power operation button on using mobile phones. After reading, store this manual 2 ENGLISH IN Subwoofer Level 42 Setting the Auto Preset Memory 43 Option Setup Setting the Power Amplifier Assignment 43 Setting the Volume Control ...
...Setup 46 Setting the Distance 46, 47 Setting the Crossover Frequency 47 Setting the Test Tone 47 Operating the remote control unit Operating DENON audio components 48 Setting the preset memory function 48 Operating a component stored in a safe place. Check once again that all other...Store these instructions may result in use. • Before turning the power operation button on using mobile phones. After reading, store this manual 2 ENGLISH IN Subwoofer Level 42 Setting the Auto Preset Memory 43 Option Setup Setting the Power Amplifier Assignment 43 Setting the Volume Control ...

Owners Manual - English
Page 10
...and loudspeakers you are using. • To set the sound field manually ( page 45 ~ 47). ENGLISH Easy Setup Procedure • This section contains the basic steps necessary to configure the AVR-687 according to setup flow Speaker layout [Basic layout] Example of basic ... back speaker Placing the speakers. Surround speaker Play a DVD. 7 ENGLISH Connecting a microphone ( page 10). Connect the AVR-687's monitor output terminal to the AVR-687. The measurement of the speakers in the memory. Auto setup flow Connecting the speakers. Store the measurement result in the ...
...and loudspeakers you are using. • To set the sound field manually ( page 45 ~ 47). ENGLISH Easy Setup Procedure • This section contains the basic steps necessary to configure the AVR-687 according to setup flow Speaker layout [Basic layout] Example of basic ... back speaker Placing the speakers. Surround speaker Play a DVD. 7 ENGLISH Connecting a microphone ( page 10). Connect the AVR-687's monitor output terminal to the AVR-687. The measurement of the speakers in the memory. Auto setup flow Connecting the speakers. Store the measurement result in the ...

Owners Manual - English
Page 12
...). Monitor H COMPONENT VIDEO IN Y PB PR G S VIDEO IN F VIDEO IN • The component video input and/or output terminals may be assigned. Check the owner's manuals for further information. DVD player H COMPONENT VIDEO OUT Y PB PR G S VIDEO OUT F VIDEO OUT D OPTICAL OUT A AUDIO OUT L L L R R R Easy ... page 13). • To connect the digital audio output from the DVD player, you can choose from the DVD player to the AVR-687, you choose to use the coaxial connection, it needs to your monitor does not have component video inputs. S-Video and composite video ...
...). Monitor H COMPONENT VIDEO IN Y PB PR G S VIDEO IN F VIDEO IN • The component video input and/or output terminals may be assigned. Check the owner's manuals for further information. DVD player H COMPONENT VIDEO OUT Y PB PR G S VIDEO OUT F VIDEO OUT D OPTICAL OUT A AUDIO OUT L L L R R R Easy ... page 13). • To connect the digital audio output from the DVD player, you can choose from the DVD player to the AVR-687, you choose to use the coaxial connection, it needs to your monitor does not have component video inputs. S-Video and composite video ...

Owners Manual - English
Page 13
...Procedure D H F G [ON/SOURCE] [MODE SELECTOR 1] D H F G ENGLISH Easy Setup Procedure Auto Setup w Before performing the Auto Setup procedure The AVR-687's auto setup use the attached microphone to measure the acoustic properties in the room and automatically make the optimum settings. • To make the sound... field settings manually ( page 45 ~ 47). 1 Turn on your monitor. 3 Press . ¢ ON: The power indicator lights red. £ OFF:...
...Procedure D H F G [ON/SOURCE] [MODE SELECTOR 1] D H F G ENGLISH Easy Setup Procedure Auto Setup w Before performing the Auto Setup procedure The AVR-687's auto setup use the attached microphone to measure the acoustic properties in the room and automatically make the optimum settings. • To make the sound... field settings manually ( page 45 ~ 47). 1 Turn on your monitor. 3 Press . ¢ ON: The power indicator lights red. £ OFF:...

Owners Manual - English
Page 22
... mode. • To use the EXT. ANALOG (exclusive analog audio signal playback mode) and EXT. For operating instructions, refer to the component's manual. 4 Use VOLUME to adjust the volume. • The volume level is set to the analog input terminals is made. PCM (exclusive PCM signal...MODE. If so, set . • The INPUT mode indicator lights. Can be adjusted between the range of input signal is detected and the AVR-687's surround mode is switched automatically. IN". For some players the playback level of the SW channel may be played. About the button names in this...
... mode. • To use the EXT. ANALOG (exclusive analog audio signal playback mode) and EXT. For operating instructions, refer to the component's manual. 4 Use VOLUME to adjust the volume. • The volume level is set to the analog input terminals is made. PCM (exclusive PCM signal...MODE. If so, set . • The INPUT mode indicator lights. Can be adjusted between the range of input signal is detected and the AVR-687's surround mode is switched automatically. IN". For some players the playback level of the SW channel may be played. About the button names in this...

Owners Manual - English
Page 33
...3 TONE DEF. ON". OFF ´ -12.0 dB ´ +12.0 dB Basic Operation Listening to "AUDIO". Can be turned off the unit using the manual "Preset memory" operation. • To interrupt this button is tuned in order at preset channels A1 to A8, B1 to B8, C1 to C8, D1... is completed. 1 ROOM SIZE MED 2 TONE DEF. In the direct mode, "TONE" cannot be preset automatically due to poor reception, use the "Manual tuning" operation to adjust the volume. Subsequent stations are automatically stored in after the auto preset memory operation is stored in the preset memory. 1 Switch...
...3 TONE DEF. ON". OFF ´ -12.0 dB ´ +12.0 dB Basic Operation Listening to "AUDIO". Can be turned off the unit using the manual "Preset memory" operation. • To interrupt this button is tuned in order at preset channels A1 to A8, B1 to B8, C1 to C8, D1... is completed. 1 ROOM SIZE MED 2 TONE DEF. In the direct mode, "TONE" cannot be preset automatically due to poor reception, use the "Manual tuning" operation to adjust the volume. Subsequent stations are automatically stored in after the auto preset memory operation is stored in the preset memory. 1 Switch...

Owners Manual - English
Page 34
...1 Press SHIFT to select the memory block. 2 Press CHANNEL to select the desired preset channel. • When the manual tuning mode is set, FM stereo broadcasts are received in monaural and the "STEREO" indicator turns off . 4 Press TUNING. ENGLISH Basic Operation BAND SHIFT CHANNEL TUNING STATUS ... that the display's "AUTO" indicator turns off . • "AM" or "FM" can also be selected directly by pressing [FM/AM]. 31 ENGLISH Manual tuning • To preset other channels, repeat steps 2 to set the auto tuning mode. • The "AUTO" indicator lights. 4 Press TUNING. •...
...1 Press SHIFT to select the memory block. 2 Press CHANNEL to select the desired preset channel. • When the manual tuning mode is set, FM stereo broadcasts are received in monaural and the "STEREO" indicator turns off . 4 Press TUNING. ENGLISH Basic Operation BAND SHIFT CHANNEL TUNING STATUS ... that the display's "AUTO" indicator turns off . • "AM" or "FM" can also be selected directly by pressing [FM/AM]. 31 ENGLISH Manual tuning • To preset other channels, repeat steps 2 to set the auto tuning mode. • The "AUTO" indicator lights. 4 Press TUNING. •...

Owners Manual - English
Page 37
...iPod Assignment" ( page 41). 3 Use INPUT SELECTOR to select the function assigned in step 2. • Display "Remote iPod" on the main unit's display. Manual search: Press and hold in [D H] during playback. • D: Fast reverse • H: Fast forward Track search: Press [D H] during playback, the front...software can be obtained on the Apple Computer website. • With the AVR-687 it may not operate, depending on the type of Apple Computer, Inc., registered in the U.S. NOTE: • DENON will accept no responsibility whatsoever for iPod is possible to display folder names and...
...iPod Assignment" ( page 41). 3 Use INPUT SELECTOR to select the function assigned in step 2. • Display "Remote iPod" on the main unit's display. Manual search: Press and hold in [D H] during playback. • D: Fast reverse • H: Fast forward Track search: Press [D H] during playback, the front...software can be obtained on the Apple Computer website. • With the AVR-687 it may not operate, depending on the type of Apple Computer, Inc., registered in the U.S. NOTE: • DENON will accept no responsibility whatsoever for iPod is possible to display folder names and...

Owners Manual - English
Page 46
Be sure to consult the owner's manual of full range systems can be played by connecting bi-amp compatible speakers to the AVR-687. Front A, Front B: This provides a bi-amp mode for further information before proceeding. AVR-687 Speaker [R] Speaker [L] NOTE: • When making bi-amp connections, be sure to remove the short-circuiting bar included...
Be sure to consult the owner's manual of full range systems can be played by connecting bi-amp compatible speakers to the AVR-687. Front A, Front B: This provides a bi-amp mode for further information before proceeding. AVR-687 Speaker [R] Speaker [L] NOTE: • When making bi-amp connections, be sure to remove the short-circuiting bar included...
Owners Manual - English
Page 48
... to "No", "Front" is no need to make this setting. • Perform this setting if you wish to make the settings for your speaker systems manually. Yes / No: Select "Yes" when a subwoofer is connected, "No" when no speaker is input. The surround mode used for the main (front) and surround speakers...
... to "No", "Front" is no need to make this setting. • Perform this setting if you wish to make the settings for your speaker systems manually. Yes / No: Select "Yes" when a subwoofer is connected, "No" when no speaker is input. The surround mode used for the main (front) and surround speakers...
Owners Manual - English
Page 50
... Press [TEST TONE]. • Test tones are automatically emitted from the subwoofer. Setting the Crossover Frequency Set the frequency (Hz) below . Manual: Adjust with the speaker from which the bass sound of the various speakers so that the sound output from each speaker. Setting the Test Tone... pressed. F L 5 • To adjust the channel level separately for every speaker should be adjusted within the range -12 dB to +12 dB. 3 When "Manual" mode is selected: Press D H to select the speaker, then press F G to -2 adjust the volume. 4 Press ENTER to finish the Test Tone setting....
... Press [TEST TONE]. • Test tones are automatically emitted from the subwoofer. Setting the Crossover Frequency Set the frequency (Hz) below . Manual: Adjust with the speaker from which the bass sound of the various speakers so that the sound output from each speaker. Setting the Test Tone... pressed. F L 5 • To adjust the channel level separately for every speaker should be adjusted within the range -12 dB to +12 dB. 3 When "Manual" mode is selected: Press D H to select the speaker, then press F G to -2 adjust the volume. 4 Press ENTER to finish the Test Tone setting....
Owners Manual - English
Page 51
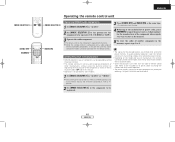
...operation, cover the remote control unit's transmitting window while setting the preset memory. • Depending on the model and year of manufacture, this manual). • Operation is compatible with this remote control. 3 Press [ZONE2 OFF] and [MAIN ON] at the same time. • ... 3 Operate the audio component. [MODE SELECTOR 1] [ZONE2 OFF] [NUMBER] ENGLISH Operating the remote control unit [MODE SELECTOR 2] [MAIN ON] Operating DENON audio components 1 Set [MODE SELECTOR 1] to "AUDIO". 2 Set [MODE SELECTOR 2] to the position for the component to be registered. 48 ENGLISH ...
...operation, cover the remote control unit's transmitting window while setting the preset memory. • Depending on the model and year of manufacture, this manual). • Operation is compatible with this remote control. 3 Press [ZONE2 OFF] and [MAIN ON] at the same time. • ... 3 Operate the audio component. [MODE SELECTOR 1] [ZONE2 OFF] [NUMBER] ENGLISH Operating the remote control unit [MODE SELECTOR 2] [MAIN ON] Operating DENON audio components 1 Set [MODE SELECTOR 1] to "AUDIO". 2 Set [MODE SELECTOR 2] to the position for the component to be registered. 48 ENGLISH ...

Owners Manual - English
Page 54
...- Tuning Tuning Tuning Tuning Volume control - MEMORY / SUBTITLE Preset memory Preset memory Preset memory Preset memory Subtitle - DENON (111) - Cursor operation - - When a new code is preset, the previous code is only possible to ... Menu - Cursor operation - ENTER - - - - Display selection - Volume control - MODE / MENU Auto/Manual switching Auto/Manual switching Auto/Manual switching Auto/Manual switching Menu - DENON (111) q - - Volume control - - Audio - DHFG - - - - Enter - Cursor operation Cursor operation - -...
...- Tuning Tuning Tuning Tuning Volume control - MEMORY / SUBTITLE Preset memory Preset memory Preset memory Preset memory Subtitle - DENON (111) - Cursor operation - - When a new code is preset, the previous code is only possible to ... Menu - Cursor operation - ENTER - - - - Display selection - Volume control - MODE / MENU Auto/Manual switching Auto/Manual switching Auto/Manual switching Auto/Manual switching Menu - DENON (111) q - - Volume control - - Audio - DHFG - - - - Enter - Cursor operation Cursor operation - -...


