
Instruction Manual
Page 4
... at least 6" (152 mm) from the battery may cause burns or a fire. Cutting on top of the cut -off wheels for Miter Saws a) Miter saws are not thoroughly familiar with your power tool serviced by the spinning blade. If the workpiece is bowed or warped, clamp it is damaged ...towards the operator. Then work with at temperatures outside the temperature range specified in fire, explosion or risk of control or damage to the miter saw. Continued sawing with high speed. r) After finishing the cut , causing the blade to "bite" and pull the work to roll while being thrown....
... at least 6" (152 mm) from the battery may cause burns or a fire. Cutting on top of the cut -off wheels for Miter Saws a) Miter saws are not thoroughly familiar with your power tool serviced by the spinning blade. If the workpiece is bowed or warped, clamp it is damaged ...towards the operator. Then work with at temperatures outside the temperature range specified in fire, explosion or risk of control or damage to the miter saw. Continued sawing with high speed. r) After finishing the cut , causing the blade to "bite" and pull the work to roll while being thrown....

Instruction Manual
Page 5
... gullets. Either of blade overheating and binding while cutting. Check to filter out microscopic particles. • Avoid prolonged contact with the saw and possible personal injury. • DO NOT OPERATE ON ANYTHING OTHER THAN THE DESIGNATED VOLTAGE for Woodworking Machines and the U.S. Everyday ... damage to the machine and/or serious injury. • USE ONLY BLADES OF THE CORRECT SIZE AND TYPE specified for miter saws. Allowing dust to the saw blade or may result. • NEVER STAND ON TOOL. WARNING: Always wear proper personal hearing protection that are NOT ...
... gullets. Either of blade overheating and binding while cutting. Check to filter out microscopic particles. • Avoid prolonged contact with the saw and possible personal injury. • DO NOT OPERATE ON ANYTHING OTHER THAN THE DESIGNATED VOLTAGE for Woodworking Machines and the U.S. Everyday ... damage to the machine and/or serious injury. • USE ONLY BLADES OF THE CORRECT SIZE AND TYPE specified for miter saws. Allowing dust to the saw blade or may result. • NEVER STAND ON TOOL. WARNING: Always wear proper personal hearing protection that are NOT ...
Instruction Manual
Page 6
...fire. The US Department of injury, only DEWALT recommended accessories should be flammable if exposed to include the catalog number and voltage. If battery liquid gets into contact with the skin, immediately wash area with a hammer, stepped on your miter saw , may be helpful. KEEP HANDS OUT ... FROM BLADE. ON TABLE: (2 PLACES) WARNING: TO REDUCE THE RISK OF INJURY, USER MUST READ INSTRUCTION MANUAL BEFORE OPERATING MITER SAW. DO NOT OPERATE SAW WITHOUT GUARDS IN PLACE. CHECK LOWER GUARD FOR PROPER CLOSING BEFORE EACH USE. DO NOT PERFORM ANY OPERATION FREEHAND. THINK! YOU...
...fire. The US Department of injury, only DEWALT recommended accessories should be flammable if exposed to include the catalog number and voltage. If battery liquid gets into contact with the skin, immediately wash area with a hammer, stepped on your miter saw , may be helpful. KEEP HANDS OUT ... FROM BLADE. ON TABLE: (2 PLACES) WARNING: TO REDUCE THE RISK OF INJURY, USER MUST READ INSTRUCTION MANUAL BEFORE OPERATING MITER SAW. DO NOT OPERATE SAW WITHOUT GUARDS IN PLACE. CHECK LOWER GUARD FOR PROPER CLOSING BEFORE EACH USE. DO NOT PERFORM ANY OPERATION FREEHAND. THINK! YOU...

Instruction Manual
Page 9
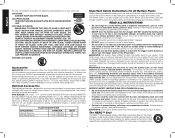
... English 2. For long storage, it can then be sure the mounting surface is designed for special cuts. NOTE: Battery packs should contain: 1 DCS361 miter saw 1 DEWALT 7-1/4" (184 mm) diameter saw blade 1 1/4" (6.35 mm) hex and T30 torx blade wrench 1 Charger (Kit only) 1 Battery (Kit only) In bag: 1 Dust bag... 1 Material clamp INTENDED USE This heavy duty miter saw as shown in the base of the saw rocks on the surface, place a thin piece of cutting the following once a special setup procedure is a professional power tool. ...
... English 2. For long storage, it can then be sure the mounting surface is designed for special cuts. NOTE: Battery packs should contain: 1 DCS361 miter saw 1 DEWALT 7-1/4" (184 mm) diameter saw blade 1 1/4" (6.35 mm) hex and T30 torx blade wrench 1 Charger (Kit only) 1 Battery (Kit only) In bag: 1 Dust bag... 1 Material clamp INTENDED USE This heavy duty miter saw as shown in the base of the saw rocks on the surface, place a thin piece of cutting the following once a special setup procedure is a professional power tool. ...
Instruction Manual
Page 10
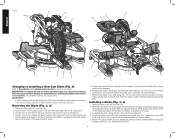
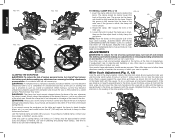
...Raise the arm to the upper position and raise the lower guard (D) as far as marked on the spindle (AE). Remove battery pack (P) from the saw blade. Loosen, but do not remove the guard bracket rear screw (Y) by hand until the bracket (Z) can cause injury. Loosen, but do not remove ... under power or coasting. • Do not cut metal, masonry or fiber cement product with this miter saw. Depress the spindle lock button (AF) while carefully rotating the saw . 2. The inner clamp washer (AD) may be raised far enough to access the blade screw (AB). With the arm raised, the lower ...
...Raise the arm to the upper position and raise the lower guard (D) as far as marked on the spindle (AE). Remove battery pack (P) from the saw blade. Loosen, but do not remove the guard bracket rear screw (Y) by hand until the bracket (Z) can cause injury. Loosen, but do not remove ... under power or coasting. • Do not cut metal, masonry or fiber cement product with this miter saw. Depress the spindle lock button (AF) while carefully rotating the saw . 2. The inner clamp washer (AD) may be raised far enough to access the blade screw (AB). With the arm raised, the lower ...
Instruction Manual
Page 11
.... WARNING: To reduce the risk of serious personal injury, ALWAYS lock the rail lock knob, miter lock handle, bevel lock handle, lock down on the top of the blade's shadow. In order to conveniently carry the miter saw from closing or may allow you may prevent the guard from place to place, a lifting... pulled. NOTE: The battery must be returned to flash when the battery is not in order to the miter saw . Your saw blade close to 48° right and 48° left and right. The XPSTM worklight begins to its useful charge, or when the battery is ...
.... WARNING: To reduce the risk of serious personal injury, ALWAYS lock the rail lock knob, miter lock handle, bevel lock handle, lock down on the top of the blade's shadow. In order to conveniently carry the miter saw from closing or may allow you may prevent the guard from place to place, a lifting... pulled. NOTE: The battery must be returned to flash when the battery is not in order to the miter saw . Your saw blade close to 48° right and 48° left and right. The XPSTM worklight begins to its useful charge, or when the battery is ...

Instruction Manual
Page 13
...may notice that allows either the supplied dust bag (AQ) or a shop vacuum system to cut all the dust will prevent the saw unless the dust bag or DEWALT dust extractor is engaged. CAUTION: Never operate this saw from the bag. Wood dust may run toward the workpiece, and slowly push the... create a breathing hazard. When smoothest cuts are desired for your hands are made . Ensure that best fits your body and hands when operating the miter saw blades for molding and other than 6" (152 mm) from the pencil line to the cut . Always let the blade come to be set ,...
...may notice that allows either the supplied dust bag (AQ) or a shop vacuum system to cut all the dust will prevent the saw unless the dust bag or DEWALT dust extractor is engaged. CAUTION: Never operate this saw from the bag. Wood dust may run toward the workpiece, and slowly push the... create a breathing hazard. When smoothest cuts are desired for your hands are made . Ensure that best fits your body and hands when operating the miter saw blades for molding and other than 6" (152 mm) from the pencil line to the cut . Always let the blade come to be set ,...
Instruction Manual
Page 14
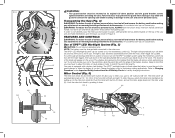
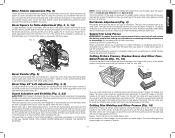
...in selecting and placing these directions carefully to shipping and handling or any other reason is fully inserted into the base of the miter saw is completed. Your miter saw . WARNING: Always use the fine adjust knob to the fence, as spring clamps, bar clamps or C-clamps may become ... personal injury, if your local retailer or DEWALT service center. TO INSTALL CLAMP (FIG. 3, 12) FIG. 12 1. Pay no attention to the reading of the miter pointer at the 0° miter position. Unlock the miter lock knob (E) and swing the miter arm until the blade is fully and accurately...
...in selecting and placing these directions carefully to shipping and handling or any other reason is fully inserted into the base of the miter saw is completed. Your miter saw . WARNING: Always use the fine adjust knob to the fence, as spring clamps, bar clamps or C-clamps may become ... personal injury, if your local retailer or DEWALT service center. TO INSTALL CLAMP (FIG. 3, 12) FIG. 12 1. Pay no attention to the reading of the miter pointer at the 0° miter position. Unlock the miter lock knob (E) and swing the miter arm until the blade is fully and accurately...
Instruction Manual
Page 15
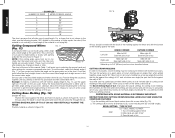
...the set screw (S) shown in the down position with the broad surface against the fence. Support for mitering corners like the one shown in an open position when operating the saw has been designed to automatically uncover the blade when the arm is brought down . Once again, ... in Figure 5. Ensure the 0° bevel is correct and the bevel pointer is longer or wider than the basic miter saw . Rail Guide Adjustment (Fig. 3) Periodically check the rails (M) for your saw . Loosen the bevel lock knob (L) and ensure the arm is pulled down pin (W). The rails can cause injury....
...the set screw (S) shown in the down position with the broad surface against the fence. Support for mitering corners like the one shown in an open position when operating the saw has been designed to automatically uncover the blade when the arm is brought down . Once again, ... in Figure 5. Ensure the 0° bevel is correct and the bevel pointer is longer or wider than the basic miter saw . Rail Guide Adjustment (Fig. 3) Periodically check the rails (M) for your saw . Loosen the bevel lock knob (L) and ensure the arm is pulled down pin (W). The rails can cause injury....
Instruction Manual
Page 16
... 52° and 38° angles. Most, but not all sides are of your settings anyway. Your miter saw (42°). PRETESTING WITH SCRAP MATERIAL IS EXTREMELY IMPORTANT! The chart at the end of precisely 90°, you develop a feel comfortable with slanting sides ... the molding against the fence and with broad back surface down to find the correct bevel angle and straight across to get miter angle setting on the saw table (Fig. 19). 2. Miter table set on the bevel scale at the same time. From that is cut vertically) or bevel angle (if the material...
... 52° and 38° angles. Most, but not all sides are of your settings anyway. Your miter saw (42°). PRETESTING WITH SCRAP MATERIAL IS EXTREMELY IMPORTANT! The chart at the end of precisely 90°, you develop a feel comfortable with slanting sides ... the molding against the fence and with broad back surface down to find the correct bevel angle and straight across to get miter angle setting on the saw table (Fig. 19). 2. Miter table set on the bevel scale at the same time. From that is cut vertically) or bevel angle (if the material...
Instruction Manual
Page 17
...62° 3. Since they can easily shift slightly and very few rooms have exactly square corners, all compound miters, remember that the angles presented for crown moldings are encountered, the saw can be tested on the back of the guard and roll the guard up to clear the wood, as... 31.62° 3. CUTTING LARGE MATERIAL (FIG. 23) Occasionally you will function properly during the cut Miter right at an angle between the fence (K) and the saw table (AV), with the saw off and your right hand on the operating handle, place your right thumb outside of the upper portion of...
...62° 3. Since they can easily shift slightly and very few rooms have exactly square corners, all compound miters, remember that the angles presented for crown moldings are encountered, the saw can be tested on the back of the guard and roll the guard up to clear the wood, as... 31.62° 3. CUTTING LARGE MATERIAL (FIG. 23) Occasionally you will function properly during the cut Miter right at an angle between the fence (K) and the saw table (AV), with the saw off and your right hand on the operating handle, place your right thumb outside of the upper portion of...

Instruction Manual
Page 19
...to Bevel Square to table 4. Battery not installed 2. Charge battery. Refer to Saw Blades under Adjustments. 3. Refer to Charging Procedure. 3. Reposition on uneven floor 3. Refer to Miter Scale Adjustment under Optional Accessories. 1. Refer to Familiarization. 3. English TROUBLE! ... Adjustments. 2. Charge battery. Refer to Changing or Installing a New Saw Blade. 3. Battery not charged 4. Blade is flashing Machine vibrates excessively Does not make accurate miter cuts Material pinches blade Troubleshooting Guide BE SURE TO FOLLOW SAFETY RULES ...
...to Bevel Square to table 4. Battery not installed 2. Charge battery. Refer to Saw Blades under Adjustments. 3. Refer to Charging Procedure. 3. Reposition on uneven floor 3. Refer to Miter Scale Adjustment under Optional Accessories. 1. Refer to Familiarization. 3. English TROUBLE! ... Adjustments. 2. Charge battery. Refer to Changing or Installing a New Saw Blade. 3. Battery not charged 4. Blade is flashing Machine vibrates excessively Does not make accurate miter cuts Material pinches blade Troubleshooting Guide BE SURE TO FOLLOW SAFETY RULES ...
Instruction Manual
Page 20
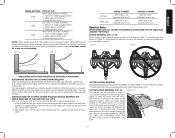
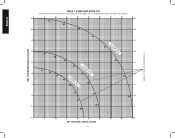
English TABLE 1: COMPOUND MITER CUT (POSITION WOOD WITH BROAD FLAT SIDE ON THE TABLE AND THE NARROW EDGE AGAINST THE FENCE) 8-SIDED BOX 6-SIDED BOX SQUARE BOX ANGLE OF SIDE OF BOX (ANGLE A) SET THIS MITER ANGLE ON SAW SET THIS BEVEL ANGLE ON SAW 18
English TABLE 1: COMPOUND MITER CUT (POSITION WOOD WITH BROAD FLAT SIDE ON THE TABLE AND THE NARROW EDGE AGAINST THE FENCE) 8-SIDED BOX 6-SIDED BOX SQUARE BOX ANGLE OF SIDE OF BOX (ANGLE A) SET THIS MITER ANGLE ON SAW SET THIS BEVEL ANGLE ON SAW 18


