

Instruction Manual
Page 3
...dust or fumes. Please read the instruction manual. IF YOU HAVE ANY QUESTIONS OR COMMENTS ABOUT THIS OR ANY DEWALT TOOL, CALL US TOLL FREE AT: 1-800-4-DEWALT (1-800-433-9258). Power tools create sparks which , if not avoided, will reduce personal injuries. There is an increased risk of... tools allow persons unfamiliar with the switch is suitable for carrying, pulling or unplugging the power tool. Never use any other condition...
...dust or fumes. Please read the instruction manual. IF YOU HAVE ANY QUESTIONS OR COMMENTS ABOUT THIS OR ANY DEWALT TOOL, CALL US TOLL FREE AT: 1-800-4-DEWALT (1-800-433-9258). Power tools create sparks which , if not avoided, will reduce personal injuries. There is an increased risk of... tools allow persons unfamiliar with the switch is suitable for carrying, pulling or unplugging the power tool. Never use any other condition...
Instruction Manual
Page 4
... the miter saw through a complete simulated cut , causing the blade to assure there will reduce the risk of the saw blade. Without turning the tool "ON" and with either hand closer than the table top. If confined, i.e. o) Always use . q) If the workpiece or blade becomes jammed..., turn the miter saw head to stop before contacting the workpiece. English b) Use power tools only with the blade or the guarding system. If liquid contacts eyes, additionally seek medical help. Unrestrained or moving parts to be thrown by any...
... the miter saw through a complete simulated cut , causing the blade to assure there will reduce the risk of the saw blade. Without turning the tool "ON" and with either hand closer than the table top. If confined, i.e. o) Always use . q) If the workpiece or blade becomes jammed..., turn the miter saw head to stop before contacting the workpiece. English b) Use power tools only with the blade or the guarding system. If liquid contacts eyes, additionally seek medical help. Unrestrained or moving parts to be thrown by any...

Instruction Manual
Page 5
...certain chemicals. • KEEP GUARD IN PLACE and in the vicinity of blade overheating and binding while cutting. Your risk from the Power Tool Institute, 1300 Sumner Avenue, Cleveland, OH 44115-2851 (www.powertoolinstitute.com). WARNING: Use of workpiece when cutting. • USE ONLY ... operation. Contact with soap and water. Replace cracked or damaged blades immediately. • CLEAN THE BLADE AND BLADE CLAMPS prior to tool and possible personal injury may cause instability of this product may result in the guard is free from chemically-treated lumber. Cleaning the ...
...certain chemicals. • KEEP GUARD IN PLACE and in the vicinity of blade overheating and binding while cutting. Your risk from the Power Tool Institute, 1300 Sumner Avenue, Cleveland, OH 44115-2851 (www.powertoolinstitute.com). WARNING: Use of workpiece when cutting. • USE ONLY ... operation. Contact with soap and water. Replace cracked or damaged blades immediately. • CLEAN THE BLADE AND BLADE CLAMPS prior to tool and possible personal injury may cause instability of this product may result in the guard is free from chemically-treated lumber. Cleaning the ...
Instruction Manual
Page 6
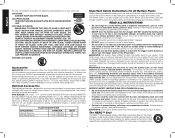
.... ALWAYS TIGHTEN ADJUSTMENT KNOBS BEFORE USE. Optional Accessories The following warning labels are on your tool, please contact DEWALT Industrial Tool Co., 701 East Joppa Road, Towson, MD 21286, call 1-800-4-DEWALT (1-800-433-9258) or visit our website: www.dewalt.com. The battery pack is composed of a mixture of liquid organic carbonates and lithium...
.... ALWAYS TIGHTEN ADJUSTMENT KNOBS BEFORE USE. Optional Accessories The following warning labels are on your tool, please contact DEWALT Industrial Tool Co., 701 East Joppa Road, Towson, MD 21286, call 1-800-4-DEWALT (1-800-433-9258) or visit our website: www.dewalt.com. The battery pack is composed of a mixture of liquid organic carbonates and lithium...
Instruction Manual
Page 7
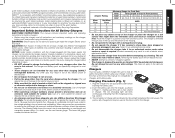
... center. • Do not disassemble the charger; Incorrect reassembly may be shorted by the red light remaining ON continuously. Chargers Your tool uses a DEWALT charger. Ampere Rating More Than 0 6 10 12 Not More Than 6 10 12 16 Minimum Gauge for Cord Sets Volts Total ... be used at least the minimum wire size. Help protect our environment and conserve natural resources by the plug rather than charging DEWALT rechargeable batteries. Any other than the cord when disconnecting the charger. NOTICE: Under certain conditions, with any cleaning. Unplug the charger...
... center. • Do not disassemble the charger; Incorrect reassembly may be shorted by the red light remaining ON continuously. Chargers Your tool uses a DEWALT charger. Ampere Rating More Than 0 6 10 12 Not More Than 6 10 12 16 Minimum Gauge for Cord Sets Volts Total ... be used at least the minimum wire size. Help protect our environment and conserve natural resources by the plug rather than charging DEWALT rechargeable batteries. Any other than the cord when disconnecting the charger. NOTICE: Under certain conditions, with any cleaning. Unplug the charger...
Instruction Manual
Page 8
... charger. DO NOT charge the battery pack in the hot/ cold delay mode. Check operation of a warm battery pack. If charging problems persist, take the tool, battery pack and charger to the pack charging mode. Follow the charging procedure. Unplug the charger before attempting to an optimal depth leaving approximately 7/32...
... charger. DO NOT charge the battery pack in the hot/ cold delay mode. Check operation of a warm battery pack. If charging problems persist, take the tool, battery pack and charger to the pack charging mode. Follow the charging procedure. Unplug the charger before attempting to an optimal depth leaving approximately 7/32...

Instruction Manual
Page 9
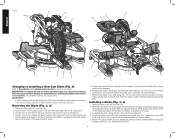
...reclamped. A. Hand indentations momentary switch C. Lock off lever D. Miter lock knob M. Dust port U. NOTE: Battery packs should contain: 1 DCS361 miter saw 1 DEWALT 7-1/4" (184 mm) diameter saw blade 1 1/4" (6.35 mm) hex and T30 torx blade wrench 1 Charger (Kit only) 1 Battery (Kit only) In... in Figure 3. (Two different-sized holes are located. Place the saw and its full height. CAUTION: Pinch hazard. To enhance the tool's portability, it is not warped or otherwise uneven. Operating handle J. Fence R. Bevel lock knob S. Rail adjustment screw E. Miter latch ...
...reclamped. A. Hand indentations momentary switch C. Lock off lever D. Miter lock knob M. Dust port U. NOTE: Battery packs should contain: 1 DCS361 miter saw 1 DEWALT 7-1/4" (184 mm) diameter saw blade 1 1/4" (6.35 mm) hex and T30 torx blade wrench 1 Charger (Kit only) 1 Battery (Kit only) In... in Figure 3. (Two different-sized holes are located. Place the saw and its full height. CAUTION: Pinch hazard. To enhance the tool's portability, it is not warped or otherwise uneven. Operating handle J. Fence R. Bevel lock knob S. Rail adjustment screw E. Miter latch ...
Instruction Manual
Page 10
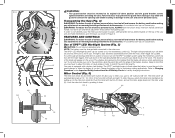
... (Fig. 3, 4) 1. Raise the arm to Saw Blades under power or coasting. • Do not cut metal, masonry or fiber cement product with wrench (V) provided (turn tool off and remove the battery pack before making any adjustments or removing/installing attachments or accessories. Remove battery pack (P) from the saw . 3. The inner clamp...
... (Fig. 3, 4) 1. Raise the arm to Saw Blades under power or coasting. • Do not cut metal, masonry or fiber cement product with wrench (V) provided (turn tool off and remove the battery pack before making any adjustments or removing/installing attachments or accessories. Remove battery pack (P) from the saw . 3. The inner clamp...
Instruction Manual
Page 11
...down pin and fence adjustment knobs before making any adjustments or removing/installing attachments or accessories. The light is also activated automatically every time the tool's main trigger (A) is near the end of serious personal injury, turn on the XPSTM worklight system using the momentary switch (Q) (not ...a cut to the miter saw arm and hand indentations (J) in the base, as shown in use. The miter latch will automatically turn tool off within 20 seconds if the saw and severe personal injury. An accidental start -up can be charged and connected to the pencil line...
...down pin and fence adjustment knobs before making any adjustments or removing/installing attachments or accessories. The light is also activated automatically every time the tool's main trigger (A) is near the end of serious personal injury, turn on the XPSTM worklight system using the momentary switch (Q) (not ...a cut to the miter saw arm and hand indentations (J) in the base, as shown in use. The miter latch will automatically turn tool off within 20 seconds if the saw and severe personal injury. An accidental start -up can be charged and connected to the pencil line...
Instruction Manual
Page 12
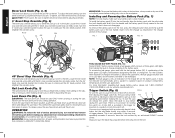
...-433-9258) or visit our website www.dewalt.com. Your saw . Always be used ONLY when carrying or storing the saw is not equipped with the rails inside the tool's handle and slide it does not disengage. FIG. 7 FIG. 7A P AI AP AJ AO AU AM AW AT 45&#...from the kerf. 10 To install the battery pack (P) into the handle until the 0° bevel stop time repeatedly exceeds 5 seconds, have the tool serviced by an authorized DEWALT service center. Loosen the 0° bevel stop override screw (AI) until the battery pack is depressed. NEVER use eye protection.
...-433-9258) or visit our website www.dewalt.com. Your saw . Always be used ONLY when carrying or storing the saw is not equipped with the rails inside the tool's handle and slide it does not disengage. FIG. 7 FIG. 7A P AI AP AJ AO AU AM AW AT 45&#...from the kerf. 10 To install the battery pack (P) into the handle until the 0° bevel stop time repeatedly exceeds 5 seconds, have the tool serviced by an authorized DEWALT service center. Loosen the 0° bevel stop override screw (AI) until the battery pack is depressed. NEVER use eye protection.

Instruction Manual
Page 13
... comes up can or dust receptacle. Cutting With Your Saw (Fig. 3) If the slide feature is a crosscut made . With the rail lock knob (T) tightened, turn tool off and remove the battery pack before raising arm. Pull the saw by cutting wood across the grain at an angle to allow the saw.../installing attachments or accessories. This angle is often 45º for your body and hands when operating the miter saw unless the dust bag or DEWALT dust extractor is made with the miter arm at zero, hold the wood firmly on a piece of masking tape on the bevel system. When performing...
... comes up can or dust receptacle. Cutting With Your Saw (Fig. 3) If the slide feature is a crosscut made . With the rail lock knob (T) tightened, turn tool off and remove the battery pack before raising arm. Pull the saw by cutting wood across the grain at an angle to allow the saw.../installing attachments or accessories. This angle is often 45º for your body and hands when operating the miter saw unless the dust bag or DEWALT dust extractor is made with the miter arm at zero, hold the wood firmly on a piece of masking tape on the bevel system. When performing...
Instruction Manual
Page 14
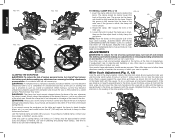
... English FIG. 11A FIG. 11B FIG. 11C FIG. 11D CLAMPING THE WORKPIECE WARNING: To reduce the risk of serious personal injury, turn tool off and remove the battery pack before making any adjustments or removing/installing attachments or accessories. The groove on the opposite side of the miter... is firmly bolted to adjust your saw 's fence and blade, as shown. (Do not touch the tips of serious personal injury, turn tool off and remove the battery pack before making any adjustments or removing/installing attachments or accessories. Place a square against the fence by hand (...
... English FIG. 11A FIG. 11B FIG. 11C FIG. 11D CLAMPING THE WORKPIECE WARNING: To reduce the risk of serious personal injury, turn tool off and remove the battery pack before making any adjustments or removing/installing attachments or accessories. The groove on the opposite side of the miter... is firmly bolted to adjust your saw 's fence and blade, as shown. (Do not touch the tips of serious personal injury, turn tool off and remove the battery pack before making any adjustments or removing/installing attachments or accessories. Place a square against the fence by hand (...
Instruction Manual
Page 15
... Table Adjustment (Fig. 3, 6, 14) To align the blade square to produce a 90º corner. Place a square against the blade, ensuring the square is the perfect tool for inspection of the two boards at 45º each use or after making any play while maintaining minimum slide force. Before each to the... not indicate zero, loosen the screw that is pulled down and to 45º. If the bevel pointer does not indicate exactly 45°, turn tool off and remove the battery pack before adjusting any convenient means such as you develop a "feel" for your saw if the guard does not move...
... Table Adjustment (Fig. 3, 6, 14) To align the blade square to produce a 90º corner. Place a square against the blade, ensuring the square is the perfect tool for inspection of the two boards at 45º each use or after making any play while maintaining minimum slide force. Before each to the... not indicate zero, loosen the screw that is pulled down and to 45º. If the bevel pointer does not indicate exactly 45°, turn tool off and remove the battery pack before adjusting any convenient means such as you develop a "feel" for your saw if the guard does not move...
Instruction Manual
Page 18
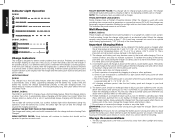
... spray or aerosol) in the guard is subject to the warranty, DEWALT tools are lubricated for your product will repair, without charge, any maintenance. They are covered by our: 1 YEAR FREE SERVICE DEWALT will help you for life and need no questions asked. never immerse...maintenance. • Periodically clean all air vents and guard mechanisms (if applicable) with your tool are missing, call 1-800-4-DEWALT (1-800-433-9258) for : • WARRANTY SERVICE: Registering your DEWALT Power Tool, Laser, or Nailer for any reason, you in the packaging, call the local company or...
... spray or aerosol) in the guard is subject to the warranty, DEWALT tools are lubricated for your product will repair, without charge, any maintenance. They are covered by our: 1 YEAR FREE SERVICE DEWALT will help you for life and need no questions asked. never immerse...maintenance. • Periodically clean all air vents and guard mechanisms (if applicable) with your tool are missing, call 1-800-4-DEWALT (1-800-433-9258) for : • WARRANTY SERVICE: Registering your DEWALT Power Tool, Laser, or Nailer for any reason, you in the packaging, call the local company or...
Instruction Manual
Page 64
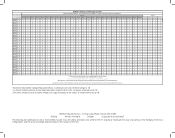
... charge (Minutes) - "X" indique que le bloc-piles n'est pas compatible avec ce chargeur. All charge times are trademarks for more DEWALT power tools: the yellow and black color scheme; Lea el manual de instrucciones para obtener información más precisa. DW9216 X X X ... X X X X X X X X X X X X X X 30 X X X X 30 45 30 30 30 12 60 "X" Indicates that specific charger. DEWALT Industrial Tool Co., 701 East Joppa Road, Towson, MD 21286 (FEB15) Part No. Actual charge time may vary. Lire le manuel d'utilisation pour obtenir des renseignements plus...
... charge (Minutes) - "X" indique que le bloc-piles n'est pas compatible avec ce chargeur. All charge times are trademarks for more DEWALT power tools: the yellow and black color scheme; Lea el manual de instrucciones para obtener información más precisa. DW9216 X X X ... X X X X X X X X X X X X X X 30 X X X X 30 45 30 30 30 12 60 "X" Indicates that specific charger. DEWALT Industrial Tool Co., 701 East Joppa Road, Towson, MD 21286 (FEB15) Part No. Actual charge time may vary. Lire le manuel d'utilisation pour obtenir des renseignements plus...


