Instruction Manual
Page 6
... your hand near flammable materials. b) Never place your side. n) Regularly clean the power tool's air vents. For example, if an abrasive wheel is snagged or pinched by the workpiece, the edge of tool misuse and/or incorrect operating procedures or conditions and can control torque .... Sparks could snag your control. Such blades create frequent kickback and loss of the disc or kickback. 4 The motor's fan will move if kickback occurs. q) Do not use excessively oversized sanding disc paper. r) Always use accessories that is entering into the pinch point can result in...
... your hand near flammable materials. b) Never place your side. n) Regularly clean the power tool's air vents. For example, if an abrasive wheel is snagged or pinched by the workpiece, the edge of tool misuse and/or incorrect operating procedures or conditions and can control torque .... Sparks could snag your control. Such blades create frequent kickback and loss of the disc or kickback. 4 The motor's fan will move if kickback occurs. q) Do not use excessively oversized sanding disc paper. r) Always use accessories that is entering into the pinch point can result in...
Instruction Manual
Page 10
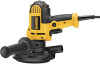
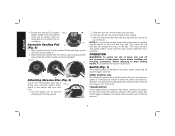
... adjusting or when making repairs. Hold the pad with dust shroud baffles (J). 2. With the other hand, align the holes and place the disc directly on the pad. OPERATION WARNING: To reduce the risk of injury, turn unit off and disconnect it from approx. 0 to 3700...sanding pad (K) onto spindle and rotate counter clockwise until tight. As the trigger is facing upward. 2. Place supplied wrench (I Attaching Abrasive Disc (Fig. 6) Use 5" (127 mm) sanding discs with a 5-hole dust extraction pattern which FIG. 6 attach to increase, but will wear very rapidly if left in either direction...
... adjusting or when making repairs. Hold the pad with dust shroud baffles (J). 2. With the other hand, align the holes and place the disc directly on the pad. OPERATION WARNING: To reduce the risk of injury, turn unit off and disconnect it from approx. 0 to 3700...sanding pad (K) onto spindle and rotate counter clockwise until tight. As the trigger is facing upward. 2. Place supplied wrench (I Attaching Abrasive Disc (Fig. 6) Use 5" (127 mm) sanding discs with a 5-hole dust extraction pattern which FIG. 6 attach to increase, but will wear very rapidly if left in either direction...
