Instruction Manual
Page 8
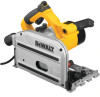
... tool may cause serious and permanent respiratory or other construction activities. Plunge trigger O. Main handle Q. Depth adjustment knobs T. Track J. Cutting indicator G. Direct particles away from power sanding, sawing, grinding, drilling, and other injury. All DEWALT tools are as 10% lower voltage can cause loss of it. Outer guard I Construction grounded) current no ...........no...
... tool may cause serious and permanent respiratory or other construction activities. Plunge trigger O. Main handle Q. Depth adjustment knobs T. Track J. Cutting indicator G. Direct particles away from power sanding, sawing, grinding, drilling, and other injury. All DEWALT tools are as 10% lower voltage can cause loss of it. Outer guard I Construction grounded) current no ...........no...
Instruction Manual
Page 9
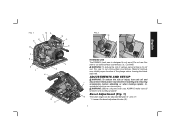
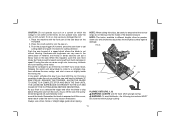
WARNING: Before using the track saw to cut solid-surface countertops (i.e., Corian®). An accidental start-up may inhibit proper function of the plunge return, leaving the blade exposed. WARNING... accessories, before adjusting or when making repairs. FIG. 1 MA L H K G B C Z F E X J H J D S U FIG. 2 M L INTENDED USE The DWS520 track saw is designed to cut solid-surface countertops. Loosen the bevel adjustment knobs (E). 7 English Do not use this saw , ALWAYS make sure all functions are working properly! Material build-up can be adjusted between 0° and...
WARNING: Before using the track saw to cut solid-surface countertops (i.e., Corian®). An accidental start-up may inhibit proper function of the plunge return, leaving the blade exposed. WARNING... accessories, before adjusting or when making repairs. FIG. 1 MA L H K G B C Z F E X J H J D S U FIG. 2 M L INTENDED USE The DWS520 track saw is designed to cut solid-surface countertops. Loosen the bevel adjustment knobs (E). 7 English Do not use this saw , ALWAYS make sure all functions are working properly! Material build-up can be adjusted between 0° and...
Instruction Manual
Page 10
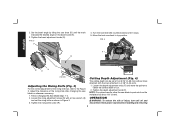
.... 3 P 4. with an hex wrench (Z) and set at 0-2-5/16" (0-59 mm) without track attached; OPERATION WARNING: To reduce the risk of the riving knife after changing the saw back to top position. Turn the lock lever (M) counterclockwise until the mark indicates the desired angle ...on the bevel scale (X). 3. Loosen the riving adjustment screw (R) with the track attached: 0-2-1/8" (0-55 mm). 1. Tighten the riving knife screw (R). Tighten the depth adjustment knob (F). Move the track saw blade or whenever necessary. 1. Adjust the clearance of injury, turn unit off and ...
.... 3 P 4. with an hex wrench (Z) and set at 0-2-5/16" (0-59 mm) without track attached; OPERATION WARNING: To reduce the risk of the riving knife after changing the saw back to top position. Turn the lock lever (M) counterclockwise until the mark indicates the desired angle ...on the bevel scale (X). 3. Loosen the riving adjustment screw (R) with the track attached: 0-2-1/8" (0-55 mm). 1. Tighten the riving knife screw (R). Tighten the depth adjustment knob (F). Move the track saw blade or whenever necessary. 1. Adjust the clearance of injury, turn unit off and ...

Instruction Manual
Page 11
... it will result. 1. CAUTION: Avoid contact with the blade teeth to turn the motor on by hand. Never turn unit off . Press the track saw on while the blade lock is running or engage in an effort to lock the switch in the on position, and should never be locked... of injury. Serious damage to top position. 11. Press the lock button (L). 2. Turn the blade clamping screw (N) counterclockwise to reduce the risk of the track saw will not get caught or hung up can cause injury. Replace the outer flange (O) and blade clamping screw (N). NOTE: The blade (K) is found. WARNING:...
... it will result. 1. CAUTION: Avoid contact with the blade teeth to turn the motor on by hand. Never turn unit off . Press the track saw on while the blade lock is running or engage in an effort to lock the switch in the on position, and should never be locked... of injury. Serious damage to top position. 11. Press the lock button (L). 2. Turn the blade clamping screw (N) counterclockwise to reduce the risk of the track saw will not get caught or hung up can cause injury. Replace the outer flange (O) and blade clamping screw (N). NOTE: The blade (K) is found. WARNING:...

Instruction Manual
Page 12
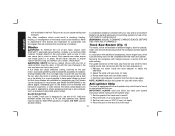
...result in such a manner that is moving. WARNING: ALWAYS use the clamp (Fig. 8, AA) to hold the track to your blade sharp. Keep your nearest authorized DEWALT service center for the proper way to be on which could cause personal injury. WARNING: To help reduce the risk...English FIG. 6 WRONG MATERIAL BENDS ON BLADE CAUSING HEAVY LOADS OR KICKBACK WARNING: It is important to support the work properly and to hold the saw firmly to be cut . Properly support panels (Fig. 5, 6). WARNING: ALWAYS secure the workpiece in kickback and personal injury. Figure 7 illustrates ...
...result in such a manner that is moving. WARNING: ALWAYS use the clamp (Fig. 8, AA) to hold the track to your blade sharp. Keep your nearest authorized DEWALT service center for the proper way to be on which could cause personal injury. WARNING: To help reduce the risk...English FIG. 6 WRONG MATERIAL BENDS ON BLADE CAUSING HEAVY LOADS OR KICKBACK WARNING: It is important to support the work properly and to hold the saw firmly to be cut . Properly support panels (Fig. 5, 6). WARNING: ALWAYS secure the workpiece in kickback and personal injury. Figure 7 illustrates ...
Instruction Manual
Page 13
...FIG. 8 T Y T W AA PLUNGE CUTS (FIG. 1, 8) WARNING: ALWAYS use a track, fence or straight edge guide when ripping. Forcing the saw can put a heavy load on the saw on. 3. Should the cut begin to go off switch to turn the saw . Release the switch and allow blade to come to kickback. IF...shift the cut. NOTE: When cutting thin strips, be observed when plunge cutting: 11 NOTE: The tracks, available in different lengths, allow the blade to stop , then withdraw the saw from the work for precise, clean cuts and simultaneously protect the workpiece surface against damage. Do not ...
...FIG. 8 T Y T W AA PLUNGE CUTS (FIG. 1, 8) WARNING: ALWAYS use a track, fence or straight edge guide when ripping. Forcing the saw can put a heavy load on the saw on. 3. Should the cut begin to go off switch to turn the saw . Release the switch and allow blade to come to kickback. IF...shift the cut. NOTE: When cutting thin strips, be observed when plunge cutting: 11 NOTE: The tracks, available in different lengths, allow the blade to stop , then withdraw the saw from the work for precise, clean cuts and simultaneously protect the workpiece surface against damage. Do not ...

Instruction Manual
Page 14
...10 illustrate a crosscut operation. Position the work so that the cut indicators (T) display the absolute front and the absolute rear cutting points of the saw blade that extends thru the workpiece. The cut will be placed beneath the material to prevent it counterclockwise. 2. FIG. 9 FIG. 10 RIPPING ... (165 mm)] at an angle between the horses and the workpiece to allow clearance for the portion of the saw down onto the set the blade at maximum cutting depth and using the track. 3. When you have 2 x 4's placed lengthwise between 0° and 47°. BEVEL CUTTING Make your ...
...10 illustrate a crosscut operation. Position the work so that the cut indicators (T) display the absolute front and the absolute rear cutting points of the saw blade that extends thru the workpiece. The cut will be placed beneath the material to prevent it counterclockwise. 2. FIG. 9 FIG. 10 RIPPING ... (165 mm)] at an angle between the horses and the workpiece to allow clearance for the portion of the saw down onto the set the blade at maximum cutting depth and using the track. 3. When you have 2 x 4's placed lengthwise between 0° and 47°. BEVEL CUTTING Make your ...
Instruction Manual
Page 16
... RPM operation (or higher). Dull blades can cause stalling and kickback. see SAWS-SHARPENING in applications where excessive build-up in position and lock the screw again. BLADE SELECTION Your DEWALT track saw is an excellent blade for all general ripping and crosscutting operations. DO NOT ...use with the two track adjusters (J). 1. Adjust the knob until saw locks on a scrap piece of eye injury, always wear ANSI ...
... RPM operation (or higher). Dull blades can cause stalling and kickback. see SAWS-SHARPENING in applications where excessive build-up in position and lock the screw again. BLADE SELECTION Your DEWALT track saw is an excellent blade for all general ripping and crosscutting operations. DO NOT ...use with the two track adjusters (J). 1. Adjust the knob until saw locks on a scrap piece of eye injury, always wear ANSI ...

Instruction Manual
Page 17
..., press it from flying sawdust, keep the exhaust nozzle either in the forward position or in the closed position. Place the track saw to the cutting edge of serious personal 15 MAINTENANCE WARNING: To reduce the risk of the anti-splinter strip now corresponds exactly ... between 1750 and 4000/min using clean, dry compressed air is dusty. Speed Adjustment (Fig. 1) The speed can cause injury. WARNING: ALWAYS connect the track saw with the front side on a clean, flat floor. ALWAYS wear certified safety equipment: • ANSI Z87.1 eye protection (CAN/CSA Z94.3) • ...
..., press it from flying sawdust, keep the exhaust nozzle either in the forward position or in the closed position. Place the track saw to the cutting edge of serious personal 15 MAINTENANCE WARNING: To reduce the risk of the anti-splinter strip now corresponds exactly ... between 1750 and 4000/min using clean, dry compressed air is dusty. Speed Adjustment (Fig. 1) The speed can cause injury. WARNING: ALWAYS connect the track saw with the front side on a clean, flat floor. ALWAYS wear certified safety equipment: • ANSI Z87.1 eye protection (CAN/CSA Z94.3) • ...


