
Manual
Page 1
Let us help you put your cleaner together or answer any questions, call: 1-800-321-1134 (USA & Canada) website: www.dirtdeviI.com For quick reference, please record your Swift Stick'". code located on the lower backside of cleaner) 02000 All rights reserved #I -113032-000 1o/oo Code: (Mfg. OWNER'S MANUAL Operating and Servicing Instructions Please read these instructions carefully before using your vacuum information below. Model #: Mfg.
Let us help you put your cleaner together or answer any questions, call: 1-800-321-1134 (USA & Canada) website: www.dirtdeviI.com For quick reference, please record your Swift Stick'". code located on the lower backside of cleaner) 02000 All rights reserved #I -113032-000 1o/oo Code: (Mfg. OWNER'S MANUAL Operating and Servicing Instructions Please read these instructions carefully before using your vacuum information below. Model #: Mfg.
Manual
Page 2
... our products and hope that you are now the proud owner of satisfaction. Visit our website at USA & CANADA: 1-800-321-1134. Refer to your vacuum cleaner carton for assistance at www.dirtdevil.com TABLE OF CONTENTS Feature Descriptions Page 4 How To Use as a Stick Vac Page 5 How To Use as a Hand Vac Page 5 Crevice Tool Installation & Removal Page 5 Dirt Cup Removal & Replacement Page 6 Filter Removal and Replacement Page 6 Troubleshooting Guide...
... our products and hope that you are now the proud owner of satisfaction. Visit our website at USA & CANADA: 1-800-321-1134. Refer to your vacuum cleaner carton for assistance at www.dirtdevil.com TABLE OF CONTENTS Feature Descriptions Page 4 How To Use as a Stick Vac Page 5 How To Use as a Hand Vac Page 5 Crevice Tool Installation & Removal Page 5 Dirt Cup Removal & Replacement Page 6 Filter Removal and Replacement Page 6 Troubleshooting Guide...

Manual
Page 3
.... Be extra careful when cleaning stairs. Do not handle vacuum cleaner or plug with damaged cord or plug. Use only manufacturer's recommended attachments. Keep appliance on dry, indoor surfaces. SAVE THESE INSTRUCTIONS WARN1NG:To reduce the risk of electric shock, this User's Guide. This I plug will fit in place. NOTE: RETURN WARRANTY CARD TO REGISTER YOUR CLEANE-R. Do not perform maintenance when vacuum cleaner is running. Do not pick up hot coals, cigarette...
.... Be extra careful when cleaning stairs. Do not handle vacuum cleaner or plug with damaged cord or plug. Use only manufacturer's recommended attachments. Keep appliance on dry, indoor surfaces. SAVE THESE INSTRUCTIONS WARN1NG:To reduce the risk of electric shock, this User's Guide. This I plug will fit in place. NOTE: RETURN WARRANTY CARD TO REGISTER YOUR CLEANE-R. Do not perform maintenance when vacuum cleaner is running. Do not pick up hot coals, cigarette...
Manual
Page 4
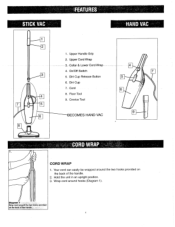
OnIOff Switch 5. Your cord can easily be wrapped around hooks (Diagram 1). Dirt Cup 7. Wrap cord around the two hooks provided on the back of the handle. 2. 1. Dirt Cup Release Button 6. Floor Tool 9. Crevice Tool CORD WRAP 1. Collar & Lower Cord Wrap - 4. Cord 8. Hold the unit in an upright position. 3. Upper Cord Wrap - - - 3. Upper Handle Grip 2.
OnIOff Switch 5. Your cord can easily be wrapped around hooks (Diagram 1). Dirt Cup 7. Wrap cord around the two hooks provided on the back of the handle. 2. 1. Dirt Cup Release Button 6. Floor Tool 9. Crevice Tool CORD WRAP 1. Collar & Lower Cord Wrap - 4. Cord 8. Hold the unit in an upright position. 3. Upper Cord Wrap - - - 3. Upper Handle Grip 2.
Manual
Page 5
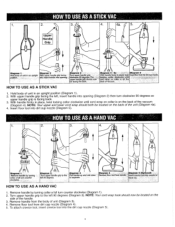
... opening (Diagram 2) then turn counter clockwise (Diaqram 1). 2. HOW TO USE AS A STICK VAC 1. Re- Hold body of the vacuum (Diagram 4). mo- NOTE: ~ o ucrord wrap hook should both be located on collar is facing back. 3. To attach crevice tool, insert crevice tool into dirt cup nozzle (Diagram 5). NOTE: Your upper and lower cord wrap should now be located on the back of the unit (Diagram #a). 4. HOW TO USE AS A HAND VAC 1. Remove handle from dirt cup nozzle (Diagram...
... opening (Diagram 2) then turn counter clockwise (Diaqram 1). 2. HOW TO USE AS A STICK VAC 1. Re- Hold body of the vacuum (Diagram 4). mo- NOTE: ~ o ucrord wrap hook should both be located on collar is facing back. 3. To attach crevice tool, insert crevice tool into dirt cup nozzle (Diagram 5). NOTE: Your upper and lower cord wrap should now be located on the back of the unit (Diagram #a). 4. HOW TO USE AS A HAND VAC 1. Remove handle from dirt cup nozzle (Diagram...

Manual
Page 6
... NOT wash parts in dishwasher. Press the dirt cup release button. 2. Slide the dirt cup onto the unit. 3. Pull filter away from un~t. t ,\ NOTE: If needed , the filter can b g washed with one hand while holding unit in the other hand (Diagram 1). 2. Grasp filter with warm, soapy water. Let filter dry completely before next use. FILTER REPLACEMENT 1. Hold dirt CUD over wastebasket and emDtv (Diaaram 3). DIRT CUP REPLACEMENT 1. FILTER REMOVAL IMPORTANT: For best results, clean the filter after each use . Brush the dust and dirt...
... NOT wash parts in dishwasher. Press the dirt cup release button. 2. Slide the dirt cup onto the unit. 3. Pull filter away from un~t. t ,\ NOTE: If needed , the filter can b g washed with one hand while holding unit in the other hand (Diagram 1). 2. Grasp filter with warm, soapy water. Let filter dry completely before next use. FILTER REPLACEMENT 1. Hold dirt CUD over wastebasket and emDtv (Diaaram 3). DIRT CUP REPLACEMENT 1. FILTER REMOVAL IMPORTANT: For best results, clean the filter after each use . Brush the dust and dirt...
Manual
Page 7
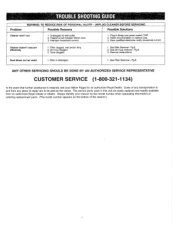
Tripped circuit breaker1Blown fuse. 3. turn power switch "ON". 2. Reset circuit breaker or replace fuse. 3. Filter clogged, wet and/or dirty. ' 2. Dirt Cup clogged. 3. See Filter Removal - Have qualified electrician verify household current. See Dirt Cup removal - See Filter Removal Pg.6. Unplugged at wall outlet. 2. Plug in this unit are to and from any place of repair are easily replaced and readily available from an authorized Royal Dealer or retailer. Cleaner doesn't vacuum effectively - - - Tools clogged. 1. Always identify your...
Tripped circuit breaker1Blown fuse. 3. turn power switch "ON". 2. Reset circuit breaker or replace fuse. 3. Filter clogged, wet and/or dirty. ' 2. Dirt Cup clogged. 3. See Filter Removal - Have qualified electrician verify household current. See Dirt Cup removal - See Filter Removal Pg.6. Unplugged at wall outlet. 2. Plug in this unit are to and from any place of repair are easily replaced and readily available from an authorized Royal Dealer or retailer. Cleaner doesn't vacuum effectively - - - Tools clogged. 1. Always identify your...


