Revision 4 (5/2003)
Page 1
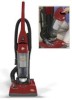
code located on the lower backside of cleaner) Espanol - Model #: Mfg. Small parts can present a choking hazard. pagina El ©2003 All rights reserved # 1-113354-000 5/03 Code: (Mfg. For quick reference, please record your vacuum together or answer any questions, call: 1 1-800-321-1134 (USA & Canada) www.dirtdevil.com A\WARNING Cleaner assembly may include small parts. Dirt uX"Aa® OWNER'S MANUAL Operating and Servicing Instructions • Please read these instructions carefully before using your cleaner. • Let us help you put your vacuum information below.
code located on the lower backside of cleaner) Espanol - Model #: Mfg. Small parts can present a choking hazard. pagina El ©2003 All rights reserved # 1-113354-000 5/03 Code: (Mfg. For quick reference, please record your vacuum together or answer any questions, call: 1 1-800-321-1134 (USA & Canada) www.dirtdevil.com A\WARNING Cleaner assembly may include small parts. Dirt uX"Aa® OWNER'S MANUAL Operating and Servicing Instructions • Please read these instructions carefully before using your cleaner. • Let us help you put your vacuum information below.
Revision 4 (5/2003)
Page 3
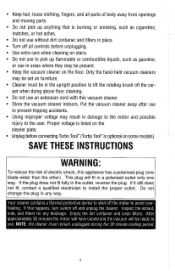
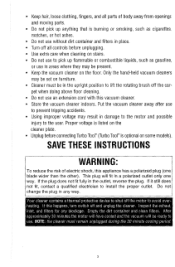
... be present. • Keep the vacuum cleaner on furniture. • Cleaner must remain unplugged during the 30 minute cooling period. 3 Empty the dirt container and clean filters. SAVE THESE INSTRUCTIONS WARNING: To reduce the risk of body away from openings and moving parts. • Do not pick up... anything that is optional on stairs. • Do not use to pick up flammable or combustible liquids, such as gasoline, or use without dirt container and filters in place. • Turn off the motor to avoid overheating. Your cleaner contains a thermal protective device to shut off all...
... be present. • Keep the vacuum cleaner on furniture. • Cleaner must remain unplugged during the 30 minute cooling period. 3 Empty the dirt container and clean filters. SAVE THESE INSTRUCTIONS WARNING: To reduce the risk of body away from openings and moving parts. • Do not pick up... anything that is optional on stairs. • Do not use to pick up flammable or combustible liquids, such as gasoline, or use without dirt container and filters in place. • Turn off the motor to avoid overheating. Your cleaner contains a thermal protective device to shut off all...
Revision 4 (5/2003)
Page 4
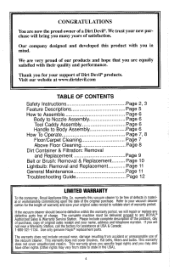
We trust your support of Dirt Devil® products. Thank you for your new purchase ... not include unusual wear, damage resulting from state to Body Assembly How To Operate Floor/Carpet Cleaning Above Floor Cleaning Dirt Container & Filtration: Removal and Replacement Belt or Brush: Removal & Replacement Lightbulb: Removal and Replacement General Maintenance Troubleshooting Guide...If you may also have other rights (Other rights may vary from accident or unreasonable use of a Dirt Devil®. This warranty gives you specific legal rights and you are not near a Warranty Station, call...
We trust your support of Dirt Devil® products. Thank you for your new purchase ... not include unusual wear, damage resulting from state to Body Assembly How To Operate Floor/Carpet Cleaning Above Floor Cleaning Dirt Container & Filtration: Removal and Replacement Belt or Brush: Removal & Replacement Lightbulb: Removal and Replacement General Maintenance Troubleshooting Guide...If you may also have other rights (Other rights may vary from accident or unreasonable use of a Dirt Devil®. This warranty gives you specific legal rights and you are not near a Warranty Station, call...

Revision 4 (5/2003)
Page 5
... VIEW V Ef 3 4 5 10 6 9 7 0 0 8 FRONT VIEW 1. On/Off Pedal 21. See Through Dirt Container 5. Carpet Height Adjust Knob 8. Bumper 9. Long Power Cord 17. Dirt Container Release Latch 3. Extension Wand 22. Lower Hose 22 0 21 11 12 13 14 15 16 20 17 19 18 18... Handle Release Pedal 20. Hose Clip 5 Carrying Handle/Upper Cord Wrap 16. Crevice Tool 15. Swivel Casters'" 19. Dirt Cup Lid 4. Clear Dirt Window 10. Cord Wrap with Quick Cord Release 18. Dirt Cup Filter 6. Hose 13. 2-in-1 Tool-Dust Brush / Upholstery Tool 14. Headlight 7. Handle 2.
... VIEW V Ef 3 4 5 10 6 9 7 0 0 8 FRONT VIEW 1. On/Off Pedal 21. See Through Dirt Container 5. Carpet Height Adjust Knob 8. Bumper 9. Long Power Cord 17. Dirt Container Release Latch 3. Extension Wand 22. Lower Hose 22 0 21 11 12 13 14 15 16 20 17 19 18 18... Handle Release Pedal 20. Hose Clip 5 Carrying Handle/Upper Cord Wrap 16. Crevice Tool 15. Swivel Casters'" 19. Dirt Cup Lid 4. Clear Dirt Window 10. Cord Wrap with Quick Cord Release 18. Dirt Cup Filter 6. Hose 13. 2-in-1 Tool-Dust Brush / Upholstery Tool 14. Headlight 7. Handle 2.
Revision 4 (5/2003)
Page 6
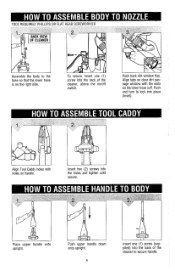
... flap. Insert two (2) screws into the back of the cleaner, above the on handle. Align tabs on clear dirt passage window with holes on /off switch. Push and turn to secure handle. Push upper handle down onto upright. 6 Insert one (1) screw into the back ...
... flap. Insert two (2) screws into the back of the cleaner, above the on handle. Align tabs on clear dirt passage window with holes on /off switch. Push and turn to secure handle. Push upper handle down onto upright. 6 Insert one (1) screw into the back ...
Revision 4 (5/2003)
Page 7
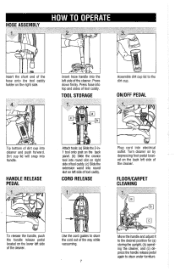
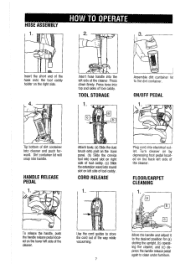
...release pedal located on the lower left side of tool caddy. Use the cord guides to the dirt cup. HOW TO OPERATE HOSE ASSEMBLY nsert the short end of the cleaner. Press hose into round...panel. (b) Slide the crevice tool into round slot on the right side. Press down firmly. a b Assemble dirt cup lid to store the cord out of the cleaner. CORD RELEASE Plug cord into cleaner and push forward. ON.../OFF PEDAL 1 Tip bottom of the cleaner. Dirt cup lid will snap into the left side of the hose onto the tool caddy holder on right ...
...release pedal located on the lower left side of tool caddy. Use the cord guides to the dirt cup. HOW TO OPERATE HOSE ASSEMBLY nsert the short end of the cleaner. Press hose into round...panel. (b) Slide the crevice tool into round slot on the right side. Press down firmly. a b Assemble dirt cup lid to store the cord out of the cleaner. CORD RELEASE Plug cord into cleaner and push forward. ON.../OFF PEDAL 1 Tip bottom of the cleaner. Dirt cup lid will snap into the left side of the hose onto the tool caddy holder on right ...

Revision 4 (5/2003)
Page 8
... CAUTION: Brush agitator continues to rotate while hose is removed or in use the extension wand. EXTENSION WAND Slide the tool hose into the lower dirt hose with the notch facing up. If additional length is needed, use and at all times while cleaner is on. Use the carry handle on...
... CAUTION: Brush agitator continues to rotate while hose is removed or in use the extension wand. EXTENSION WAND Slide the tool hose into the lower dirt hose with the notch facing up. If additional length is needed, use and at all times while cleaner is on. Use the carry handle on...
Revision 4 (5/2003)
Page 9
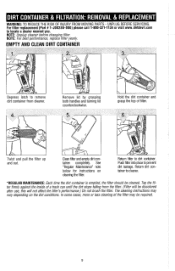
... filter should be required. 9 The cleaning instructions may be cleaned. In some cases, more or less cleaning of a trash can until the dirt stops falling from cleaner. UNPLUG BEFORE SERVICING. NOTE: Unplug cleaner before changing filter. CJ Depress latch to locate a dealer nearest you. Remove lid...and turning lid counterclockwise. For filter replacement (Part # 1-J00280-000) please call 1-800-321-1134 or visit www.dirtdevil.com to remove dirt container from the filter. (Filter will be discolored after use, this will not affect the filter's performance.) Do not brush the filter. ...
... filter should be required. 9 The cleaning instructions may be cleaned. In some cases, more or less cleaning of a trash can until the dirt stops falling from cleaner. UNPLUG BEFORE SERVICING. NOTE: Unplug cleaner before changing filter. CJ Depress latch to locate a dealer nearest you. Remove lid...and turning lid counterclockwise. For filter replacement (Part # 1-J00280-000) please call 1-800-321-1134 or visit www.dirtdevil.com to remove dirt container from the filter. (Filter will be discolored after use, this will not affect the filter's performance.) Do not brush the filter. ...

Revision 4 (5/2003)
Page 11
Remove any obstruction that occurs in or around the brushroll area. Pull bulb out of socket to see if dirt cup is full; Do NOT twist. Secure the headlight lens by replacing the two (2) screws. If obstruction develops while...2. LIGHTBULB REMOVAL AND REPLACEMENT WARNING: TO REDUCE THE RISK OF ELECTRIC SHOCK - UNPLUG CLEANER BEFORE REMOVING OR REPLACING LIGHTBULB. f Depress latch to remove dirt container from cleaner. Remove the two (2) screws located on the inside of hose (Diagram 4). UNPLUG BEFORE SERVICING. IF OBSTRUCTION DEVELOPS DURING ABOVE FLOOR ...
Remove any obstruction that occurs in or around the brushroll area. Pull bulb out of socket to see if dirt cup is full; Do NOT twist. Secure the headlight lens by replacing the two (2) screws. If obstruction develops while...2. LIGHTBULB REMOVAL AND REPLACEMENT WARNING: TO REDUCE THE RISK OF ELECTRIC SHOCK - UNPLUG CLEANER BEFORE REMOVING OR REPLACING LIGHTBULB. f Depress latch to remove dirt container from cleaner. Remove the two (2) screws located on the inside of hose (Diagram 4). UNPLUG BEFORE SERVICING. IF OBSTRUCTION DEVELOPS DURING ABOVE FLOOR ...

Revision 4 (5/2003)
Page 12
...cord not firmly 1. Plug unit in home. Check fuse or breaker in firmly. Cleaner won 't pick-up or low suction 1. Review dirt container removal and replacement - Pg. 9. 3. Pg. 10. 4. Remove filter and clean - Set carpet height adjust lever to appropriate ... are easily replaced and readily available from any transportation to push incorrect. 1. Costs of any place of the cleaner.) 12 Thermal Protector activated. 4. Dirt container not installed correctly. 2. Carpet height setting is 1. Pg. 10. 5. Remove lower hose; Pg. 9. 3. Review filter Removal and Replacement ...
...cord not firmly 1. Plug unit in home. Check fuse or breaker in firmly. Cleaner won 't pick-up or low suction 1. Review dirt container removal and replacement - Pg. 9. 3. Pg. 10. 4. Remove filter and clean - Set carpet height adjust lever to appropriate ... are easily replaced and readily available from any transportation to push incorrect. 1. Costs of any place of the cleaner.) 12 Thermal Protector activated. 4. Dirt container not installed correctly. 2. Carpet height setting is 1. Pg. 10. 5. Remove lower hose; Pg. 9. 3. Review filter Removal and Replacement ...
Revision 1 (3/2004)
Page 3
... cigarettes. Do not use to install the proper outlet. Use extra care when cleaning on the floor. Put the vacuum cleaner away after use without dirt container and filters in the upright position to lift the rotating brush off all parts of electric shock, this vacuum cleaner. matches, or hot ashes...
... cigarettes. Do not use to install the proper outlet. Use extra care when cleaning on the floor. Put the vacuum cleaner away after use without dirt container and filters in the upright position to lift the rotating brush off all parts of electric shock, this vacuum cleaner. matches, or hot ashes...
Revision 1 (3/2004)
Page 4
... Nozzle Assembly P. age 6 Body to Assemble P. age 6 How To Operate P. age 7, 8 FloorICarpet Cleaning Page 7 Above Floor Cleaning Page 8 Dirt Container & Filtration: Removal and Replacement P. age 9 Belt or Brush: Removal & Replacement..........Page 10 Lightbulb: Removal and Replacement Page 11 General Maintenance P....original purchase. age 6 Tool Caddy Assembly Page 6 Handle to state in material or workmanship commencing upon the date of Dirt Devilmproducts. Refer to any defective parts free of original sales receipt and your new purchase will repair or replace any ROYALe...
... Nozzle Assembly P. age 6 Body to Assemble P. age 6 How To Operate P. age 7, 8 FloorICarpet Cleaning Page 7 Above Floor Cleaning Page 8 Dirt Container & Filtration: Removal and Replacement P. age 9 Belt or Brush: Removal & Replacement..........Page 10 Lightbulb: Removal and Replacement Page 11 General Maintenance P....original purchase. age 6 Tool Caddy Assembly Page 6 Handle to state in material or workmanship commencing upon the date of Dirt Devilmproducts. Refer to any defective parts free of original sales receipt and your new purchase will repair or replace any ROYALe...

Revision 1 (3/2004)
Page 5
See Through Dirt Container 5. Cord Wrap with Quick Cord Release 18. Handle Release Pedal 20. Lower Hose BACK VlEW 11. Crevice Tool 15. Headlight 7. Long Power Cord 17. OnIOff Pedal 21. Dirt Container Lid 4. Carpet Height Adjust Knob 8. Cord Guide 12. Swivel C- -as.t.e-r.s-" 19. Dirt Container Filter 6. Clear Dirt Window 10. Dust Brush 14. Bumper 9. Carrying HandleIUpper Cord Wrap 16. Handle 2. Extension Wand.. ~~~ 22. Hose 13. Hose Clip FRONT VlEW BACK VlEW FRONT VlEW 1. Dirt Container Release Latch 3.
See Through Dirt Container 5. Cord Wrap with Quick Cord Release 18. Handle Release Pedal 20. Lower Hose BACK VlEW 11. Crevice Tool 15. Headlight 7. Long Power Cord 17. OnIOff Pedal 21. Dirt Container Lid 4. Carpet Height Adjust Knob 8. Cord Guide 12. Swivel C- -as.t.e-r.s-" 19. Dirt Container Filter 6. Clear Dirt Window 10. Dust Brush 14. Bumper 9. Carrying HandleIUpper Cord Wrap 16. Handle 2. Extension Wand.. ~~~ 22. Hose 13. Hose Clip FRONT VlEW BACK VlEW FRONT VlEW 1. Dirt Container Release Latch 3.

Revision 1 (3/2004)
Page 6
.... Push and turn to the ase so that the lower hose ; ace upper handle onto )right. sage window with ~leson handle. Push back dirt window flap. on clear dirt pas- Push upper handle down onto upright. Insert two (2) screws into place (inset). OOL REQUIRED: PHILLIPS OR FLAT HEAD SCREWDRIVER ssernble the body...
.... Push and turn to the ase so that the lower hose ; ace upper handle onto )right. sage window with ~leson handle. Push back dirt window flap. on clear dirt pas- Push upper handle down onto upright. Insert two (2) screws into place (inset). OOL REQUIRED: PHILLIPS OR FLAT HEAD SCREWDRIVER ssernble the body...
Revision 1 (3/2004)
Page 7
Press down firmly. TOOL STORAGE Assemble dirt container lid to store the cord out of the way while vacuuming. Use the cord guides to the dirt container. Dirt container lid will snap into electrical outlet. Turn cleaner on by depressing foot pedal located on left side of tool caddy. Press ...hose into top and sides of dirt container into cleaner and push forward. HANDLE RELEASE PEDAL Attach tools: (a) Slide the dust brush onto post on the back panel. (b) Slide the...
Press down firmly. TOOL STORAGE Assemble dirt container lid to store the cord out of the way while vacuuming. Use the cord guides to the dirt container. Dirt container lid will snap into electrical outlet. Turn cleaner on by depressing foot pedal located on left side of tool caddy. Press ...hose into top and sides of dirt container into cleaner and push forward. HANDLE RELEASE PEDAL Attach tools: (a) Slide the dust brush onto post on the back panel. (b) Slide the...

Revision 1 (3/2004)
Page 8
... leaner must be in use and at all parts of body away from the tool caddy. EXTENSION WAND Slide the tool hose into the lower dirt hose with the notch facing up. L If additional length is needed, use the hose lone. Push together and twist to the right and then JIIoff...
... leaner must be in use and at all parts of body away from the tool caddy. EXTENSION WAND Slide the tool hose into the lower dirt hose with the notch facing up. L If additional length is needed, use the hose lone. Push together and twist to the right and then JIIoff...

Revision 1 (3/2004)
Page 9
... grasping both handles and turning lid counterclockwise. For filter replacement (Part # 1-500280-000) please call 1-800-321-1134 or visit www.dirtdevil.com to dirt container. Return dirt container to cleaner. See "Regular Maintenance" note below for instructions on cleaning the filter. WARNING: TO REDUCE THE RISK OF INJURY FROM MOVING PARTS -
... grasping both handles and turning lid counterclockwise. For filter replacement (Part # 1-500280-000) please call 1-800-321-1134 or visit www.dirtdevil.com to dirt container. Return dirt container to cleaner. See "Regular Maintenance" note below for instructions on cleaning the filter. WARNING: TO REDUCE THE RISK OF INJURY FROM MOVING PARTS -

Revision 1 (3/2004)
Page 11
... (2) screws located on the inside of socket to remove. Remove lens (Diagram l a ) . Gently push new bulb into socket to remove dirt container from cleaner. Secure the headlight lens by replacing the two (2) screws. If obstruction develops while cleaning carpets, turn cleaner OFF and unplug....obstruction that occurs in or around the brushroll area. Check airflow areas of hose (Diagram 4). drop quarter through end. Clear any obstruction. 3. Check dirt path window and lower hose (Diagram 2). Do NOT twist. empty if needed (Page 9). 2. For bulb replacement call 1-800-3211134 or your ...
... (2) screws located on the inside of socket to remove. Remove lens (Diagram l a ) . Gently push new bulb into socket to remove dirt container from cleaner. Secure the headlight lens by replacing the two (2) screws. If obstruction develops while cleaning carpets, turn cleaner OFF and unplug....obstruction that occurs in or around the brushroll area. Check airflow areas of hose (Diagram 4). drop quarter through end. Clear any obstruction. 3. Check dirt path window and lower hose (Diagram 2). Do NOT twist. empty if needed (Page 9). 2. For bulb replacement call 1-800-3211134 or your ...

Revision 1 (3/2004)
Page 12
...Always ideny your cleaner by the owner. Power cord not firmly 1. Replact fuselreset breaker. 3. Pa. 3. Pg. 9. - 6. Dirt container not installed correctly. 3. Filter not installed completely. 1. Cleaner tools won't pick-up or low suction 1. ANY OTHER SERVICING ... and clean - Dust escaping from an authorized RoyaleDealer or retailer. Empty dirt container - Review dirt container removal and replacement- Filter clogged. 1. Empty dirt container Pg. 9. 3. Set carpet height setting adjust knob to - - Empty dirt container Pg. 9. 3. Pg. 7. - 4. remove - Set carpet...
...Always ideny your cleaner by the owner. Power cord not firmly 1. Replact fuselreset breaker. 3. Pa. 3. Pg. 9. - 6. Dirt container not installed correctly. 3. Filter not installed completely. 1. Cleaner tools won't pick-up or low suction 1. ANY OTHER SERVICING ... and clean - Dust escaping from an authorized RoyaleDealer or retailer. Empty dirt container - Review dirt container removal and replacement- Filter clogged. 1. Empty dirt container Pg. 9. 3. Set carpet height setting adjust knob to - - Empty dirt container Pg. 9. 3. Pg. 7. - 4. remove - Set carpet...


