Revision 1 (3/2004)
Page 1
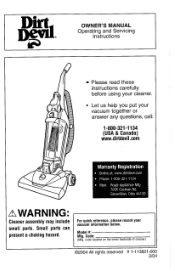
For quick reference, please record your cleaner. Code: (Mfg. OWNER'S MANUAL Operating and Servicing Instructions Please read these instructions carefully before using your vacuum information below. code located on the lower backside of cleaner) Small parts can present a choking hazard. Model #: Mfg. Let us help you put your vacuum together or answer any questions, call: 1-800-321-1134 (USA & Canada) www.dirtdevil.com AWARNING: Cleaner assembly may include small parts.
For quick reference, please record your cleaner. Code: (Mfg. OWNER'S MANUAL Operating and Servicing Instructions Please read these instructions carefully before using your vacuum information below. code located on the lower backside of cleaner) Small parts can present a choking hazard. Model #: Mfg. Let us help you put your vacuum together or answer any questions, call: 1-800-321-1134 (USA & Canada) www.dirtdevil.com AWARNING: Cleaner assembly may include small parts.

Revision 1 (3/2004)
Page 2
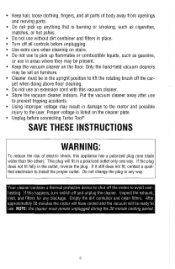
... following: READ ALL INSTRUCTIONS BEFORE USING THE APPLIANCE. REGULARLY CHECK THE FILTERS TO CLEAN OR REPLACE. WASH HANDS AFTER USING. Do not allow to a service center for the nearest service center. If appliance is necessary when used as handle, close a door on cord, or pull cord around sharp edges or corners. Do not put any opening blocked; BRING CLEANER TO UPRIGHT POSITION WHEN USING THE HOSE AND ATTACHMENTS. WARNING: TO REDUCE...
... following: READ ALL INSTRUCTIONS BEFORE USING THE APPLIANCE. REGULARLY CHECK THE FILTERS TO CLEAN OR REPLACE. WASH HANDS AFTER USING. Do not allow to a service center for the nearest service center. If appliance is necessary when used as handle, close a door on cord, or pull cord around sharp edges or corners. Do not put any opening blocked; BRING CLEANER TO UPRIGHT POSITION WHEN USING THE HOSE AND ATTACHMENTS. WARNING: TO REDUCE...
Revision 1 (3/2004)
Page 3
... the user. Keep the vacuum cleaner on stairs. Cleaner must be set on the cleaner plate. Do not use an extension cord with this appliance has a polarized plug (one way. Using improper voltage may be in the outlet, reverse the plug. Keep hair, loose clothing, fingers, and all controls before connecting Turbo Toole. Only the hand-held vacuum cleaners may result in place. Do not use without dirt container and filters in...
... the user. Keep the vacuum cleaner on stairs. Cleaner must be set on the cleaner plate. Do not use an extension cord with this appliance has a polarized plug (one way. Using improper voltage may be in the outlet, reverse the plug. Keep hair, loose clothing, fingers, and all controls before connecting Turbo Toole. Only the hand-held vacuum cleaners may result in place. Do not use without dirt container and filters in...

Revision 1 (3/2004)
Page 4
... state to your vacuum cleaner carton for your support of charge. Our company designed and developed this vacuum cleaner to be delivered, DreDaid to Nozzle Assembly P. age 9 Belt or Brush: Removal & Replacement...........Page 10 Lightbulb: Removal & Replacement Page 11 General Maintenance P.age 11 Troubleshooting Guide Page 12 LIMITED WARRANTY To the consumer, Royal Appliance Mfg. warrants this product with their quality and performance. If the vacuum cleaner should become defective...
... state to your vacuum cleaner carton for your support of charge. Our company designed and developed this vacuum cleaner to be delivered, DreDaid to Nozzle Assembly P. age 9 Belt or Brush: Removal & Replacement...........Page 10 Lightbulb: Removal & Replacement Page 11 General Maintenance P.age 11 Troubleshooting Guide Page 12 LIMITED WARRANTY To the consumer, Royal Appliance Mfg. warrants this product with their quality and performance. If the vacuum cleaner should become defective...
Revision 1 (3/2004)
Page 5
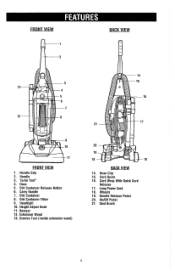
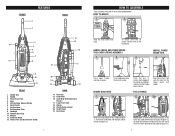
FRONT VlEW BACK VlEW FRONT VlEW 1. Handle Grip 2. Carry Handle 7. Headlight 10. Crevice Tool (inside extension wand) BACK VlEW 14. Hose Clip 15. Handle Release Pedal 20. Dust Brush Dirt Container Release Button 6. Dirt Container Filter 9. Height Adjust Knob 11. Hose 5. Dirt Container 8. Extension Wand 13. OnlOif Pedal 21. Handle 3. Turbo Tool" 4. Cord Guide 16. Wheels 19. Cord Wrap With Quick Cord Release 17. Bumper 12. Long Power Cord 18.
FRONT VlEW BACK VlEW FRONT VlEW 1. Handle Grip 2. Carry Handle 7. Headlight 10. Crevice Tool (inside extension wand) BACK VlEW 14. Hose Clip 15. Handle Release Pedal 20. Dust Brush Dirt Container Release Button 6. Dirt Container Filter 9. Height Adjust Knob 11. Hose 5. Dirt Container 8. Extension Wand 13. OnlOif Pedal 21. Handle 3. Turbo Tool" 4. Cord Guide 16. Wheels 19. Cord Wrap With Quick Cord Release 17. Bumper 12. Long Power Cord 18.

Revision 1 (3/2004)
Page 6
HANDLE (BACK) AND TURBO TOOL@ CADDY (FRONT) ASSEMBLY INSTALL TURB Place upper handle onto top of cleaner. ittach tools: (a) Slide the dust brush onto post on the front right side of tool caddy (Diagram 2a). Push handle plug onto the front of cleaner. SECURE BACK HOSE TOOL STORAGE Clip turbo tool onto the front of the Turbo Tool a caddy. 1 Wrap hose around back of the back panel. Insert the one (1) screws into round...
HANDLE (BACK) AND TURBO TOOL@ CADDY (FRONT) ASSEMBLY INSTALL TURB Place upper handle onto top of cleaner. ittach tools: (a) Slide the dust brush onto post on the front right side of tool caddy (Diagram 2a). Push handle plug onto the front of cleaner. SECURE BACK HOSE TOOL STORAGE Clip turbo tool onto the front of the Turbo Tool a caddy. 1 Wrap hose around back of the back panel. Insert the one (1) screws into round...
Revision 1 (3/2004)
Page 7
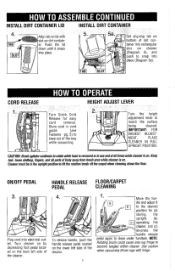
... electrical outlet. ONIOFF PEDAL HANDLE RELEASE FLOORICARPET PEDAL CLEANING /Ll 1 dle and adiust it Plug cord into place (Diagram 5a). To release handle, push the handle release pedal located on . Keep hair, loose clothing, fingers, and all timeswhilecleaneris on the lower left side of the cleaner. 7 I~ e d a lagain to become tangled within cleaner. CORD RELEASE Turn Quick Cord Release for easy cord removal. Store cord in the upright positionto lilt the rotation brush off the calpet when cleaning...
... electrical outlet. ONIOFF PEDAL HANDLE RELEASE FLOORICARPET PEDAL CLEANING /Ll 1 dle and adiust it Plug cord into place (Diagram 5a). To release handle, push the handle release pedal located on . Keep hair, loose clothing, fingers, and all timeswhilecleaneris on the lower left side of the cleaner. 7 I~ e d a lagain to become tangled within cleaner. CORD RELEASE Turn Quick Cord Release for easy cord removal. Store cord in the upright positionto lilt the rotation brush off the calpet when cleaning...

Revision 1 (3/2004)
Page 8
... its upright position to room. ABOVE FLOOR CLEANING Cleaner must be in place BEFORE lifting cleaner. Remove the hose from room to raise brushroll. To remove tool, twist and pull apart gently. NOTE: Veriw dirt cup is needed, use the hose alone Simply push the attachment firmly onto the end of the wand or I hose handle. Pull crevice tool out of the handy accessories or use the extensron wand and crevice tool. Choose...
... its upright position to room. ABOVE FLOOR CLEANING Cleaner must be in place BEFORE lifting cleaner. Remove the hose from room to raise brushroll. To remove tool, twist and pull apart gently. NOTE: Veriw dirt cup is needed, use the hose alone Simply push the attachment firmly onto the end of the wand or I hose handle. Pull crevice tool out of the handy accessories or use the extensron wand and crevice tool. Choose...

Revision 1 (3/2004)
Page 9
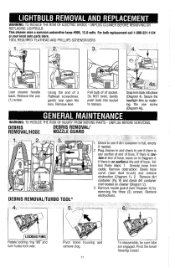
... FROM MOVING PARTS - NOTE: For best performance, replace filter yearly. See "Regular Maintenance" note below for instructions on cleaning the filter. Push filter into place to locate a dealer nearest you. For filter re~lacernent(Part # 2-JC0280-000) please call 1-800-321-1134 or visit www.dirtdevil.com to prevent dirt leakage. I Remove dirt container lid. Return filter to cleaner (see Page 7, Install Dirt Container). I I Hold the dirt container and...
... FROM MOVING PARTS - NOTE: For best performance, replace filter yearly. See "Regular Maintenance" note below for instructions on cleaning the filter. Push filter into place to locate a dealer nearest you. For filter re~lacernent(Part # 2-JC0280-000) please call 1-800-321-1134 or visit www.dirtdevil.com to prevent dirt leakage. I Remove dirt container lid. Return filter to cleaner (see Page 7, Install Dirt Container). I I Hold the dirt container and...
Revision 1 (3/2004)
Page 10
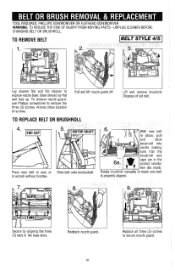
... INJURY FROM MOVING PARTS - UNPLUG CLEANER BEFORE CHANGING BELT OR BRUSHROLL. PUII and lift nozzle guard off. To remove nozzle guard, use Phillips screwdriver to secure nozzle guard. TO REPLACE BELT OR BRUSHROLL Lift and remove brushroll. Replace all three (3) screws to remove the three (3) screws. Rotate brushroll manually to expose nozzle base. Arrows show location of old belt. Lay cleaner flat and flip cleaner to make sure belt is properly...
... INJURY FROM MOVING PARTS - UNPLUG CLEANER BEFORE CHANGING BELT OR BRUSHROLL. PUII and lift nozzle guard off. To remove nozzle guard, use Phillips screwdriver to secure nozzle guard. TO REPLACE BELT OR BRUSHROLL Lift and remove brushroll. Replace all three (3) screws to remove the three (3) screws. Rotate brushroll manually to expose nozzle base. Arrows show location of old belt. Lay cleaner flat and flip cleaner to make sure belt is properly...
Revision 1 (3/2004)
Page 11
.... DEBRIS REMOVAL/TURBO TOOL@ obstructions. To reassemble, be sure tabs are engaged. TOOL REQUIRED: FLATHEAD AND PHILLIPS SCREWDRIVERS Lean cleaner handle back. This cleaner uses a common automotive lamp #906,13.0 volts. For bulb replacement call 1-800-321-1134 or your local auto parts store. ing the one (I LOCKING RING Rotate locking ring 180" and turn turbo tool over. Pivot lower housing and remove clog. Remove the...
.... DEBRIS REMOVAL/TURBO TOOL@ obstructions. To reassemble, be sure tabs are engaged. TOOL REQUIRED: FLATHEAD AND PHILLIPS SCREWDRIVERS Lean cleaner handle back. This cleaner uses a common automotive lamp #906,13.0 volts. For bulb replacement call 1-800-321-1134 or your local auto parts store. ing the one (I LOCKING RING Rotate locking ring 180" and turn turbo tool over. Pivot lower housing and remove clog. Remove the...

Revision 1 (3/2004)
Page 12
... by the owner. Check fuse or breaker in this unit are to service center or call 1-800-321-1134. Empty dirt container - Remove filter and clean - Hose not installed correctly. 4. Pg. 9. Filter clogged. 1. Cleaner is incorrect. 1. Dirt container full. 2. Hose clogged 2. Remove hose and tools; Brushroll worn. 3. Clogged filter. 5. Review hose installation - Loose electrical wires. 1. Pg. 11. 2. Take to be paid by the model number and manufacturing code when requesting information or ordering replacement parts. (The model number appears on...
... by the owner. Check fuse or breaker in this unit are to service center or call 1-800-321-1134. Empty dirt container - Remove filter and clean - Hose not installed correctly. 4. Pg. 9. Filter clogged. 1. Cleaner is incorrect. 1. Dirt container full. 2. Hose clogged 2. Remove hose and tools; Brushroll worn. 3. Clogged filter. 5. Review hose installation - Loose electrical wires. 1. Pg. 11. 2. Take to be paid by the model number and manufacturing code when requesting information or ordering replacement parts. (The model number appears on...

Revision 1 (11/2004)
Page 1
... THESE SAFETY INSTRUCTIONS. • BRING CLEANER TO UPRIGHT POSITION WHEN USING THE HOSE AND ATTACHMENTS. • DO NOT LEAVE CLEANER UNATTENDED WHEN PLUGGED IN. • REGULARLY CHECK THE FILTERS TO CLEAN OR REPLACE. • WARNING: DO NOT USE SHARP OBJECTS TO CLEAN OUT THE HOSE SINCE THEY COULD CAUSE DAMAGE. • OCCASIONALLY REMOVE BRUSH AND CLEAN DEBRIS FROM END CAPS TO KEEP BRUSH ROTATING SMOOTHLY. • WARNING: THE CORDS, WIRES, AND/OR...
... THESE SAFETY INSTRUCTIONS. • BRING CLEANER TO UPRIGHT POSITION WHEN USING THE HOSE AND ATTACHMENTS. • DO NOT LEAVE CLEANER UNATTENDED WHEN PLUGGED IN. • REGULARLY CHECK THE FILTERS TO CLEAN OR REPLACE. • WARNING: DO NOT USE SHARP OBJECTS TO CLEAN OUT THE HOSE SINCE THEY COULD CAUSE DAMAGE. • OCCASIONALLY REMOVE BRUSH AND CLEAN DEBRIS FROM END CAPS TO KEEP BRUSH ROTATING SMOOTHLY. • WARNING: THE CORDS, WIRES, AND/OR...

Revision 1 (11/2004)
Page 2
... to Nozzle Page 6 Handle Page 6 Power Brush Tool Caddy Page 6 Tool Storage Page 6 Dirt Container Page 7 How To Operate Page 7, 8 Floor/Carpet Cleaning Page 7 Above Floor Cleaning Page 8 Dirt Container & Filter: Removal & Replacement Page 9 Belt or Brush: Removal & Replacement Page 10 Lightbulb: Removal & Replacement Page 11 General Maintenance Page 11 Troubleshooting Guide Page 12 WARRANTY To the consumer, Royal Appliance Mfg. Your cleaner contains a thermal protective device to shut off and unplug the cleaner. After approximately 30 minutes the motor will...
... to Nozzle Page 6 Handle Page 6 Power Brush Tool Caddy Page 6 Tool Storage Page 6 Dirt Container Page 7 How To Operate Page 7, 8 Floor/Carpet Cleaning Page 7 Above Floor Cleaning Page 8 Dirt Container & Filter: Removal & Replacement Page 9 Belt or Brush: Removal & Replacement Page 10 Lightbulb: Removal & Replacement Page 11 General Maintenance Page 11 Troubleshooting Guide Page 12 WARRANTY To the consumer, Royal Appliance Mfg. Your cleaner contains a thermal protective device to shut off and unplug the cleaner. After approximately 30 minutes the motor will...
Revision 1 (11/2004)
Page 3
... POWER BRUSH TOOL CADDY (FRONT) ASSEMBLY 1. 2. 3. Place upper handle onto top of cleaner. Hose 5. Dirt Container 8. Extension Wand 13. On/Off Pedal 21. Wrap hose around back of the Power Brush Tool caddy. Cord Guide 16. Long Power Cord 18. INSTALL POWER BRUSH TOOL 4. Insert the one (1) screws into the front of the handle and tighten, making sure the handle plug is secure. Dirt Container Filter 9. Cord Wrap With Quick Cord Release 17. Wheels 19. Clip Power Brush Tool onto the front of hose caddy (Diagram...
... POWER BRUSH TOOL CADDY (FRONT) ASSEMBLY 1. 2. 3. Place upper handle onto top of cleaner. Hose 5. Dirt Container 8. Extension Wand 13. On/Off Pedal 21. Wrap hose around back of the Power Brush Tool caddy. Cord Guide 16. Long Power Cord 18. INSTALL POWER BRUSH TOOL 4. Insert the one (1) screws into the front of the handle and tighten, making sure the handle plug is secure. Dirt Container Filter 9. Cord Wrap With Quick Cord Release 17. Wheels 19. Clip Power Brush Tool onto the front of hose caddy (Diagram...

Revision 1 (11/2004)
Page 4
... the cleaner. 4. Plug cord into place (Diagram 4a). Turn cleaner on by depressing foot pedal located on the dirt container to clean under furniture. Move the handle a and adjust it snaps into place. To remove tool, twist and pull apart gently. Use the carry handle on the back left side of the wand or hose handle. INSTALL DIRT CONTAINER 4. 4a. HOW TO OPERATE Turn Quick Cord Release for (a) storing the upright, (b) c operating the cleaner, and (c) de-press the handle release...
... the cleaner. 4. Plug cord into place (Diagram 4a). Turn cleaner on by depressing foot pedal located on the dirt container to clean under furniture. Move the handle a and adjust it snaps into place. To remove tool, twist and pull apart gently. Use the carry handle on the back left side of the wand or hose handle. INSTALL DIRT CONTAINER 4. 4a. HOW TO OPERATE Turn Quick Cord Release for (a) storing the upright, (b) c operating the cleaner, and (c) de-press the handle release...
Revision 1 (11/2004)
Page 5
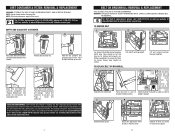
UNPLUG BEFORE SERVICING. EMPTY AND CLEAN DIRT CONTAINER 1. 2. 3. BELT OR BRUSHROLL: REMOVAL & REPLACEMENT TOOL REQUIRED: PHILLIPS OR FLATHEAD SCREWDRIVER WARNING: TO REDUCE THE RISK OF INJURY FROM MOVING PARTS - It is recommended that the brushroll end 6a. To remove nozzle guard, use reminder label located on filter cap to record replacement date. 9 Lay cleaner flat and flip cleaner to expose nozzle base. TO REPLACE BELT OR BRUSHROLL 4. With new belt in the...
UNPLUG BEFORE SERVICING. EMPTY AND CLEAN DIRT CONTAINER 1. 2. 3. BELT OR BRUSHROLL: REMOVAL & REPLACEMENT TOOL REQUIRED: PHILLIPS OR FLATHEAD SCREWDRIVER WARNING: TO REDUCE THE RISK OF INJURY FROM MOVING PARTS - It is recommended that the brushroll end 6a. To remove nozzle guard, use reminder label located on filter cap to record replacement date. 9 Lay cleaner flat and flip cleaner to expose nozzle base. TO REPLACE BELT OR BRUSHROLL 4. With new belt in the...

Revision 1 (11/2004)
Page 6
... by replacing the one (1) screw. UNPLUG CLEANER BEFORE SERVICING PROBLEM Cleaner won 't pick-up 1. Check fuse or breaker in firmly. 2. Broken or worn belt. 5. Nozzle/dirt passage hose clogged. 7. Remove lower hose; Set carpet height adjust lever to Diagram 4. Pg. 9. 2. Clean filter - Pg. 9. Pg. 7. Snap lens back into socket to be sure tabs are engaged. DEBRIS REMOVAL/POWER BRUSH TOOL 1. If there is no suction at end of repair are easily replaced and readily available from caddy. TROUBLESHOOTING GUIDE WARNING...
... by replacing the one (1) screw. UNPLUG CLEANER BEFORE SERVICING PROBLEM Cleaner won 't pick-up 1. Check fuse or breaker in firmly. 2. Broken or worn belt. 5. Nozzle/dirt passage hose clogged. 7. Remove lower hose; Set carpet height adjust lever to Diagram 4. Pg. 9. 2. Clean filter - Pg. 9. Pg. 7. Snap lens back into socket to be sure tabs are engaged. DEBRIS REMOVAL/POWER BRUSH TOOL 1. If there is no suction at end of repair are easily replaced and readily available from caddy. TROUBLESHOOTING GUIDE WARNING...


