User Guide
Page 2
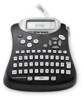
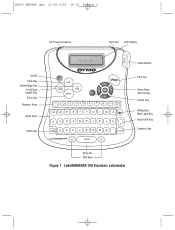
LM150 WEUdef.qxd 23-09-2003 16:07 Pagina 2 DC Power Connector Tape Exit LCD Display On/Off Style Key Frame/Align Key Font/Fixed Length Key Extra Key Numeric Keys Alpha Keys CAPS Key 150 Cutter Button Print Key Arrow Keys with OK Key Cancel Key Backspace/ New Label Key Return/OK Key Symbols Key Space Bar Shift Keys Figure 1 LabelMANAGER 150 Electronic Labelmaker
LM150 WEUdef.qxd 23-09-2003 16:07 Pagina 2 DC Power Connector Tape Exit LCD Display On/Off Style Key Frame/Align Key Font/Fixed Length Key Extra Key Numeric Keys Alpha Keys CAPS Key 150 Cutter Button Print Key Arrow Keys with OK Key Cancel Key Backspace/ New Label Key Return/OK Key Symbols Key Space Bar Shift Keys Figure 1 LabelMANAGER 150 Electronic Labelmaker
User Guide
Page 3
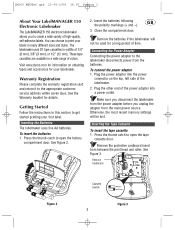
... adapter from between the print head and roller. The labelmaker uses D1 tape cassettes in a wide range of 1/4" (6 mm), 3/8" (9 mm), or 1/2" (12 mm). Plug the other end of the labelmaker. 2. Visit www.dymo.com for information on the top, left side of the power adapter ...into the power connector on obtaining tapes and accessories for details. Warranty Registration Please complete the warranty registration card and return it to...
... adapter from between the print head and roller. The labelmaker uses D1 tape cassettes in a wide range of 1/4" (6 mm), 3/8" (9 mm), or 1/2" (12 mm). Plug the other end of the labelmaker. 2. Visit www.dymo.com for information on the top, left side of the power adapter ...into the power connector on obtaining tapes and accessories for details. Warranty Registration Please complete the warranty registration card and return it to...
User Guide
Page 4
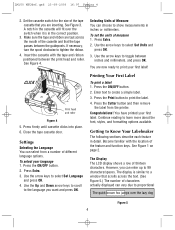
...print your first label! Press the Cutter button and then remove the label from a number of different language options. Make sure the tape and ribbon are now ready to proportional spTahceinqgu.ick brown fox jumps over the switch when it is similar to a window that ... keys to tighten the ribbon. 4. CLICK ! Press firmly until cassette clicks into place. 6. Close the tape cassette door. Congratulations! See Figure 4. Selecting Units of the cassette and that the tape passes between the guideposts. Press Extra. 3. Printing Your First Label To print a label 1. Press the Print...
...print your first label! Press the Cutter button and then remove the label from a number of different language options. Make sure the tape and ribbon are now ready to proportional spTahceinqgu.ick brown fox jumps over the switch when it is similar to a window that ... keys to tighten the ribbon. 4. CLICK ! Press firmly until cassette clicks into place. 6. Close the tape cassette door. Congratulations! See Figure 4. Selecting Units of the cassette and that the tape passes between the guideposts. Press Extra. 3. Printing Your First Label To print a label 1. Press the Print...
User Guide
Page 6
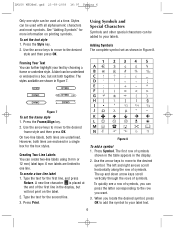
... be used with all alphanumeric characters and most symbols. Press the Style key. 2. A label can create two-line labels using 9 mm or 12 mm) label tape. 6 mm labels are enclosed in Figure 8. Figure 8 To add a symbol 1. When you can press the letter corresponding to one style can further highlight your label...
... be used with all alphanumeric characters and most symbols. Press the Style key. 2. A label can create two-line labels using 9 mm or 12 mm) label tape. 6 mm labels are enclosed in Figure 8. Figure 8 To add a symbol 1. When you can press the letter corresponding to one style can further highlight your label...

User Guide
Page 8
.... To clean the cutter blade 1. To set the contrast 1. Use the arrow keys to keep it working properly. Press and hold cutter 4. Remove the tape cassette. 2. Press Extra. 2. Caring for Your Labelmaker Your labelmaker is designed to expose the cutter blade. 8 Insert the tip of pen or pencil Press...contrast to clean both sides of the blade. 5. Use the arrow keys to select Set Contrast and press OK. 3. Release the cutter lever. DYMO D1 label cassettes Width: Length: Black/Clear Blue/Clear Red/Clear Black/White Blue/White Red/White Black/Blue Black/Red Black/Yellow Black/Green...
.... To clean the cutter blade 1. To set the contrast 1. Use the arrow keys to keep it working properly. Press and hold cutter 4. Remove the tape cassette. 2. Press Extra. 2. Caring for Your Labelmaker Your labelmaker is designed to expose the cutter blade. 8 Insert the tip of pen or pencil Press...contrast to clean both sides of the blade. 5. Use the arrow keys to select Set Contrast and press OK. 3. Release the cutter lever. DYMO D1 label cassettes Width: Length: Black/Clear Blue/Clear Red/Clear Black/White Blue/White Red/White Black/Blue Black/Red Black/Yellow Black/Green...
User Guide
Page 9
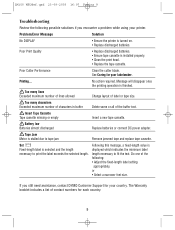
...of the following possible solutions if you still need assistance, contact DYMO Customer Support for each country. 9 Tape Jam Motor is selected and the length necessary to tape jam Remove jammed tape and replace tape cassette. Set Fixed-length label is stalled due to print the...No DISPLAY • Ensure the printer is installed properly. • Clean the print head. • Replace the tape cassette. Insert Tape Cassette Tape cassette missing or empty Insert a new tape cassette. ! If you encounter a problem while using your printer. The Warranty booklet includes a list of the ...
...of the following possible solutions if you still need assistance, contact DYMO Customer Support for each country. 9 Tape Jam Motor is selected and the length necessary to tape jam Remove jammed tape and replace tape cassette. Set Fixed-length label is stalled due to print the...No DISPLAY • Ensure the printer is installed properly. • Clean the print head. • Replace the tape cassette. Insert Tape Cassette Tape cassette missing or empty Insert a new tape cassette. ! If you encounter a problem while using your printer. The Warranty booklet includes a list of the ...


