
User Guide 1
Page 2
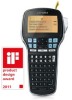
17 18 19 20 21 22 16 15 14 13 12 Insert . , - -+ Shift % 1 2 3 4 5 6 7 8 1 Print 2 Preview 3 Save 4 Settings 5 Symbols 6 Shift 7 Backspace 8 Return 11 10 9 Figure 1DYMO LabelManager 420P label maker 9 Accented characters 10 Space bar 11 Caps 12 Numeric keys 13 Insert 14 Font Size 15 New label/Clear 16 On/Off 17 Format 18 LCD display 19 Cancel 20 Navigation 21 OK 22 Open
17 18 19 20 21 22 16 15 14 13 12 Insert . , - -+ Shift % 1 2 3 4 5 6 7 8 1 Print 2 Preview 3 Save 4 Settings 5 Symbols 6 Shift 7 Backspace 8 Return 11 10 9 Figure 1DYMO LabelManager 420P label maker 9 Accented characters 10 Space bar 11 Caps 12 Numeric keys 13 Insert 14 Font Size 15 New label/Clear 16 On/Off 17 Format 18 LCD display 19 Cancel 20 Navigation 21 OK 22 Open

User Guide 1
Page 3
...Font Size 6 Font Styles 6 Adding Borders 7 Using Mirror Text 7 Vertical Text 7 Aligning the Text 7 Creating Fixed-Length Labels 7 Creating Multi-Line Labels 7 Using Clip Art, Symbols, and Special Characters 8 Adding Clip Art 8 Adding Symbols 8 Adding International Characters 9 Using the ...Label Maker Memory 10 Saving a Label 10 Opening Saved Labels 10 Inserting Saved Text 10 Caring for Your Label Maker 10 Using Your Label Maker with Your Computer 10 Connecting the Label Maker to your Computer 10 About the Built-In Software 11 About the DYMO Label™ v.8 Software 11 Label...
...Font Size 6 Font Styles 6 Adding Borders 7 Using Mirror Text 7 Vertical Text 7 Aligning the Text 7 Creating Fixed-Length Labels 7 Creating Multi-Line Labels 7 Using Clip Art, Symbols, and Special Characters 8 Adding Clip Art 8 Adding Symbols 8 Adding International Characters 9 Using the ...Label Maker Memory 10 Saving a Label 10 Opening Saved Labels 10 Inserting Saved Text 10 Caring for Your Label Maker 10 Using Your Label Maker with Your Computer 10 Connecting the Label Maker to your Computer 10 About the Built-In Software 11 About the DYMO Label™ v.8 Software 11 Label...
User Guide 1
Page 4
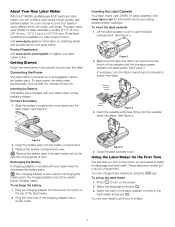
... is only used for recharging the battery pack. ! To set until the cassette clicks into a power outlet. Inserting the Label Cassette Your label maker uses DYMO D1 label cassettes. Figure 2 2 Insert the battery pack into the battery compartment. 3 Replace the battery compartment cover. ! You can..., the label maker automatically turns off after ten minutes of the cassette and that the tape passes between the label guides. These label cassettes are taut across the mouth of inactivity. About Your New Label Maker With the DYMO® LabelManager 420P electronic label maker, ...
... is only used for recharging the battery pack. ! To set until the cassette clicks into a power outlet. Inserting the Label Cassette Your label maker uses DYMO D1 label cassettes. Figure 2 2 Insert the battery pack into the battery compartment. 3 Replace the battery compartment cover. ! You can..., the label maker automatically turns off after ten minutes of the cassette and that the tape passes between the label guides. These label cassettes are taut across the mouth of inactivity. About Your New Label Maker With the DYMO® LabelManager 420P electronic label maker, ...

User Guide 1
Page 5
... appears in detail. You can show four lines of the formatting you to exit from the label to make a selection. The following sections describe each line will print on . With DYMO's exclusive graphical display, most of text at a time. These features are also restored. When ...Caps mode is turned back on the label. 5 Backspace The key removes the character to cancel an action. ...
... appears in detail. You can show four lines of the formatting you to exit from the label to make a selection. The following sections describe each line will print on . With DYMO's exclusive graphical display, most of text at a time. These features are also restored. When ...Caps mode is turned back on the label. 5 Backspace The key removes the character to cancel an action. ...

User Guide 1
Page 6
... type. When using the Font Size shortcut key, . Font Styles You can also quickly access the Font Size menu using underline on the label width you have selected. Label Width Font Size Available 1/4" (6 mm) 8, 10, 12 point 3/8" (9 mm) 8, 10, 12, 16, 20 point 1/2" (12 mm) 8, 10...) 8, 10, 12, 16, 20, 24, 32, 40 point ♦ Use the left and right navigation keys to all characters on a label. Formatting Your Label You can choose from 12 different font styles: Normal Bold Italic Outline Shadow Italic + Bold Normal + Underline Bold + Underline Italic + Underline Outline...
... type. When using the Font Size shortcut key, . Font Styles You can also quickly access the Font Size menu using underline on the label width you have selected. Label Width Font Size Available 1/4" (6 mm) 8, 10, 12 point 3/8" (9 mm) 8, 10, 12, 16, 20 point 1/2" (12 mm) 8, 10...) 8, 10, 12, 16, 20, 24, 32, 40 point ♦ Use the left and right navigation keys to all characters on a label. Formatting Your Label You can choose from 12 different font styles: Normal Bold Italic Outline Shadow Italic + Bold Normal + Underline Bold + Underline Italic + Underline Outline...

User Guide 1
Page 7
...a fixed length 1 Use the up and down navigation keys to select the fixed option. ♦ Use the left or right justified on multi-line labels, all lines are enclosed in a single border. When using vertical text with multiple lines of text will not print. 2 Use the up to select... Using Mirror Text The mirror format allows you have selected. The default alignment is determined by choosing a border. To set the length of the label for each additional line and press after each line of text. 3 Press to select the mirror format. Any text that does not fit within ...
...a fixed length 1 Use the up and down navigation keys to select the fixed option. ♦ Use the left or right justified on multi-line labels, all lines are enclosed in a single border. When using vertical text with multiple lines of text will not print. 2 Use the up to select... Using Mirror Text The mirror format allows you have selected. The default alignment is determined by choosing a border. To set the length of the label for each additional line and press after each line of text. 3 Press to select the mirror format. Any text that does not fit within ...
User Guide 1
Page 8
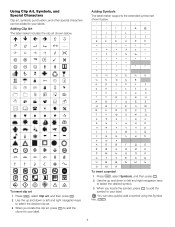
... desired symbol. 3 When you locate the clip art, press clip art to add the ! to your label. Using Clip Art, Symbols, and Special Characters Clip art, symbols, punctuation, and other special characters can ...also quickly add a symbol using the Symbol key, . 8 Adding Clip Art The label maker includes the clip art shown below . ' " , . ; ' : / \ | & @ ! ¡ ? ¿ _ • ( ) { } [ ] € £ $ ¢ ¥ # + - * ÷ √ ^ ~ &#...
... desired symbol. 3 When you locate the clip art, press clip art to add the ! to your label. Using Clip Art, Symbols, and Special Characters Clip art, symbols, punctuation, and other special characters can ...also quickly add a symbol using the Symbol key, . 8 Adding Clip Art The label maker includes the clip art shown below . ' " , . ; ' : / \ | & @ ! ¡ ? ¿ _ • ( ) { } [ ] € £ $ ¢ ¥ # + - * ÷ √ ^ ~ &#...
User Guide 1
Page 9
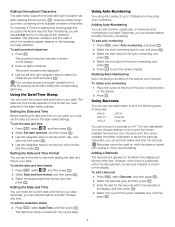
...up a menu containing all the variations available. However, if the cursor is positioned within the barcode on your label. You can insert the current date and time on the label as the language and you press the Accent key and then the letter a, you have selected. Using Auto-...2 Press . To set . To add the date/time stamp ♦ Press Insert , select Date/Time, and then press . Optionally, you have selected in the label maker settings. To add a barcode 1 Press Insert , select Barcode, and then press . 2 Select the barcode type, and then press . 3 Enter the text ...
...up a menu containing all the variations available. However, if the cursor is positioned within the barcode on your label. You can insert the current date and time on the label as the language and you press the Accent key and then the letter a, you have selected. Using Auto-...2 Press . To set . To add the date/time stamp ♦ Press Insert , select Date/Time, and then press . Optionally, you have selected in the label maker settings. To add a barcode 1 Press Insert , select Barcode, and then press . 2 Select the barcode type, and then press . 3 Enter the text ...

User Guide 1
Page 10
... is designed to move through the locations. Opening Saved Labels You can be used labels. Using Your Label Maker with Your Computer Your label maker can easily open labels saved in software or DYMO Label v.8 software. Editing a Barcode You can insert the text of a saved label into the current label. To edit a barcode 1 Move the cursor anywhere within the...
... is designed to move through the locations. Opening Saved Labels You can be used labels. Using Your Label Maker with Your Computer Your label maker can easily open labels saved in software or DYMO Label v.8 software. Editing a Barcode You can insert the text of a saved label into the current label. To edit a barcode 1 Move the cursor anywhere within the...
User Guide 1
Page 11
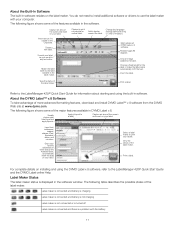
... a fixed length for information about starting and using the DYMO Label v.8 software, refer to fit the text. Zoom the label. Refer to print your computer. Select a label maker to the LabelManager 420P Quick Start Guide for the label or make the label resize automatically to the LabelManager 420P Quick Start Guide and the DYMO Label online Help. For complete details on the...
... a fixed length for information about starting and using the DYMO Label v.8 software, refer to fit the text. Zoom the label. Refer to print your computer. Select a label maker to the LabelManager 420P Quick Start Guide for the label or make the label resize automatically to the LabelManager 420P Quick Start Guide and the DYMO Label online Help. For complete details on the...

User Guide 1
Page 12
... or all of the buffer text. • Delete lines to fit on 3/4" wide labels. Allow the battery pack to recharge the battery pack. We welcome your label maker. Send email messages to: documentation@dymo.com Please keep in mind that this product, please contact your end-of-life equipment in... should use these systems. If you need assistance, visit the DYMO Web site at www.dymo.com. Battery pack almost discharged. Solution • Ensure the label maker is needed, and so on . • Attach the charging adapter to the label maker to recharge the battery pack. Clean the cutter blade....
... or all of the buffer text. • Delete lines to fit on 3/4" wide labels. Allow the battery pack to recharge the battery pack. We welcome your label maker. Send email messages to: documentation@dymo.com Please keep in mind that this product, please contact your end-of-life equipment in... should use these systems. If you need assistance, visit the DYMO Web site at www.dymo.com. Battery pack almost discharged. Solution • Ensure the label maker is needed, and so on . • Attach the charging adapter to the label maker to recharge the battery pack. Clean the cutter blade....


