User Guide 1
Page 2
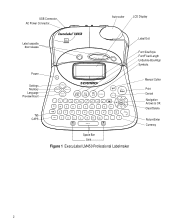
Q W E R T Y U I O P A S D F G H J K L N~ Enter CAPS Z X C V BNM , . $ Shift SPAC E Shift Space Bar Shift Figure 1 ExecuLabel LM450 Professional Labelmaker Manual Cutter Print Cancel Navigation Arrows & OK Clear/Delete Return/Enter Currency 2 USB Connector AC Power Connector Auto-cutter LCD Display Label cassette door release Power Settings Memory Language Preview/Insert Tab CAPS www.dymo.c om Label Exit Font Size/Style Font/Fixed Length Underline-Box/Align Symbols Settings Language Memor y Preview Inser t Symbols 1,2...n Cancel !1 ?2 : 33 - 4...
Q W E R T Y U I O P A S D F G H J K L N~ Enter CAPS Z X C V BNM , . $ Shift SPAC E Shift Space Bar Shift Figure 1 ExecuLabel LM450 Professional Labelmaker Manual Cutter Print Cancel Navigation Arrows & OK Clear/Delete Return/Enter Currency 2 USB Connector AC Power Connector Auto-cutter LCD Display Label cassette door release Power Settings Memory Language Preview/Insert Tab CAPS www.dymo.c om Label Exit Font Size/Style Font/Fixed Length Underline-Box/Align Symbols Settings Language Memor y Preview Inser t Symbols 1,2...n Cancel !1 ?2 : 33 - 4...
User Guide 1
Page 3
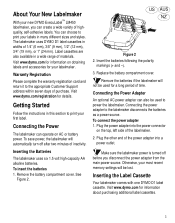
... memory settings will be used to print your labels in widths of materials. Remove the battery compartment cover. About Your New Labelmaker With your new DYMO ExecuLabel™ LM450 labelmaker, you disconnect the power adapter from the main power source. Make sure the labelmaker power is turned off after two minutes of purchase. Connecting the Power Adapter An optional AC power adapter can choose to power the labelmaker. The labelmaker uses DYMO D1 label cassettes in many different sizes and...
... memory settings will be used to print your labels in widths of materials. Remove the battery compartment cover. About Your New Labelmaker With your new DYMO ExecuLabel™ LM450 labelmaker, you disconnect the power adapter from the main power source. Make sure the labelmaker power is turned off after two minutes of purchase. Connecting the Power Adapter An optional AC power adapter can choose to power the labelmaker. The labelmaker uses DYMO D1 label cassettes in many different sizes and...

User Guide 1
Page 4
... Label Settings menu automatically appears immediately after inserting a new label cassette. 6. By default, the language is taut across the mouth of different language options. See Figure 4. If necessary, turn the spool clockwise to turn on the power. See Figure 5. Close the label cassette cover and press to tighten the ribbon. 3. Settings You can select from between the print head and pinch roller. Use the arrow keys to select the language you use . CLICK! Make sure...
... Label Settings menu automatically appears immediately after inserting a new label cassette. 6. By default, the language is taut across the mouth of different language options. See Figure 4. If necessary, turn the spool clockwise to turn on the power. See Figure 5. Close the label cassette cover and press to tighten the ribbon. 3. Settings You can select from between the print head and pinch roller. Use the arrow keys to select the language you use . CLICK! Make sure...

User Guide 1
Page 5
... function keys on the inside front cover. Select Set Time, and press . The default time is automatically cut. Use the arrow keys to create a simple label. 2. Select inches or millimeters and press . Enter text to select Set Units and press . 3. The label is displayed. 3. Power A The button turns the power on by default. You can change the default date format by following the instructions in Changing the Date Format on page 11. You...
... function keys on the inside front cover. Select Set Time, and press . The default time is automatically cut. Use the arrow keys to create a simple label. 2. Select inches or millimeters and press . Enter text to select Set Units and press . 3. The label is displayed. 3. Power A The button turns the power on by default. You can change the default date format by following the instructions in Changing the Date Format on page 11. You...

User Guide 1
Page 6
... and off , all letters that you enter will be used in your text. Cancel The Cancel key allows you type more blank spaces in combination with an alphabet key, changes the case of characters actually displayed can be capitalized. See Figure 8. 6 Connecting to Your Computer Your labelmaker can vary due to type a new label. Font and Size Style Scroll BIG CAPS mode Multiple Lines Fixed Length Align/Justify Underline/Box...
... and off , all letters that you enter will be used in your text. Cancel The Cancel key allows you type more blank spaces in combination with an alphabet key, changes the case of characters actually displayed can be capitalized. See Figure 8. 6 Connecting to Your Computer Your labelmaker can vary due to type a new label. Font and Size Style Scroll BIG CAPS mode Multiple Lines Fixed Length Align/Justify Underline/Box...

User Guide 1
Page 7
... alphanumeric characters and symbols. Styles can choose from that font applies to your labels. If you specify a font, that menu. See Using Mixed Formats on page 9 for information about designing and printing labels. Figure 8 Refer to the desired font and then press . To set the font 1. Use the arrow keys to move to the ExecuLabel LM450 Quick Start Guide for installation instructions and the DYMO LabelMANAGER Software User Guide...
... alphanumeric characters and symbols. Styles can choose from that font applies to your labels. If you specify a font, that menu. See Using Mixed Formats on page 9 for information about designing and printing labels. Figure 8 Refer to the desired font and then press . To set the font 1. Use the arrow keys to move to the ExecuLabel LM450 Quick Start Guide for installation instructions and the DYMO LabelMANAGER Software User Guide...

User Guide 1
Page 8
... the first line in memory. A new line character is displayed. 3. On multi-line labels, all lines are underlined. A label can also use as background text on storing text in the display, but not both together. To set the font style 1. In box style mode, all lines are enclosed in a box or background, but will not print on 1/4" (6 mm) labels To create a multi-line label Enter 1. Type the text for the second line. Type the text for the...
... the first line in memory. A new line character is displayed. 3. On multi-line labels, all lines are underlined. A label can also use as background text on storing text in the display, but not both together. To set the font style 1. In box style mode, all lines are enclosed in a box or background, but will not print on 1/4" (6 mm) labels To create a multi-line label Enter 1. Type the text for the second line. Type the text for the...

User Guide 1
Page 9
... section. 2. Enter your labels. Using Mixed Formats You can apply different fonts and format styles to the text on a label by a format break. Tabs are common to the entire label. To change the tab spacing 1. Use the up and down arrow keys to a label. Press . Alignment, underline, box styles, and background patterns cannot be added to align text on multiline labels. Select Set Tab Length and press . 3. Press...
... section. 2. Enter your labels. Using Mixed Formats You can apply different fonts and format styles to the text on a label by a format break. Tabs are common to the entire label. To change the tab spacing 1. Use the up and down arrow keys to a label. Press . Alignment, underline, box styles, and background patterns cannot be added to align text on multiline labels. Select Set Tab Length and press . 3. Press...

User Guide 1
Page 10
... to the row you have selected. When Fixed Date is selected, the actual date is inserted on that is automatically updated with the current date when the label is actually printed. The left and right arrows move to your label text. Press . Updated is selected, a date icon is selected as variable text that letter. Adding International Characters The labelmaker supports the extended Latin character set date. 3. The character variations and the order in...
... to the row you have selected. When Fixed Date is selected, the actual date is inserted on that is automatically updated with the current date when the label is actually printed. The left and right arrows move to your label text. Press . Updated is selected, a date icon is selected as variable text that letter. Adding International Characters The labelmaker supports the extended Latin character set date. 3. The character variations and the order in...

User Guide 1
Page 11
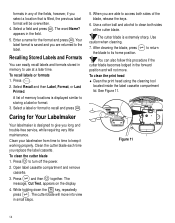
... print returns to print and press . 5. Changing the Time Format You can choose to print. Updated and press . Select Set # Copies and press . 3. You may notice a brief pause in printing between each label for your labels 1. Press . Press . Select Insert Time and press . 3. When printing multiple copies, a dotted cut-line is finished, the number of copies to print. 4. Press . 6. Serializing Your Labels You can print a series of 1. Press + . 1,2...n Shift The labels automatically print, each part...
... print returns to print and press . 5. Changing the Time Format You can choose to print. Updated and press . Select Set # Copies and press . 3. You may notice a brief pause in printing between each label for your labels 1. Press . Press . Select Insert Time and press . 3. When printing multiple copies, a dotted cut-line is finished, the number of copies to print. 4. Press . 6. Serializing Your Labels You can print a series of 1. Press + . 1,2...n Shift The labels automatically print, each part...

User Guide 1
Page 12
... make a label for a specific purpose that setting remains until you select a different barcode type. Adding Barcodes to appear after the barcode. You can preview the text or format of your label 1. Enter the data for some barcode types. To insert a barcode 1. Press . Select Insert Barcode and press . 4. Previewing Your Label You can print a barcode on 3/4" (19 mm) and 1" (24 mm) labels; Press + . If you select Format, the format selected displays briefly. 12 You can specify a fixed length for a label...
... make a label for a specific purpose that setting remains until you select a different barcode type. Adding Barcodes to appear after the barcode. You can preview the text or format of your label 1. Enter the data for some barcode types. To insert a barcode 1. Press . Select Insert Barcode and press . 4. Previewing Your Label You can print a barcode on 3/4" (19 mm) and 1" (24 mm) labels; Press + . If you select Format, the format selected displays briefly. 12 You can specify a fixed length for a label...

User Guide 1
Page 13
... last fifteen labels printed. • Allows you to store the text of text are displayed. Your label text is printed between each label. Aligning the Text When you print a fixed length label you can store up to ten specific label formats you use frequently. When manual cutting is filled, the previous label text will remain until you can choose to align the text at the left , center, and right relative to the label. Settings 2. Select On...
... last fifteen labels printed. • Allows you to store the text of text are displayed. Your label text is printed between each label. Aligning the Text When you print a fixed length label you can store up to ten specific label formats you use frequently. When manual cutting is filled, the previous label text will remain until you can choose to align the text at the left , center, and right relative to the label. Settings 2. Select On...
User Guide 1
Page 14
... print head using the cleaning tool located inside the label cassette compartment lid. The word Name? Memory 2. Press to access both sides of the cutter blade. Use a cotton ball and alcohol to the label. Use caution when cleaning. 7. Select a field and press . Enter a name for Your Labelmaker Your labelmaker is designed to storing a label or format. 3. Your label format is extremely sharp. The message, Cut Test, appears on the display. 4. Select a label...
... print head using the cleaning tool located inside the label cassette compartment lid. The word Name? Memory 2. Press to access both sides of the cutter blade. Use a cotton ball and alcohol to the label. Use caution when cleaning. 7. Select a field and press . Enter a name for Your Labelmaker Your labelmaker is designed to storing a label or format. 3. Your label format is extremely sharp. The message, Cut Test, appears on the display. 4. Select a label...

User Guide 1
Page 15
...labelmaker is turned on the label. • Following this message, a fixed-length value is stalled due to print the label exceeds the selected length. Troubleshooting Review the following : • Adjust the fixed-length label setting appropriately, or • Select a narrower font size. Insert a new label cassette Replace batteries or connect AC power adapter. • Remove jammed label and replace label cassette. • Clean cutter blade. Refer to Contacting Customer Support on the page. Too many lines Exceeded maximum number of format breaks allowed. Change label...
...labelmaker is turned on the label. • Following this message, a fixed-length value is stalled due to print the label exceeds the selected length. Troubleshooting Review the following : • Adjust the fixed-length label setting appropriately, or • Select a narrower font size. Insert a new label cassette Replace batteries or connect AC power adapter. • Remove jammed label and replace label cassette. • Clean cutter blade. Refer to Contacting Customer Support on the page. Too many lines Exceeded maximum number of format breaks allowed. Change label...

User Guide 1
Page 16
...: documentation@dymo.com Please keep in accordance with your feedback. We welcome your feedback: • Product name, model number, and User Guide page number • Brief description of this email address is designed to produce the highest quality documentation for documentation feedback. This product is CE marked in mind that are constantly working to conform with the following information...
...: documentation@dymo.com Please keep in accordance with your feedback. We welcome your feedback: • Product name, model number, and User Guide page number • Brief description of this email address is designed to produce the highest quality documentation for documentation feedback. This product is CE marked in mind that are constantly working to conform with the following information...

User Guide 1
Page 17
Country Australia Canada Mexico New Zealand United States Telephone 1800/ 633 868 (800) 263-6105 +01 5368 2066 0800 803 966 (203) 588-2500 Fax 1800/ 817 558 (905) 890-2347 0800 737 212 You can also reach DYMO at www.dymo.com. Contacting Customer Support The following table provides a list of telephone numbers to reach DYMO Sales and Support departments.
Country Australia Canada Mexico New Zealand United States Telephone 1800/ 633 868 (800) 263-6105 +01 5368 2066 0800 803 966 (203) 588-2500 Fax 1800/ 817 558 (905) 890-2347 0800 737 212 You can also reach DYMO at www.dymo.com. Contacting Customer Support The following table provides a list of telephone numbers to reach DYMO Sales and Support departments.
User Guide 1
Page 18
ExecuLabel is a registered trademark of DYMO Corporation. All other trademarks are the property of DYMO Corporation. All Rights Reserved. 04/05 No part of this document may be reproduced or transmitted in any form or by any means or translated into another language without the prior written consent of Esselte Corporation. DYMO is a trademark of their respective holders. DYMO Corporation 44 Commerce Road Stamford, CT 06902-4561 (203) 355-9000 © 2005 DYMO Corporation.
ExecuLabel is a registered trademark of DYMO Corporation. All other trademarks are the property of DYMO Corporation. All Rights Reserved. 04/05 No part of this document may be reproduced or transmitted in any form or by any means or translated into another language without the prior written consent of Esselte Corporation. DYMO is a trademark of their respective holders. DYMO Corporation 44 Commerce Road Stamford, CT 06902-4561 (203) 355-9000 © 2005 DYMO Corporation.


