User Guide 1
Page 2
... Battery Pack 8 Inserting and Removing the Tape Cassette 8 Setting the Tape Width 8 Selecting a Language 8 Selecting Units of Measure 9 Getting to Know Your Printer 9 Power 9 LCD Display 9 Using the Backlight 9 Adjusting the Display Contrast 9 Hiding the Caption Bar 10 CAPS Mode 10 Shift Key 10 Escape Key 10 Navigation Keys 10 Backspace Key 10 Clear Key 10 Cutter Button 10 Pausing between Labels on page 20Hot Keys 10 Working with Label Files 11 Creating a Label File 11 Adding Labels...
... Battery Pack 8 Inserting and Removing the Tape Cassette 8 Setting the Tape Width 8 Selecting a Language 8 Selecting Units of Measure 9 Getting to Know Your Printer 9 Power 9 LCD Display 9 Using the Backlight 9 Adjusting the Display Contrast 9 Hiding the Caption Bar 10 CAPS Mode 10 Shift Key 10 Escape Key 10 Navigation Keys 10 Backspace Key 10 Clear Key 10 Cutter Button 10 Pausing between Labels on page 20Hot Keys 10 Working with Label Files 11 Creating a Label File 11 Adding Labels...

User Guide 1
Page 3
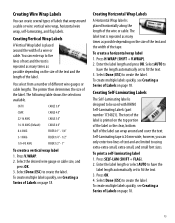
...Multi-Line Labels 12 Using International Characters 12 Creating Industrial Labels 12 Creating Wire Wrap Labels 13 Creating Vertical Wrap Labels 13 Creating Horizontal Wrap Labels 13 Creating Self-Laminating Labels 13 Creating Flag Labels 14 Creating Fixed Length Labels 14 Creating Patch Panel Labels 14 Creating Terminal Block Labels 14 Creating Module Labels 15 Using Fuse Multipliers 15 Printing Empty Modules 15 Creating Vertical Labels 15 Changing the Label Type 16 Changing the Label Settings 16 Printing Vertical Lines between Cells 16 Using Barcodes 16 Adding a Barcode 16...
...Multi-Line Labels 12 Using International Characters 12 Creating Industrial Labels 12 Creating Wire Wrap Labels 13 Creating Vertical Wrap Labels 13 Creating Horizontal Wrap Labels 13 Creating Self-Laminating Labels 13 Creating Flag Labels 14 Creating Fixed Length Labels 14 Creating Patch Panel Labels 14 Creating Terminal Block Labels 14 Creating Module Labels 15 Using Fuse Multipliers 15 Printing Empty Modules 15 Creating Vertical Labels 15 Changing the Label Type 16 Changing the Label Settings 16 Printing Vertical Lines between Cells 16 Using Barcodes 16 Adding a Barcode 16...
User Guide 1
Page 4
Using Simultaneous Serialization 19 Using Advanced Serialization 19 Printing Options 20 Printing Multiple Copies 20 Collating Multiple Copies 20 Pausing between Labels 20 Using the Auto-Cut Option 20 Advancing the Label Tape 20 Adjusting Print Contrast 21 Using Printer Memory 21 Saving a Label File 21 Recalling a Label File from Memory 21 Deleting a Label File from Memory 21 Cleaning Your Printer 21 Using RHINO Connect Software 22 Connecting to your Computer 22 Symbols 23 Library Text 24 Troubleshooting 26 Contacting Customer Support 31 4
Using Simultaneous Serialization 19 Using Advanced Serialization 19 Printing Options 20 Printing Multiple Copies 20 Collating Multiple Copies 20 Pausing between Labels 20 Using the Auto-Cut Option 20 Advancing the Label Tape 20 Adjusting Print Contrast 21 Using Printer Memory 21 Saving a Label File 21 Recalling a Label File from Memory 21 Deleting a Label File from Memory 21 Cleaning Your Printer 21 Using RHINO Connect Software 22 Connecting to your Computer 22 Symbols 23 Library Text 24 Troubleshooting 26 Contacting Customer Support 31 4
User Guide 1
Page 6
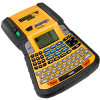
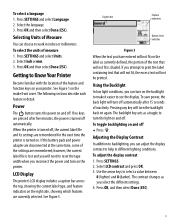
Power connector USB connector Backlight Power Tape Door Latch Cut/Feed Hot Keys Barcode Symbol Save/Insert Recall/Remove Size/CAPS Space bar Figure 1 RHINO 6500 Label Printer Tape Exit LCD display Print/# of copies Clear Escape Navigation keys Library Settings Serialization OK Backspace Enter Shift
Power connector USB connector Backlight Power Tape Door Latch Cut/Feed Hot Keys Barcode Symbol Save/Insert Recall/Remove Size/CAPS Space bar Figure 1 RHINO 6500 Label Printer Tape Exit LCD display Print/# of copies Clear Escape Navigation keys Library Settings Serialization OK Backspace Enter Shift
User Guide 1
Page 7
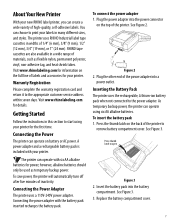
...-adhesive labels. About Your New Printer With your printer for the first time. Visit www.rhinolabeling.com for details. Getting Started Follow the instructions in many different sizes, and styles. Plug the power adapter into the power connector on the back of inactivity. Figure 2 2. Inserting the Battery Pack The printer uses the rechargeable, Lithium-ion battery pack when not connected to start using your new RHINO label printer, you can operate using six...
...-adhesive labels. About Your New Printer With your printer for the first time. Visit www.rhinolabeling.com for details. Getting Started Follow the instructions in many different sizes, and styles. Plug the power adapter into the power connector on the back of inactivity. Figure 2 2. Inserting the Battery Pack The printer uses the rechargeable, Lithium-ion battery pack when not connected to start using your new RHINO label printer, you can operate using six...

User Guide 1
Page 8
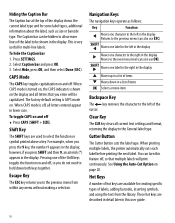
... battery pack will not be used for a long period of the features you use to create a label for information about purchasing additional tape cassettes. Inserting and Removing the Tape Cassette Your printer comes with the tape and ribbon positioned between the guides. Guide posts Ribbon rewind spool Eject Button Figure 4 4. The tape cassette is connected to open the tape cassette door. 2. Some of time. The Settings menu appears on the printer are currently using. By default...
... battery pack will not be used for a long period of the features you use to create a label for information about purchasing additional tape cassettes. Inserting and Removing the Tape Cassette Your printer comes with the tape and ribbon positioned between the guides. Guide posts Ribbon rewind spool Eject Button Figure 4 4. The tape cassette is connected to open the tape cassette door. 2. Some of time. The Settings menu appears on the printer are currently using. By default...
User Guide 1
Page 9
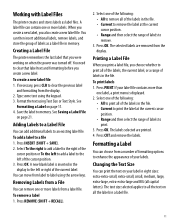
... save power, the back light will not be printed. Adjusting the Display Contrast In addition to turn on . Press SETTINGS. 2. Use the arrow keys to reset the tape width when you select the different settings. 4. Press SETTINGS and select Units. 2. however, the current label file is shaded. Caption bar Feature indicators Battery level indicator Figure 5 When the text you will turn on the inside front cover. The contrast changes as...
... save power, the back light will not be printed. Adjusting the Display Contrast In addition to turn on . Press SETTINGS. 2. Use the arrow keys to reset the tape width when you select the different settings. 4. Press SETTINGS and select Units. 2. however, the current label file is shaded. Caption bar Feature indicators Battery level indicator Figure 5 When the text you will turn on the inside front cover. The contrast changes as...
User Guide 1
Page 10
... one character to the left in the display. Select Caption bar and press OK. 3. The factory default setting is very useful for creating specific types of labels, adding barcodes, inserting symbols, and using the text from within any menu without making a selection. Clear Key The CLR key clears all letters that multiple labels will be hidden to select the function or symbol printed above a key. When printing multiple labels, the printer automatically cuts each label before printing the next label. See Using the Auto-Cut Option on...
... one character to the left in the display. Select Caption bar and press OK. 3. The factory default setting is very useful for creating specific types of labels, adding barcodes, inserting symbols, and using the text from within any menu without making a selection. Clear Key The CLR key clears all letters that multiple labels will be hidden to select the function or symbol printed above a key. When printing multiple labels, the printer automatically cuts each label before printing the next label. See Using the Auto-Cut Option on...
User Guide 1
Page 11
.... Printing a Label File When you print a label file, you also create a new label file. If your label in eight sizes: extra-extra-small, extra-small, small, medium, large, extra-large, extra-extra-large and BIG (all of the labels in a label file. 11 The text size selected applies to a file 1. Type some text using Text Size or Text Style. See Formatting a Label on when the power was turned off. Press REMOVE (SHIFT + RECALL). 2. Select one of the following : • All to remove all capital letters). Press CUT and remove the labels. You can move from label to clear the...
.... Printing a Label File When you print a label file, you also create a new label file. If your label in eight sizes: extra-extra-small, extra-small, small, medium, large, extra-large, extra-extra-large and BIG (all of the labels in a label file. 11 The text size selected applies to a file 1. Type some text using Text Size or Text Style. See Formatting a Label on when the power was turned off. Press REMOVE (SHIFT + RECALL). 2. Select one of the following : • All to remove all capital letters). Press CUT and remove the labels. You can move from label to clear the...

User Guide 1
Page 12
... available for special industrial applications, such as the text size. Press OK and then select Done (ESC). Using International Characters The printer supports the extended Latin character set the font size ♦ Press SIZE. Creating Industrial Labels You can choose normal width or narrow width. By default, the label type is highlighted on the Size feature indicator on through multiple lines. Each time you can quickly create labels for each additional line. The text style applies to...
... available for special industrial applications, such as the text size. Press OK and then select Done (ESC). Using International Characters The printer supports the extended Latin character set the font size ♦ Press SIZE. Creating Industrial Labels You can choose normal width or narrow width. By default, the label type is highlighted on the Size feature indicator on through multiple lines. Each time you can quickly create labels for each additional line. The text style applies to...
User Guide 1
Page 13
... create a horizontal wrap label 1. Self-Laminating tape is designed to fit the text. 3. Enter the label length or select AUTO to have the length automatically set to five lines of text and the text is repeated as many times as possible depending on page 18. You select from a number of the label. Select the desired wire gauge or cable size, and press OK. 3. Select Done (ESC) to using extra-extra-small, extra-small, and small font sizes. To create multiple labels quickly, see Creating a Series of Labels...
... create a horizontal wrap label 1. Self-Laminating tape is designed to fit the text. 3. Enter the label length or select AUTO to have the length automatically set to five lines of text and the text is repeated as many times as possible depending on page 18. You select from a number of the label. Select the desired wire gauge or cable size, and press OK. 3. Select Done (ESC) to using extra-extra-small, extra-small, and small font sizes. To create multiple labels quickly, see Creating a Series of Labels...

User Guide 1
Page 14
... by doubling the flag length and adding 34 mm to label a row of Labels on the display. 7. Each port is a long label with multiple, evenly spaced text for the ports automatically, see Creating a Series of ports on page 16. To create a terminal block label 1. Creating Flag Labels Flag labels wrap around the cable. 3. The result is applied to patch panel labels; Select AUTO to port. To create a patch panel label 1. Select Done (ESC) to create the label. 4. Use the left or...
... by doubling the flag length and adding 34 mm to label a row of Labels on the display. 7. Each port is a long label with multiple, evenly spaced text for the ports automatically, see Creating a Series of ports on page 16. To create a terminal block label 1. Creating Flag Labels Flag labels wrap around the cable. 3. The result is applied to patch panel labels; Select AUTO to port. To create a patch panel label 1. Select Done (ESC) to create the label. 4. Use the left or...

User Guide 1
Page 16
.... Make any other text. The settings for the label. To print vertical lines between each cell. Using Barcodes The printer can choose to print the human-readable text or not, and you would like any necessary adjustments to fit the text. 4. You can generate the following types of the label automatically set to the settings for the label type. To add a barcode 1. Enter a length for the particular label type are displayed. 3. Changing the Label Type Once you create a label using one label type will not fit...
.... Make any other text. The settings for the label. To print vertical lines between each cell. Using Barcodes The printer can choose to print the human-readable text or not, and you would like any necessary adjustments to fit the text. 4. You can generate the following types of the label automatically set to the settings for the label type. To add a barcode 1. Enter a length for the particular label type are displayed. 3. Changing the Label Type Once you create a label using one label type will not fit...
User Guide 1
Page 17
The text of symbols. 4. Press . Adding Symbols Your printer includes a set of symbols from RHINO Connect Software are separated into several categories: Electrical Brackets Voice/Data Arrows Audio/Video Numbers Warning Home Electrical Punctuation Currency A complete list of the barcode on the label as one character. For example, pressing SHIFT + 1 inserts an open bracket ([). Select a category of the existing barcode appears. 4. however, User symbols cannot...
The text of symbols. 4. Press . Adding Symbols Your printer includes a set of symbols from RHINO Connect Software are separated into several categories: Electrical Brackets Voice/Data Arrows Audio/Video Numbers Warning Home Electrical Punctuation Currency A complete list of the barcode on the label as one character. For example, pressing SHIFT + 1 inserts an open bracket ([). Select a category of the existing barcode appears. 4. however, User symbols cannot...
User Guide 1
Page 18
... text from RHINO Connect Software or you can be used with that begins with a certain label, a warning appears on page 22 for the series. Press LIBRARY. 2. Select the text to a label 1. Adding Graphics When labels are transferred to the printer from 1 to z, and numbers from RHINO Connect Software, any number or letter by creating a series. When a graphic cannot be incremented from A to Z and a to 9. See RHINO Connect Software Online Help...
... text from RHINO Connect Software or you can be used with that begins with a certain label, a warning appears on page 22 for the series. Press LIBRARY. 2. Select the text to a label 1. Adding Graphics When labels are transferred to the printer from 1 to z, and numbers from RHINO Connect Software, any number or letter by creating a series. When a graphic cannot be incremented from A to Z and a to 9. See RHINO Connect Software Online Help...
User Guide 1
Page 20
... Collating Multiple Copies When printing multiple copies of a label file containing more complex formats. Press SETTINGS. 2. To set the printer to print. Using the Auto-Cut Option When the Auto-cut between each label so you can cut after printing each label for example, if you want to print labels continuously or use the pause to cut labels, advance the label tape, and adjust the print contrast. Press SETTINGS. 2. Select Auto Cut and press OK. 3. Advancing the Label Tape The default leader space for all...
... Collating Multiple Copies When printing multiple copies of a label file containing more complex formats. Press SETTINGS. 2. To set the printer to print. Using the Auto-Cut Option When the Auto-cut between each label so you can cut after printing each label for example, if you want to print labels continuously or use the pause to cut labels, advance the label tape, and adjust the print contrast. Press SETTINGS. 2. Select Auto Cut and press OK. 3. Advancing the Label Tape The default leader space for all...

User Guide 1
Page 21
... OK. The saved label files are displayed. 2. The number of the tool across the print head. 21 When you can be up to clear the current label text and formatting. 3. Press SAVE. 3. To save a label file 1. To recall a label from inside the tape cassette door. 3. Press RECALL. Press RECALL. Cleaning Your Printer Your printer is available for your label file. 2. Remove the tape cassette. 2. Adjusting Print Contrast Depending on the label. Deleting a Label File from time to...
... OK. The saved label files are displayed. 2. The number of the tool across the print head. 21 When you can be up to clear the current label text and formatting. 3. Press SAVE. 3. To save a label file 1. To recall a label from inside the tape cassette door. 3. Press RECALL. Press RECALL. Cleaning Your Printer Your printer is available for your label file. 2. Remove the tape cassette. 2. Adjusting Print Contrast Depending on the label. Deleting a Label File from time to...
User Guide 1
Page 22
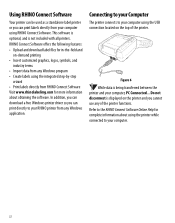
... and download label files for in-the-field and on-demand printing • Insert customized graphics, logos, symbols, and industry terms • Import data from any Windows program • Create labels using the USB connection located on the printer and you can print directly to your computer using the printer while connected to your computer. 22 Connecting to your Computer The printer connects to the RHINO Connect Software Online Help for more...
... and download label files for in-the-field and on-demand printing • Insert customized graphics, logos, symbols, and industry terms • Import data from any Windows program • Create labels using the USB connection located on the printer and you can print directly to your computer using the printer while connected to your computer. 22 Connecting to your Computer The printer connects to the RHINO Connect Software Online Help for more...

User Guide 1
Page 26
... on . • Recharge battery pack or plug in the cassette before starting a large print job. 26 Uneven or slanted printing The cassette is inserted properly. See Adjusting Print Contrast. • Open the tape cassette compartment and press the eject button to the display and clear all settings. • Ensure the printer is turned on the tape cassette. Make sure you encounter a problem while using your printer. See Inserting and Removing the Tape Cassette. • Make sure the two levers...
... on . • Recharge battery pack or plug in the cassette before starting a large print job. 26 Uneven or slanted printing The cassette is inserted properly. See Adjusting Print Contrast. • Open the tape cassette compartment and press the eject button to the display and clear all settings. • Ensure the printer is turned on the tape cassette. Make sure you encounter a problem while using your printer. See Inserting and Removing the Tape Cassette. • Make sure the two levers...
User Guide 1
Page 27
..., contact DYMO Customer Support for each key to read • Turn on backlight. Print error... Barcode not allowed • Replace the tape cassette. Printing Self-Lam label not allowed • Replace the tape cassette. See Adjusting the Display Contrast. Too many lines Too many lines for this User Guide. 27 tape. A list of contact numbers for your country. Self-Lam labels can only be printed on 24 mm Self-Laminated • Change the tape width. Barcodes can...
..., contact DYMO Customer Support for each key to read • Turn on backlight. Print error... Barcode not allowed • Replace the tape cassette. Printing Self-Lam label not allowed • Replace the tape cassette. See Adjusting the Display Contrast. Too many lines Too many lines for this User Guide. 27 tape. A list of contact numbers for your country. Self-Lam labels can only be printed on 24 mm Self-Laminated • Change the tape width. Barcodes can...


