Firmware Installation Guide (English)
Page 1
... a rubber flap, you are on the back, bottom or side of your TV located on the support tab of TV (see photos below do not help, call Dynex Customer Support at (800) 305‐2204 for TV Models: DX‐15L150A11, DX‐19L150A11, DX‐22L150A11, DX‐40L150A11 System requirements: a computer with a USB Flash Drive (Stick) 1. Determine...
... a rubber flap, you are on the back, bottom or side of your TV located on the support tab of TV (see photos below do not help, call Dynex Customer Support at (800) 305‐2204 for TV Models: DX‐15L150A11, DX‐19L150A11, DX‐22L150A11, DX‐40L150A11 System requirements: a computer with a USB Flash Drive (Stick) 1. Determine...

Firmware Installation Guide (English)
Page 2
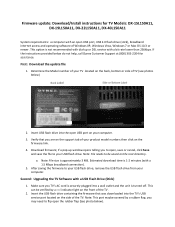
this update takes approximately one shown below will appear displaying the progress of the TV. 4. Using your TV off, then turn your remote control arrow keys, make sure the "Yes" button is no upgrade menu displayed; you can turn the unit back on): 5. ...Once the update has completed, a screen similar to the one below will appear: A screen similar to the one (1) minute. 6. Turn the TV on using the remote control or power button on the remote. 3. The software update will then begin Note: DO NOT TURN THE POWER OFF OR...
this update takes approximately one shown below will appear displaying the progress of the TV. 4. Using your TV off, then turn your remote control arrow keys, make sure the "Yes" button is no upgrade menu displayed; you can turn the unit back on): 5. ...Once the update has completed, a screen similar to the one below will appear: A screen similar to the one (1) minute. 6. Turn the TV on using the remote control or power button on the remote. 3. The software update will then begin Note: DO NOT TURN THE POWER OFF OR...

Firmware Installation Guide (English)
Page 3
...prior to reprogram your favorite channels and any custom settings that you erase/delete the update file from the TV. 8. January 2011 Power off TV, and then unplug TV from wall socket (keep TV unplugged for assistance. Note: If you may have set up the process is complete. Note: It ...is powered up . 7. Plug TV back into wall socket, wait 5 to 10 seconds then power on TV. 10. Once the TV is recommended that you experience any issues while performing this upgrade, call Dynex Customer Support at (800) 305‐2204 for 5‐10 seconds). ...
...prior to reprogram your favorite channels and any custom settings that you erase/delete the update file from the TV. 8. January 2011 Power off TV, and then unplug TV from wall socket (keep TV unplugged for assistance. Note: If you may have set up the process is complete. Note: It ...is powered up . 7. Plug TV back into wall socket, wait 5 to 10 seconds then power on TV. 10. Once the TV is recommended that you experience any issues while performing this upgrade, call Dynex Customer Support at (800) 305‐2204 for 5‐10 seconds). ...
Quick Setup Guide (English)
Page 1
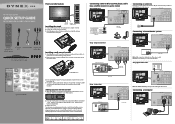
...-down on the antenna. symbols on the back of TV ANT/CABLE IN 2 Insert two AAA batteries into place. Match the colors when you just installed. 15"/19"/22" LCD TV QUICK SETUP GUIDE DX-15L150A11/DX-19L150A11 /DX-22L150A11 Front and side features Power Remote indicator control sensor...or need a di erent remote control code, visit www.dynexproducts.com for the latest remote control code information. Universal remote control TV codes (for all Dynex TVs manufactured after Jan. 1, 2007) Universal remote control makers and models Philips PHDVD5, PH5DSS, PMDVR8, PDVR8 RCA RCU807 One for...
...-down on the antenna. symbols on the back of TV ANT/CABLE IN 2 Insert two AAA batteries into place. Match the colors when you just installed. 15"/19"/22" LCD TV QUICK SETUP GUIDE DX-15L150A11/DX-19L150A11 /DX-22L150A11 Front and side features Power Remote indicator control sensor...or need a di erent remote control code, visit www.dynexproducts.com for the latest remote control code information. Universal remote control TV codes (for all Dynex TVs manufactured after Jan. 1, 2007) Universal remote control makers and models Philips PHDVD5, PH5DSS, PMDVR8, PDVR8 RCA RCU807 One for...

Quick Setup Guide (English)
Page 2
...are trademarks of their respective owners. 4 Press or to close the menu. 15" • 19" • 22" LCD TV I QUICK SETUP GUIDE I DX-15L150A11/DX-19L150A11 /DX-22L150A11 English 09-1037 09-0xxx If you selected Cable/Satellite Box, you selected Antenna or Cable, your set date/time manually ...connect the other products and brand names are asked to select the correct input source for your TV automatically scans for available channels. We're here for details. All rights reserved. DYNEX is a trademark of the video source buttons directly. You can also press any of BBY Solutions...
...are trademarks of their respective owners. 4 Press or to close the menu. 15" • 19" • 22" LCD TV I QUICK SETUP GUIDE I DX-15L150A11/DX-19L150A11 /DX-22L150A11 English 09-1037 09-0xxx If you selected Cable/Satellite Box, you selected Antenna or Cable, your set date/time manually ...connect the other products and brand names are asked to select the correct input source for your TV automatically scans for available channels. We're here for details. All rights reserved. DYNEX is a trademark of the video source buttons directly. You can also press any of BBY Solutions...

User Manual (English)
Page 2
ii Dynex 15", 19", and 22" LCD TVs Contents CHILD SAFETY 1 Important safety instructions 2 Warnings 2 Cautions 2 Installing and removing the stand 4 Installing the stand 4 Installing a wall-mount bracket 4 TV components 5 Accessories 5 Front 5 Back 6 Side 6 Remote control 7 Using the remote control 8 Installing remote control batteries...a computer 11 Connecting a home theater system 12 Connecting headphones 12 Turning on your TV for the first time 12 Understanding the basics 13 Turning your TV on or off 13 Selecting the video input source 13 Selecting a channel 13 Adjusting...
ii Dynex 15", 19", and 22" LCD TVs Contents CHILD SAFETY 1 Important safety instructions 2 Warnings 2 Cautions 2 Installing and removing the stand 4 Installing the stand 4 Installing a wall-mount bracket 4 TV components 5 Accessories 5 Front 5 Back 6 Side 6 Remote control 7 Using the remote control 8 Installing remote control batteries...a computer 11 Connecting a home theater system 12 Connecting headphones 12 Turning on your TV for the first time 12 Understanding the basics 13 Turning your TV on or off 13 Selecting the video input source 13 Selecting a channel 13 Adjusting...

User Manual (English)
Page 3
...parental control levels 21 Using closed captioning 24 Turning closed captioning on or off 24 Selecting the closed captioning mode 24 Customizing digital TV closed captioning styles 24 Adjusting time settings 25 Setting the clock 25 Setting the sleep timer 26 Adjusting menu settings 26 Selecting the... 27 Restoring default settings 27 Troubleshooting 28 Video and audio 28 Remote control 28 General 29 Maintenance 29 Cleaning the TV cabinet 29 Cleaning the TV screen 29 Specifications 29 Legal notices 29 One-year limited warranty 31 US and Canada Markets 31 Mexico Market 31
...parental control levels 21 Using closed captioning 24 Turning closed captioning on or off 24 Selecting the closed captioning mode 24 Customizing digital TV closed captioning styles 24 Adjusting time settings 25 Setting the clock 25 Setting the sleep timer 26 Adjusting menu settings 26 Selecting the... 27 Restoring default settings 27 Troubleshooting 28 Video and audio 28 Remote control 28 General 29 Maintenance 29 Cleaning the TV cabinet 29 Cleaning the TV screen 29 Specifications 29 Legal notices 29 One-year limited warranty 31 US and Canada Markets 31 Mexico Market 31

User Manual (English)
Page 4
... and the consumer electronics industry are committed to walls backed with entertainment system furniture and TVs. • Don't place TVs on furniture that can easily be heavy. Wall mounting If you decide to the manufacturer's recommendations. DX-15L150A11/DX19L150A11/DX-22L150A11 1 f CHILD SAFETY It makes a difference how and where you use your flat panel...
... and the consumer electronics industry are committed to walls backed with entertainment system furniture and TVs. • Don't place TVs on furniture that can easily be heavy. Wall mounting If you decide to the manufacturer's recommendations. DX-15L150A11/DX19L150A11/DX-22L150A11 1 f CHILD SAFETY It makes a difference how and where you use your flat panel...

User Manual (English)
Page 5
...be exposed to qualified service personnel. Lightning For added protection for long periods of time, unplug it can fall into your TV. • If your TV. 1 Read these instructions. 2 Keep these instructions. 3 Heed all warnings. 4 Follow all servicing to excessive heat such... Replacement parts When replacement parts are required, make absolutely sure that you do not remove any ventilation openings. 2 DX-15L150A11/DX19L150A11/DX-22L150A11 Important safety instructions Important safety instructions CAUTION RISK OF ELECTRIC SHOCK DO NOT OPEN This symbol indicates that dangerous ...
...be exposed to qualified service personnel. Lightning For added protection for long periods of time, unplug it can fall into your TV. • If your TV. 1 Read these instructions. 2 Keep these instructions. 3 Heed all warnings. 4 Follow all servicing to excessive heat such... Replacement parts When replacement parts are required, make absolutely sure that you do not remove any ventilation openings. 2 DX-15L150A11/DX19L150A11/DX-22L150A11 Important safety instructions Important safety instructions CAUTION RISK OF ELECTRIC SHOCK DO NOT OPEN This symbol indicates that dangerous ...

User Manual (English)
Page 6
... only those controls that are not considered defects. 1 2 3 4 5 7 6 1 Antenna lead-in damage and will form on the TV if the TV is connected to your TV, make sure that the cable ground must be connected to the grounding system of the building as close to its new surroundings... of the lead-in wire to find a recycler in any way. • When your area. Important safety instructions DX-15L150A11/DX19L150A11/DX-22L150A11 3 • If your TV does not operate normally by the operating instructions because incorrect adjustment of these materials may be regulated for about an hour ...
... only those controls that are not considered defects. 1 2 3 4 5 7 6 1 Antenna lead-in damage and will form on the TV if the TV is connected to your TV, make sure that the cable ground must be connected to the grounding system of the building as close to its new surroundings... of the lead-in wire to find a recycler in any way. • When your area. Important safety instructions DX-15L150A11/DX19L150A11/DX-22L150A11 3 • If your TV does not operate normally by the operating instructions because incorrect adjustment of these materials may be regulated for about an hour ...

User Manual (English)
Page 7
... damage to assemble or remove the stand. Installing the stand Note: Your TV may differ from the illustrations shown. 4 DX-15L150A11/DX19L150A11/DX-22L150A11 Installing and removing the stand Installing and removing the stand You must remove the stand column. Dynex is not responsible for any servicing other than that occur because of the...
... damage to assemble or remove the stand. Installing the stand Note: Your TV may differ from the illustrations shown. 4 DX-15L150A11/DX19L150A11/DX-22L150A11 Installing and removing the stand Installing and removing the stand You must remove the stand column. Dynex is not responsible for any servicing other than that occur because of the...

User Manual (English)
Page 8
...to adjust menu settings. Press to turn on the TV or put the TV in standby mode. Press to open the on page 13. For more information, see "Selecting the video input source" on -screen menu. TV components DX-15L150A11/DX19L150A11/DX-22L150A11 5 4 Secure the wall-mount bracket to ...the back of your TV: • Remote control • Component video cable and audio cable L and R • AC power ...
...to adjust menu settings. Press to turn on the TV or put the TV in standby mode. Press to open the on page 13. For more information, see "Selecting the video input source" on -screen menu. TV components DX-15L150A11/DX19L150A11/DX-22L150A11 5 4 Secure the wall-mount bracket to ...the back of your TV: • Remote control • Component video cable and audio cable L and R • AC power ...

User Manual (English)
Page 9
...on page 11. Item Name Description 1 SERVICE PORT For software updates only. For more information, see "Connecting an antenna, cable TV, or satellite TV box via coax" on page 11. For more information, see "Connecting a camcorder or game console" on page 10. 4 ... a camcorder or game console" on page 10 for an example of the connection. 2 SPDIF Connect a digital optical cable to this jack. 6 DX-15L150A11/DX19L150A11/DX-22L150A11 TV components Back Side 1 45 1 6 2 2 7 3 ANT/CABLE IN 8 3 4 10 9 Item Name Description Connect an S-Video device ...
...on page 11. Item Name Description 1 SERVICE PORT For software updates only. For more information, see "Connecting an antenna, cable TV, or satellite TV box via coax" on page 11. For more information, see "Connecting a camcorder or game console" on page 10. 4 ... a camcorder or game console" on page 10 for an example of the connection. 2 SPDIF Connect a digital optical cable to this jack. 6 DX-15L150A11/DX19L150A11/DX-22L150A11 TV components Back Side 1 45 1 6 2 2 7 3 ANT/CABLE IN 8 3 4 10 9 Item Name Description Connect an S-Video device ...

User Manual (English)
Page 10
... to open the on-screen menu. 8 MUTE Press to select STEREO, SAP (secondary audio language), or MONO. Press to enter a digital sub-channel number. TV components DX-15L150A11/DX19L150A11/DX-22L150A11 7 Remote control 1 2 3 14 4 15 5 6 7 16 8 9 17 18 10 11 19 12 20 13 21 22 Item Name 1 POWER 2 INPUT 3 Numbers/4 INFO Description...
... to open the on-screen menu. 8 MUTE Press to select STEREO, SAP (secondary audio language), or MONO. Press to enter a digital sub-channel number. TV components DX-15L150A11/DX19L150A11/DX-22L150A11 7 Remote control 1 2 3 14 4 15 5 6 7 16 8 9 17 18 10 11 19 12 20 13 21 22 Item Name 1 POWER 2 INPUT 3 Numbers/4 INFO Description...

User Manual (English)
Page 11
... a code that can leak from the batteries can manually program it using your universal remote control's instructions for details. 3 If all Dynex TVs manufactured after Jan. 1, 2007) Universal remote control manufacturer and model Philips PHDVD5, PH5DSS, PMDVR8, PDVR8 RCA RCU807 One for All Sony...-926-3020. You may not work with high humidity. • Do not place the remote control in the market. 8 DX-15L150A11/DX19L150A11/DX-22L150A11 Using the remote control Using the remote control Installing remote control batteries To install remote control batteries: 1 Press down on...
... a code that can leak from the batteries can manually program it using your universal remote control's instructions for details. 3 If all Dynex TVs manufactured after Jan. 1, 2007) Universal remote control manufacturer and model Philips PHDVD5, PH5DSS, PMDVR8, PDVR8 RCA RCU807 One for All Sony...-926-3020. You may not work with high humidity. • Do not place the remote control in the market. 8 DX-15L150A11/DX19L150A11/DX-22L150A11 Using the remote control Using the remote control Installing remote control batteries To install remote control batteries: 1 Press down on...

User Manual (English)
Page 12
... set it to the correct mode. Making connections DX-15L150A11/DX19L150A11/DX-22L150A11 9 Making connections Before you make any connections: • Check the plugs on the ends of cables to make sure that the TV and the device are securely inserted into jacks on the TV. • Make sure that all plugs are turned...
... set it to the correct mode. Making connections DX-15L150A11/DX19L150A11/DX-22L150A11 9 Making connections Before you make any connections: • Check the plugs on the ends of cables to make sure that the TV and the device are securely inserted into jacks on the TV. • Make sure that all plugs are turned...

User Manual (English)
Page 13
... Notes: • We recommend using a 75-Ohm, coaxial cable to the S-VIDEO OUT jack on the VCR and the S-VIDEO jack on your TV. 10 DX-15L150A11/DX19L150A11/DX-22L150A11 Making connections 3 Connect the other end of the component video cable to the COMPONENT Y/Pb/Pr jacks on the back of your... TV. 4 Connect an audio cable to the AUDIO OUT jacks (L/R) on the component device. 5 Connect the other end of the audio cable to select AV1...
... Notes: • We recommend using a 75-Ohm, coaxial cable to the S-VIDEO OUT jack on the VCR and the S-VIDEO jack on your TV. 10 DX-15L150A11/DX19L150A11/DX-22L150A11 Making connections 3 Connect the other end of the component video cable to the COMPONENT Y/Pb/Pr jacks on the back of your... TV. 4 Connect an audio cable to the AUDIO OUT jacks (L/R) on the component device. 5 Connect the other end of the audio cable to select AV1...

User Manual (English)
Page 14
... on the side of the cable to the PC/DVI AUDIO IN jack on the back of the TV, then connect the other end of the AV connection. Making connections DX-15L150A11/DX19L150A11/DX-22L150A11 11 Connecting a camcorder or game console Note: If your game console has an HDMI connection,... you "wake" your computer, press (power) on your TV or remote control. The INPUT SOURCE menu opens. 2 Press or ...
... on the side of the cable to the PC/DVI AUDIO IN jack on the back of the TV, then connect the other end of the AV connection. Making connections DX-15L150A11/DX19L150A11/DX-22L150A11 11 Connecting a camcorder or game console Note: If your game console has an HDMI connection,... you "wake" your computer, press (power) on your TV or remote control. The INPUT SOURCE menu opens. 2 Press or ...

User Manual (English)
Page 15
... time mode is turned off. 2 Connect one end of a digital optical audio cable (not included) to the DIGITAL OUTPUT jack on the back of the TV. 3 Press or to select English, French, or Spanish, then press ENTER to confirm. The Setup Wizard guides you chose Home mode (default - Note: ...then press ENTER to confirm. If you through a home theater system: 1 Turn on the TV and select a program to watch. 2 Turn on your TV) to the Choose your menu language screen. 12 DX-15L150A11/DX19L150A11/DX-22L150A11 Turning on your TV for the first time The first time you turn on the home theater system...
... time mode is turned off. 2 Connect one end of a digital optical audio cable (not included) to the DIGITAL OUTPUT jack on the back of the TV. 3 Press or to select English, French, or Spanish, then press ENTER to confirm. The Setup Wizard guides you chose Home mode (default - Note: ...then press ENTER to confirm. If you through a home theater system: 1 Turn on the TV and select a program to watch. 2 Turn on your TV) to the Choose your menu language screen. 12 DX-15L150A11/DX19L150A11/DX-22L150A11 Turning on your TV for the first time The first time you turn on the home theater system...

User Manual (English)
Page 16
... to change the channel immediately. To completely disconnect power, unplug the power cord. Understanding the basics DX-15L150A11/DX19L150A11/DX-22L150A11 13 Selecting the video input source To select the video input source: 1 Turn on your TV. For more than one page, press or to turn off : 1 Plug the power cord into standby...
... to change the channel immediately. To completely disconnect power, unplug the power cord. Understanding the basics DX-15L150A11/DX19L150A11/DX-22L150A11 13 Selecting the video input source To select the video input source: 1 Turn on your TV. For more than one page, press or to turn off : 1 Plug the power cord into standby...


