User Manual
Page 1
... To Start With PC Camera 07 4. User's Manual USB PC Camera Table of Contents 1. How To Install And Use The PC Camera 1.1 How To Install Camera Driver And Application Software 02 1.1.1 Install Driver 02 1.1.2 Install Application Software 02 1.2 Plug & Play Installation Under Windows 03 1.2.1 Install PC Camera and PC Camera driver 03 1.2.2 Restart Your Computer 04 1.3 How To Use Your PC Camera 05 2. How To Install MicroSoft NetMeeting (For Windows 98/Me/2000) 2.1 How To Install Microsoft NetMeeting 06 2.2 How To Start With PC Camera 06 3. Getting Started...
... To Start With PC Camera 07 4. User's Manual USB PC Camera Table of Contents 1. How To Install And Use The PC Camera 1.1 How To Install Camera Driver And Application Software 02 1.1.1 Install Driver 02 1.1.2 Install Application Software 02 1.2 Plug & Play Installation Under Windows 03 1.2.1 Install PC Camera and PC Camera driver 03 1.2.2 Restart Your Computer 04 1.3 How To Use Your PC Camera 05 2. How To Install MicroSoft NetMeeting (For Windows 98/Me/2000) 2.1 How To Install Microsoft NetMeeting 06 2.2 How To Start With PC Camera 06 3. Getting Started...

User Manual
Page 2
... file "launch.exe" on the Programs Menu. How To Install and Use The PC Camera 1.1 How To Install Camera Driver And Application Software Do not connect the camera to your CD-ROM drive, the installer screen will appear as a folder on the CD to start the installer program. 1.1.2 Install Application Software Check the box in front of the Software you would like to install, then click the "Install Application Software" button to start installing, then follow the instructions to "Programs...
... file "launch.exe" on the Programs Menu. How To Install and Use The PC Camera 1.1 How To Install Camera Driver And Application Software Do not connect the camera to your CD-ROM drive, the installer screen will appear as a folder on the CD to start the installer program. 1.1.2 Install Application Software Check the box in front of the Software you would like to install, then click the "Install Application Software" button to start installing, then follow the instructions to "Programs...
User Manual
Page 3
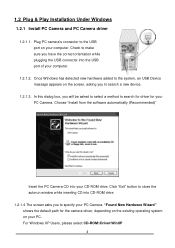
... the USB port of your CD-ROM drive. For Windows XP Users, please select CD-ROM:\Driver\WinXP 3 Check to the system, an USB Device message appears on your computer. Once Windows has detected new hardware added to make sure you to the USB port on your PC. 1.2 Plug & Play Installation Under Windows 1.2.1 Install PC Camera and PC Camera driver 1.2.1.1. Plug PC camera's connector to search a new device. 1.2.1.3. "Found New Hardware Wizard" shows the default path for your PC Camera.
... the USB port of your CD-ROM drive. For Windows XP Users, please select CD-ROM:\Driver\WinXP 3 Check to the system, an USB Device message appears on your computer. Once Windows has detected new hardware added to make sure you to the USB port on your PC. 1.2 Plug & Play Installation Under Windows 1.2.1 Install PC Camera and PC Camera driver 1.2.1.1. Plug PC camera's connector to search a new device. 1.2.1.3. "Found New Hardware Wizard" shows the default path for your PC Camera.

User Manual
Page 4
... your PC Camera device and driver location. Then, displays the detected device and the driver location. 1.2.1.6. Click "Next" from the following screen displays. Click "Finish" to complete PC Camera driver installation. 1.2.2 Restart Your Computer Once you have finished PC camera driver installation, you have finished the location selection, click "Next" to restart. 4 For Windows Me Users, please select CD-ROM:\Driver\WinME For Windows 2000 Users, please select CD-ROM:\Driver\Win2000 For Windows 98 Users, please...
... your PC Camera device and driver location. Then, displays the detected device and the driver location. 1.2.1.6. Click "Next" from the following screen displays. Click "Finish" to complete PC Camera driver installation. 1.2.2 Restart Your Computer Once you have finished PC camera driver installation, you have finished the location selection, click "Next" to restart. 4 For Windows Me Users, please select CD-ROM:\Driver\WinME For Windows 2000 Users, please select CD-ROM:\Driver\Win2000 For Windows 98 Users, please...
User Manual
Page 5
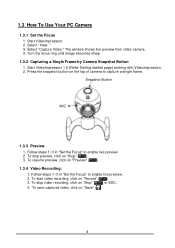
... on "Stop" ( ) or ESC. 4. Start VideoImpression 1.6 (Refer Getting started page) working with VideoImpression. 2. To stop preview, click on the top of camera to enable live preview. 2. To start video recording, click on "Save" ( ). 5 Turn the focus ring until image becomes sharp. 1.3.2 Capturing a Single Frame by Camera Snapshot Button 1. The window shows live preview from video camera. 4. " 3. To save captured video, click on "Record" ( ). 3. Start VideoImpression. 2. Snapshot Button MIC 1.3.3 Preview 1. 1.3 How To Use Your PC Camera 1.3.1 Set the Focus 1.
... on "Stop" ( ) or ESC. 4. Start VideoImpression 1.6 (Refer Getting started page) working with VideoImpression. 2. To stop preview, click on the top of camera to enable live preview. 2. To start video recording, click on "Save" ( ). 5 Turn the focus ring until image becomes sharp. 1.3.2 Capturing a Single Frame by Camera Snapshot Button 1. The window shows live preview from video camera. 4. " 3. To save captured video, click on "Record" ( ). 3. Start VideoImpression. 2. Snapshot Button MIC 1.3.3 Preview 1. 1.3 How To Use Your PC Camera 1.3.1 Set the Focus 1.
User Manual
Page 6
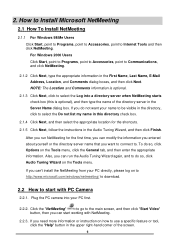
... Audio Tuning Wizard on to http://www.microsoft.com/windows/netmeeting/ to download. 2.2 How to the main screen, and then click "Start Video" button, then you can 't install the NetMeeting from your PC first. 2.2.2. Also, you can start with NetMeeting. 2.2.3. If you can modify the information you entered about yourself or the directory server name that you run the Audio Tuning Wizard again, and to Communications...
... Audio Tuning Wizard on to http://www.microsoft.com/windows/netmeeting/ to download. 2.2 How to the main screen, and then click "Start Video" button, then you can 't install the NetMeeting from your PC first. 2.2.2. Also, you can start with NetMeeting. 2.2.3. If you can modify the information you entered about yourself or the directory server name that you run the Audio Tuning Wizard again, and to Communications...
User Manual
Page 7
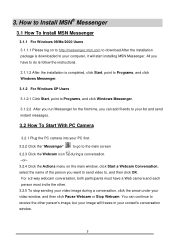
... the PC camera into your PC first. 3.2.2 Click the "Messenger" to go to the main screen 3.2.3 Click the Webcam icon during a conversation, click the arrow under your video window, and then click Pause Webcam or Stop Webcam. For a 2-way webcam conversation, both participants must have to do is follow the instructions. 3.1.1.2 After the installation is downloaded to receive the other . 3.2.5 To stop sending your video image...
... the PC camera into your PC first. 3.2.2 Click the "Messenger" to go to the main screen 3.2.3 Click the Webcam icon during a conversation, click the arrow under your video window, and then click Pause Webcam or Stop Webcam. For a 2-way webcam conversation, both participants must have to do is follow the instructions. 3.1.1.2 After the installation is downloaded to receive the other . 3.2.5 To stop sending your video image...
User Manual
Page 8
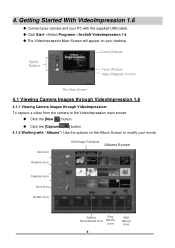
... Buttons Control Buttons Timer Window Video Playback Control The View Screen 4.1 Viewing Camera Images through VideoImpression 1.6 4.1.1 Viewing Camera Images through VideoImpression: To capture a video from the camera to Play Storyboard Icon Movie Icon 8 Edit Movie Icon Get Icon Still Image Template Albums Screen Acquire Icon Capture Icon Sort Icon Delete Icon Add to the VideoImpression main screen. u Click the [New ] button. u Click the [Capture ] button 4.1.2 Working with the supplied USB cable. 4. Getting Started With Videolmpression 1.6 u Connect your camera...
... Buttons Control Buttons Timer Window Video Playback Control The View Screen 4.1 Viewing Camera Images through VideoImpression 1.6 4.1.1 Viewing Camera Images through VideoImpression: To capture a video from the camera to Play Storyboard Icon Movie Icon 8 Edit Movie Icon Get Icon Still Image Template Albums Screen Acquire Icon Capture Icon Sort Icon Delete Icon Add to the VideoImpression main screen. u Click the [New ] button. u Click the [Capture ] button 4.1.2 Working with the supplied USB cable. 4. Getting Started With Videolmpression 1.6 u Connect your camera...
User Manual
Page 9
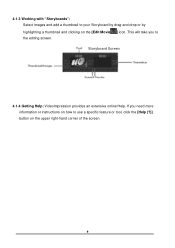
If you to Storyboard Screen 4.1.4 Getting Help: VideoImpression provides an extensive online Help. This will take you need more information or instructions on how to use a specific feature or tool, click the [Help (?)] button on the [Edit Movie the editing screen. ] icon. 4.1.3 Working with "Storyboards": Select images and add a thumbnail to your Storyboard by drag-and-drop or by highlighting a thumbnail and clicking on the upper right-hand corner of the screen. 9
If you to Storyboard Screen 4.1.4 Getting Help: VideoImpression provides an extensive online Help. This will take you need more information or instructions on how to use a specific feature or tool, click the [Help (?)] button on the [Edit Movie the editing screen. ] icon. 4.1.3 Working with "Storyboards": Select images and add a thumbnail to your Storyboard by drag-and-drop or by highlighting a thumbnail and clicking on the upper right-hand corner of the screen. 9

User Manual
Page 10
... a file name. Main Screen Command Buttons Navigation Window Magnification Controls Tool Bars 5.1 Viewing Camera Images through PhotoImpression 3.0 5.1.1 Viewing Camera Images through PhotoImpression: u Click the [Get Photo ] button. u Click the [Camera/Scanner ] button u View live video from the [Video Camera ] button Crop/ and you need more information or instructions on your PC with "Albums": Reverse Icon Paste Icon Close Icon Use the feature to view the album options. 5.1.4 Getting Help: PhotoImpression provides extensive online help. 5. u Click Start...
... a file name. Main Screen Command Buttons Navigation Window Magnification Controls Tool Bars 5.1 Viewing Camera Images through PhotoImpression 3.0 5.1.1 Viewing Camera Images through PhotoImpression: u Click the [Get Photo ] button. u Click the [Camera/Scanner ] button u View live video from the [Video Camera ] button Crop/ and you need more information or instructions on your PC with "Albums": Reverse Icon Paste Icon Close Icon Use the feature to view the album options. 5.1.4 Getting Help: PhotoImpression provides extensive online help. 5. u Click Start...

