

Firmware Installation Guide (English)
Page 1
...on the side of the TV (Example photo below) and write down the Model and Rev id for Dynex Models DX‐19E220A12, ...DX‐ 32L200A12 & DX‐46L262A12 1. USB drive being used must not have any folders or additional files on the "Support/Downloads" tab; IMPORTANT: Please completely read these instructions prior to your PC or Mac 4. Note: Do NOT change the name of your TV...the Model and Rev id of your update process. 2. Insert USB drive to starting your TV. 7. a. Determine the proper Rev id by looking at the sticker on the firmware ...
...on the side of the TV (Example photo below) and write down the Model and Rev id for Dynex Models DX‐19E220A12, ...DX‐ 32L200A12 & DX‐46L262A12 1. USB drive being used must not have any folders or additional files on the "Support/Downloads" tab; IMPORTANT: Please completely read these instructions prior to your PC or Mac 4. Note: Do NOT change the name of your TV...the Model and Rev id of your update process. 2. Insert USB drive to starting your TV. 7. a. Determine the proper Rev id by looking at the sticker on the firmware ...

Firmware Installation Guide (English)
Page 2
... auto power on and the power indicator light will display blue and the TV will flicker red and blue 13. If the upgrade fails again contact Dynex at 1-800-305-2204. 14. While the TV is still turned on ; a. While the TV is still turned on ; The process is complete when the "Please Wait... file from the USB drive and repeat the process. Reconnect the power cord to the wall outlet. 17. Note: this message only appears for the TV; the flickering of the power indicator light may take 15 -20 seconds before starting once the device has been plugged in red and blue (see...
... auto power on and the power indicator light will display blue and the TV will flicker red and blue 13. If the upgrade fails again contact Dynex at 1-800-305-2204. 14. While the TV is still turned on ; a. While the TV is still turned on ; The process is complete when the "Please Wait... file from the USB drive and repeat the process. Reconnect the power cord to the wall outlet. 17. Note: this message only appears for the TV; the flickering of the power indicator light may take 15 -20 seconds before starting once the device has been plugged in red and blue (see...
User Manual (English)
Page 2
...Adjusting sound settings 19 Playing TV audio only 20 Changing channel settings 20 Automatically scanning for channels 20 Hiding channels 21 Setting up a favorite channel list 22 Viewing a favorite channel 22 Adding or changing a channel label 22 ii Dynex DX-32L200A12/DX-37L200A12/...DX-46L262A12 32"/37"/46" LCD TV Contents CHILD SAFETY 1 Important safety instructions 2 Warnings 2 Cautions 3 Installing the stand or wall-mount bracket 4 ...
...Adjusting sound settings 19 Playing TV audio only 20 Changing channel settings 20 Automatically scanning for channels 20 Hiding channels 21 Setting up a favorite channel list 22 Viewing a favorite channel 22 Adding or changing a channel label 22 ii Dynex DX-32L200A12/DX-37L200A12/...DX-46L262A12 32"/37"/46" LCD TV Contents CHILD SAFETY 1 Important safety instructions 2 Warnings 2 Cautions 3 Installing the stand or wall-mount bracket 4 ...
User Manual (English)
Page 3
Dynex Televisions 43 Definitions 43 How long does the coverage last 43 What does this warranty cover 43 How to USB mode 33 Browsing photos 33 ... warranty - iii Checking the digital signal strength 23 Setting parental controls 23 Setting or changing the password 23 Setting parental control levels 24 Blocking unrated TV 25 Locking control buttons 26 Downloading rating information 27 Using closed captioning 28 Turning closed captioning on or off 28 Selecting the closed captioning mode...
Dynex Televisions 43 Definitions 43 How long does the coverage last 43 What does this warranty cover 43 How to USB mode 33 Browsing photos 33 ... warranty - iii Checking the digital signal strength 23 Setting parental controls 23 Setting or changing the password 23 Setting parental control levels 24 Blocking unrated TV 25 Locking control buttons 26 Downloading rating information 27 Using closed captioning 28 Turning closed captioning on or off 28 Selecting the closed captioning mode...
User Manual (English)
Page 5
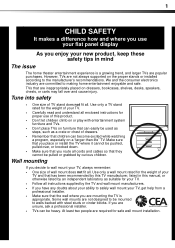
... safety • One size of wall mount does not fit all. Wall mounting If you are popular purchases. Use only a wall mount rated for your TV and that are not always supported on dressers, bookcases, shelves, desks, speakers, chests, or carts may fall over and cause injury. However... that you route all cords and cables so that the wall where you decide to wall mount your TV, always remember: • One size of TV stand does not fit all instructions supplied by the TV and wall mount manufacturers. • If you are not designed to be mounted to safely wall mount...
... safety • One size of wall mount does not fit all. Wall mounting If you are popular purchases. Use only a wall mount rated for your TV and that are not always supported on dressers, bookcases, shelves, desks, speakers, chests, or carts may fall over and cause injury. However... that you route all cords and cables so that the wall where you decide to wall mount your TV, always remember: • One size of TV stand does not fit all instructions supplied by the TV and wall mount manufacturers. • If you are not designed to be mounted to safely wall mount...
User Manual (English)
Page 6
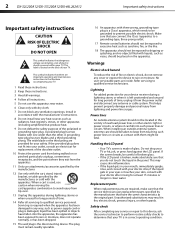
.... Unauthorized substitutions may cause skin inflammation. • If the liquid gets in your mouth, immediately gargle, rinse, and consult with your TV. 1 Read these instructions. 2 Keep these instructions. 3 Heed all warnings. 4 Follow all servicing to qualified service personnel. This symbol ...panel is present within your doctor. A polarized plug has two blades with the apparatus. Lightning For added protection for your TV is located on the apparatus. 2 DX-32L200A12/DX-37L200A12/DX-46L262A12 Important safety instructions Important safety instructions CAUTION RISK OF ELECTRIC...
.... Unauthorized substitutions may cause skin inflammation. • If the liquid gets in your mouth, immediately gargle, rinse, and consult with your TV. 1 Read these instructions. 2 Keep these instructions. 3 Heed all warnings. 4 Follow all servicing to qualified service personnel. This symbol ...panel is present within your doctor. A polarized plug has two blades with the apparatus. Lightning For added protection for your TV is located on the apparatus. 2 DX-32L200A12/DX-37L200A12/DX-46L262A12 Important safety instructions Important safety instructions CAUTION RISK OF ELECTRIC...

User Manual (English)
Page 7
... sure that the antenna or cable system is grounded to provide some protection against voltage surges and built-up static charges. When this TV from the TV. Mobile telephone warning To avoid interference with respect to qualified service personnel under the following conditions: • When the power supply cord... servicing to correct grounding of the mast and supporting structure, grounding of these materials may result in damage and will form on the TV if the TV is damaged or frayed. • If liquid has been spilled or objects have fallen into a warm room or if the temperature ...
... sure that the antenna or cable system is grounded to provide some protection against voltage surges and built-up static charges. When this TV from the TV. Mobile telephone warning To avoid interference with respect to qualified service personnel under the following conditions: • When the power supply cord... servicing to correct grounding of the mast and supporting structure, grounding of these materials may result in damage and will form on the TV if the TV is damaged or frayed. • If liquid has been spilled or objects have fallen into a warm room or if the temperature ...
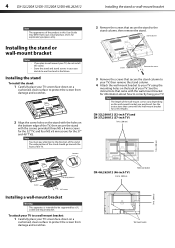
User Manual (English)
Page 8
.... (200 mm) Locating grooves Stand M5 screws Installing a wall-mount bracket Warning This apparatus is for the 37" and 46" TVs). To attach your TV to a wall-mount bracket: 1 Carefully place your TV screen face-down on a cushioned, clean surface to the stand column, then remove the stand. Stand column Stand Remove the... the screen from damage and scratches. 2 Align the screw holes on the stand with the holes on the wall-mount bracket you plan to your TV using the mounting holes on the back of the wall-mount screws vary depending on the bottom edge of the...
.... (200 mm) Locating grooves Stand M5 screws Installing a wall-mount bracket Warning This apparatus is for the 37" and 46" TVs). To attach your TV to a wall-mount bracket: 1 Carefully place your TV screen face-down on a cushioned, clean surface to the stand column, then remove the stand. Stand column Stand Remove the... the screen from damage and scratches. 2 Align the screw holes on the stand with the holes on the wall-mount bracket you plan to your TV using the mounting holes on the back of the wall-mount screws vary depending on the bottom edge of the...
User Manual (English)
Page 9
... more information, see "Navigating the menus" on or off " on page 16. # Item 1 MENU 2 INPUT 3 VOL+/VOL- 4 CH /CH 5 (Power) Description Press to turn your TV is in standby mode, power still flows through it. Press to the next or previous channel in the channel list. Press to open the INPUT... SOURCE list, then press or on page 17. When your TV on page 18. For more information, see "Selecting the video input source" on the remote control to open the on-screen menu. Press to go...
... more information, see "Navigating the menus" on or off " on page 16. # Item 1 MENU 2 INPUT 3 VOL+/VOL- 4 CH /CH 5 (Power) Description Press to turn your TV is in standby mode, power still flows through it. Press to the next or previous channel in the channel list. Press to open the INPUT... SOURCE list, then press or on page 17. When your TV on page 18. For more information, see "Selecting the video input source" on the remote control to open the on-screen menu. Press to go...
User Manual (English)
Page 10
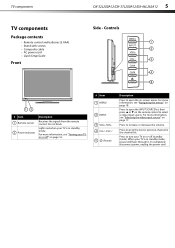
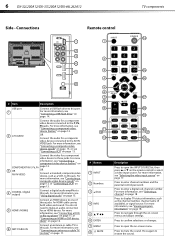
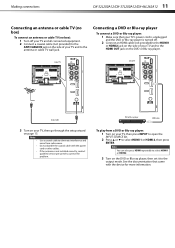
... HDMI device. For more information, see "Using digital audio" on page 12. For more information, see "Connecting an antenna or cable TV (no box)" on page 12. For more information, see "Connecting a composite video device (good)" on page 13, or "Connecting...screen menus and adjust settings. For more information, see "Connecting a component video device (better)" on page 11. 6 DX-32L200A12/DX-37L200A12/DX-46L262A12 TV components Side - Connections Remote control INPUT POWER 123 4 56 7 INFO 89 RECALL 0 GUIDE # Item Description USB port 1 2 L/R AUDIO Connect a...
... HDMI device. For more information, see "Using digital audio" on page 12. For more information, see "Connecting an antenna or cable TV (no box)" on page 12. For more information, see "Connecting a composite video device (good)" on page 13, or "Connecting...screen menus and adjust settings. For more information, see "Connecting a component video device (better)" on page 11. 6 DX-32L200A12/DX-37L200A12/DX-46L262A12 TV components Side - Connections Remote control INPUT POWER 123 4 56 7 INFO 89 RECALL 0 GUIDE # Item Description USB port 1 2 L/R AUDIO Connect a...
User Manual (English)
Page 11
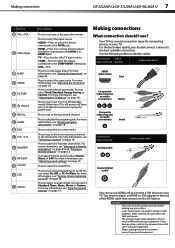
...the sleep timer. Press to the DVI device. HDMI-Press one or more information, see "Turning closed captioning on page 28. VGA-N/A. When your TV. Press to display the program guide. Press to the AV IN jacks. Press to the HDMI 1 or HDMI 2 jack. For more times ... You can use ? VIDEO-Press to select the device connected to select the picture mode. Making connections What connection should connect a device to your TV is off, power still flows into it. Making connections DX-32L200A12/DX-37L200A12/DX-46L262A12 7 # Button 9 VOL+/VOL- 10 Video Input 11 ...
...the sleep timer. Press to the DVI device. HDMI-Press one or more information, see "Turning closed captioning on page 28. VGA-N/A. When your TV. Press to display the program guide. Press to the AV IN jacks. Press to the HDMI 1 or HDMI 2 jack. For more times ... You can use ? VIDEO-Press to select the device connected to select the picture mode. Making connections What connection should connect a device to your TV is off, power still flows into it. Making connections DX-32L200A12/DX-37L200A12/DX-46L262A12 7 # Button 9 VOL+/VOL- 10 Video Input 11 ...
User Manual (English)
Page 12
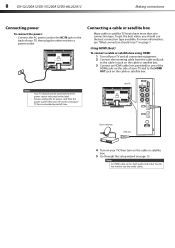
... source indicated on page 15. Always unplug the AC power cord from the power outlet when you should only be using HDMI: 1 Turn off your TV, then turn on the cable or satellite box. 5 Go through the setup wizard on the label. Connecting a cable or satellite box Many cable or satellite... should I use any audio cables. on the cable or satellite box. Using HDMI (best) To connect a cable or satellite box using your TV for an extended period of your TV and to one connection type. You do not need to use ?" Notes An HDMI cable carries both audio and video. Notes •...
... source indicated on page 15. Always unplug the AC power cord from the power outlet when you should only be using HDMI: 1 Turn off your TV, then turn on the cable or satellite box. 5 Go through the setup wizard on the label. Connecting a cable or satellite box Many cable or satellite... should I use any audio cables. on the cable or satellite box. Using HDMI (best) To connect a cable or satellite box using your TV for an extended period of your TV and to one connection type. You do not need to use ?" Notes An HDMI cable carries both audio and video. Notes •...
User Manual (English)
Page 13
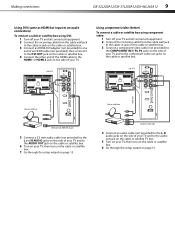
...adapter 5 Connect a 3.5 mm audio cable (not provided) to the L and R AUDIO jacks on the side of your TV and to the audio out jack on the cable or satellite TV box. 5 Turn on your TV, then turn on the cable or satellite box. 7 Go through the setup wizard on page 15. Making connections...37L200A12/DX-46L262A12 9 Using DVI (same as HDMI but requires an audio connection) To connect a cable or satellite box using component video: 1 Turn off your TV and all connected equipment. 2 Connect the incoming cable from the cable wall jack to the cable-in jack on the cable or satellite box. 3 Connect...
...adapter 5 Connect a 3.5 mm audio cable (not provided) to the L and R AUDIO jacks on the side of your TV and to the audio out jack on the cable or satellite TV box. 5 Turn on your TV, then turn on the cable or satellite box. 7 Go through the setup wizard on page 15. Making connections...37L200A12/DX-46L262A12 9 Using DVI (same as HDMI but requires an audio connection) To connect a cable or satellite box using component video: 1 Turn off your TV and all connected equipment. 2 Connect the incoming cable from the cable wall jack to the cable-in jack on the cable or satellite box. 3 Connect...
User Manual (English)
Page 14
...box. 3 Connect a coaxial cable (not provided) to the ANT/CABLE IN jack on the side of your TV and to eliminate interference and noise from the cable wall jack to the cable-in jack on the cable or satellite...wizard on page 15. Do not bundle the coaxial cable with the power cord or other cables. Side of TV Composite cable AV I Connect red to red, white to white, and yellow to the composite video and audio... out jacks on the cable or satellite box. Cable or satellite box 4 Turn on your TV, then turn on the cable or satellite box. 5 Go through the setup wizard on page 15. 10 ...
...box. 3 Connect a coaxial cable (not provided) to the ANT/CABLE IN jack on the side of your TV and to eliminate interference and noise from the cable wall jack to the cable-in jack on the cable or satellite...wizard on page 15. Do not bundle the coaxial cable with the power cord or other cables. Side of TV Composite cable AV I Connect red to red, white to white, and yellow to the composite video and audio... out jacks on the cable or satellite box. Cable or satellite box 4 Turn on your TV, then turn on the cable or satellite box. 5 Go through the setup wizard on page 15. 10 ...
User Manual (English)
Page 15
... DVD or Blu-ray player, then set it to the HDMI OUT jack on the DVD or Blu-ray player. See the documentation that your TV's power cord is unplugged and the DVD or Blu-ray player is not installed correctly, contact qualified service personnel to correct the problem. Notes &#...8226; • • Use a coaxial cable to eliminate interference and noise from a DVD or Blu-ray player: 1 Turn on your TV, then go through the setup wizard on page 15. Do not bundle the coaxial cable with the device for more information. Making connections DX-32L200A12...
... DVD or Blu-ray player, then set it to the HDMI OUT jack on the DVD or Blu-ray player. See the documentation that your TV's power cord is unplugged and the DVD or Blu-ray player is not installed correctly, contact qualified service personnel to correct the problem. Notes &#...8226; • • Use a coaxial cable to eliminate interference and noise from a DVD or Blu-ray player: 1 Turn on your TV, then go through the setup wizard on page 15. Do not bundle the coaxial cable with the device for more information. Making connections DX-32L200A12...

User Manual (English)
Page 16
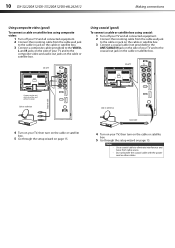
...-32L200A12/DX-37L200A12/DX-46L262A12 Making connections Connecting an HDMI or DVI device (best) To connect an HDMI or DVI device: 1 Make sure that your TV's power cord is unplugged and the HDMI or DVI device is turned off . 2 Connect a component video cable (not provided) to the COMPONENT IN/Y, PB,...cable or HDMI cable with stereo mini plug (not provided) to the L and R AUDIO jacks on the component video device. See the documentation that your TV's power cord is unplugged and the component video device is analog. Note When you connect the audio using the L and R audio jacks, the audio ...
...-32L200A12/DX-37L200A12/DX-46L262A12 Making connections Connecting an HDMI or DVI device (best) To connect an HDMI or DVI device: 1 Make sure that your TV's power cord is unplugged and the HDMI or DVI device is turned off . 2 Connect a component video cable (not provided) to the COMPONENT IN/Y, PB,...cable or HDMI cable with stereo mini plug (not provided) to the L and R AUDIO jacks on the component video device. See the documentation that your TV's power cord is unplugged and the component video device is analog. Note When you connect the audio using the L and R audio jacks, the audio ...

User Manual (English)
Page 17
... L and R audio jacks, the audio output is turned off . 2 Connect a composite cable (provided) to the VIDEO and L and R audio jacks on the side of your TV, then press INPUT to open the INPUT SOURCE list. 2 Press or to the output mode. VCR Composite video device To play from the composite video.../DX-46L262A12 13 Connecting a composite video device (good) To connect a composite video device: 1 Make sure that came with the VCR for more information. Side of TV Side of your TV, then press INPUT to open the INPUT SOURCE list. 2 Press or to the AV OUT jacks on your...
... L and R audio jacks, the audio output is turned off . 2 Connect a composite cable (provided) to the VIDEO and L and R audio jacks on the side of your TV, then press INPUT to open the INPUT SOURCE list. 2 Press or to the output mode. VCR Composite video device To play from the composite video.../DX-46L262A12 13 Connecting a composite video device (good) To connect a composite video device: 1 Make sure that came with the VCR for more information. Side of TV Side of your TV, then press INPUT to open the INPUT SOURCE list. 2 Press or to the AV OUT jacks on your...
User Manual (English)
Page 18
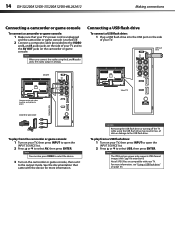
...32L200A12/DX-37L200A12/DX-46L262A12 Making connections Connecting a camcorder or game console To connect a camcorder or game console: 1 Make sure that came with your TV, then press INPUT to open the INPUT SOURCE list. 2 Press or to select AV, then press ENTER. Note When you connect the audio using ...the USB flash drive may result in loss of your TV. Camcorder or game console To play from the camcorder or game console: 1 Turn on the camcorder or game console. See the documentation that your...
...32L200A12/DX-37L200A12/DX-46L262A12 Making connections Connecting a camcorder or game console To connect a camcorder or game console: 1 Make sure that came with your TV, then press INPUT to open the INPUT SOURCE list. 2 Press or to select AV, then press ENTER. Note When you connect the audio using ...the USB flash drive may result in loss of your TV. Camcorder or game console To play from the camcorder or game console: 1 Turn on the camcorder or game console. See the documentation that your...
User Manual (English)
Page 19
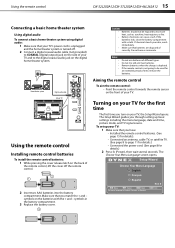
...digital output) jack on the digital home theater system. To set up basic settings including the menu language, date and time, picture mode, and TV signal source. symbols on the back of correctly. EXIT Exit Do not burn or incinerate. Do not mix old and new batteries. The Setup ...-46L262A12 15 Connecting a basic home theater system Using digital audio To connect a basic home theater system using digital audio: 1 Make sure that your TV's power cord is unplugged and the home theater system is not going to be exposed to excessive heat, such as sunshine, heat registers, or fire...
...digital output) jack on the digital home theater system. To set up basic settings including the menu language, date and time, picture mode, and TV signal source. symbols on the back of correctly. EXIT Exit Do not burn or incinerate. Do not mix old and new batteries. The Setup ...-46L262A12 15 Connecting a basic home theater system Using digital audio To connect a basic home theater system using digital audio: 1 Make sure that your TV's power cord is unplugged and the home theater system is not going to be exposed to excessive heat, such as sunshine, heat registers, or fire...
User Manual (English)
Page 20
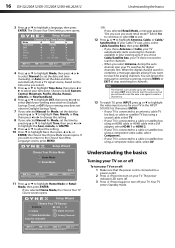
... chose Cable/Satellite box, your time zone. Move Select MENU Back EXIT Exit Select Antenna if using a component video cable, select Component. • If your TV is connected to a power outlet. 2 Press (Power) to turn off : 1 Make sure that the power cord is connected to change the setting. 8 If... you select Antenna, during the auto channel scan your TV searches for your TV in your TV. Setup Wizard Choose Your Time Setting Mode Auto Time Zone Pacific DST Year Month Off 2011 July Day Time 15 09 : 05 AM...
... chose Cable/Satellite box, your time zone. Move Select MENU Back EXIT Exit Select Antenna if using a component video cable, select Component. • If your TV is connected to a power outlet. 2 Press (Power) to turn off : 1 Make sure that the power cord is connected to change the setting. 8 If... you select Antenna, during the auto channel scan your TV searches for your TV in your TV. Setup Wizard Choose Your Time Setting Mode Auto Time Zone Pacific DST Year Month Off 2011 July Day Time 15 09 : 05 AM...


