
User Manual (English)
Page 10
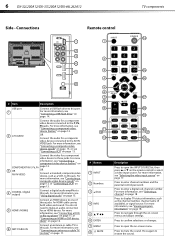
... components Side - Connections Remote control INPUT POWER 123 4 56 7 INFO 89 RECALL 0 GUIDE # Item Description USB port 1 2 L/R AUDIO Connect a USB flash drive to these jacks. For more information, see "Connecting a VCR" on page 11. Connect the video for an HDMI device. For more information, see ... navigate through the on page 15. 5 HDMI1/HDMI2 6 ANT/CABLE IN Connect an HDMI device to make an audio connection for a component video device to this jack. Press to enter a digital sub-channel number. Press to restore the sound. Press again to mute the sound....
... components Side - Connections Remote control INPUT POWER 123 4 56 7 INFO 89 RECALL 0 GUIDE # Item Description USB port 1 2 L/R AUDIO Connect a USB flash drive to these jacks. For more information, see "Connecting a VCR" on page 11. Connect the video for an HDMI device. For more information, see ... navigate through the on page 15. 5 HDMI1/HDMI2 6 ANT/CABLE IN Connect an HDMI device to make an audio connection for a component video device to this jack. Press to enter a digital sub-channel number. Press to restore the sound. Press again to mute the sound....
User Manual (English)
Page 11
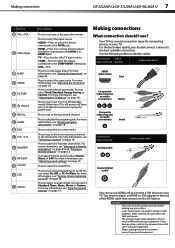
... a device to identify cables: Connection Video type and jack quality Cable connector HDMI video/audio Best Component video (requires an audio connection) Better Composite video (requires an audio connection) Good Connection type and jack Analog audio Cable connectors Coaxial digital audio You can select Standard, News, Music, Movie, or...EXIT 18 CH+ / CH- 19 FAVORITE 20 MTS/SAP 21 CH-LIST 22 CCD 23 AUDIO Description Press to select an audio mode. Press to the COMPONENT video jacks. COMP-Press to select the device connected to select the input source. Press to select the ...
... a device to identify cables: Connection Video type and jack quality Cable connector HDMI video/audio Best Component video (requires an audio connection) Better Composite video (requires an audio connection) Good Connection type and jack Analog audio Cable connectors Coaxial digital audio You can select Standard, News, Music, Movie, or...EXIT 18 CH+ / CH- 19 FAVORITE 20 MTS/SAP 21 CH-LIST 22 CCD 23 AUDIO Description Press to select an audio mode. Press to the COMPONENT video jacks. COMP-Press to select the device connected to select the input source. Press to select the ...
User Manual (English)
Page 12
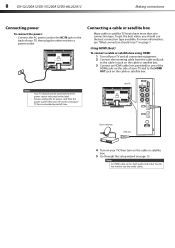
Notes An HDMI cable carries both audio and video. For more than one of the HDMI jacks on the side of your TV and to the HDMI OUT jack on the cable or satellite box. 3 Connect an HDMI cable (not provided) to one connection type. on page 15. Side of TV Cable or ...HDMI cable 4 Turn on your TV for an extended period of your TV and all connected equipment. 2 Connect the incoming cable from the cable wall jack to use the best connection type available. 8 DX-32L200A12/DX-37L200A12/DX-46L262A12 Making connections Connecting power To connect the power: • Connect the ...
Notes An HDMI cable carries both audio and video. For more than one of the HDMI jacks on the side of your TV and to the HDMI OUT jack on the cable or satellite box. 3 Connect an HDMI cable (not provided) to one connection type. on page 15. Side of TV Cable or ...HDMI cable 4 Turn on your TV for an extended period of your TV and all connected equipment. 2 Connect the incoming cable from the cable wall jack to use the best connection type available. 8 DX-32L200A12/DX-37L200A12/DX-46L262A12 Making connections Connecting power To connect the power: • Connect the ...
User Manual (English)
Page 13
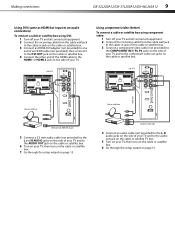
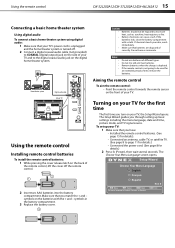
... box. 6 Go through the setup wizard on the cable or satellite box. Cable or satellite box Component video cable 4 Connect an audio cable (not provided) to the L, R audio jacks on the side of your TV. Side of TV 3.5 mm audio cable Audio cable Cable or satellite box HDMI cable with HDMI-DVI adapter 5 Connect a 3.5 mm... the other end of the HDMI cable to the HDMI1 or HDMI 2 jack on the side of your TV and to the audio out jack on the cable or satellite TV box. 5 Turn on your TV and to the L and R AUDIO jacks on the side of your TV, then turn on the cable or satellite...
... box. 6 Go through the setup wizard on the cable or satellite box. Cable or satellite box Component video cable 4 Connect an audio cable (not provided) to the L, R audio jacks on the side of your TV. Side of TV 3.5 mm audio cable Audio cable Cable or satellite box HDMI cable with HDMI-DVI adapter 5 Connect a 3.5 mm... the other end of the HDMI cable to the HDMI1 or HDMI 2 jack on the side of your TV and to the audio out jack on the cable or satellite TV box. 5 Turn on your TV and to the L and R AUDIO jacks on the side of your TV, then turn on the cable or satellite...
User Manual (English)
Page 14
... 1 Turn off your TV and all connected equipment. 2 Connect the incoming cable from the cable wall jack to the cable-in jack on the cable or satellite box. 3 Connect a composite cable (provided) to the VIDEO, L and R jacks on the side of TV Composite cable AV I Connect red to red, white to white, and... yellow to green. Side of your TV and to the composite video and audio out jacks on the cable or satellite box. Side of TV Using coaxial (good) To connect a cable or satellite box using composite video: 1 Turn off your...
... 1 Turn off your TV and all connected equipment. 2 Connect the incoming cable from the cable wall jack to the cable-in jack on the cable or satellite box. 3 Connect a composite cable (provided) to the VIDEO, L and R jacks on the side of TV Composite cable AV I Connect red to red, white to white, and... yellow to green. Side of your TV and to the composite video and audio out jacks on the cable or satellite box. Side of TV Using coaxial (good) To connect a cable or satellite box using composite video: 1 Turn off your...

User Manual (English)
Page 16
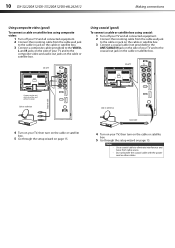
... that your TV and to the output mode. Note When you connect the audio using the L and R audio jacks, the audio output is turned off . 2 Connect a component video cable (not provided) to the COMPONENT IN/Y, PB, PR jacks on the DVI device. To play from an HDMI or DVI device: 1...open the INPUT SOURCE list. 2 Press or to the output mode. Component video device 3 Connect an audio cable (not provided) to the L and R audio jacks on the side of your TV and to the AUDIO OUT jack on the side of TV Connecting a component video device (better) To connect a component video device:...
... that your TV and to the output mode. Note When you connect the audio using the L and R audio jacks, the audio output is turned off . 2 Connect a component video cable (not provided) to the COMPONENT IN/Y, PB, PR jacks on the DVI device. To play from an HDMI or DVI device: 1...open the INPUT SOURCE list. 2 Press or to the output mode. Component video device 3 Connect an audio cable (not provided) to the L and R audio jacks on the side of your TV and to the AUDIO OUT jack on the side of TV Connecting a component video device (better) To connect a component video device:...

User Manual (English)
Page 17
...2 Press or to select AV, then press ENTER. Note When you connect the audio using the L and R audio jacks, the audio output is turned off . 2 Connect a composite cable (provided) to the VIDEO and L and R audio jacks on the VCR. Note You can also press VIDEO to select the VCR. 3 ...power cord is unplugged and the VCR is analog. Note When you connect the audio using the L and R audio jacks, the audio output is turned off . 2 Connect a composite cable (provided) to the VIDEO and L and R audio jacks on the composite video device. See the documentation that came with the VCR ...
...2 Press or to select AV, then press ENTER. Note When you connect the audio using the L and R audio jacks, the audio output is turned off . 2 Connect a composite cable (provided) to the VIDEO and L and R audio jacks on the VCR. Note You can also press VIDEO to select the VCR. 3 ...power cord is unplugged and the VCR is analog. Note When you connect the audio using the L and R audio jacks, the audio output is turned off . 2 Connect a composite cable (provided) to the VIDEO and L and R audio jacks on the composite video device. See the documentation that came with the VCR ...
User Manual (English)
Page 18
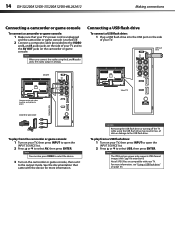
... the documentation that your TV's power cord is unplugged and the camcorder or game console is turned off the TV while using the L and R audio jacks, the audio output is analog. Note You can also press VIDEO to select the device. 3 Turn on the side of TV Connect red to red, white to... ENTER. Composite cable AV I Side of TV Caution Removing the USB flash drive or turning off . 2 Connect a composite cable (provided) to the VIDEO and L and R audio jacks on the camcorder or game console, then set it to green.
... the documentation that your TV's power cord is unplugged and the camcorder or game console is turned off the TV while using the L and R audio jacks, the audio output is analog. Note You can also press VIDEO to select the device. 3 Turn on the side of TV Connect red to red, white to... ENTER. Composite cable AV I Side of TV Caution Removing the USB flash drive or turning off . 2 Connect a composite cable (provided) to the VIDEO and L and R audio jacks on the camcorder or game console, then set it to green.
User Manual (English)
Page 19
... the remote control towards the remote sensor on the back of the remote control, lift the cover off . 2 Connect a digital coaxial audio cable (not provided) to COAXIAL (digital output) jack on the side of your TV and to page 11 for details.) • Connected the power cord. (See page 8 for an extended...; Installed the remote control batteries. (See page 15 for details). • Connected an antenna, cable TV, or satellite TV. (See page 8 to the digital coaxial audio jack on the batteries with a cloth. Do not burn or incinerate. Do not mix old and new batteries.
... the remote control towards the remote sensor on the back of the remote control, lift the cover off . 2 Connect a digital coaxial audio cable (not provided) to COAXIAL (digital output) jack on the side of your TV and to page 11 for details.) • Connected the power cord. (See page 8 for an extended...; Installed the remote control batteries. (See page 15 for details). • Connected an antenna, cable TV, or satellite TV. (See page 8 to the digital coaxial audio jack on the batteries with a cloth. Do not burn or incinerate. Do not mix old and new batteries.
User Manual (English)
Page 21
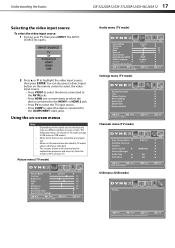
..., then press ENTER. Menu items that are not selectable are for explanation purposes and may see different options on your screen. Audio menu (TV mode) 2 Press or to the COMPONENT video jacks. Using the on-screen menus Notes • • • • Depending on the signal source selected, you may vary from...
..., then press ENTER. Menu items that are not selectable are for explanation purposes and may see different options on your screen. Audio menu (TV mode) 2 Press or to the COMPONENT video jacks. Using the on-screen menus Notes • • • • Depending on the signal source selected, you may vary from...

Quick Setup Guide (English)
Page 1
...Using component cables (better) COMPONENT OUT Note: The COMPONENT IN jacks share the audio jacks with the wall-mount bracket for connecting devices. Using composite cables (good) AUDIO/VIDEO OUT Note: The AV IN VIDEO jack shares the audio jacks with multiple devices Blu-ray player/DVD player/VCR Cable or ...satellite TV box AV receiver Game console or camera We recommend that came with the AV IN VIDEO jack. COAXIAL IN Connecting a...
...Using component cables (better) COMPONENT OUT Note: The COMPONENT IN jacks share the audio jacks with the wall-mount bracket for connecting devices. Using composite cables (good) AUDIO/VIDEO OUT Note: The AV IN VIDEO jack shares the audio jacks with multiple devices Blu-ray player/DVD player/VCR Cable or ...satellite TV box AV receiver Game console or camera We recommend that came with the AV IN VIDEO jack. COAXIAL IN Connecting a...

Quick Setup Guide (English)
Page 2
...year limited warranty Visit www.dynexproducts.com for analog programs. CH-LIST Opens the channel list. DYNEX is connected to On. Cinema: Stretches the image at the edges, but keeps a clear image... SLEEP Sets the sleep timer. MTS/SAP Cycles through mono, stereo, and secondary audio for details. AUDIO Selects the audio modes. If you select Manual, you have problems programming your TV. Need additional...9658; to remove the battery compartment cover. 2 Insert two AAA batteries into the AC IN jack on or off . For example, select HDMI if your TV is not an energy-saving ...
...year limited warranty Visit www.dynexproducts.com for analog programs. CH-LIST Opens the channel list. DYNEX is connected to On. Cinema: Stretches the image at the edges, but keeps a clear image... SLEEP Sets the sleep timer. MTS/SAP Cycles through mono, stereo, and secondary audio for details. AUDIO Selects the audio modes. If you select Manual, you have problems programming your TV. Need additional...9658; to remove the battery compartment cover. 2 Insert two AAA batteries into the AC IN jack on or off . For example, select HDMI if your TV is not an energy-saving ...

Information Brochure (English)
Page 1
...) 3.5 mm PC audio input RF input Video output Analog audio output Digital audio output (coaxial) Media card slot INlink WiFi 176° 8.5 ms NTSC, ATSC, 8-VSB, Clear-QAM 1 (side) No 1 (side) 2 (side) No Yes No Yes No No 1 (side) No No No Ethernet port USB port Headphone jack Watts/channel # of...Warranty-Labor 1 year Dimensions (W×H×D)-w/ostand 30.5" × 20.1" × 4.6" Weight-without stand 19.2 lbs. Easy to understand and use All Dynex products are designed to meet or exceed industry standards. Dynex products are designed for easy use with stand 20.9 lbs.
...) 3.5 mm PC audio input RF input Video output Analog audio output Digital audio output (coaxial) Media card slot INlink WiFi 176° 8.5 ms NTSC, ATSC, 8-VSB, Clear-QAM 1 (side) No 1 (side) 2 (side) No Yes No Yes No No 1 (side) No No No Ethernet port USB port Headphone jack Watts/channel # of...Warranty-Labor 1 year Dimensions (W×H×D)-w/ostand 30.5" × 20.1" × 4.6" Weight-without stand 19.2 lbs. Easy to understand and use All Dynex products are designed to meet or exceed industry standards. Dynex products are designed for easy use with stand 20.9 lbs.


