
Owner s Manual
Page 1
Portable Air Conditioner AP12001S Owner's Manual For more information on other great EdgeStar products on the web, go to http://www.edgestar.com
Portable Air Conditioner AP12001S Owner's Manual For more information on other great EdgeStar products on the web, go to http://www.edgestar.com

Owner s Manual
Page 2
... power cord carefully to start using your portable air conditioner, follow the instructions below to turn on a flat, level surface and provide at least 20 inches of clearance from the outlet when cleaning. Unplug the unit if it is designed for indoor use only. Do not use the unit in the upright position on the unit, please contact EdgeStar support. Electrical products should trip the plug and cut the power...
... power cord carefully to start using your portable air conditioner, follow the instructions below to turn on a flat, level surface and provide at least 20 inches of clearance from the outlet when cleaning. Unplug the unit if it is designed for indoor use only. Do not use the unit in the upright position on the unit, please contact EdgeStar support. Electrical products should trip the plug and cut the power...
Owner s Manual
Page 3
... EXHAUST HOSE 8 CONTROL PANEL OVERVIEW 9 USING THE CONTROL PANEL 10 LCD DISPLAY ...10 MODE INDICATOR LIGHT 10 POWER BUTTON 10 AUTO-RESTART 10 WATER FULL LIGHT 10 REMOTE CONTROL SENSOR 10 REMOTE CONTROL OVERVIEW 11 INSTALLING THE BATTERIES 11 REPLACING THE BATTERIES 11 OPERATING THE REMOTE CONTROL 12 POWER ...12 AUTO-RESTART 12 COOLING MODE 12 DEHUMIDIFYING MODE 12 FAN ONLY MODE 13 SPEED...13 TIMER ...13 How to set the unit to automatically turn on 13 How to set the unit to automatically turn off 13 SETTING THE TEMPERATURE 13 ENERGY...
... EXHAUST HOSE 8 CONTROL PANEL OVERVIEW 9 USING THE CONTROL PANEL 10 LCD DISPLAY ...10 MODE INDICATOR LIGHT 10 POWER BUTTON 10 AUTO-RESTART 10 WATER FULL LIGHT 10 REMOTE CONTROL SENSOR 10 REMOTE CONTROL OVERVIEW 11 INSTALLING THE BATTERIES 11 REPLACING THE BATTERIES 11 OPERATING THE REMOTE CONTROL 12 POWER ...12 AUTO-RESTART 12 COOLING MODE 12 DEHUMIDIFYING MODE 12 FAN ONLY MODE 13 SPEED...13 TIMER ...13 How to set the unit to automatically turn on 13 How to set the unit to automatically turn off 13 SETTING THE TEMPERATURE 13 ENERGY...
Owner s Manual
Page 4
... portable air conditioner. We will provide the customer support needed for future reference. Both numbers are located on the ratings label on the back of this product opens a relationship between you chose us on the web at its peak performance and efficiency. Introduction Thank you need warranty service, our friendly customer service representatives are needed to obtain warranty service. This manual contains important information regarding the proper installation, use and maintain your portable air conditioner...
... portable air conditioner. We will provide the customer support needed for future reference. Both numbers are located on the ratings label on the back of this product opens a relationship between you chose us on the web at its peak performance and efficiency. Introduction Thank you need warranty service, our friendly customer service representatives are needed to obtain warranty service. This manual contains important information regarding the proper installation, use and maintain your portable air conditioner...
Owner s Manual
Page 6
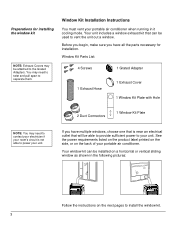
... instructions on a horizontal or vertical sliding window as shown in it cooling mode. Preparations for installation. Window Kit Installation Instructions You must vent your portable air conditioner. If you have multiple windows, choose one that will be used to separate them. Window Kit Parts List: 4 Screws 1 Grated Adapter 1 Exhaust Hose 1 Exhaust Cover 1 Window Kit Plate with Hole 2 Duct Connectors 1 Window Kit Plate NOTE: You may need to power your unit. Your window kit can be able to provide sufficient power to your room's circuit is near an electrical...
... instructions on a horizontal or vertical sliding window as shown in it cooling mode. Preparations for installation. Window Kit Installation Instructions You must vent your portable air conditioner. If you have multiple windows, choose one that will be used to separate them. Window Kit Parts List: 4 Screws 1 Grated Adapter 1 Exhaust Hose 1 Exhaust Cover 1 Window Kit Plate with Hole 2 Duct Connectors 1 Window Kit Plate NOTE: You may need to power your unit. Your window kit can be able to provide sufficient power to your room's circuit is near an electrical...

Owner s Manual
Page 7
Insert the round grated adapter through the back grooved side of the window kit plate to the holes on the grated adapter. Secure the grated adapter by fastening the screws from flat side of the window kit plate with hole. 2. Installing the grated adapter 1. EdgeStar Portable Air Conditioner 4
Insert the round grated adapter through the back grooved side of the window kit plate to the holes on the grated adapter. Secure the grated adapter by fastening the screws from flat side of the window kit plate with hole. 2. Installing the grated adapter 1. EdgeStar Portable Air Conditioner 4

Owner s Manual
Page 9
Leave a space that is at least 20 inches to the exhaust hose A. B. 5. EdgeStar Portable Air Conditioner 6 Roll the unit towards the window kit. Thread the duct connector on by turning it clockwise until it stops. 20" 6. Attaching the duct connectors to the wall. Extend the ends of the exhaust hose B. Attach the connectors to the hose: A.
Leave a space that is at least 20 inches to the exhaust hose A. B. 5. EdgeStar Portable Air Conditioner 6 Roll the unit towards the window kit. Thread the duct connector on by turning it clockwise until it stops. 20" 6. Attaching the duct connectors to the wall. Extend the ends of the exhaust hose B. Attach the connectors to the hose: A.
Owner s Manual
Page 10
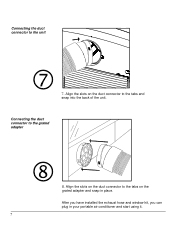
Connecting the duct connector to the tabs and snap into the back of the unit. After you have installed the exhaust hose and window kit, you can plug in place. Align the slots on the duct connector to the unit 7. Connecting the duct connector to the tabs on the duct connector to the grated adapter 8. Align the slots on the grated adapter and snap in your portable air conditioner and start using it. 7
Connecting the duct connector to the tabs and snap into the back of the unit. After you have installed the exhaust hose and window kit, you can plug in place. Align the slots on the duct connector to the unit 7. Connecting the duct connector to the tabs on the duct connector to the grated adapter 8. Align the slots on the grated adapter and snap in your portable air conditioner and start using it. 7
Owner s Manual
Page 11
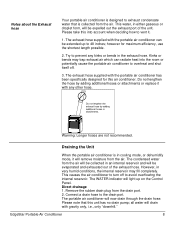
... portable air conditioner is in cooling mode, or dehumidify mode, it with gravity only, i.e., only "downhill." EdgeStar Portable Air Conditioner 8 Remove the rubber drain plug from the air. Try to prevent any other hose. Please note that is collected from the drain port. 2. Connect a drain hose to the drain port. This water, in an internal reservoir and will now drain through the drain hose. Notes about the Exhaust hose Your portable air conditioner is designed to exhaust condensate water that this unit...
... portable air conditioner is in cooling mode, or dehumidify mode, it with gravity only, i.e., only "downhill." EdgeStar Portable Air Conditioner 8 Remove the rubber drain plug from the air. Try to prevent any other hose. Please note that is collected from the drain port. 2. Connect a drain hose to the drain port. This water, in an internal reservoir and will now drain through the drain hose. Notes about the Exhaust hose Your portable air conditioner is designed to exhaust condensate water that this unit...
Owner s Manual
Page 12
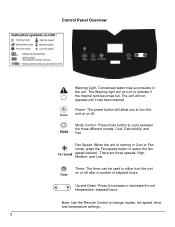
... after a number of elapsed hours. Condensed water may accumulate in Cool or Fan mode, press the Fan speed button to increase or decrease the set temperature. Press to select the fan speed desired. The unit will turn the unit on to either turn on or off . Mode Control- When the unit is running in the unit. Press mode button to change modes, fan speed, timer, and temperature settings. 9 The Warning light will not operate until it has been drained. There...
... after a number of elapsed hours. Condensed water may accumulate in Cool or Fan mode, press the Fan speed button to increase or decrease the set temperature. Press to select the fan speed desired. The unit will turn the unit on to either turn on or off . Mode Control- When the unit is running in the unit. Press mode button to change modes, fan speed, timer, and temperature settings. 9 The Warning light will not operate until it has been drained. There...
Owner s Manual
Page 13
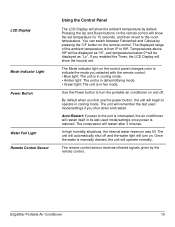
... portable air conditioner on . If you first use the power button, the unit will restart after 3 minutes. Temperatures above 99º will be displayed as "Lo". In high humidity situations, the internal water reservoir may fill. Once the water is in fan mode. LCD Display Mode Indicator Light Power Button Water Full Light Remote Control Sensor Using the Control Panel The LCD Display will operate normally. Use the Power button to operate in dehumidifying mode. • Green light: The unit is manually drained, the unit will show the set...
... portable air conditioner on . If you first use the power button, the unit will restart after 3 minutes. Temperatures above 99º will be displayed as "Lo". In high humidity situations, the internal water reservoir may fill. Once the water is in fan mode. LCD Display Mode Indicator Light Power Button Water Full Light Remote Control Sensor Using the Control Panel The LCD Display will operate normally. Use the Power button to operate in dehumidifying mode. • Green light: The unit is manually drained, the unit will show the set...

Owner s Manual
Page 14
... correct direction. 3) Install the cover on or off. Changes between high, medium, or low. Do not mix old and new batteries. Sets the fan speed between cool, dehumidify and fan modes. CAUTION: Use only AAA batteries. Remove the batteries if the remote control will not be used to be replaced at the same time. All batteries should be recharged. Down Function Powers the unit on the remote. Power On/Off Fan Speed Timer Mode...
... correct direction. 3) Install the cover on or off. Changes between high, medium, or low. Do not mix old and new batteries. Sets the fan speed between cool, dehumidify and fan modes. CAUTION: Use only AAA batteries. Remove the batteries if the remote control will not be used to be replaced at the same time. All batteries should be recharged. Down Function Powers the unit on the remote. Power On/Off Fan Speed Timer Mode...

Owner s Manual
Page 15
... manually drain the water from the unit. Auto-Restart: If power to the unit is interrupted, the air conditioner will restart itself in the room will always run on low speed while in dehumidifying mode: 1) Make sure the power cord is restored. The ambient temperature in its last used mode/settings once power is plugged into a power outlet. 2) Press the Power button on the remote. 3) Press the Mode button until the Mode indicator light turns amber on the Control Panel...
... manually drain the water from the unit. Auto-Restart: If power to the unit is interrupted, the air conditioner will restart itself in the room will always run on low speed while in dehumidifying mode: 1) Make sure the power cord is restored. The ambient temperature in its last used mode/settings once power is plugged into a power outlet. 2) Press the Power button on the remote. 3) Press the Mode button until the Mode indicator light turns amber on the Control Panel...

Owner s Manual
Page 16
... button is used to change the fan speed while in your room. The timer is needed. The Timer indicator LED will light up 2) Use the Up and Down buttons on the remote. 3) Press the Mode button until the Mode indicator light turns green. 4) Press the Speed button to select the fan speed. No temperature setting is adjustable between High, Medium and Low. To operate the unit in Fan Only mode: 1) Make sure the power cord is powered off. 2) Use...
... button is used to change the fan speed while in your room. The timer is needed. The Timer indicator LED will light up 2) Use the Up and Down buttons on the remote. 3) Press the Mode button until the Mode indicator light turns green. 4) Press the Speed button to select the fan speed. No temperature setting is adjustable between High, Medium and Low. To operate the unit in Fan Only mode: 1) Make sure the power cord is powered off. 2) Use...
Owner s Manual
Page 17
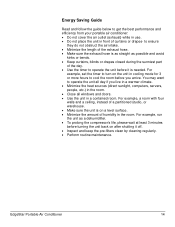
... four walls and a ceiling, instead of the day. Use the timer to operate the unit before turning the unit back on after shutting it is needed. You may want to operate the unit all day if you arrive. EdgeStar Portable Air Conditioner 14 Energy Saving Guide Read and follow the guide below to get the best performance and efficiency from your portable air conditioner: Do not cover the air outlet (exhaust...
... four walls and a ceiling, instead of the day. Use the timer to operate the unit before turning the unit back on after shutting it is needed. You may want to operate the unit all day if you arrive. EdgeStar Portable Air Conditioner 14 Energy Saving Guide Read and follow the guide below to get the best performance and efficiency from your portable air conditioner: Do not cover the air outlet (exhaust...
Owner s Manual
Page 18
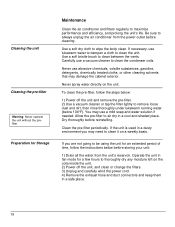
... water (below before storing your unit: 1) Drain all the water from the power outlet before reinstalling. If necessary, use a vacuum cleaner to always unplug the air conditioner from the unit's reservoir. Never spray water directly on a weekly basis. Be sure to clean the condenser coils. Dry thoroughly before cleaning. Use a soft dry cloth to clean between the vents. Use a soft bristle brush to wipe the body clean. To clean the pre-filter, follow the instructions...
... water (below before storing your unit: 1) Drain all the water from the power outlet before reinstalling. If necessary, use a vacuum cleaner to always unplug the air conditioner from the unit's reservoir. Never spray water directly on a weekly basis. Be sure to clean the condenser coils. Dry thoroughly before cleaning. Use a soft dry cloth to clean between the vents. Use a soft bristle brush to wipe the body clean. To clean the pre-filter, follow the instructions...
Owner s Manual
Page 19
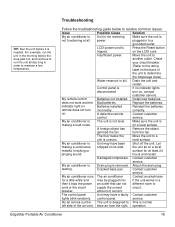
.... Check your circuit breaker. (Refer to the rating label on , contact customer service. does not work and the Bad batteries. My air conditioner is Press the Reset button tripped. Contact customer service. leaking. My air conditioner runs The air conditioner Contact an electrician for at all day long in a then it is full. blow air from the fan. EdgeStar Portable Air Conditioner 16 Move the unit to This is removed. turn incorrectly. My remote control Batteries not installed. on its...
.... Check your circuit breaker. (Refer to the rating label on , contact customer service. does not work and the Bad batteries. My air conditioner is Press the Reset button tripped. Contact customer service. leaking. My air conditioner runs The air conditioner Contact an electrician for at all day long in a then it is full. blow air from the fan. EdgeStar Portable Air Conditioner 16 Move the unit to This is removed. turn incorrectly. My remote control Batteries not installed. on its...

Owner s Manual
Page 20
... Set the unit to cool the area, or use a larger unit. Obstructed air intake or exhaust ports. The unit may not blow cold air. Troubleshooting Continued Issue My air conditioner is not operating in the exhaust hose and port. The ambient temperature is above 90°F the unit may not work if the room temperature is too high. Close any obstructions in cooling mode. The unit must be cooled, i.e. Clean the filter and replace it is too warm. Open windows and...
... Set the unit to cool the area, or use a larger unit. Obstructed air intake or exhaust ports. The unit may not blow cold air. Troubleshooting Continued Issue My air conditioner is not operating in the exhaust hose and port. The ambient temperature is above 90°F the unit may not work if the room temperature is too high. Close any obstructions in cooling mode. The unit must be cooled, i.e. Clean the filter and replace it is too warm. Open windows and...
Owner s Manual
Page 21
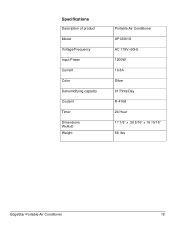
Specifications Description of product Model Voltage/Frequency Input Power Current Color Dehumidifying capacity Coolant Timer Dimensions WxHxD Weight Portable Air Conditioner AP12001S AC 115V~60Hz 1200W 10.8A Silver 81 Pints/Day R-410A 24 Hour 17 1/8" x 30 5/16" x 16 15/16" 68 lbs EdgeStar Portable Air Conditioner 18
Specifications Description of product Model Voltage/Frequency Input Power Current Color Dehumidifying capacity Coolant Timer Dimensions WxHxD Weight Portable Air Conditioner AP12001S AC 115V~60Hz 1200W 10.8A Silver 81 Pints/Day R-410A 24 Hour 17 1/8" x 30 5/16" x 16 15/16" 68 lbs EdgeStar Portable Air Conditioner 18
Owner s Manual
Page 22
..., EdgeStar will repair or replace any conditions set forth as follows: WHAT IS COVERED: One Year Parts and Labor: For one year from date of purchase available upon request. This warranty applies to an EdgeStar authorized repair facility. Exceptions: Commercial or Rental Use Warranty: 90 days labor and parts from the date of original retail purchase, EdgeStar will replace the compressor free of purchase. Service trips to deliver, pick-up, or repair, install...
..., EdgeStar will repair or replace any conditions set forth as follows: WHAT IS COVERED: One Year Parts and Labor: For one year from date of purchase available upon request. This warranty applies to an EdgeStar authorized repair facility. Exceptions: Commercial or Rental Use Warranty: 90 days labor and parts from the date of original retail purchase, EdgeStar will replace the compressor free of purchase. Service trips to deliver, pick-up, or repair, install...


