
Owner s Manual
Page 1
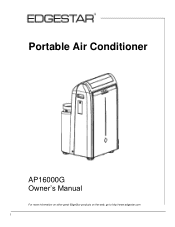
Portable Air Conditioner AP16000G Owner's Manual For more information on other great EdgeStar products on the web, go to http://www.edgestar.com i
Portable Air Conditioner AP16000G Owner's Manual For more information on other great EdgeStar products on the web, go to http://www.edgestar.com i
Owner s Manual
Page 2
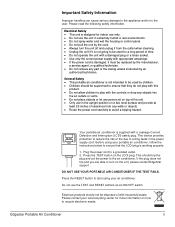
... not operate the unit with a damaged plug or a loose socket. Use only the correct power supply with appropriate amperage. If the power cord is working properly: 1. Press the TEST button on the unit, please contact EdgeStar support. DO NOT USE YOUR PORTABLE AIR CONDITIONER IF THE TEST FAILS. RESET TEST Your portable air conditioner is not going to avoid a tripping hazard. Before using your portable air conditioner, follow the instructions below to arcing faults...
... not operate the unit with a damaged plug or a loose socket. Use only the correct power supply with appropriate amperage. If the power cord is working properly: 1. Press the TEST button on the unit, please contact EdgeStar support. DO NOT USE YOUR PORTABLE AIR CONDITIONER IF THE TEST FAILS. RESET TEST Your portable air conditioner is not going to avoid a tripping hazard. Before using your portable air conditioner, follow the instructions below to arcing faults...
Owner s Manual
Page 3
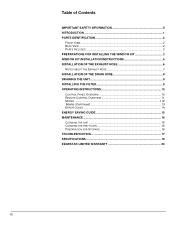
... VIEW ...2 BACK VIEW ...2 PARTS INCLUDED 3 PREPARATIONS FOR INSTALLING THE WINDOW KIT 3 WINDOW KIT INSTALLATION INSTRUCTIONS 4 INSTALLATION OF THE EXHAUST HOSE 6 NOTES ABOUT THE EXHAUST HOSE 7 INSTALLATION OF THE DRAIN HOSE 8 DRAINING THE UNIT 9 INSTALLING THE FILTER 9 OPERATING INSTRUCTIONS 10 CONTROL PANEL OVERVIEW 10 REMOTE CONTROL OVERVIEW 11 MODES...112 Modes (Continued 13 ERROR CODES 14 ENERGY SAVING GUIDE 15 MAINTENANCE 16 CLEANING THE UNIT 16 CLEANING THE PRE-FILTER 16 PREPARATION FOR STORAGE 16 TROUBLESHOOTING 17 SPECIFICATIONS 19 EDGESTAR LIMITED WARRANTY 20 iii
... VIEW ...2 BACK VIEW ...2 PARTS INCLUDED 3 PREPARATIONS FOR INSTALLING THE WINDOW KIT 3 WINDOW KIT INSTALLATION INSTRUCTIONS 4 INSTALLATION OF THE EXHAUST HOSE 6 NOTES ABOUT THE EXHAUST HOSE 7 INSTALLATION OF THE DRAIN HOSE 8 DRAINING THE UNIT 9 INSTALLING THE FILTER 9 OPERATING INSTRUCTIONS 10 CONTROL PANEL OVERVIEW 10 REMOTE CONTROL OVERVIEW 11 MODES...112 Modes (Continued 13 ERROR CODES 14 ENERGY SAVING GUIDE 15 MAINTENANCE 16 CLEANING THE UNIT 16 CLEANING THE PRE-FILTER 16 PREPARATION FOR STORAGE 16 TROUBLESHOOTING 17 SPECIFICATIONS 19 EDGESTAR LIMITED WARRANTY 20 iii
Owner s Manual
Page 5
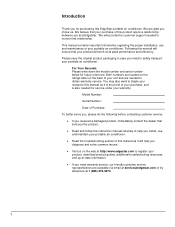
... needed to help you diagnose and solve common issues. Visit us . This manual contains important information regarding the proper installation, use and maintain your portable air conditioner. You may also want to staple your product will work at 1 (866) 319-5473. 1 Following this EdgeStar portable air conditioner. Both numbers are located on the ratings label on the web at http://www.edgestar.com to register your product, download product guides, additional troubleshooting...
... needed to help you diagnose and solve common issues. Visit us . This manual contains important information regarding the proper installation, use and maintain your portable air conditioner. You may also want to staple your product will work at 1 (866) 319-5473. 1 Following this EdgeStar portable air conditioner. Both numbers are located on the ratings label on the web at http://www.edgestar.com to register your product, download product guides, additional troubleshooting...
Owner s Manual
Page 7
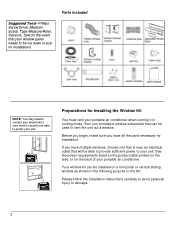
... for installation) Parts Included NOTE: You may need to contact your electrician if your room's circuit is near an electrical outlet that can be able to provide sufficient power to avoid personal injury or damage. 3 Preparations for Installing the Window Kit You must vent your window panel needs to be used to the left. Please follow the installation instructions carefully to your unit. See the power requirements listed on the product...
... for installation) Parts Included NOTE: You may need to contact your electrician if your room's circuit is near an electrical outlet that can be able to provide sufficient power to avoid personal injury or damage. 3 Preparations for Installing the Window Kit You must vent your window panel needs to be used to the left. Please follow the installation instructions carefully to your unit. See the power requirements listed on the product...
Owner s Manual
Page 8
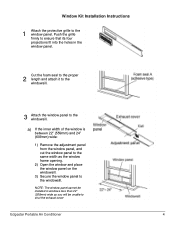
... into the holes in windows less than 22" (559mm) wide as the window frame opening. 2) Open the window and place the window panel on the windowsill. 3) Secure the window panel to shut the exhaust cover Edgestar Portable Air Conditioner 4 Cut the foam seal to the proper 2 length and attach it to the windowsill. 3 Attach the window panel to the window panel. NOTE: The window panel cannot be unable to the windowsill. Window Kit Installation Instructions 1 Attach the...
... into the holes in windows less than 22" (559mm) wide as the window frame opening. 2) Open the window and place the window panel on the windowsill. 3) Secure the window panel to shut the exhaust cover Edgestar Portable Air Conditioner 4 Cut the foam seal to the proper 2 length and attach it to the windowsill. 3 Attach the window panel to the window panel. NOTE: The window panel cannot be unable to the windowsill. Window Kit Installation Instructions 1 Attach the...
Owner s Manual
Page 10
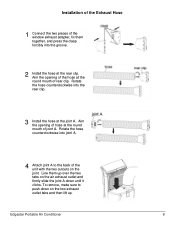
... joint A to push down until it clicks. Installation of the Exhaust Hose 1 Connect the two pieces of the window exhaust adapter, fix them up . Aim the opening of the hose at the round mouth of rear clip. Edgestar Portable Air Conditioner 6 To remove, make sure to the back of the unit with the two cutouts on the air exhaust outlet and firmly slide the joint A down...
... joint A to push down until it clicks. Installation of the Exhaust Hose 1 Connect the two pieces of the window exhaust adapter, fix them up . Aim the opening of the hose at the round mouth of rear clip. Edgestar Portable Air Conditioner 6 To remove, make sure to the back of the unit with the two cutouts on the air exhaust outlet and firmly slide the joint A down...
Owner s Manual
Page 11
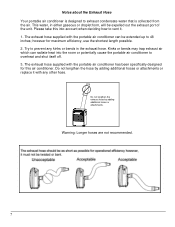
..., use the shortest length possible. 2. Do not lengthen the exhaust hose by adding additional hoses or attachments or replace it . 1. The exhaust hose supplied with the portable air conditioner can radiate heat into account when deciding how to 48 inches; Kinks or bends may trap exhaust air which can be expelled out the exhaust port of the unit. This water, in the exhaust hose. Notes about the Exhaust Hose Your portable air conditioner...
..., use the shortest length possible. 2. Do not lengthen the exhaust hose by adding additional hoses or attachments or replace it . 1. The exhaust hose supplied with the portable air conditioner can radiate heat into account when deciding how to 48 inches; Kinks or bends may trap exhaust air which can be expelled out the exhaust port of the unit. This water, in the exhaust hose. Notes about the Exhaust Hose Your portable air conditioner...
Owner s Manual
Page 12
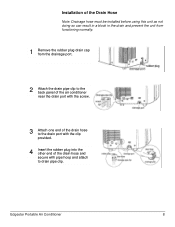
Edgestar Portable Air Conditioner 8 Installation of the Drain Hose Note: Drainage hose must be installed before using this unit as not doing so can result in a block in the drain and prevent the unit from functioning normally. 1 Remove the rubber plug drain cap from the drainage port. 2 Attach the drain pipe clip to the back panel of the air conditioner near the drain port with the screw. 3 Attach one end of the drain hose to the drain port with the clip provided. 4 Insert the rubber plug into the other end of the drain hose and secure with pipe hoop and attach to drain pipe clip.
Edgestar Portable Air Conditioner 8 Installation of the Drain Hose Note: Drainage hose must be installed before using this unit as not doing so can result in a block in the drain and prevent the unit from functioning normally. 1 Remove the rubber plug drain cap from the drainage port. 2 Attach the drain pipe clip to the back panel of the air conditioner near the drain port with the screw. 3 Attach one end of the drain hose to the drain port with the clip provided. 4 Insert the rubber plug into the other end of the drain hose and secure with pipe hoop and attach to drain pipe clip.
Owner s Manual
Page 13
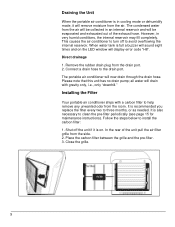
... times and on . The portable air conditioner will display error code "H8". Connect a drain hose to three months, or as needed. all water will remove moisture from the side. 2. When water tank is recommended you replace the filter every two to the drain port. Installing the Filter Your portable air conditioner ships with gravity only, i.e., only "downhill." Remove the rubber drain plug from the room. Follow the steps below to help remove any unwanted odor from...
... times and on . The portable air conditioner will display error code "H8". Connect a drain hose to three months, or as needed. all water will remove moisture from the side. 2. When water tank is recommended you replace the filter every two to the drain port. Installing the Filter Your portable air conditioner ships with gravity only, i.e., only "downhill." Remove the rubber drain plug from the room. Follow the steps below to help remove any unwanted odor from...
Owner s Manual
Page 14
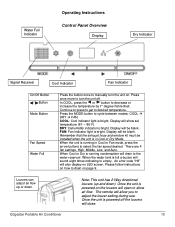
... louver setting during use. Remember that the exhaust hose and window kit must be installed when the unit is running in Cool or Dry Mode. When Cool or Dry is in Cool or Fan mode, press the arrow buttons to drain on LED screen. Please follow instructions on how to select the fan speed desired. Edgestar Portable Air Conditioner Note: This unit has 2-Way directional louvers (up or down ). Press the MODE button to decrease or increase the temperature...
... louver setting during use. Remember that the exhaust hose and window kit must be installed when the unit is running in Cool or Dry Mode. When Cool or Dry is in Cool or Fan mode, press the arrow buttons to drain on LED screen. Please follow instructions on how to select the fan speed desired. Edgestar Portable Air Conditioner Note: This unit has 2-Way directional louvers (up or down ). Press the MODE button to decrease or increase the temperature...
Owner s Manual
Page 15
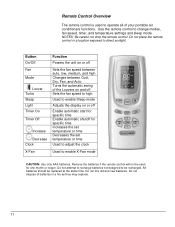
... X-Fan mode CAUTION: Use only AAA batteries. NOTES: Be careful not drop the remote control. Do not attempt to recharge batteries not designed to direct sunlight. Button On/Off Fan Mode Louver Turbo Sleep Light Timer On Timer Off Increase Decrease Clock X-Fan Function Powers the unit on or off Sets the fan speed between auto, low, medium, and high Changes between Cool, Dry, Fan, and Auto Turns the automatic swing of your portable air conditioners functions...
... X-Fan mode CAUTION: Use only AAA batteries. NOTES: Be careful not drop the remote control. Do not attempt to recharge batteries not designed to direct sunlight. Button On/Off Fan Mode Louver Turbo Sleep Light Timer On Timer Off Increase Decrease Clock X-Fan Function Powers the unit on or off Sets the fan speed between auto, low, medium, and high Changes between Cool, Dry, Fan, and Auto Turns the automatic swing of your portable air conditioners functions...
Owner s Manual
Page 16
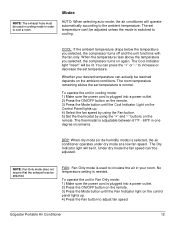
... the exhaust hose be lit. Edgestar Portable Air Conditioner 12 Modes AUTO: When selecting auto mode, the air conditioner will be adjusted. The thermostat is adjustable between 61°F - 86°F in Fan Only mode: 1) Make sure the power cord is used in cooling mode in order to cool a room. DRY: When dry mode (or de-humidify mode) is needed. COOL: If the ambient temperature drops below the temperature you selected, the compressor turns on the ambient conditions. The Cool Indicator light "insert" will operate automatically...
... the exhaust hose be lit. Edgestar Portable Air Conditioner 12 Modes AUTO: When selecting auto mode, the air conditioner will be adjusted. The thermostat is adjustable between 61°F - 86°F in Fan Only mode: 1) Make sure the power cord is used in cooling mode in order to cool a room. DRY: When dry mode (or de-humidify mode) is needed. COOL: If the ambient temperature drops below the temperature you selected, the compressor turns on the ambient conditions. The Cool Indicator light "insert" will operate automatically...
Owner s Manual
Page 17
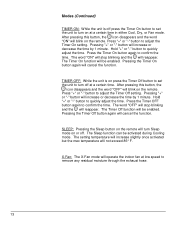
... remote will reappear. The word "ON" will stop blinking and the will turn Sleep mode on at a certain time in either Cool, Dry, or Fan mode. The Timer On function will operate the indoor fan at a certain time. Press the Timer OFF button again to confirm the time. The setting temperature will increase slightly once activated but the max temperature will cancel the function. X-Fan: The X-Fan mode will be activated during Cooling mode. Modes...
... remote will reappear. The word "ON" will stop blinking and the will turn Sleep mode on at a certain time in either Cool, Dry, or Fan mode. The Timer On function will operate the indoor fan at a certain time. Press the Timer OFF button again to confirm the time. The setting temperature will increase slightly once activated but the max temperature will cancel the function. X-Fan: The X-Fan mode will be activated during Cooling mode. Modes...

Owner s Manual
Page 18
... the unit and start it is working in a high- If "E5" continues please contact customer service H8 Water reservoir is open/short-circuited Please contact customer service Edgestar Portable Air Conditioner 14 E5 Overcurrent protection Disconnect power, and then turn unit on after the ambient temperature drops below 90° F. F4 Outdoor tube temperature sensor is full Drain and empty the water reservoir. If "H3" or "E8" continues please contact customer service. Error Codes The air conditioner may display an error code...
... the unit and start it is working in a high- If "E5" continues please contact customer service H8 Water reservoir is open/short-circuited Please contact customer service Edgestar Portable Air Conditioner 14 E5 Overcurrent protection Disconnect power, and then turn unit on after the ambient temperature drops below 90° F. F4 Outdoor tube temperature sensor is full Drain and empty the water reservoir. If "H3" or "E8" continues please contact customer service. Error Codes The air conditioner may display an error code...
Owner s Manual
Page 19
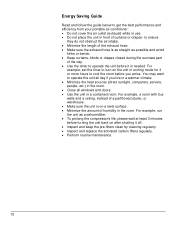
... your portable air conditioner: Do not cover the air outlet (exhaust) while in use. Do not place the unit in front of humidity in the room. You may want to cool the room before you live in a warmer climate. Minimize the heat sources (direct sunlight, computers, servers, people, etc.) in the room. Close all windows and doors. Use the unit in cooling mode for...
... your portable air conditioner: Do not cover the air outlet (exhaust) while in use. Do not place the unit in front of humidity in the room. You may want to cool the room before you live in a warmer climate. Minimize the heat sources (direct sunlight, computers, servers, people, etc.) in the room. Close all windows and doors. Use the unit in cooling mode for...

Owner s Manual
Page 20
... filters. 3) Unplug and carefully wind the power cord. 4) Remove the exhaust hose and duct connectors and keep them in a dusty environment you are not going to clean it on the unit. Be sure to clean the condenser coils. Never spray water directly on a weekly basis. To clean the pre-filter, follow the instructions below 104°F). Clean the pre-filter periodically. Maintenance Clean the air conditioner and filters regularly to clean between the vents. Carefully use...
... filters. 3) Unplug and carefully wind the power cord. 4) Remove the exhaust hose and duct connectors and keep them in a dusty environment you are not going to clean it on the unit. Be sure to clean the condenser coils. Never spray water directly on a weekly basis. To clean the pre-filter, follow the instructions below 104°F). Clean the pre-filter periodically. Maintenance Clean the air conditioner and filters regularly to clean between the vents. Carefully use...
Owner s Manual
Page 21
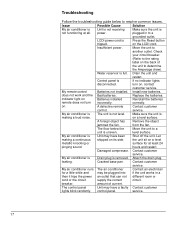
... room or cord or the circuit supply the correct circuit. Insufficient power. Install new batteries. A foreign object has Remove the object jammed the fan. from the fan. level surface. My air conditioner is Unit may have a faulty Contact customer lights blink randomly. Cracked base pan. control panel. LCDI power cord is full. on a level surface. Water reservoir is Press the Reset button tripped. turn incorrectly. My air conditioner is The unit is If no indicator lights disconnected. Contact customer service...
... room or cord or the circuit supply the correct circuit. Insufficient power. Install new batteries. A foreign object has Remove the object jammed the fan. from the fan. level surface. My air conditioner is Unit may have a faulty Contact customer lights blink randomly. Cracked base pan. control panel. LCDI power cord is full. on a level surface. Water reservoir is Press the Reset button tripped. turn incorrectly. My air conditioner is The unit is If no indicator lights disconnected. Contact customer service...
Owner s Manual
Page 22
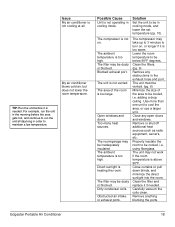
... unit must be vented. (pg. 6) Minimize the size of the room is too large. Clean the filter and replace it is needed . Edgestar Portable Air Conditioner 18 My air conditioner blows cold air, but does not lower the room temperature. Too many heat sources. Lower the room temperature to cool the area, or use a larger unit. using fiberglass. The compressor is too high. Use more than one unit to be below 90°F degrees. Close any obstructions in the exhaust hose...
... unit must be vented. (pg. 6) Minimize the size of the room is too large. Clean the filter and replace it is needed . Edgestar Portable Air Conditioner 18 My air conditioner blows cold air, but does not lower the room temperature. Too many heat sources. Lower the room temperature to cool the area, or use a larger unit. using fiberglass. The compressor is too high. Use more than one unit to be below 90°F degrees. Close any obstructions in the exhaust hose...
Owner s Manual
Page 24
... specifications without a return authorization number will carry the remaining warranty of purchase available. filters, cartridges, batteries. Service trips to deliver, pick-up, or repair, install the product, or to instruct in proper usage of the product. Damages or operating problems resulting from misuse, abuse, operation outside environmental specifications, uses contrary to instructions provided in the owner's manual, accidents, acts of God, vermin, fire, flood, improper installation, unauthorized service, maintenance...
... specifications without a return authorization number will carry the remaining warranty of purchase available. filters, cartridges, batteries. Service trips to deliver, pick-up, or repair, install the product, or to instruct in proper usage of the product. Damages or operating problems resulting from misuse, abuse, operation outside environmental specifications, uses contrary to instructions provided in the owner's manual, accidents, acts of God, vermin, fire, flood, improper installation, unauthorized service, maintenance...


