Owner's Manual
Page 3
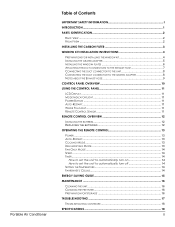
Portable Air Conditioner Table of Contents IMPORTANT SAFETY INFORMATION I INTRODUCTION ...1 PARTS IDENTIFICATION 2 BACK VIEW ...2 FRONT VIEW ...2 INSTALLING THE CARBON FILTER 3 WINDOW KIT INSTALLATION INSTRUCTIONS 4 PREPARATIONS FOR INSTALLING THE WINDOW KIT 4 INSTALLING THE GRATED ADAPTER 5 INSTALLING THE WINDOW PLATES 6 ATTACHING THE DUCT CONNECTORS TO THE EXHAUST HOSE 7 CONNECTING THE DUCT CONNECTOR TO THE UNIT 8 CONNECTING THE DUCT...
Portable Air Conditioner Table of Contents IMPORTANT SAFETY INFORMATION I INTRODUCTION ...1 PARTS IDENTIFICATION 2 BACK VIEW ...2 FRONT VIEW ...2 INSTALLING THE CARBON FILTER 3 WINDOW KIT INSTALLATION INSTRUCTIONS 4 PREPARATIONS FOR INSTALLING THE WINDOW KIT 4 INSTALLING THE GRATED ADAPTER 5 INSTALLING THE WINDOW PLATES 6 ATTACHING THE DUCT CONNECTORS TO THE EXHAUST HOSE 7 CONNECTING THE DUCT CONNECTOR TO THE UNIT 8 CONNECTING THE DUCT...

Owner's Manual
Page 7
...sure you have all the parts necessary for installing the window kit NOTE: Exhaust Covers may be able to provide sufficient power to install the window kit. 4 Your window kit can be installed on a horizontal or vertical sliding window as shown in it cooling mode. You may need to...room's circuit is near an electrical outlet that can be used to the Grated Adapters. Window Kit Parts List: 4 Screws 1 Grated Adapter 1 Exhaust Hose 1 Exhaust Cover 1 Window Kit Plate with Hole 2 Duct Connectors 1 Window Kit Plate NOTE: You may need to contact your electrician if your unit.
...sure you have all the parts necessary for installing the window kit NOTE: Exhaust Covers may be able to provide sufficient power to install the window kit. 4 Your window kit can be installed on a horizontal or vertical sliding window as shown in it cooling mode. You may need to...room's circuit is near an electrical outlet that can be used to the Grated Adapters. Window Kit Parts List: 4 Screws 1 Grated Adapter 1 Exhaust Hose 1 Exhaust Cover 1 Window Kit Plate with Hole 2 Duct Connectors 1 Window Kit Plate NOTE: You may need to contact your electrician if your unit.
Owner's Manual
Page 8
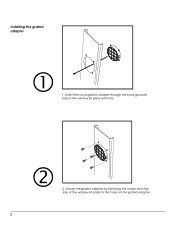
Insert the round grated adapter through the back grooved side of the window kit plate to the holes on the grated adapter. 5 Installing the grated adapter 1. Secure the grated adapter by fastening the screws from flat side of the window kit plate with hole. 2.
Insert the round grated adapter through the back grooved side of the window kit plate to the holes on the grated adapter. 5 Installing the grated adapter 1. Secure the grated adapter by fastening the screws from flat side of the window kit plate with hole. 2.

Owner's Manual
Page 9
Portable Air Conditioner 6 Then, slide the window kit plate to secure the window kit in place. Lower the window to fit the width of the window. Installing the window plates 3. You can use duct tape to better secure the window kit. You may need to use screws to purchase window locks. 4. Open your window by using window locks. Please contact your dealer to secure the window kit plate from sliding. CAUTION: Secure your window and place the window kit with grooved side facing outward on the window sill.
Portable Air Conditioner 6 Then, slide the window kit plate to secure the window kit in place. Lower the window to fit the width of the window. Installing the window plates 3. You can use duct tape to better secure the window kit. You may need to use screws to purchase window locks. 4. Open your window by using window locks. Please contact your dealer to secure the window kit plate from sliding. CAUTION: Secure your window and place the window kit with grooved side facing outward on the window sill.
Owner's Manual
Page 10
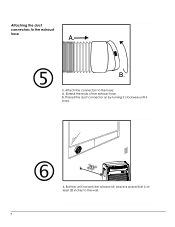
Roll the unit towards the window kit. Extend the ends of the exhaust hose B. Attach the connectors to the exhaust hose A. B. 5. Thread the duct connector on by turning it clockwise until it stops. 6. Attaching the duct connectors to the hose: A. Leave a space that is at least 20 inches to the wall. 7
Roll the unit towards the window kit. Extend the ends of the exhaust hose B. Attach the connectors to the exhaust hose A. B. 5. Thread the duct connector on by turning it clockwise until it stops. 6. Attaching the duct connectors to the hose: A. Leave a space that is at least 20 inches to the wall. 7

Owner's Manual
Page 12
Notes about the Exhaust hose After you have installed the exhaust hose and window kit, you can be extended up on the Control Panel. Try to 48 inches; The WATER indicator will be expelled out the exhaust port of the ...
Notes about the Exhaust hose After you have installed the exhaust hose and window kit, you can be extended up on the Control Panel. Try to 48 inches; The WATER indicator will be expelled out the exhaust port of the ...
