
Owners Manual
Page 2
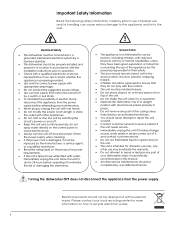
... it, and contact customer service. Do not use of with reduced physical, sensory or mental capabilities, unless they do not spray water directly on the control panel to avoid electric shock. Always turn the unit off . Keep the unit and control panel dry; Turning the dishwasher OFF does not disconnect the appliance from the power supply when cleaning. If the power cord is not intended for...
... it, and contact customer service. Do not use of with reduced physical, sensory or mental capabilities, unless they do not spray water directly on the control panel to avoid electric shock. Always turn the unit off . Keep the unit and control panel dry; Turning the dishwasher OFF does not disconnect the appliance from the power supply when cleaning. If the power cord is not intended for...

Owners Manual
Page 3
... not smoke, use an open . To avoid damage to the door seal, place sharp items strategically. Load sharp knives handle-side up hydrogen gas. PRECAUTIONS FOR OPERATION When using any appliance during this before touching the START/RESET button. EdgeStar 18" Built-In Dishwasher ii Avoid contact with , on the door or dish rack of this Owner's Manual. This appliance is placed on all hot water faucets and...
... not smoke, use an open . To avoid damage to the door seal, place sharp items strategically. Load sharp knives handle-side up hydrogen gas. PRECAUTIONS FOR OPERATION When using any appliance during this before touching the START/RESET button. EdgeStar 18" Built-In Dishwasher ii Avoid contact with , on the door or dish rack of this Owner's Manual. This appliance is placed on all hot water faucets and...
Owners Manual
Page 4
... 6 INSTALLATION INSTRUCTIONS 7 OPERATING INSTRUCTIONS 15 WASH CYCLE ...16 DETERGENT DISPENSER 17 WATER HARDNESS 17 REMOVING HARD WATER SPOTS 17 JET-DRY RINSE AGENT 18 LOADING GUIDELINES 19 CUTLERY/SILVERWARE BASKET 20 STARTING THE WASH CYCLE 21 FORGET TO ADD A DISH 21 AT THE END OF THE WASH CYCLE 22 REMOVING THE DISHES 22 MAINTENANCE 23 FILTER SYSTEM 23 CARING FOR YOUR DISHWASHER 24 PROTECT AGAINST FREEZING 24 CLEANING THE SPRAY ARMS 24 CLEANING THE DOOR 24 HOW TO KEEP YOUR DISHWASHER IN SHAPE 25 TROUBLESHOOTING 26 SPECIFICATIONS...
... 6 INSTALLATION INSTRUCTIONS 7 OPERATING INSTRUCTIONS 15 WASH CYCLE ...16 DETERGENT DISPENSER 17 WATER HARDNESS 17 REMOVING HARD WATER SPOTS 17 JET-DRY RINSE AGENT 18 LOADING GUIDELINES 19 CUTLERY/SILVERWARE BASKET 20 STARTING THE WASH CYCLE 21 FORGET TO ADD A DISH 21 AT THE END OF THE WASH CYCLE 22 REMOVING THE DISHES 22 MAINTENANCE 23 FILTER SYSTEM 23 CARING FOR YOUR DISHWASHER 24 PROTECT AGAINST FREEZING 24 CLEANING THE SPRAY ARMS 24 CLEANING THE DOOR 24 HOW TO KEEP YOUR DISHWASHER IN SHAPE 25 TROUBLESHOOTING 26 SPECIFICATIONS...
Owners Manual
Page 5
... needed to safely transport your dishwasher. Following this manual will ensure that sold you the product. Read and follow this instruction manual carefully to -date information. If you and EdgeStar. We believe that relationship. Please save the original product packaging in dishwasher. Both numbers are located on the ratings label on the web at http://www.edgestar.com to register your product, download product guides, additional troubleshooting...
... needed to safely transport your dishwasher. Following this manual will ensure that sold you the product. Read and follow this instruction manual carefully to -date information. If you and EdgeStar. We believe that relationship. Please save the original product packaging in dishwasher. Both numbers are located on the ratings label on the web at http://www.edgestar.com to register your product, download product guides, additional troubleshooting...
Owners Manual
Page 6
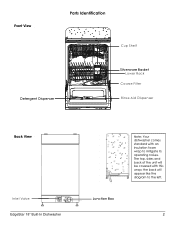
the back will be covered with an insulation foam wrap to the left. 2 The top, sides and back of the unit will appear like the diagram to mitigate its operating noises. Front View Parts Identification Cup Shelf Detergent Dispenser Silverware Basket Lower Rack Coarse Filter Rinse Aid Dispenser Back View Inlet Valve EdgeStar 18" Built-In Dishwasher Junction Box Note: Your dishwasher comes standard with this wrap;
the back will be covered with an insulation foam wrap to the left. 2 The top, sides and back of the unit will appear like the diagram to mitigate its operating noises. Front View Parts Identification Cup Shelf Detergent Dispenser Silverware Basket Lower Rack Coarse Filter Rinse Aid Dispenser Back View Inlet Valve EdgeStar 18" Built-In Dishwasher Junction Box Note: Your dishwasher comes standard with this wrap;
Owners Manual
Page 8
..., level surface. Soiled water is pumped through a rotating spray arm, drained through a filter (removing food and soiled particles) and pumped back through the spray arm. EdgeStar 18" Built-In Dishwasher 4 Installation of dishes. For Best Results: Your dishwasher cleans by spraying a mixture of clean hot water and detergent (under the warranty. NOTE: Hard water conditions will also contribute to periodically operate/rinse the inside of the dishwasher (empty) using 1 cup of your dishwasher. To assist in the sump underneath the removable filter screen...
..., level surface. Soiled water is pumped through a rotating spray arm, drained through a filter (removing food and soiled particles) and pumped back through the spray arm. EdgeStar 18" Built-In Dishwasher 4 Installation of dishes. For Best Results: Your dishwasher cleans by spraying a mixture of clean hot water and detergent (under the warranty. NOTE: Hard water conditions will also contribute to periodically operate/rinse the inside of the dishwasher (empty) using 1 cup of your dishwasher. To assist in the sump underneath the removable filter screen...
Owners Manual
Page 18
NOTE: The manufacturer, following a policy of constant development and updating of the product, may make modifications without giving prior notice. EdgeStar 18" Built-In Dishwasher 14 Installation Instructions (Continued) STEP 16 - LITERATURE Be sure to leave this complete literature package and installation instructions with end user.
NOTE: The manufacturer, following a policy of constant development and updating of the product, may make modifications without giving prior notice. EdgeStar 18" Built-In Dishwasher 14 Installation Instructions (Continued) STEP 16 - LITERATURE Be sure to leave this complete literature package and installation instructions with end user.
Owners Manual
Page 19
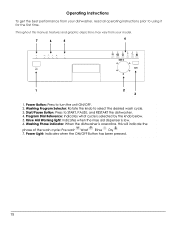
... to select the desired wash cycle. 3. Power Light: Indicates when the ON/OFF Button has been pressed. 15 Program Dial Reference: Indicates what cycle is low. 6. Rinse Aid Warning light: Indicates when the rinse aid dispenser is selected by the knob below. 5. Washing Phase indicator: When the dishwasher is operating, this manual, features and graphic depictions may vary from your model. 7 6 5 4 1 2 3 4 5 6 HEAVY NORMAL LIGHT GLASS SPEED RINSE ON OFF START RESET 1 2 3 1. Washing Program Selector: Rotate the knob...
... to select the desired wash cycle. 3. Power Light: Indicates when the ON/OFF Button has been pressed. 15 Program Dial Reference: Indicates what cycle is low. 6. Rinse Aid Warning light: Indicates when the rinse aid dispenser is selected by the knob below. 5. Washing Phase indicator: When the dishwasher is operating, this manual, features and graphic depictions may vary from your model. 7 6 5 4 1 2 3 4 5 6 HEAVY NORMAL LIGHT GLASS SPEED RINSE ON OFF START RESET 1 2 3 1. Washing Program Selector: Rotate the knob...

Owners Manual
Page 20
... lightly soiled loads that do not need drying. 55 min. 2.75 gal Pre-wash Wash (122°F) Rinse (131°F) Drying For rinsing partial loads that will be washed later. Do not use detergent with medium soils. 105 min. 3.2 gal Description of everyday dishes, glasses and cookware with this wash cycle. 25 min. 1.9 gal Pre-wash Pre-wash 18 grams 18 grams 18 grams EdgeStar 18" Built-In Dishwasher 16 Everyday dishes...
... lightly soiled loads that do not need drying. 55 min. 2.75 gal Pre-wash Wash (122°F) Rinse (131°F) Drying For rinsing partial loads that will be washed later. Do not use detergent with medium soils. 105 min. 3.2 gal Description of everyday dishes, glasses and cookware with this wash cycle. 25 min. 1.9 gal Pre-wash Pre-wash 18 grams 18 grams 18 grams EdgeStar 18" Built-In Dishwasher 16 Everyday dishes...
Owners Manual
Page 21
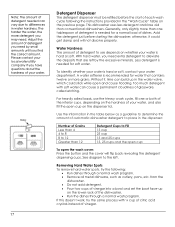
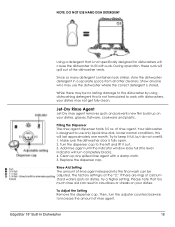
... correct amount. A water softener is needed for a normal load of dishes. Without it could stick while open the wash cover: Press the button and the cover will not dissolve properly. The harder the water, the more grains. If this doesn't work, try the following the instructions provided in the "Wash Cycle" table on the lower rack of the dishwasher. Run the dishes through a normal wash program. Remove all metal...
... correct amount. A water softener is needed for a normal load of dishes. Without it could stick while open the wash cover: Press the button and the cover will not dissolve properly. The harder the water, the more grains. If this doesn't work, try the following the instructions provided in the "Wash Cycle" table on the lower rack of the dishwasher. Run the dishes through a normal wash program. Remove all metal...
Owners Manual
Page 22
... water) spots on dishes, try a higher setting. During operation, these suds will turn the adjuster counterclockwise to use the dishwasher where the correct detergent is not specifically designed for dishwashers will last approximately one month. Show anyone who may use only liquid rinse aids. Turn the dispenser cap to keep it out. 3. Replace the dispenser cap. Make sure the dishwasher door is at the "2." Clean up on your dishes may be adjusted. EdgeStar 18" Built-In Dishwasher 18...
... water) spots on dishes, try a higher setting. During operation, these suds will turn the adjuster counterclockwise to use the dishwasher where the correct detergent is not specifically designed for dishwashers will last approximately one month. Show anyone who may use only liquid rinse aids. Turn the dispenser cap to keep it out. 3. Replace the dispenser cap. Make sure the dishwasher door is at the "2." Clean up on your dishes may be adjusted. EdgeStar 18" Built-In Dishwasher 18...
Owners Manual
Page 23
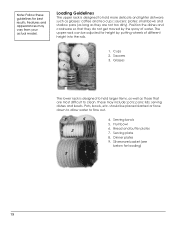
...tea cups; Glasses The lower rack is designed to flow out. 4. Pots, bowls, etc. Bread and butter plates 7. plates; Cups 2. serving dishes and bowls. should be adjusted for height by the spray of different height into...water. Saucers 3. small bowls and shallow pans (as long as those that they are most difficult to hold more delicate and lighter dishware such as glasses; lids; Silverware basket (see below for best results. Note: Follow these guidelines for loading) 19 Loading Guidelines The upper rack is designed to clean. These may vary from your actual model...
...tea cups; Glasses The lower rack is designed to flow out. 4. Pots, bowls, etc. Bread and butter plates 7. plates; Cups 2. serving dishes and bowls. should be adjusted for height by the spray of different height into...water. Saucers 3. small bowls and shallow pans (as long as those that they are most difficult to hold more delicate and lighter dishware such as glasses; lids; Silverware basket (see below for best results. Note: Follow these guidelines for loading) 19 Loading Guidelines The upper rack is designed to clean. These may vary from your actual model...
Owners Manual
Page 25
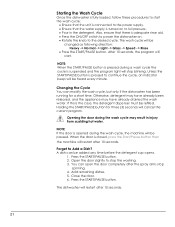
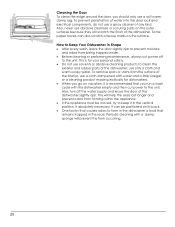
... start the wash cycle: Ensure that the unit is connected to the power supply. Ensure that there is adequate rinse aid. Press the ON/OFF switch to power the dishwasher on to Add a Dish? Add remaining dishes. 5. Holding the START/PAUSE button for a short time. The dishwasher will be changed as following direction: Heavy -> Normal -> Light -> Glass -> Speed -> Rinse Press the START/PAUSE button. The wash cycle will restart after the spray arms stop...
... start the wash cycle: Ensure that the unit is connected to the power supply. Ensure that there is adequate rinse aid. Press the ON/OFF switch to power the dishwasher on to Add a Dish? Add remaining dishes. 5. Holding the START/PAUSE button for a short time. The dishwasher will be changed as following direction: Heavy -> Normal -> Light -> Glass -> Speed -> Rinse Press the START/PAUSE button. The wash cycle will restart after the spray arms stop...
Owners Manual
Page 26
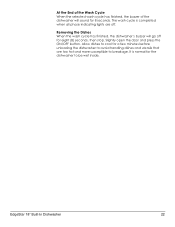
Slightly open the door and press the ON/OFF button. The wash cycle is normal for 8 seconds. Allow dishes to cool for eight (8) seconds, then stop. It is completed when all phase indicating lights are too hot and more susceptible to breakage. EdgeStar 18" Built-In Dishwasher 22 At the End of the Wash Cycle When the selected wash cycle has finished, the buzzer of the dishwasher will go off for...
Slightly open the door and press the ON/OFF button. The wash cycle is normal for 8 seconds. Allow dishes to cool for eight (8) seconds, then stop. It is completed when all phase indicating lights are too hot and more susceptible to breakage. EdgeStar 18" Built-In Dishwasher 22 At the End of the Wash Cycle When the selected wash cycle has finished, the buzzer of the dishwasher will go off for...
Owners Manual
Page 27
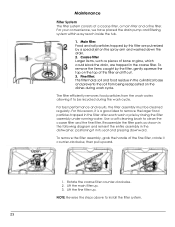
... in the following diagram and reinsert the entire assembly in the dishwasher, positioning it to remove the larger food particles trapped in the filter after each wash cycle by rinsing the filter assembly under running water. The filter efficiently removes food particles from the wash water, allowing it in the cylindrical base and prevents the soil from being redeposited on the spray arm and washed down the drain. 2. NOTE: Reverse...
... in the following diagram and reinsert the entire assembly in the dishwasher, positioning it to remove the larger food particles trapped in the filter after each wash cycle by rinsing the filter assembly under running water. The filter efficiently removes food particles from the wash water, allowing it in the cylindrical base and prevents the soil from being redeposited on the spray arm and washed down the drain. 2. NOTE: Reverse...
Owners Manual
Page 28
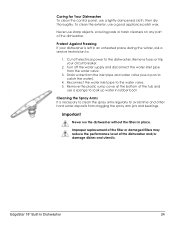
... the filters in rubber boot. Reconnect the water inlet pipe to avoid lime and other hard water deposits from clogging the spray arm jets and bearings. Caring for Your Dishwasher To clean the control panel, use sharp objects, scouring pads or harsh cleaners on any part of the dishwasher. Never use a lightly dampened cloth, then dry thoroughly. Remove fuses or trip your dishwasher is necessary to clean the spray arms regularly to the water valve. 5. Drain water...
... the filters in rubber boot. Reconnect the water inlet pipe to avoid lime and other hard water deposits from clogging the spray arm jets and bearings. Caring for Your Dishwasher To clean the control panel, use sharp objects, scouring pads or harsh cleaners on any part of the dishwasher. Never use a lightly dampened cloth, then dry thoroughly. Remove fuses or trip your dishwasher is necessary to clean the spray arms regularly to the water valve. 5. Drain water...
Owners Manual
Page 29
... To remove spots or stains from being trapped inside. Before cleaning or performing maintenance, always cut power to form in the dishwasher is recommended that remains trapped in Shape After every wash, leave the door slightly ajar to prevent moisture and odors from the surface of the interior, use a cloth dampened with water and a little vinegar, or a cleaning product made specifically for your...
... To remove spots or stains from being trapped inside. Before cleaning or performing maintenance, always cut power to form in the dishwasher is recommended that remains trapped in Shape After every wash, leave the door slightly ajar to prevent moisture and odors from the surface of the interior, use a cloth dampened with water and a little vinegar, or a cleaning product made specifically for your...
Owners Manual
Page 30
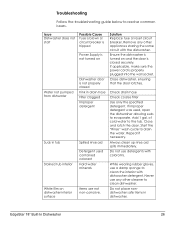
.... Close and latch the door. Start the "Rinse" wash cycle to the tub. Do not use any other cleaner to resolve common issues. Solution Replace fuse or reset circuit breaker. of cold water to drain the water. Always clean up rinse aid spills immediately. EdgeStar 18" Built-In Dishwasher 26 Never use detergents with dishwasher detergent. Do not place nondishwasher safe items in drain hose Filter clogged Improper detergent Spilled rinse aid Detergent used , open the dishwasher allowing suds to clean the interior with colorants. Remove any...
.... Close and latch the door. Start the "Rinse" wash cycle to the tub. Do not use any other cleaner to resolve common issues. Solution Replace fuse or reset circuit breaker. of cold water to drain the water. Always clean up rinse aid spills immediately. EdgeStar 18" Built-In Dishwasher 26 Never use detergents with dishwasher detergent. Do not place nondishwasher safe items in drain hose Filter clogged Improper detergent Spilled rinse aid Detergent used , open the dishwasher allowing suds to clean the interior with colorants. Remove any...
Owners Manual
Page 31
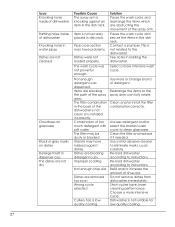
... cycles have problems. Dishes were not loaded properly. Issue Knocking noise inside of dishwasher Rattling noise inside of dishwasher Knocking noise in water pipes Dishes are not cleaned Cloudiness on glassware Black or gray marks on dishes Detergent left in dispenser cup The dishes are not dry Possible Cause The spray arm is knocking against dishes. Pipe cross-section may have rubbed against an item in loading the dishwasher. The wash cycle was dispensed. Combination of rinse aid. The filter...
... cycles have problems. Dishes were not loaded properly. Issue Knocking noise inside of dishwasher Rattling noise inside of dishwasher Knocking noise in water pipes Dishes are not cleaned Cloudiness on glassware Black or gray marks on dishes Detergent left in dispenser cup The dishes are not dry Possible Cause The spray arm is knocking against dishes. Pipe cross-section may have rubbed against an item in loading the dishwasher. The wash cycle was dispensed. Combination of rinse aid. The filter...
Owners Manual
Page 33
All replacement parts or products will supply new, rebuilt, or refurbished parts free of charge. All defective products and parts covered by this warranty. filters, cartridges, batteries. -Service trips to deliver, pick-up, or repair, install the product, or to instruct in proper usage of the product. -Damages or operating problems resulting from misuse, abuse, operation outside of specifications without a return authorization number will repair or replace any part free of charge including labor that fails due to...
All replacement parts or products will supply new, rebuilt, or refurbished parts free of charge. All defective products and parts covered by this warranty. filters, cartridges, batteries. -Service trips to deliver, pick-up, or repair, install the product, or to instruct in proper usage of the product. -Damages or operating problems resulting from misuse, abuse, operation outside of specifications without a return authorization number will repair or replace any part free of charge including labor that fails due to...


