
Owner's Manual
Page 1
Built-In Kegerator BR7000SS Fridge for the KC7000SS Kegerator Owner's Manual For more information on other great EdgeStar products on the web, go to http://www.edgestar.com
Built-In Kegerator BR7000SS Fridge for the KC7000SS Kegerator Owner's Manual For more information on other great EdgeStar products on the web, go to http://www.edgestar.com

Owner's Manual
Page 2
...• Do not operate the unit with a power plug missing the ground plug, a damaged cord or a loose socket. • Be sure the kegerator is plugged in a properly grounded wall outlet. General Safety • To prevent back and other appliances. • Do not start or stop the unit...properly grounded. • Never plug or unplug the unit with this unit. Important Safety Information Improper handling can cause serious damage to the EdgeStar kegerator and/or injury to repair the unit yourself. • Contact customer service for service options if the unit needs service. Do not ...
...• Do not operate the unit with a power plug missing the ground plug, a damaged cord or a loose socket. • Be sure the kegerator is plugged in a properly grounded wall outlet. General Safety • To prevent back and other appliances. • Do not start or stop the unit...properly grounded. • Never plug or unplug the unit with this unit. Important Safety Information Improper handling can cause serious damage to the EdgeStar kegerator and/or injury to repair the unit yourself. • Contact customer service for service options if the unit needs service. Do not ...

Owner's Manual
Page 3
... only. This owner's manual is advised that you keep track of all removed from transit. EdgeStar Built-in Kegerator ii Table of Contents IMPORTANT SAFETY INFORMATION I INTRODUCTION 1 PARTS IDENTIFICATION 2 BACK VIEW ...2 FRONT VIEW ...2 ACCESSORIES ...3 INSTALLING THE......10 INSTALLATION CHECK LIST BEFORE OPERATION 10 USING THE TEMPERATURE CONTROL PANEL 10 NORMAL SOUNDS 11 DEFROSTING ...11 PREPARING THE KEGERATOR FOR STORAGE 11 CLEANING AND MAINTENANCE 12 EXTERIOR CLEANING 12 INTERIOR CLEANING 12 TROUBLESHOOTING 12 TROUBLESHOOTING CONTINUED 13 SPECIFICATIONS 14 First...
... only. This owner's manual is advised that you keep track of all removed from transit. EdgeStar Built-in Kegerator ii Table of Contents IMPORTANT SAFETY INFORMATION I INTRODUCTION 1 PARTS IDENTIFICATION 2 BACK VIEW ...2 FRONT VIEW ...2 ACCESSORIES ...3 INSTALLING THE......10 INSTALLATION CHECK LIST BEFORE OPERATION 10 USING THE TEMPERATURE CONTROL PANEL 10 NORMAL SOUNDS 11 DEFROSTING ...11 PREPARING THE KEGERATOR FOR STORAGE 11 CLEANING AND MAINTENANCE 12 EXTERIOR CLEANING 12 INTERIOR CLEANING 12 TROUBLESHOOTING 12 TROUBLESHOOTING CONTINUED 13 SPECIFICATIONS 14 First...

Owner's Manual
Page 4
...believe that your purchase of your purchase, and is also needed for service under your kegerator. Both numbers are located on the ratings label on the web at http://www.edgestar.com to register your product, download product guides, additional troubleshooting resources and up-to-...(866) 319-5473. 1 Please save the original product packaging in case you chose us on the back of this EdgeStar kegerator. Introduction Thank you and EdgeStar. We are glad you need warranty service, our friendly customer service representatives are needed to obtain warranty service. This manual ...
...believe that your purchase of your purchase, and is also needed for service under your kegerator. Both numbers are located on the ratings label on the web at http://www.edgestar.com to register your product, download product guides, additional troubleshooting resources and up-to-...(866) 319-5473. 1 Please save the original product packaging in case you chose us on the back of this EdgeStar kegerator. Introduction Thank you and EdgeStar. We are glad you need warranty service, our friendly customer service representatives are needed to obtain warranty service. This manual ...

Owner's Manual
Page 5
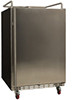
Cabinet EdgeStar Built-in Kegerator Control Panel Opening for Dispense Tower Compressor Step Lock Leveling Foot Can be replaced with Fan Pipe For Cooling of Dispense Tower Parts Identification Front Vent Back View Tip: Gather the model and serial number from the product label and write them down before installing the kegerator. Front View LED Light Bar Internal Fan with casters Product Label Power Plug 2
Cabinet EdgeStar Built-in Kegerator Control Panel Opening for Dispense Tower Compressor Step Lock Leveling Foot Can be replaced with Fan Pipe For Cooling of Dispense Tower Parts Identification Front Vent Back View Tip: Gather the model and serial number from the product label and write them down before installing the kegerator. Front View LED Light Bar Internal Fan with casters Product Label Power Plug 2
Owner's Manual
Page 6
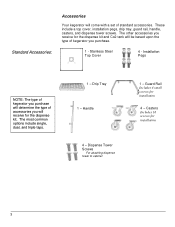
... come with a set of accessories you will determine the type of standard accessories. Installation Pegs NOTE: The type of kegerator you purchase. 1 - Dispense Tower Screws For attaching dispense tower to cabinet 1 - Drip Tray 1 - Handle 4 - The most common options include single, dual, and ...triple taps. 1 - The other accessories you receive for the dispense kit and Co2 tank will be based upon the type of kegerator you purchase will receive for the dispense kit. These include a top cover, installation pegs, drip tray, guard rail, handle, casters, and dispense ...
... come with a set of accessories you will determine the type of standard accessories. Installation Pegs NOTE: The type of kegerator you purchase. 1 - Dispense Tower Screws For attaching dispense tower to cabinet 1 - Drip Tray 1 - Handle 4 - The most common options include single, dual, and ...triple taps. 1 - The other accessories you receive for the dispense kit and Co2 tank will be based upon the type of kegerator you purchase will receive for the dispense kit. These include a top cover, installation pegs, drip tray, guard rail, handle, casters, and dispense ...

Owner's Manual
Page 7
... the packaging materials. Remove any safety, warning, or product information labels from your kegerator, be provided. Use receptacles that a separate circuit, serving only your kegerator before using. The kegerator should also be placed in a location that is recommended that cannot be turned off... death. To minimize possible shock hazard, the cord must be grounded. Recommended grounding method For your kegerator. EdgeStar Built-in Kegerator Installing the Kegerator The kegerator should be 3 Amps. IMPORTANT: Do not remove any shipping tape and glue from your personal safety...
... the packaging materials. Remove any safety, warning, or product information labels from your kegerator, be provided. Use receptacles that a separate circuit, serving only your kegerator before using. The kegerator should also be placed in a location that is recommended that cannot be turned off... death. To minimize possible shock hazard, the cord must be grounded. Recommended grounding method For your kegerator. EdgeStar Built-in Kegerator Installing the Kegerator The kegerator should be 3 Amps. IMPORTANT: Do not remove any shipping tape and glue from your personal safety...

Owner's Manual
Page 8
...screws to check the machine. 1. Place the top plate of the product to see if the kegerator is important for a brake lock. 3. Make sure the screws are tight so the caster is not level,... rotate the feet until the kegerator becomes level .You may cause damage to the handle or to the stainless steel door Installing the ... on the floor, you would like to make several adjustments to the screw hole openings. 4. Leveling the Kegerator It is level from front to back and side to side. 2. Insert the screws to attach the caster...
...screws to check the machine. 1. Place the top plate of the product to see if the kegerator is important for a brake lock. 3. Make sure the screws are tight so the caster is not level,... rotate the feet until the kegerator becomes level .You may cause damage to the handle or to the stainless steel door Installing the ... on the floor, you would like to make several adjustments to the screw hole openings. 4. Leveling the Kegerator It is level from front to back and side to side. 2. Insert the screws to attach the caster...

Owner's Manual
Page 9
IMPORTANT: Before you need to reverse the door in Kegerator 6 Remove the screws from the upper left hinge corner. Remove the plastic caps from the upper right hinge. Install the bottom left support bracket from ... door from the plastic bag that was included with the instruction manual. 5. Install the lower hinge on a padded surface to left corner of the door 6. EdgeStar Built-in the future. Carefully slide the bottom of the lower hinge and secure the door by fastening the screws through the left hinge by...
IMPORTANT: Before you need to reverse the door in Kegerator 6 Remove the screws from the upper left hinge corner. Remove the plastic caps from the upper right hinge. Install the bottom left support bracket from ... door from the plastic bag that was included with the instruction manual. 5. Install the lower hinge on a padded surface to left corner of the door 6. EdgeStar Built-in the future. Carefully slide the bottom of the lower hinge and secure the door by fastening the screws through the left hinge by...
Owner's Manual
Page 10
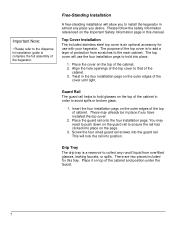
...push down on the guard rail to hold glasses on top of the cabinet. 2. This will allow you to complete the full assembly of the kegerator. There are two pieces included for use the four installation pegs to ensure the rail has clicked into place. 1. Guard Rail The guard rail ...the outer edges of the top of the cover until tight. Important Note: • Please refer to the dispense kit installation guide to install the kegerator in almost any runoff liquid from scratches to that of the cabinet. 3. Free-Standing Installation A free-standing installation will lock the rail into the ...
...push down on the guard rail to hold glasses on top of the cabinet. 2. This will allow you to complete the full assembly of the kegerator. There are two pieces included for use the four installation pegs to ensure the rail has clicked into place. 1. Guard Rail The guard rail ...the outer edges of the top of the cover until tight. Important Note: • Please refer to the dispense kit installation guide to install the kegerator in almost any runoff liquid from scratches to that of the cabinet. 3. Free-Standing Installation A free-standing installation will lock the rail into the ...

Owner's Manual
Page 11
... so it larger than a free-standing install. If needed, you will be able to support the entire weight of the kegerator that size hole. EdgeStar Built-in Kegerator A built-in installation allows the kegerator to be directly above 50°F and below . • Make sure the top cover, guard rail, drip tray, and installation...
... so it larger than a free-standing install. If needed, you will be able to support the entire weight of the kegerator that size hole. EdgeStar Built-in Kegerator A built-in installation allows the kegerator to be directly above 50°F and below . • Make sure the top cover, guard rail, drip tray, and installation...

Owner's Manual
Page 13
... or off the unit, please wait at the same time for approximately 5 seconds until the temperature scale changes. Is the kegerator in Fahrenheit or Celsius. This kegerator has one display. Press the button on the ambient environmental conditions. Press the button to 60°F. The temperature displayed can... Power Button Run Light Temperature Display Temp. And has proper grounding been installed for approximately 3 seconds to see the set temperature. EdgeStar Built-in Kegerator 10 The Run Light will switch to electricity? Once you powered off .
... or off the unit, please wait at the same time for approximately 5 seconds until the temperature scale changes. Is the kegerator in Fahrenheit or Celsius. This kegerator has one display. Press the button on the ambient environmental conditions. Press the button to 60°F. The temperature displayed can... Power Button Run Light Temperature Display Temp. And has proper grounding been installed for approximately 3 seconds to see the set temperature. EdgeStar Built-in Kegerator 10 The Run Light will switch to electricity? Once you powered off .

Owner's Manual
Page 14
...child from being forced over the condenser by removing the power plug from the power supply by the condenser fan. Preparing the Kegerator for air circulation and to prevent mold, mildew and unpleasant smells. The following describes the kinds of sounds that under most ... Additionally, the more humid the ambient conditions, the more frost may build up . Leave the door open to allow for Storage If the kegerator will automatically defrost under most ambient conditions. Disconnect the unit from the wall socket. 2. WARNING: Never attempt to minimize frost build-up ....
...child from being forced over the condenser by removing the power plug from the power supply by the condenser fan. Preparing the Kegerator for air circulation and to prevent mold, mildew and unpleasant smells. The following describes the kinds of sounds that under most ... Additionally, the more humid the ambient conditions, the more frost may build up . Leave the door open to allow for Storage If the kegerator will automatically defrost under most ambient conditions. Disconnect the unit from the wall socket. 2. WARNING: Never attempt to minimize frost build-up ....

Owner's Manual
Page 15
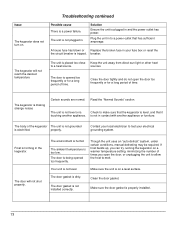
...is being opened . CLEANING AND MAINTENANCE Periodic cleaning and proper maintenance will ensure efficiency, top performance, and long life. Symptoms The kegerator turns on the following page. Solutions Run the unit at the appropriate ambient temperature. Minimize the number of the unit. 5. ...If the door panel is opened often. Interior Cleaning The kegerator's interior should be solved or explained. The door is not sealing properly. EdgeStar Built-in Kegerator 12 Use a soft sponge and rinse with a mild detergent and lukewarm water solution such ...
...is being opened . CLEANING AND MAINTENANCE Periodic cleaning and proper maintenance will ensure efficiency, top performance, and long life. Symptoms The kegerator turns on the following page. Solutions Run the unit at the appropriate ambient temperature. Minimize the number of the unit. 5. ...If the door panel is opened often. Interior Cleaning The kegerator's interior should be solved or explained. The door is not sealing properly. EdgeStar Built-in Kegerator 12 Use a soft sponge and rinse with a mild detergent and lukewarm water solution such ...
Owner's Manual
Page 16
...close Keep the unit away from direct sun light or other heat to a power outlet that the kegerator is being opened too frequently or for a long period of times you can try running the kegerator on a level surface. Frost is on a warmer temperature setting, minimizing the number of time. ...Make sure the unit is forming in to a heat source. Plug the unit in the kegerator. The ambient temperature is making strange noises Certain sounds are normal. The unit is plugged in . The kegerator is too low. Solution Ensure the unit is not plugged in and the power outlet has...
...close Keep the unit away from direct sun light or other heat to a power outlet that the kegerator is being opened too frequently or for a long period of times you can try running the kegerator on a level surface. Frost is on a warmer temperature setting, minimizing the number of time. ...Make sure the unit is forming in to a heat source. Plug the unit in the kegerator. The ambient temperature is making strange noises Certain sounds are normal. The unit is plugged in . The kegerator is too low. Solution Ensure the unit is not plugged in and the power outlet has...
Owner's Manual
Page 17
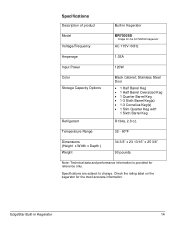
...34 3/8" x 23 13/16" x 25 3/8" 90 pounds Note: Technical data and performance information is provided for the most accurate information. EdgeStar Built-in Kegerator Model Voltage/Frequency BR7000SS Fridge for the KC7000SS Kegerator AC 115V~60Hz Amperage 1.03A Input Power 120W Color Storage Capacity Options Refrigerant Black Cabinet; Specifications are subject to change. Stainless... Keg • 1-3 Sixth Barrel Keg(s) • 1-3 Cornelius Keg(s) • 1 Slim Quarter Keg with 1 Sixth Barrel Keg R134a, 2.8 oz. Check the rating label on the kegerator for reference only.
...34 3/8" x 23 13/16" x 25 3/8" 90 pounds Note: Technical data and performance information is provided for the most accurate information. EdgeStar Built-in Kegerator Model Voltage/Frequency BR7000SS Fridge for the KC7000SS Kegerator AC 115V~60Hz Amperage 1.03A Input Power 120W Color Storage Capacity Options Refrigerant Black Cabinet; Specifications are subject to change. Stainless... Keg • 1-3 Sixth Barrel Keg(s) • 1-3 Cornelius Keg(s) • 1 Slim Quarter Keg with 1 Sixth Barrel Keg R134a, 2.8 oz. Check the rating label on the kegerator for reference only.
