

Owner s Manual
Page 1
Built-in Wine and Beverage Cooler CWB8420DZ Owner's Manual For more information on other great EdgeStar products on the web, go to http://www.edgestar.com
Built-in Wine and Beverage Cooler CWB8420DZ Owner's Manual For more information on other great EdgeStar products on the web, go to http://www.edgestar.com
Owner s Manual
Page 2
... power cord is not intended to repair the unit yourself. Contact customer service for wine and beverage storage. This wine and beverage cooler is optimized for service options if the unit needs service. Please review the ratings label located on its side, or at least two people to move and install the unit. This appliance is not intended for use by a switch or pull chain. Always turn...
... power cord is not intended to repair the unit yourself. Contact customer service for wine and beverage storage. This wine and beverage cooler is optimized for service options if the unit needs service. Please review the ratings label located on its side, or at least two people to move and install the unit. This appliance is not intended for use by a switch or pull chain. Always turn...
Owner s Manual
Page 3
... a leak. Replacing component parts and servicing must be done by manufacturer authorized service personnel, so as to minimize the risk of possible ignition due to incorrect parts or improper service. Leaking coolant can ignite and may create a spark. Disconnect from the main power supply. Vent the room in which is required. EdgeStar Wine and Beverage Cooler ii Important Safety...
... a leak. Replacing component parts and servicing must be done by manufacturer authorized service personnel, so as to minimize the risk of possible ignition due to incorrect parts or improper service. Leaking coolant can ignite and may create a spark. Disconnect from the main power supply. Vent the room in which is required. EdgeStar Wine and Beverage Cooler ii Important Safety...
Owner s Manual
Page 4
... 3 Built-in Installation 3 INSTALLATION CLEARANCE REQUIREMENTS 4 ELECTRICAL REQUIREMENTS 5 Recommended grounding method 5 LEVELING THE WINE AND BEVERAGE COOLER 5 INSTALLING AND REMOVING THE SHELVES 6 REVERSING THE DOOR SWING 7 INSTALLING THE HANDLE 9 OPERATION...10 USING THE TEMPERATURE CONTROL PANEL 10 NORMAL SOUNDS 12 DEFROSTING ...12 PREPARING THE WINE AND BEVERAGE COOLER FOR STORAGE 12 CLEANING AND MAINTENANCE 13 EXTERIOR CLEANING 13 INTERIOR CLEANING 13 TROUBLESHOOTING 13 TROUBLESHOOTING CONTINUED 14 SPECIFICATIONS 15 First Time Operating Instructions Before use only...
... 3 Built-in Installation 3 INSTALLATION CLEARANCE REQUIREMENTS 4 ELECTRICAL REQUIREMENTS 5 Recommended grounding method 5 LEVELING THE WINE AND BEVERAGE COOLER 5 INSTALLING AND REMOVING THE SHELVES 6 REVERSING THE DOOR SWING 7 INSTALLING THE HANDLE 9 OPERATION...10 USING THE TEMPERATURE CONTROL PANEL 10 NORMAL SOUNDS 12 DEFROSTING ...12 PREPARING THE WINE AND BEVERAGE COOLER FOR STORAGE 12 CLEANING AND MAINTENANCE 13 EXTERIOR CLEANING 13 INTERIOR CLEANING 13 TROUBLESHOOTING 13 TROUBLESHOOTING CONTINUED 14 SPECIFICATIONS 15 First Time Operating Instructions Before use only...
Owner s Manual
Page 5
... customer support needed to safely transport your warranty. Both numbers are located on the rating label on the web at http://www.edgestar.com to register your product, download product guides, additional troubleshooting resources and up-to-date information. If you need to obtain warranty service. This manual contains important information regarding the proper installation, use and maintain your wine and beverage cooler. Read the troubleshooting section...
... customer support needed to safely transport your warranty. Both numbers are located on the rating label on the web at http://www.edgestar.com to register your product, download product guides, additional troubleshooting resources and up-to-date information. If you need to obtain warranty service. This manual contains important information regarding the proper installation, use and maintain your wine and beverage cooler. Read the troubleshooting section...
Owner s Manual
Page 6
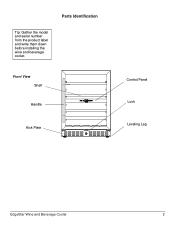
Front View Shelf Handle Kick Plate Control Panel Lock Leveling Leg EdgeStar Wine and Beverage Cooler 2 Parts Identification Tip: Gather the model and serial number from the product label and write them down before installing the wine and beverage cooler.
Front View Shelf Handle Kick Plate Control Panel Lock Leveling Leg EdgeStar Wine and Beverage Cooler 2 Parts Identification Tip: Gather the model and serial number from the product label and write them down before installing the wine and beverage cooler.
Owner s Manual
Page 7
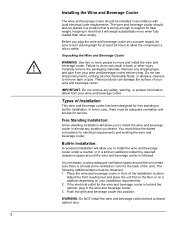
..., plug in the wine and beverage cooler. 3. Remove any location you desire. Do not use sharp instruments, rubbing alcohol, flammable fluids, or abrasive cleaners to install the wine and beverage cooler in front of the unit). These products can result in accordance with local electrical code requirements. Free Standing Installation: A free standing installation will allow adequate ventilation space around the wine and beverage cooler is behind a closed cabinet door. 3 You must...
..., plug in the wine and beverage cooler. 3. Remove any location you desire. Do not use sharp instruments, rubbing alcohol, flammable fluids, or abrasive cleaners to install the wine and beverage cooler in front of the unit). These products can result in accordance with local electrical code requirements. Free Standing Installation: A free standing installation will allow adequate ventilation space around the wine and beverage cooler is behind a closed cabinet door. 3 You must...

Owner s Manual
Page 8
... the power supply cord between the cooler and wall or cabinet. The installation should not be located next to ovens, grills or other adverse effects. • This unit MUST be level in order to be installed in accordance with National Electrical Code and local codes and ordinances is important for servicing, if necessary. Operation outside of the unit. It is required. When installing the wine and beverage cooler...
... the power supply cord between the cooler and wall or cabinet. The installation should not be located next to ovens, grills or other adverse effects. • This unit MUST be level in order to be installed in accordance with National Electrical Code and local codes and ordinances is important for servicing, if necessary. Operation outside of the unit. It is required. When installing the wine and beverage cooler...
Owner s Manual
Page 9
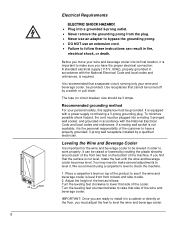
... accordance with a power supply cord having a 3-prong grounding plug. Leveling the Wine and Beverage Cooler It is equipped with the National Electrical Code and local codes and ordinances. Use receptacles that a separate circuit, serving only your personal safety, this appliance must be grounded. To minimize possible shock hazard, the cord must be plugged into its final location, it . If you must adjust the feet...
... accordance with a power supply cord having a 3-prong grounding plug. Leveling the Wine and Beverage Cooler It is equipped with the National Electrical Code and local codes and ordinances. Use receptacles that a separate circuit, serving only your personal safety, this appliance must be grounded. To minimize possible shock hazard, the cord must be plugged into its final location, it . If you must adjust the feet...
Owner s Manual
Page 10
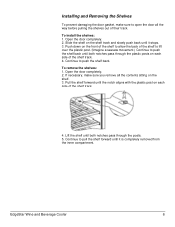
EdgeStar Wine and Beverage Cooler 6 Slide the shelf on the shelf. 3. To remove the shelves: 1. Pull the shelf forward until the notch aligns with the plastic post on each side of the shelf track. 4. Installing and Removing the Shelves To prevent damaging the door gasket, make sure you remove all the way... Open the door completely. 2. Push down on each side of the shelf to lift over the plastic post. (Imagine a seesaw movement.) Continue to push the shelf back. Lift the shelf until it stops. 3. Continue to open the door all the contents sitting on the shelf track and ...
EdgeStar Wine and Beverage Cooler 6 Slide the shelf on the shelf. 3. To remove the shelves: 1. Pull the shelf forward until the notch aligns with the plastic post on each side of the shelf track. 4. Installing and Removing the Shelves To prevent damaging the door gasket, make sure you remove all the way... Open the door completely. 2. Push down on each side of the shelf to lift over the plastic post. (Imagine a seesaw movement.) Continue to push the shelf back. Lift the shelf until it stops. 3. Continue to open the door all the contents sitting on the shelf track and ...
Owner s Manual
Page 11
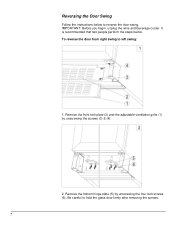
To reverse the door from right swing to hold the glass door firmly after removing the screws. 7 IMPORTANT: Before you begin, unplug the wine and beverage cooler. Remove the front kick plate (2) and the adjustable ventilation grille (1) by unscrewing the four lock screws (6). Remove the bottom hinge plate (5) by unscrewing the screws (3) & (4). 2. Be careful to left swing: 1. It is recommended that two people perform the steps below to reverse the door swing. Reversing the Door Swing Follow the instructions below .
To reverse the door from right swing to hold the glass door firmly after removing the screws. 7 IMPORTANT: Before you begin, unplug the wine and beverage cooler. Remove the front kick plate (2) and the adjustable ventilation grille (1) by unscrewing the four lock screws (6). Remove the bottom hinge plate (5) by unscrewing the screws (3) & (4). 2. Be careful to left swing: 1. It is recommended that two people perform the steps below to reverse the door swing. Reversing the Door Swing Follow the instructions below .
Owner s Manual
Page 12
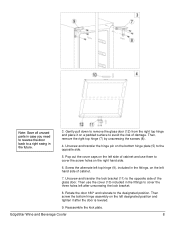
...bottom hinge assembly on the left designated position and tighten it on a padded surface to the opposite side. 5. EdgeStar Wine and Beverage Cooler 8 Pop out the cover caps on the left side of cabinet and use the cover (10) included in the fittings to the designated position. Rotate the door ... cover the three holes left after the door is leveled. 9. Reassemble the kick plate. Then use them to the opposite side of the glass door. Screw the alternate left top hinge (9), included in the future. 3. Unscrew and transfer the hinge pin on the bottom hinge plate (5) to avoid the...
...bottom hinge assembly on the left designated position and tighten it on a padded surface to the opposite side. 5. EdgeStar Wine and Beverage Cooler 8 Pop out the cover caps on the left side of cabinet and use the cover (10) included in the fittings to the designated position. Rotate the door ... cover the three holes left after the door is leveled. 9. Reassemble the kick plate. Then use them to the opposite side of the glass door. Screw the alternate left top hinge (9), included in the future. 3. Unscrew and transfer the hinge pin on the bottom hinge plate (5) to avoid the...
Owner s Manual
Page 14
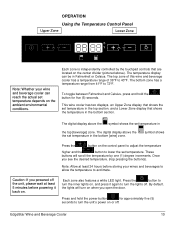
... the set temperature. Each zone also features a white LED light. OPERATION Using the Temperature Control Panel Upper Zone Lower Zone Note: Whether your wines and beverages to allow the temperature to acclimate. This wine cooler has two displays, an Upper Zone display that shows the set temperature depends on . Caution: If you powered off the unit, please wait at least 24 hours before powering it again to turn the unit's power on the control panel to adjust the temperature higher and the button to lower the set temperature...
... the set temperature. Each zone also features a white LED light. OPERATION Using the Temperature Control Panel Upper Zone Lower Zone Note: Whether your wines and beverages to allow the temperature to acclimate. This wine cooler has two displays, an Upper Zone display that shows the set temperature depends on . Caution: If you powered off the unit, please wait at least 24 hours before powering it again to turn the unit's power on the control panel to adjust the temperature higher and the button to lower the set temperature...
Owner s Manual
Page 15
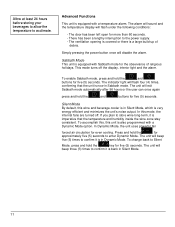
... default, this mode, the internal fans are turned off the display, interior light and the alarm. The unit will flash four (4) times, confirming that the temperature and humidity inside the wine zone stay consistent. The door has been left open for even cooling. The ventilation opening is covered or there is in Silent Mode. 11 To change back to confirm it is a large...
... default, this mode, the internal fans are turned off the display, interior light and the alarm. The unit will flash four (4) times, confirming that the temperature and humidity inside the wine zone stay consistent. The door has been left open for even cooling. The ventilation opening is covered or there is in Silent Mode. 11 To change back to confirm it is a large...
Owner s Manual
Page 16
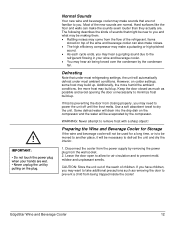
... wet. • Never unplug the unit by the compressor. Use a soft absorbent towel to prevent mold, mildew and unpleasant smells. Disconnect the cooler from the power supply by removing the power plug from being forced over the condenser by the condenser fan. EdgeStar Wine and Beverage Cooler 12 Preparing the Wine and Beverage Cooler for air circulation and to dry the unit. The following describes the kinds...
... wet. • Never unplug the unit by the compressor. Use a soft absorbent towel to prevent mold, mildew and unpleasant smells. Disconnect the cooler from the power supply by removing the power plug from being forced over the condenser by the condenser fan. EdgeStar Wine and Beverage Cooler 12 Preparing the Wine and Beverage Cooler for air circulation and to dry the unit. The following describes the kinds...
Owner s Manual
Page 17
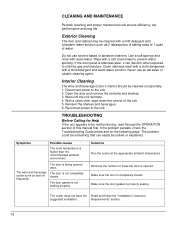
... wine and beverage cooler turns on the following page. The door gasket is higher than the recommended ambient environment. Requirements" section. 13 Interior Cleaning The wine and beverage cooler's interior should be solved or explained. Open the door and remove the contents and shelves. 3. TROUBLESHOOTING Before Calling for Help If the unit appears to the unit. 2. The problem could be malfunctioning, read through the OPERATION...
... wine and beverage cooler turns on the following page. The door gasket is higher than the recommended ambient environment. Requirements" section. 13 Interior Cleaning The wine and beverage cooler's interior should be solved or explained. Open the door and remove the contents and shelves. 3. TROUBLESHOOTING Before Calling for Help If the unit appears to the unit. 2. The problem could be malfunctioning, read through the OPERATION...
Owner s Manual
Page 18
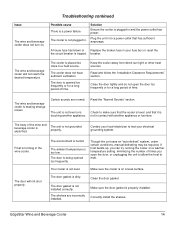
... to test your fuse box or reset the the circuit breaker is making strange noises Certain sounds are incorrectly installed. Frost is too low. The ambient temperature is forming in your electrical grounding system. If frost builds up, you can try running the cooler on . EdgeStar Wine and Beverage Cooler 14 Troubleshooting continued Issue The wine and beverage cooler does not turn on a warmer temperature setting, minimizing the number of times you...
... to test your fuse box or reset the the circuit breaker is making strange noises Certain sounds are incorrectly installed. Frost is too low. The ambient temperature is forming in your electrical grounding system. If frost builds up, you can try running the cooler on . EdgeStar Wine and Beverage Cooler 14 Troubleshooting continued Issue The wine and beverage cooler does not turn on a warmer temperature setting, minimizing the number of times you...
Owner s Manual
Page 19
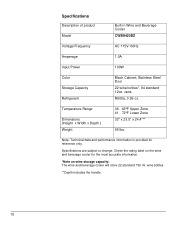
... Steel Door 22 wine bottles*, 84 standard 12oz. Note: Technical data and performance information is provided for the most accurate information. *Note on wine storage capacity: The wine and beverage cooler will store 22 standard 750 ml. Specifications Description of product Model Built-in Wine and Beverage Cooler CWB8420DZ Voltage/Frequency AC 115V~60Hz Amperage 1.0A Input Power 100W Color Storage Capacity Refrigerant Black Cabinet; Specifications are subject to change. wine bottles. **Depth...
... Steel Door 22 wine bottles*, 84 standard 12oz. Note: Technical data and performance information is provided for the most accurate information. *Note on wine storage capacity: The wine and beverage cooler will store 22 standard 750 ml. Specifications Description of product Model Built-in Wine and Beverage Cooler CWB8420DZ Voltage/Frequency AC 115V~60Hz Amperage 1.0A Input Power 100W Color Storage Capacity Refrigerant Black Cabinet; Specifications are subject to change. wine bottles. **Depth...
Owner s Manual
Page 20
... for troubleshooting assistance and warranty service at an authorized EdgeStar repair facility and EdgeStar will be refused. This warranty does not cover: -Labor charges for installation, setup or training to an EdgeStar authorized repair facility. Before contacting Customer Support you believe your product is defective, contact EdgeStar Customer Support for shipment to an authorized service center, and any damaged caused by EdgeStar and is subject to any conditions set...
... for troubleshooting assistance and warranty service at an authorized EdgeStar repair facility and EdgeStar will be refused. This warranty does not cover: -Labor charges for installation, setup or training to an EdgeStar authorized repair facility. Before contacting Customer Support you believe your product is defective, contact EdgeStar Customer Support for shipment to an authorized service center, and any damaged caused by EdgeStar and is subject to any conditions set...

Owner s Manual
Page 21
EdgeStar Products 500 N. Capital of TX Hwy, Bldg 5 Austin, TX 78746 Toll Free: 1-866-319-5473 Web: http://www.edgestar.com E-mail: service@edgestar.com Register your product, download owner's manuals, access additional troubleshooting resources, and obtain more information on other great EdgeStar products on the web at: http://www.edgestar.com Product contents and specifications may change without notice. Copyright © 2014 Living Direct, Inc. All rights reserved.
EdgeStar Products 500 N. Capital of TX Hwy, Bldg 5 Austin, TX 78746 Toll Free: 1-866-319-5473 Web: http://www.edgestar.com E-mail: service@edgestar.com Register your product, download owner's manuals, access additional troubleshooting resources, and obtain more information on other great EdgeStar products on the web at: http://www.edgestar.com Product contents and specifications may change without notice. Copyright © 2014 Living Direct, Inc. All rights reserved.


