Owner's Manual
Page 1
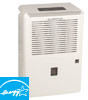
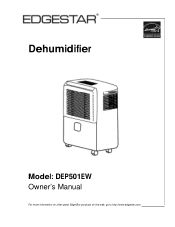
Dehumidifier Model: DEP501EW Owner's Manual For more information on other great EdgeStar products on the web, go to http://www.edgestar.com
Dehumidifier Model: DEP501EW Owner's Manual For more information on other great EdgeStar products on the web, go to http://www.edgestar.com
Owner's Manual
Page 2
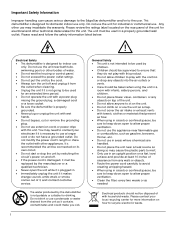
... housing or control panel. Do not exceed the power outlet ratings. Do not pull the unit by switching the circuit's power on the rear panel of with a power plug missing the ground plug, a damaged cord or a loose socket. Be sure the dehumidifier is designed for electrical and other appliances. Do not drink or use condensate or water drained from...
... housing or control panel. Do not exceed the power outlet ratings. Do not pull the unit by switching the circuit's power on the rear panel of with a power plug missing the ground plug, a damaged cord or a loose socket. Be sure the dehumidifier is designed for electrical and other appliances. Do not drink or use condensate or water drained from...
Owner's Manual
Page 3
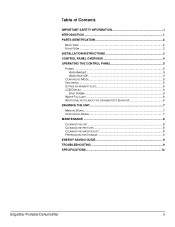
... ...2 FRONT VIEW ...2 INSTALLATION INSTRUCTIONS 3 CONTROL PANEL OVERVIEW 4 OPERATING THE CONTROL PANEL 5 POWER ...5 Auto-Restart 5 Auto-Shut Off 5 CONTINUOUS MODE 5 FAN SPEEDS ...5 SETTING THE HUMIDITY LEVEL 5 LCD DISPLAY ...6 Error Codes 6 WATER FULL LIGHT 6 ADDITIONAL NOTES ABOUT THE DEHUMIDIFIER'S BEHAVIOR 6 DRAINING THE UNIT 7 MANUAL DRAIN...7 CONTINUOUS DRAIN 7 MAINTENANCE ...8 CLEANING THE UNIT 8 CLEANING THE PRE-FILTER 8 CLEANING THE WATER BUCKET 8 PREPARATION FOR STORAGE 9 ENERGY SAVING GUIDE 9 TROUBLESHOOTING 9 SPECIFICATIONS 12 EdgeStar Portable Dehumidifier ii
... ...2 FRONT VIEW ...2 INSTALLATION INSTRUCTIONS 3 CONTROL PANEL OVERVIEW 4 OPERATING THE CONTROL PANEL 5 POWER ...5 Auto-Restart 5 Auto-Shut Off 5 CONTINUOUS MODE 5 FAN SPEEDS ...5 SETTING THE HUMIDITY LEVEL 5 LCD DISPLAY ...6 Error Codes 6 WATER FULL LIGHT 6 ADDITIONAL NOTES ABOUT THE DEHUMIDIFIER'S BEHAVIOR 6 DRAINING THE UNIT 7 MANUAL DRAIN...7 CONTINUOUS DRAIN 7 MAINTENANCE ...8 CLEANING THE UNIT 8 CLEANING THE PRE-FILTER 8 CLEANING THE WATER BUCKET 8 PREPARATION FOR STORAGE 9 ENERGY SAVING GUIDE 9 TROUBLESHOOTING 9 SPECIFICATIONS 12 EdgeStar Portable Dehumidifier ii
Owner's Manual
Page 4
... relationship. We are needed for service under your purchase of your product at http://www.edgestar.com and download product guides, owner's manuals, and access additional troubleshooting resources. If you need to remove moisture in the air by telephone at service@edgestar.com or by condensation removal and collecting the water in a removable bucket, or draining into a drain hose that can be routed to obtain warranty service. Your dehumidifier is the proof of this EdgeStar portable dehumidifier. Introduction Thank...
... relationship. We are needed for service under your purchase of your product at http://www.edgestar.com and download product guides, owner's manuals, and access additional troubleshooting resources. If you need to remove moisture in the air by telephone at service@edgestar.com or by condensation removal and collecting the water in a removable bucket, or draining into a drain hose that can be routed to obtain warranty service. Your dehumidifier is the proof of this EdgeStar portable dehumidifier. Introduction Thank...
Owner's Manual
Page 6
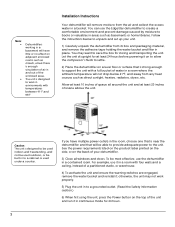
... warning switches are engaged, remove the water bucket and reinstall it on to allow the compressor's fluids to unpack and set up your dehumidifier. 3) Close all around the unit and at least 24 hours before powering it ; You may not work in environments with temperatures between 41°F and 95°F Installation Instructions Your dehumidifier will remove moisture from the air and collect the excess water in a bucket...
... warning switches are engaged, remove the water bucket and reinstall it on to allow the compressor's fluids to unpack and set up your dehumidifier. 3) Close all around the unit and at least 24 hours before powering it ; You may not work in environments with temperatures between 41°F and 95°F Installation Instructions Your dehumidifier will remove moisture from the air and collect the excess water in a bucket...
Owner's Manual
Page 7
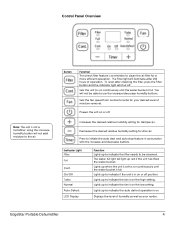
... removal. Lights up to indicate the fan is on the low setting. You will not add moisture to use the increase/decrease humidity buttons. Button Function The check filter feature is a reminder to indicate the auto defrost operation is not a humidifier; Powers the unit on or off. Decreases the desired relative humidity setting for damper air. Control Panel Overview Note: The unit is on Displays the level of humidity as well as error codes...
... removal. Lights up to indicate the fan is on the low setting. You will not add moisture to use the increase/decrease humidity buttons. Button Function The check filter feature is a reminder to indicate the auto defrost operation is not a humidifier; Powers the unit on or off. Decreases the desired relative humidity setting for damper air. Control Panel Overview Note: The unit is on Displays the level of humidity as well as error codes...
Owner's Manual
Page 8
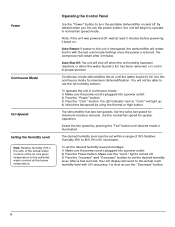
... "Power" button to turn the portable dehumidifier on . The compressor will light up. 4) Select the fan speed by pressing the "Fan" button until the water bucket is interrupted, the dehumidifier will restart itself in its proper position. Use the turbo fan speed for maximum dehumidification. Select the fan speed by using the Normal or High button. After a few seconds, the LCD display will begin to operate in 5% increments. Power Continuous Mode Fan Speeds Setting the Humidity Level...
... "Power" button to turn the portable dehumidifier on . The compressor will light up. 4) Select the fan speed by pressing the "Fan" button until the water bucket is interrupted, the dehumidifier will restart itself in its proper position. Use the turbo fan speed for maximum dehumidification. Select the fan speed by using the Normal or High button. After a few seconds, the LCD display will begin to operate in 5% increments. Power Continuous Mode Fan Speeds Setting the Humidity Level...
Owner's Manual
Page 9
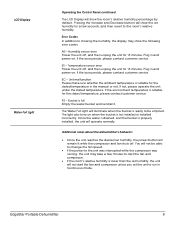
... contact customer service. Bucket is suitable for 15 minutes. Pressing the Increase and Decrease buttons will show the room's relative humidity percentage by default. ES - Once the water is drained, and the bucket is properly installed, the unit will remain lit while the compressor and fan shuts off , and then unplug the unit for 15 minutes. LCD Display Water Full Light Operating the Control Panel continued The LCD Display...
... contact customer service. Bucket is suitable for 15 minutes. Pressing the Increase and Decrease buttons will show the room's relative humidity percentage by default. ES - Once the water is drained, and the bucket is properly installed, the unit will remain lit while the compressor and fan shuts off , and then unplug the unit for 15 minutes. LCD Display Water Full Light Operating the Control Panel continued The LCD Display...
Owner's Manual
Page 10
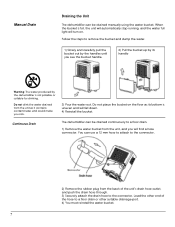
... uneven and will turn on the floor as it contains contaminates and could make you will find a hose connector. The dehumidifier can be drained continuously to a floor drain. 1) Remove the water bucket from the unit as its handle Warning: The water produced by the dehumidifier is full, the unit will automatically stop running, and the water full light will fall down. 4) Reinstall the bucket. When the bucket is not...
... uneven and will turn on the floor as it contains contaminates and could make you will find a hose connector. The dehumidifier can be drained continuously to a floor drain. 1) Remove the water bucket from the unit as its handle Warning: The water produced by the dehumidifier is full, the unit will automatically stop running, and the water full light will fall down. 4) Reinstall the bucket. When the bucket is not...
Owner's Manual
Page 11
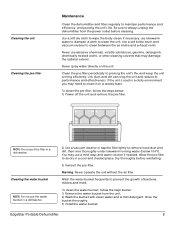
...: Never operate the unit without the air filter. Never use a mild soap and water solution if needed. Never spray water directly on a weekly basis. Allow the pre-filter to always unplug the dehumidifier from the unit. 2) Wash the bucket with clean water and a mild detergent. If the unit is used in a dishwasher. Cleaning the unit Cleaning the pre-filter Maintenance Clean the dehumidifier and filters regularly to clean it on the unit. EdgeStar Portable Dehumidifier 8
...: Never operate the unit without the air filter. Never use a mild soap and water solution if needed. Never spray water directly on a weekly basis. Allow the pre-filter to always unplug the dehumidifier from the unit. 2) Wash the bucket with clean water and a mild detergent. If the unit is used in a dishwasher. Cleaning the unit Cleaning the pre-filter Maintenance Clean the dehumidifier and filters regularly to clean it on the unit. EdgeStar Portable Dehumidifier 8

Owner's Manual
Page 12
Energy Saving Guide Read and follow the instructions below to get the best performance and efficiency from the water tank. 3) Clean the air filter, water tank and unit. 4) Unplug and carefully wind the power cord. 5) Cover the unit with a plastic bag. 6) Store the unit in an upright position in front of time, follow the guide below before storing your portable dehumidifier: Do not cover the air outlet (exhaust) while...
Energy Saving Guide Read and follow the instructions below to get the best performance and efficiency from the water tank. 3) Clean the air filter, water tank and unit. 4) Unplug and carefully wind the power cord. 5) Cover the unit with a plastic bag. 6) Store the unit in an upright position in front of time, follow the guide below before storing your portable dehumidifier: Do not cover the air outlet (exhaust) while...
Owner's Manual
Page 13
... indicator lights turn on a level surface. Remove bucket and reinsert. Make sure the unit is clogged Unit may have been shipped on a level surface for a longer period of time. Contact customer service. Troubleshooting Follow the troubleshooting chart to another outlet. EdgeStar Portable Dehumidifier 10 Check your circuit breaker. (Refer to the rating label on the coils My dehumidifier is plugged in continuous mode. Shut off the unit. Increase the room temperature...
... indicator lights turn on a level surface. Remove bucket and reinsert. Make sure the unit is clogged Unit may have been shipped on a level surface for a longer period of time. Contact customer service. Troubleshooting Follow the troubleshooting chart to another outlet. EdgeStar Portable Dehumidifier 10 Check your circuit breaker. (Refer to the rating label on the coils My dehumidifier is plugged in continuous mode. Shut off the unit. Increase the room temperature...

Owner's Manual
Page 14
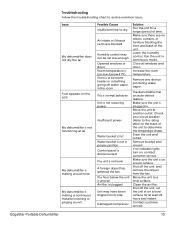
... lights blink randomly Unit has an AS error Unit has an ES error Unit has a EC error Unit has a P2 error A drain hose has been attached and is loose Cracked water bucket The dehumidifier may be plugged into an outlet that can not supply the correct amount of current Unit may have a faulty control panel Humidity sensor error Temperature sensor error Unit malfunction Bucket is full Bucket is suitable, please contact customer service...
... lights blink randomly Unit has an AS error Unit has an ES error Unit has a EC error Unit has a P2 error A drain hose has been attached and is loose Cracked water bucket The dehumidifier may be plugged into an outlet that can not supply the correct amount of current Unit may have a faulty control panel Humidity sensor error Temperature sensor error Unit malfunction Bucket is full Bucket is suitable, please contact customer service...
Owner's Manual
Page 15
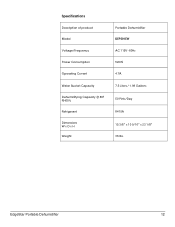
EdgeStar Portable Dehumidifier 12 Specifications Description of product Model Voltage/Frequency Power Consumption Operating Current Water Bucket Capacity Dehumidifying Capacity @ 80F RH60% Refrigerant Dimensions W x D x H Weight Portable Dehumidifier DEP501EW AC 115V~60Hz 520W 4.7A 7.5 Liters / 1.98 Gallons 50 Pints/Day R410A 15 3/8" x 10 9/16" x 23 1/8" 36 lbs.
EdgeStar Portable Dehumidifier 12 Specifications Description of product Model Voltage/Frequency Power Consumption Operating Current Water Bucket Capacity Dehumidifying Capacity @ 80F RH60% Refrigerant Dimensions W x D x H Weight Portable Dehumidifier DEP501EW AC 115V~60Hz 520W 4.7A 7.5 Liters / 1.98 Gallons 50 Pints/Day R410A 15 3/8" x 10 9/16" x 23 1/8" 36 lbs.
Owner's Manual
Page 16
..., or repair, install the product, or to instruct in the owner's manual, accidents, acts of God, vermin, fire, flood, improper installation, unauthorized service, maintenance negligence, unauthorized installation or modification, or commercial use of specifications without a return authorization number will be responsible for warranty service, the product must be returned in basis to an authorized service center, and any damaged caused by this warranty. EdgeStar is defective, contact EdgeStar Customer Support for shipment...
..., or repair, install the product, or to instruct in the owner's manual, accidents, acts of God, vermin, fire, flood, improper installation, unauthorized service, maintenance negligence, unauthorized installation or modification, or commercial use of specifications without a return authorization number will be responsible for warranty service, the product must be returned in basis to an authorized service center, and any damaged caused by this warranty. EdgeStar is defective, contact EdgeStar Customer Support for shipment...

Owner's Manual
Page 17
EdgeStar Products 500 N. Copyright © 2012 Living Direct, Inc. All rights reserved. Capital of TX Hwy, Bldg 5 Austin, TX 78746 Toll Free: 1-866-319-5473 Web: http://www.edgestar.com E-mail: service@edgestar.com Register your product, download owner's manuals, access additional troubleshooting resources, and obtain more information on other great EdgeStar & Koldfront products on the web at: http://www.edgestar.com Product contents and specifications may change without notice.
EdgeStar Products 500 N. Copyright © 2012 Living Direct, Inc. All rights reserved. Capital of TX Hwy, Bldg 5 Austin, TX 78746 Toll Free: 1-866-319-5473 Web: http://www.edgestar.com E-mail: service@edgestar.com Register your product, download owner's manuals, access additional troubleshooting resources, and obtain more information on other great EdgeStar & Koldfront products on the web at: http://www.edgestar.com Product contents and specifications may change without notice.


