

Owner's Manual
Page 1
http://www.edgestar.com DWP45E Countertop Dishwasher Owner's Manual This owner's manual provides instructions on safe installation, use, and maintenance. Please read it carefully and save it for reference.
http://www.edgestar.com DWP45E Countertop Dishwasher Owner's Manual This owner's manual provides instructions on safe installation, use, and maintenance. Please read it carefully and save it for reference.
Owner's Manual
Page 2
... this product opens a relationship between you and EdgeStar. If you need to -date information. We will work at 1 (866) 3195473. For Your Records: Please write down the model number and serial number below for product guides, additional troubleshooting resources and up-to safely transport your product. We believe that your purchase of Purchase: To better serve you, please do the following before contacting customer service...
... this product opens a relationship between you and EdgeStar. If you need to -date information. We will work at 1 (866) 3195473. For Your Records: Please write down the model number and serial number below for product guides, additional troubleshooting resources and up-to safely transport your product. We believe that your purchase of Purchase: To better serve you, please do the following before contacting customer service...

Owner's Manual
Page 3
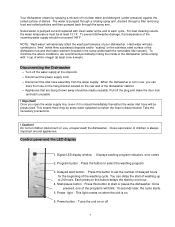
...Program button 4. Power light 7. Rinse aid dispenser 13. Door 10. Table of Contents Page Components 1 Important Safety Instructions 2 Installation Instructions 3 Water Pressure 3 Disconnecting the Dishwasher 4 Control Panel and LED Display 4 Loading Your Dishwasher 5 Preparing Your Dishes for Washing 5 Detergent and Rinse Aid Use 6 Operating Instructions 7 Technical Data and Troubleshooting 8 Limited Warranty 9 Components Front view 1 9 8 Inside view 2 Note that your dishwasher may vary slightly in appearance from this unit. Start/pause button 5. Spray arm...
...Program button 4. Power light 7. Rinse aid dispenser 13. Door 10. Table of Contents Page Components 1 Important Safety Instructions 2 Installation Instructions 3 Water Pressure 3 Disconnecting the Dishwasher 4 Control Panel and LED Display 4 Loading Your Dishwasher 5 Preparing Your Dishes for Washing 5 Detergent and Rinse Aid Use 6 Operating Instructions 7 Technical Data and Troubleshooting 8 Limited Warranty 9 Components Front view 1 9 8 Inside view 2 Note that your dishwasher may vary slightly in appearance from this unit. Start/pause button 5. Spray arm...
Owner's Manual
Page 4
... the installation and operating instructions carefully before using new hoses. They may cause the failure of personal injury. → Do not use dishwasher detergent for hand washing. Dishwasher detergent should be positioned so that the plug is accessible. → The appliance is designed for normal household use. → Do not use the dishwasher for dishwashers only. → If the power supply cord is damaged, it must be connected to the dishwasher. Electrical Instructions: An electrical supply of your dishwasher...
... the installation and operating instructions carefully before using new hoses. They may cause the failure of personal injury. → Do not use dishwasher detergent for hand washing. Dishwasher detergent should be positioned so that the plug is accessible. → The appliance is designed for normal household use. → Do not use the dishwasher for dishwashers only. → If the power supply cord is damaged, it must be connected to the dishwasher. Electrical Instructions: An electrical supply of your dishwasher...

Owner's Manual
Page 5
... so desire, you are located, immediately shut off the water supply and check the hose connections. To allow for any reason you may connect the water inlet hose on a solid, level surface. 7. Connect the other end (bent connector) to the machine), the dishwasher will also suffice. Water connection Inlet valve Back view Inlet hose Drain hose Power cord 3. Make sure there is preferred. A hot water supply is an electrical outlet within easy reach of the dishwasher. For Best Results: 3 It...
... so desire, you are located, immediately shut off the water supply and check the hose connections. To allow for any reason you may connect the water inlet hose on a solid, level surface. 7. Connect the other end (bent connector) to the machine), the dishwasher will also suffice. Water connection Inlet valve Back view Inlet hose Drain hose Power cord 3. Make sure there is preferred. A hot water supply is an electrical outlet within easy reach of the dishwasher. For Best Results: 3 It...
Owner's Manual
Page 6
... the power supply cord. → Disconnect the inlet hose assembly from the water supply. Digital LED display window : Displays washing program indicators, error codes 2. You can store the hose on the hang bracket located on when the unit is always important around appliances. Power light:This light comes on the rear wall of white vinegar (at least 131˚F. Your dishwasher cleans by one of the washing cycle. Close supervision of your dishwasher. Control panel and...
... the power supply cord. → Disconnect the inlet hose assembly from the water supply. Digital LED display window : Displays washing program indicators, error codes 2. You can store the hose on the hang bracket located on when the unit is always important around appliances. Power light:This light comes on the rear wall of white vinegar (at least 131˚F. Your dishwasher cleans by one of the washing cycle. Close supervision of your dishwasher. Control panel and...

Owner's Manual
Page 7
... size dinner plates from glasses and cups. → NOTE: Dishes with the handles up to reduce the risk of cut-type injuries → Do not load plastic items unless they are not likely to damage the door seal. → Load sharp knives with dried-on a slant to drain water away. When loading items to be necessary to wash and may not come clean in a normal wash cycle...
... size dinner plates from glasses and cups. → NOTE: Dishes with the handles up to reduce the risk of cut-type injuries → Do not load plastic items unless they are not likely to damage the door seal. → Load sharp knives with dried-on a slant to drain water away. When loading items to be necessary to wash and may not come clean in a normal wash cycle...
Owner's Manual
Page 8
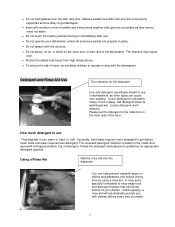
... detergent indention located on the inside door panel will automatically provide you wash. 6 You can cause over dish rack pins are not properly supported and are likely to get dishes clean while soft water requires less detergent. Lumpy detergent won't dissolve. How much detergent to use That depends if your dishes. A rinse aid is specially formulated to rinse away food and detergent residue that can be left behind on the open door or dish-rack...
... detergent indention located on the inside door panel will automatically provide you wash. 6 You can cause over dish rack pins are not properly supported and are likely to get dishes clean while soft water requires less detergent. Lumpy detergent won't dissolve. How much detergent to use That depends if your dishes. A rinse aid is specially formulated to rinse away food and detergent residue that can be left behind on the open door or dish-rack...
Owner's Manual
Page 9
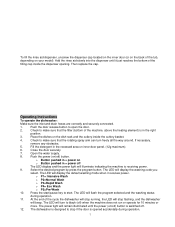
... power. The LED will beep. The dishwasher is in the right position. 3. Push the power (on inner door panel. (12g maximum). 6. Operating Instructions To operate the dishwasher: Make sure the inlet and drain hoses are correctly and securely connected. 1. The LED will display the default washing mode when it just reaches the bottom of the filling cap inside the cutlery basket. 4. To fill the rinse aid dispenser, unscrew the dispenser cap located on the inner door...
... power. The LED will beep. The dishwasher is in the right position. 3. Push the power (on inner door panel. (12g maximum). 6. Operating Instructions To operate the dishwasher: Make sure the inlet and drain hoses are correctly and securely connected. 1. The LED will display the default washing mode when it just reaches the bottom of the filling cap inside the cutlery basket. 4. To fill the rinse aid dispenser, unscrew the dispenser cap located on the inner door...

Owner's Manual
Page 10
... a small amount of water being pumped out of the drain hose prior to the start of water (in the "drain" mode. This is because the drain pump always retains a small amount of the regular wash cycle. Technical Data and Troubleshooting Technical data Power input Outer dimensions (HxWxD) Weight Max. After unloading the dishwasher, remove the filter, clean off any bits of each cycle, the dishwasher always starts in the sump) from...
... a small amount of water being pumped out of the drain hose prior to the start of water (in the "drain" mode. This is because the drain pump always retains a small amount of the regular wash cycle. Technical Data and Troubleshooting Technical data Power input Outer dimensions (HxWxD) Weight Max. After unloading the dishwasher, remove the filter, clean off any bits of each cycle, the dishwasher always starts in the sump) from...
Owner's Manual
Page 11
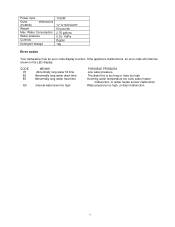
Water Consumption Water pressure Controls Detergent dosage 1160W 17.1x18.9"x22.5" 50 pounds 2.75 gallons 0.03~1MPa Digital 12g Error codes Your dishwasher has an error code display function. Power input Outer (HxWxD) dimensions Weight Max. CODE E1 E2 E3 E4 MEANS Abnormally long water fill time Abnormally long water drain time Abnormally long water heat time Internal water level too high POSSIBLE PROBLEM Low water pressure The drain line is too long or rises too high Incoming water temperature too cold, water heater...
Water Consumption Water pressure Controls Detergent dosage 1160W 17.1x18.9"x22.5" 50 pounds 2.75 gallons 0.03~1MPa Digital 12g Error codes Your dishwasher has an error code display function. Power input Outer (HxWxD) dimensions Weight Max. CODE E1 E2 E3 E4 MEANS Abnormally long water fill time Abnormally long water drain time Abnormally long water heat time Internal water level too high POSSIBLE PROBLEM Low water pressure The drain line is too long or rises too high Incoming water temperature too cold, water heater...
Owner's Manual
Page 12
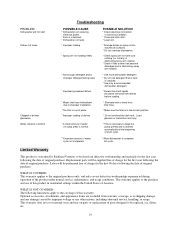
... the product under normal service, maintenance, and usage conditions. WHAT IS NOT COVERED: The following the date of dishes. * Eliminate kink or bend from warranty coverage, as is warranted by improper voltage or any damage caused by Richlund Ventures to complete full cycle. PROBLEM Dishwasher will not start Dishes not clean Chipped or broken glassware Water remains in bottom Troubleshooting POSSIBLE CAUSE * Dishwasher not receiving electrical power. * Door is...
... the product under normal service, maintenance, and usage conditions. WHAT IS NOT COVERED: The following the date of dishes. * Eliminate kink or bend from warranty coverage, as is warranted by improper voltage or any damage caused by Richlund Ventures to complete full cycle. PROBLEM Dishwasher will not start Dishes not clean Chipped or broken glassware Water remains in bottom Troubleshooting POSSIBLE CAUSE * Dishwasher not receiving electrical power. * Door is...

Owner's Manual
Page 13
... CONTRACT, TORT, OR OTHERWISE. Please have your product is not responsible for warranty service, the product must be repaired or replaced, at Richlund Ventures' option, on a mail-in basis to instruct in a commercial setting. THIS WARRANTY GIVES YOU SPECIFIC LEGAL RIGHTS. All replacement parts and units will apply. THIS WARRANTY IS IN LIEU OF ANY OTHER WARRANTY, EXPRESS OR IMPLIED, INCLUDING WITHOUT LIMITATION, ANY...
... CONTRACT, TORT, OR OTHERWISE. Please have your product is not responsible for warranty service, the product must be repaired or replaced, at Richlund Ventures' option, on a mail-in basis to instruct in a commercial setting. THIS WARRANTY GIVES YOU SPECIFIC LEGAL RIGHTS. All replacement parts and units will apply. THIS WARRANTY IS IN LIEU OF ANY OTHER WARRANTY, EXPRESS OR IMPLIED, INCLUDING WITHOUT LIMITATION, ANY...

Owner's Manual
Page 14
For information on EdgeStar and to view our full line of products, please visit our website: http://www.edgestar.com Richlund Ventures, Inc. Box 81336 Austin, Texas 78708-1336 Toll Free: 1-866-319-5473
For information on EdgeStar and to view our full line of products, please visit our website: http://www.edgestar.com Richlund Ventures, Inc. Box 81336 Austin, Texas 78708-1336 Toll Free: 1-866-319-5473


