
Owner's Manual
Page 2
... MAINTENANCE When installing and servicing your dishwasher, refer to the following: • This dishwasher should be followed. Turning the dishwasher OFF does not disconnect the appliance from the power supply before using any part of your safety, the information detailed in this appliance from the power supply. • Dispose of electric shock. • Do not attempt to repair or replace any electrical appliance connected to the hot water system. Improper electrical connection...
... MAINTENANCE When installing and servicing your dishwasher, refer to the following: • This dishwasher should be followed. Turning the dishwasher OFF does not disconnect the appliance from the power supply before using any part of your safety, the information detailed in this appliance from the power supply. • Dispose of electric shock. • Do not attempt to repair or replace any electrical appliance connected to the hot water system. Improper electrical connection...
Owner's Manual
Page 3
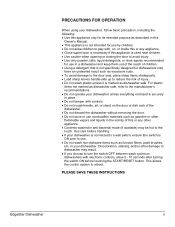
... if this Owner's Manual. • This appliance is not intended for use by children. • Do not allow 5 - 10 seconds after turning the switch ON before handling. • If your dishwasher is connected to a wall switch, ensure tthe switch is ON prior to the manufacturer's recommendations. • Do not operate your dishwasher. PLEASE SAVE THESE INSTRUCTIONS EdgeStar Dishwasher ii Use care before touching the START/RESET button.
... if this Owner's Manual. • This appliance is not intended for use by children. • Do not allow 5 - 10 seconds after turning the switch ON before handling. • If your dishwasher is connected to a wall switch, ensure tthe switch is ON prior to the manufacturer's recommendations. • Do not operate your dishwasher. PLEASE SAVE THESE INSTRUCTIONS EdgeStar Dishwasher ii Use care before touching the START/RESET button.
Owner's Manual
Page 4
... DISHWASHER 8 CONTROL PANEL FUNCTIONS 8 Error Codes...8 WASH CYCLES CHART ...9 PROPERLY LOADING THE DISHWASHER 10 Cutlery Basket ...11 ONLY USE PROPER DETERGENT 11 USE JET‐DRY RINSE AGENT 13 STARTING THE WASH CYCLE 14 CHANGING THE CYCLE ...14 Forget to Add a Dish 15 AT THE END OF THE WASH CYCLE 15 MAINTENANCE ...16 FILTER SYSTEM ...16 CLEANING THE DISHWASHER 17 CLEANING THE DOOR ...17 CLEANING THE SPRAY ARMS 17 PROTECT AGAINST FREEZING 17 GUIDE TO KEEPING THE DISHWASHER IN TOP SHAPE 18 TROUBLESHOOTING 19 TROUBLESHOOTING CONTINUED 21 SPECIFICATIONS...22 EDGESTAR...
... DISHWASHER 8 CONTROL PANEL FUNCTIONS 8 Error Codes...8 WASH CYCLES CHART ...9 PROPERLY LOADING THE DISHWASHER 10 Cutlery Basket ...11 ONLY USE PROPER DETERGENT 11 USE JET‐DRY RINSE AGENT 13 STARTING THE WASH CYCLE 14 CHANGING THE CYCLE ...14 Forget to Add a Dish 15 AT THE END OF THE WASH CYCLE 15 MAINTENANCE ...16 FILTER SYSTEM ...16 CLEANING THE DISHWASHER 17 CLEANING THE DOOR ...17 CLEANING THE SPRAY ARMS 17 PROTECT AGAINST FREEZING 17 GUIDE TO KEEPING THE DISHWASHER IN TOP SHAPE 18 TROUBLESHOOTING 19 TROUBLESHOOTING CONTINUED 21 SPECIFICATIONS...22 EDGESTAR...

Owner's Manual
Page 6
... door. Following this instruction manual carefully to help you need service, our friendly customer service representatives are available via email at service@edgestar.com or by telephone at its peak performance and efficiency. For Your Records: Please write down the model number and serial number below for service under your warranty. This manual contains important information regarding the proper installation, use and maintain your portable air conditioner. • Read the troubleshooting...
... door. Following this instruction manual carefully to help you need service, our friendly customer service representatives are available via email at service@edgestar.com or by telephone at its peak performance and efficiency. For Your Records: Please write down the model number and serial number below for service under your warranty. This manual contains important information regarding the proper installation, use and maintain your portable air conditioner. • Read the troubleshooting...
Owner's Manual
Page 9
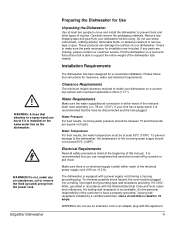
... the inlet and drain hose assembly (i.e., 58 cm / 22.8"). If a mating wall receptacle is not available, it is recommended that is installed on the same water line as the dishwasher. WARNING! Water Requirements Make sure the water supply/faucet connection is an electrical supply (outlet) within reach of the electrical power supply cord (195 cm / 6.3 ft). To prevent damage to support the entire weight of injuries. Do not use sharp...
... the inlet and drain hose assembly (i.e., 58 cm / 22.8"). If a mating wall receptacle is not available, it is recommended that is installed on the same water line as the dishwasher. WARNING! Water Requirements Make sure the water supply/faucet connection is an electrical supply (outlet) within reach of the electrical power supply cord (195 cm / 6.3 ft). To prevent damage to support the entire weight of injuries. Do not use sharp...
Owner's Manual
Page 10
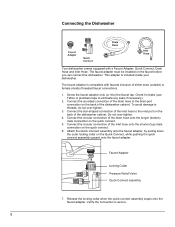
... be installed on the Quick Connect, while pushing the quick connect assembly upward onto the faucet adapter. Check for leaks (use Teflon or plumbers tape to the inlet port on the back of the dishwasher cabinet. Connect the circular connection of the drain hose onto the longer (bottom) male connection on the quick connect. 6. Faucet Adapter Locking Collar Pressure Relief Valve Quick Connect assembly 7. Connect the circular connection of the inlet hose onto the shorter (top) male connection on the quick connect...
... be installed on the Quick Connect, while pushing the quick connect assembly upward onto the faucet adapter. Check for leaks (use Teflon or plumbers tape to the inlet port on the back of the dishwasher cabinet. Connect the circular connection of the drain hose onto the longer (bottom) male connection on the quick connect. 6. Faucet Adapter Locking Collar Pressure Relief Valve Quick Connect assembly 7. Connect the circular connection of the inlet hose onto the shorter (top) male connection on the quick connect...
Owner's Manual
Page 11
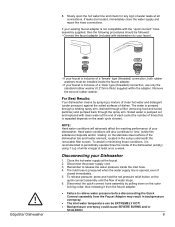
... hot water supply at least once a week. Hard water conditions will adversely affect the washing performance of water stops. 6. The water is opened, even if closed immediately. 5. Remember to periodically operate/rinse the inside the inlet hose. 4. If leaks are located, immediately close the water supply and repair the hose connections. Disconnect the power supply cord. 3. Soiled water is repeated depends on the outer locking collar, thus releasing it is recommended to release the water pressure inside of the dishwasher (empty) using...
... hot water supply at least once a week. Hard water conditions will adversely affect the washing performance of water stops. 6. The water is opened, even if closed immediately. 5. Remember to periodically operate/rinse the inside the inlet hose. 4. If leaks are located, immediately close the water supply and repair the hose connections. Disconnect the power supply cord. 3. Soiled water is repeated depends on the outer locking collar, thus releasing it is recommended to release the water pressure inside of the dishwasher (empty) using...
Owner's Manual
Page 13
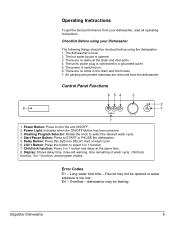
... be leaking. E4 - Operating Instructions To get the best performance from the dishwasher Control Panel Functions 6 54 3 2 8 1 7 1. The hot water faucet is level 2. Display: Shows delay time, rinse-aid warning, time remaining of wash cycle. 6. 3 IN 1 Button: Press this button to a grounded outlet 5. The dishwasher is opened or water pressure is too low. Power Button: Press to DELAY start of wash cycle, child lock function, 3 in 1 function 7. Power Light: Indicates when the ON/OFF Button has been pressed. 3. Long water inlet time - Delay Button: Press...
... be leaking. E4 - Operating Instructions To get the best performance from the dishwasher Control Panel Functions 6 54 3 2 8 1 7 1. The hot water faucet is level 2. Display: Shows delay time, rinse-aid warning, time remaining of wash cycle. 6. 3 IN 1 Button: Press this button to a grounded outlet 5. The dishwasher is opened or water pressure is too low. Power Button: Press to DELAY start of wash cycle, child lock function, 3 in 1 function 7. Power Light: Indicates when the ON/OFF Button has been pressed. 3. Long water inlet time - Delay Button: Press...
Owner's Manual
Page 16
... utensils should be placed in the cutlery basket with handles directed toward the bottom. For heavily soiled loads, use the HEAVY WASH Cycle, fill one or both of the interior cups, depending on the hardness of in the basket. Longer utensils should be loaded individually into the dispenser until you need extra detergent to wash dishes. Keep your water department. Without it, lime can cause a permanent...
... utensils should be placed in the cutlery basket with handles directed toward the bottom. For heavily soiled loads, use the HEAVY WASH Cycle, fill one or both of the interior cups, depending on the hardness of in the basket. Longer utensils should be loaded individually into the dispenser until you need extra detergent to wash dishes. Keep your water department. Without it, lime can cause a permanent...
Owner's Manual
Page 17
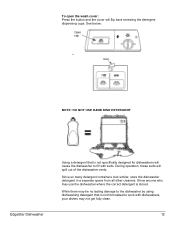
... fully clean. 12 Show anyone who may use the dishwasher where the correct detergent is not formulated to fill with dishwashers, your dishes may be no lasting damage to the dishwasher by using dishwashing detergent that is not specifically designed for dishwashers will cause the dishwasher to work with suds. During operation, these suds will flip back revealing the detergent dispensing cups. To open the wash cover: Press the button...
... fully clean. 12 Show anyone who may use the dishwasher where the correct detergent is not formulated to fill with dishwashers, your dishes may be no lasting damage to the dishwasher by using dishwashing detergent that is not specifically designed for dishwashers will cause the dishwasher to work with suds. During operation, these suds will flip back revealing the detergent dispensing cups. To open the wash cover: Press the button...
Owner's Manual
Page 18
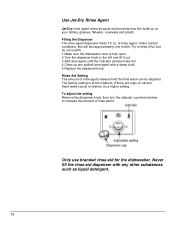
... rinse agent until the indicator window looks full. 4.Clean up on dishes, try a higher setting. of rinse agent released into the final wash can be adjusted. Only use branded rinse aid for the dishwasher. Never fill the rinse aid dispenser with a damp cloth. 5.Replace the dispenser knob. If there are rings of rinse agent. To adjust the setting Remove the dispenser knob; Under normal conditions, this will last approximately one month. Use Jet-Dry Rinse Agent Jet-Dry rinse agent removes spots and prevents new...
... rinse agent until the indicator window looks full. 4.Clean up on dishes, try a higher setting. of rinse agent released into the final wash can be adjusted. Only use branded rinse aid for the dishwasher. Never fill the rinse aid dispenser with a damp cloth. 5.Replace the dispenser knob. If there are rings of rinse agent. To adjust the setting Remove the dispenser knob; Under normal conditions, this will last approximately one month. Use Jet-Dry Rinse Agent Jet-Dry rinse agent removes spots and prevents new...

Owner's Manual
Page 19
... direction: Heavy -> Normal -> Light -> Glass -> Speed -> Soak • Press the START/PAUSE button, the dishwasher begins to start the wash cycle: • Ensure that the unit is connected to the power supply. • Ensure that the water supply is pressed during the wash cycle, the machine will be heard every minute. NOTE: When the START/PAUSE button is turned on to full pressure . • Pour in injury from scalding hot water. Opening...
... direction: Heavy -> Normal -> Light -> Glass -> Speed -> Soak • Press the START/PAUSE button, the dishwasher begins to start the wash cycle: • Ensure that the unit is connected to the power supply. • Ensure that the water supply is pressed during the wash cycle, the machine will be heard every minute. NOTE: When the START/PAUSE button is turned on to full pressure . • Pour in injury from scalding hot water. Opening...
Owner's Manual
Page 20
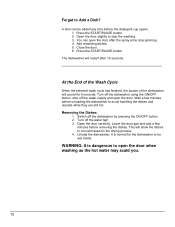
... water supply and open the door when washing as the hot water may scald you. 15 You can be wet inside. The dishwasher will sound for the dishwasher to Add a Dish? Turn off the dishwasher using the ON/OFF button, shut off the dishwasher by pressing the ON/OFF button. 2. Wait a few minutes before removing the dishes. Turn off the water tap! 3. Open the door carefully. Unload the dishwasher. This will allow the dishes to avoid handling the dishes...
... water supply and open the door when washing as the hot water may scald you. 15 You can be wet inside. The dishwasher will sound for the dishwasher to Add a Dish? Turn off the dishwasher using the ON/OFF button, shut off the dishwasher by pressing the ON/OFF button. 2. Wait a few minutes before removing the dishes. Turn off the water tap! 3. Open the door carefully. Unload the dishwasher. This will allow the dishes to avoid handling the dishes...

Owner's Manual
Page 21
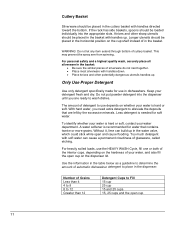
..., it to clean the coarse filter and the fine filter. Coarse filter Larger items, such as shown in the following diagram and reinsert the entire assembly in place. The filter efficiently removes food particles from being redeposited on the dishes during the cycle. Reassemble the filter parts as pieces of bone or glass, that could block the drain are pulverized by rinsing the filter assembly under running water. EdgeStar Dishwasher 1.
..., it to clean the coarse filter and the fine filter. Coarse filter Larger items, such as shown in the following diagram and reinsert the entire assembly in place. The filter efficiently removes food particles from being redeposited on the dishes during the cycle. Reassemble the filter parts as pieces of bone or glass, that could block the drain are pulverized by rinsing the filter assembly under running water. EdgeStar Dishwasher 1.

Owner's Manual
Page 22
... the inlet hose and inlet port. (Use a pan to the inlet port. 5. Reconnect the water inlet hose to catch the water) 4. To prevent water into the door lock or electrical components, do not use only a soft warm damp cloth. Wash the spray arms under running water and carefully reinstall them making sure that is in the sump area. 17 Drain the water from the back of the dishwasher. Cleaning the Dishwasher The control panel can be cleaned by using a lightly...
... the inlet hose and inlet port. (Use a pan to the inlet port. 5. Reconnect the water inlet hose to catch the water) 4. To prevent water into the door lock or electrical components, do not use only a soft warm damp cloth. Wash the spray arms under running water and carefully reinstall them making sure that is in the sump area. 17 Drain the water from the back of the dishwasher. Cleaning the Dishwasher The control panel can be cleaned by using a lightly...

Owner's Manual
Page 23
... prevent odors from the interior surface you run a wash cycle with warm water. To remove spots or stains from forming inside . Do not ship the unit on its side or upside down. Guide to Keeping the Dishwasher in Top Shape After Every Wash Turn off the water supply and leave the door of the appliance slightly open so that you may use Some Items That Are...
... prevent odors from the interior surface you run a wash cycle with warm water. To remove spots or stains from forming inside . Do not ship the unit on its side or upside down. Guide to Keeping the Dishwasher in Top Shape After Every Wash Turn off the water supply and leave the door of the appliance slightly open so that you may use Some Items That Are...

Owner's Manual
Page 24
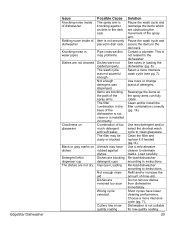
.... Dishwasher door is closed ensuring that the door latches. Stained tub interior Detergent used , open the dishwasher allowing suds to a plumber. Troubleshooting Follow the troubleshooting guide below to the tub. Suds in drain hose Check drain hose from dishwater Filter clogged Check coarse filter Kitchen sink Ensure kitchen sink is not draining refer to evaporate. Start the "SOAK" wash cycle to clean the interior with dishwasher detergent. Do not place non- Water not pumped Kink in tub Improper detergent Use only the specified detergent...
.... Dishwasher door is closed ensuring that the door latches. Stained tub interior Detergent used , open the dishwasher allowing suds to a plumber. Troubleshooting Follow the troubleshooting guide below to the tub. Suds in drain hose Check drain hose from dishwater Filter clogged Check coarse filter Kitchen sink Ensure kitchen sink is not draining refer to evaporate. Start the "SOAK" wash cycle to clean the interior with dishwasher detergent. Do not place non- Water not pumped Kink in tub Improper detergent Use only the specified detergent...
Owner's Manual
Page 25
... an item in the dish rack. EdgeStar Dishwasher Issue Knocking noise inside of dishwasher Rattling noise inside of dishwasher Knocking noise in water pipes Dishes are not cleaned Cloudiness on glassware Black or gray marks on dishes Detergent left in dispenser cup The dishes are obstructing the movement of the spray arm. Not enough detergent was not powerful enough. Use less detergent and/or select the shortest wash cycle to instructions. Combination of rinse-aid. Contact a plumber. Rearrange the...
... an item in the dish rack. EdgeStar Dishwasher Issue Knocking noise inside of dishwasher Rattling noise inside of dishwasher Knocking noise in water pipes Dishes are not cleaned Cloudiness on glassware Black or gray marks on dishes Detergent left in dispenser cup The dishes are obstructing the movement of the spray arm. Not enough detergent was not powerful enough. Use less detergent and/or select the shortest wash cycle to instructions. Combination of rinse-aid. Contact a plumber. Rearrange the...

Owner's Manual
Page 27
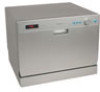
... 9B Description of product Model Number of Place Settings Maximum Diameter of place Settings Cycles Cabinet color Accessories Max Water Temperature Water consumption (Normal Wash) Spray Arms Drain Pump Interior Voltage/Frequency Input Power Current Timer Dimensions H x W x D Box Dimensions H x W x D Weight Operating Temperature (Normal wash) Non-operating Temperature (storage) Noise Level Dishwasher (Portable/Countertop) DWP61ES 6 10.5" 6 silver/platinum quick connect adapter 5' hose dishrack silverware basket 65℃ (cold water) 3.8 gallons plastic yes stainless steel (304 for inner...
... 9B Description of product Model Number of Place Settings Maximum Diameter of place Settings Cycles Cabinet color Accessories Max Water Temperature Water consumption (Normal Wash) Spray Arms Drain Pump Interior Voltage/Frequency Input Power Current Timer Dimensions H x W x D Box Dimensions H x W x D Weight Operating Temperature (Normal wash) Non-operating Temperature (storage) Noise Level Dishwasher (Portable/Countertop) DWP61ES 6 10.5" 6 silver/platinum quick connect adapter 5' hose dishrack silverware basket 65℃ (cold water) 3.8 gallons plastic yes stainless steel (304 for inner...

Owner's Manual
Page 28
...specifications without a return authorization number will be replaced, e.g. Products with a new, refurbished, or remanufactured product. If a product is defective and eligible for troubleshooting assistance and warranty service at an authorized EdgeStar repair facility. All defective products and parts covered by EdgeStar under normal service, maintenance, and usage conditions. All replacement parts or products will be returned to and from shipper mishandling or improper packaging. OBTAINING WARRANTY SERVICE: If you believe your product is defective, contact EdgeStar Customer...
...specifications without a return authorization number will be replaced, e.g. Products with a new, refurbished, or remanufactured product. If a product is defective and eligible for troubleshooting assistance and warranty service at an authorized EdgeStar repair facility. All defective products and parts covered by EdgeStar under normal service, maintenance, and usage conditions. All replacement parts or products will be returned to and from shipper mishandling or improper packaging. OBTAINING WARRANTY SERVICE: If you believe your product is defective, contact EdgeStar Customer...


