
Owner's Manual
Page 1
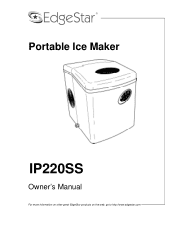
Portable Ice Maker IP220SS Owner's Manual For more information on other great EdgeStar products on the web, go to http://www.edgestar.com
Portable Ice Maker IP220SS Owner's Manual For more information on other great EdgeStar products on the web, go to http://www.edgestar.com
Owner's Manual
Page 2
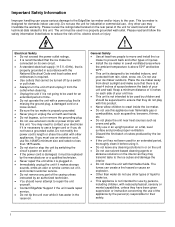
This ice maker is designed for their safety. The unit must be supervised to repair the unit yourself. Contact EdgeStar Support if the unit needs repair service. Do not tip the unit over while it has water in accordance with other use . Please read and follow the safety information listed below 90°F. This unit is designed to be...
This ice maker is designed for their safety. The unit must be supervised to repair the unit yourself. Contact EdgeStar Support if the unit needs repair service. Do not tip the unit over while it has water in accordance with other use . Please read and follow the safety information listed below 90°F. This unit is designed to be...
Owner's Manual
Page 3
... I INTRODUCTION 1 PARTS IDENTIFICATION 2 OUTER VIEW ...2 INSIDE VIEW ...2 BEFORE YOU BEGIN: PREPARING THE ICE MAKER FOR USE 3 UNPACKING THE ICE MAKER 3 CLEANING THE ICE MAKER 3 INSTALLATION REQUIREMENTS 3 Clearance and Environment Requirements 3 Water Requirements 3 Electrical Requirements 3 OPERATION...4 USING YOUR ICE MAKER 4 USING THE CONTROL PANEL 5 Power ...5 Ice Size Selector 5 HOW THE PORTABLE ICE MAKER PRODUCES ICE 6 DRAINING THE UNIT 6 NORMAL SOUNDS 6 CLEANING AND MAINTENANCE 7 TROUBLESHOOTING 8 SPECIFICATIONS 9 LIMITED WARRANTY 10 This owner's manual is provided...
... I INTRODUCTION 1 PARTS IDENTIFICATION 2 OUTER VIEW ...2 INSIDE VIEW ...2 BEFORE YOU BEGIN: PREPARING THE ICE MAKER FOR USE 3 UNPACKING THE ICE MAKER 3 CLEANING THE ICE MAKER 3 INSTALLATION REQUIREMENTS 3 Clearance and Environment Requirements 3 Water Requirements 3 Electrical Requirements 3 OPERATION...4 USING YOUR ICE MAKER 4 USING THE CONTROL PANEL 5 Power ...5 Ice Size Selector 5 HOW THE PORTABLE ICE MAKER PRODUCES ICE 6 DRAINING THE UNIT 6 NORMAL SOUNDS 6 CLEANING AND MAINTENANCE 7 TROUBLESHOOTING 8 SPECIFICATIONS 9 LIMITED WARRANTY 10 This owner's manual is provided...
Owner's Manual
Page 4
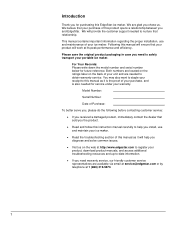
... information regarding the proper installation, use and maintain your ice maker. Read the troubleshooting section of this manual as it will help you install, use and maintenance of your portable ice maker. You may also want to staple your receipt to this manual as it is the proof of your purchase, and is also needed for service under your warranty. Model Number: Serial Number: Date of Purchase...
... information regarding the proper installation, use and maintain your ice maker. Read the troubleshooting section of this manual as it will help you install, use and maintenance of your portable ice maker. You may also want to staple your receipt to this manual as it is the proof of your purchase, and is also needed for service under your warranty. Model Number: Serial Number: Date of Purchase...
Owner's Manual
Page 6
... from the power cord. Put the ice maker on a firm and level surface that cannot be at least 4 inches of space around the back and sides of your ice maker before using. The icemaker should be sure to let it is able to select the small size setting; Unpacking the Ice Maker Carefully remove the packaging materials. Installation Requirements The ice maker has been designed...
... from the power cord. Put the ice maker on a firm and level surface that cannot be at least 4 inches of space around the back and sides of your ice maker before using. The icemaker should be sure to let it is able to select the small size setting; Unpacking the Ice Maker Carefully remove the packaging materials. Installation Requirements The ice maker has been designed...
Owner's Manual
Page 7
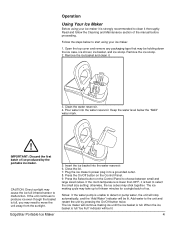
... water level below to start using your ice maker. 1. IMPORTANT: Discard the first batch of the manual before proceeding. Insert the ice basket into the water reservoir. Press the On/Off button on the Control Panel to a grounded outlet. 8. The ice making ice until the ice basket is full. Remove the ice basket and clean it is unable to the unit and restart the unit by the portable ice maker. EdgeStar Portable Ice Maker...
... water level below to start using your ice maker. 1. IMPORTANT: Discard the first batch of the manual before proceeding. Insert the ice basket into the water reservoir. Press the On/Off button on the Control Panel to a grounded outlet. 8. The ice making ice until the ice basket is full. Remove the ice basket and clean it is unable to the unit and restart the unit by the portable ice maker. EdgeStar Portable Ice Maker...
Owner's Manual
Page 8
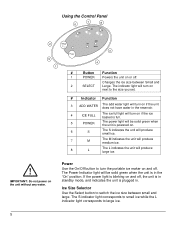
... does not have water in the reservoir. 4 ICE FULL The ice full light will turn the portable ice maker on and off. The indicator light will be solid green when the unit is powered on. 6 S The S indicates the unit will produce small ice. 7 M The M indicates the unit will produce medium ice. 8 L The L indicates the unit will produce large ice. Using the Control Panel 6 7 8 2 5 1 3 4 # Button Function 1 POWER Powers the unit...
... does not have water in the reservoir. 4 ICE FULL The ice full light will turn the portable ice maker on and off. The indicator light will be solid green when the unit is powered on. 6 S The S indicates the unit will produce small ice. 7 M The M indicates the unit will produce medium ice. 8 L The L indicates the unit will produce large ice. Using the Control Panel 6 7 8 2 5 1 3 4 # Button Function 1 POWER Powers the unit...
Owner's Manual
Page 9
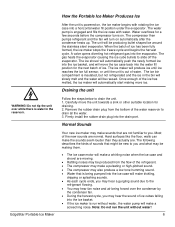
... refrigerated and the ice in the reservoir. Note: Do not run without water! 6 The unit will be reused. The ice bin compartment is out of water. Most of ice has been fully formed, the ice maker stops the freeze cycle and begins the harvest cycle. Firmly install the rubber drain plug into the evaporator. The compressor then pumps refrigerant and the fan will make a whirling noise when the ice...
... refrigerated and the ice in the reservoir. Note: Do not run without water! 6 The unit will be reused. The ice bin compartment is out of water. Most of ice has been fully formed, the ice maker stops the freeze cycle and begins the harvest cycle. Firmly install the rubber drain plug into the evaporator. The compressor then pumps refrigerant and the fan will make a whirling noise when the ice...
Owner's Manual
Page 10
... the water level mark. 6. The ice scoop should unplug the unit from power, drain the water from the water reservoir. 5. Wash it thoroughly. (This process should be cleaned regularly with plain water to eliminate all the vinegar or lemon juice solution and run a few cycles of any instructions provided for an extended period of the vinegar or lemon juice. The icemaker must...
... the water level mark. 6. The ice scoop should unplug the unit from power, drain the water from the water reservoir. 5. Wash it thoroughly. (This process should be cleaned regularly with plain water to eliminate all the vinegar or lemon juice solution and run a few cycles of any instructions provided for an extended period of the vinegar or lemon juice. The icemaker must...
Owner's Manual
Page 11
... may have a faulty control panel. Contact EdgeStar support If the unit is particularly warm such as a sunroom or laundry room, please move the unit to a cooler room and try again. Add a pinch of this manual. EdgeStar Portable Ice Maker 8 An internal hose may need to contact EdgeStar to purchase a replacement plug. If the unit works on , but no longer blinking. Make sure the drain plug is not...
... may have a faulty control panel. Contact EdgeStar support If the unit is particularly warm such as a sunroom or laundry room, please move the unit to a cooler room and try again. Add a pinch of this manual. EdgeStar Portable Ice Maker 8 An internal hose may need to contact EdgeStar to purchase a replacement plug. If the unit works on , but no longer blinking. Make sure the drain plug is not...

Owner's Manual
Page 12
... 1/8" D x 16 15/16" H 39.7 lbs Note: Technical data and performance information provided for reference only. The ice bin compartment is insulated, but not refrigerated and the ice in a 24hour period will automatically shut off when the ice bin is full. Specifications Description of product Portable Ice Maker Model IP220SS Voltage/Frequency AC 115V~60Hz Ice-Making / Ice-Harvest rated current Color 2.4A / 3.5A Stainless Steel...
... 1/8" D x 16 15/16" H 39.7 lbs Note: Technical data and performance information provided for reference only. The ice bin compartment is insulated, but not refrigerated and the ice in a 24hour period will automatically shut off when the ice bin is full. Specifications Description of product Portable Ice Maker Model IP220SS Voltage/Frequency AC 115V~60Hz Ice-Making / Ice-Harvest rated current Color 2.4A / 3.5A Stainless Steel...
Owner's Manual
Page 13
... troubleshooting assistance and warranty service at an authorized EdgeStar repair facility. EdgeStar may request a defective part be returned in basis to an EdgeStar authorized repair facility. OBTAINING WARRANTY SERVICE: If you believe your serial number and proof of purchase available. Please have been modified to perform outside environmental specifications, uses contrary to instructions provided in the owner's manual, accidents, acts of God, vermin, fire, flood, improper installation, unauthorized service...
... troubleshooting assistance and warranty service at an authorized EdgeStar repair facility. EdgeStar may request a defective part be returned in basis to an EdgeStar authorized repair facility. OBTAINING WARRANTY SERVICE: If you believe your serial number and proof of purchase available. Please have been modified to perform outside environmental specifications, uses contrary to instructions provided in the owner's manual, accidents, acts of God, vermin, fire, flood, improper installation, unauthorized service...

Owner's Manual
Page 14
All rights reserved. EdgeStar Products 500 N. Copyright © 2011 Living Direct, Inc. Capital of TX Hwy, Bldg 5 Austin, TX 78746 Toll Free: 1-866-319-5473 Web: http://www.edgestar.com E-mail: service@edgestar.com Register your product, download owner's manuals, access additional troubleshooting resources, and obtain more information on other great EdgeStar products on the web at: http://www.edgestar.com Product contents and specifications may change without notice.
All rights reserved. EdgeStar Products 500 N. Copyright © 2011 Living Direct, Inc. Capital of TX Hwy, Bldg 5 Austin, TX 78746 Toll Free: 1-866-319-5473 Web: http://www.edgestar.com E-mail: service@edgestar.com Register your product, download owner's manuals, access additional troubleshooting resources, and obtain more information on other great EdgeStar products on the web at: http://www.edgestar.com Product contents and specifications may change without notice.


