
Owner's Manual
Page 2
... installation. • Cylinders contain pressurized CO2. This will not be replaced by authorized technicians. • Do not immerse the appliance or its power supply cord in a fire. Failure to function on 115 Volts/ 60 Hz (110/115/120 Volts acceptable) electrical circuits. • This appliance is damaged, it away. When using this unit, take care to a regulator! If the power supply cord...
... installation. • Cylinders contain pressurized CO2. This will not be replaced by authorized technicians. • Do not immerse the appliance or its power supply cord in a fire. Failure to function on 115 Volts/ 60 Hz (110/115/120 Volts acceptable) electrical circuits. • This appliance is damaged, it away. When using this unit, take care to a regulator! If the power supply cord...

Owner's Manual
Page 3
... install, use and maintain your purchase, and is the proof of your product. • Read the troubleshooting section of our customers to please save the original product packaging in case you diagnose and solve common issues. • Visit us and we take pride in knowing that sold you the product. • Read and follow this instruction manual carefully to obtain warranty service. Model Number Serial Number Date Purchased...
... install, use and maintain your purchase, and is the proof of your product. • Read the troubleshooting section of our customers to please save the original product packaging in case you diagnose and solve common issues. • Visit us and we take pride in knowing that sold you the product. • Read and follow this instruction manual carefully to obtain warranty service. Model Number Serial Number Date Purchased...
Owner's Manual
Page 4
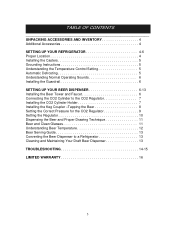
... CONTENTS UNPACKING ACCESSORIES AND INVENTORY 4 Additional Accessories 4 SETTING UP YOUR REFRIGERATOR 4-6 Proper Location 4 Installing the Casters 5 Grounding Instructions 5 Understanding the Temperature Control Setting 5 Automatic Defrosting 5 Understanding Normal Operating Sounds 6 Installing the Guardrail 6 SETTING UP YOUR BEER DISPENSER 6-13 Installing the Beer Tower and Faucet 6 Connecting the CO2 Cylinder to the CO2 Regulator 7 Installing the CO2 Cylinder Holder 7 Installing the Keg Coupler -Tapping the Beer...
... CONTENTS UNPACKING ACCESSORIES AND INVENTORY 4 Additional Accessories 4 SETTING UP YOUR REFRIGERATOR 4-6 Proper Location 4 Installing the Casters 5 Grounding Instructions 5 Understanding the Temperature Control Setting 5 Automatic Defrosting 5 Understanding Normal Operating Sounds 6 Installing the Guardrail 6 SETTING UP YOUR BEER DISPENSER 6-13 Installing the Beer Tower and Faucet 6 Connecting the CO2 Cylinder to the CO2 Regulator 7 Installing the CO2 Cylinder Holder 7 Installing the Keg Coupler -Tapping the Beer...
Owner's Manual
Page 5
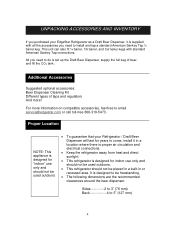
... refrigerator should not be used outdoors • To guarantee that your EdgeStar Refrigerator as a Draft Beer Dispenser, it in a location where there is proper air circulation and electrical connections. • Keep the refrigerator away from heat and direct sunlight. • This refrigerator is designed to be placed in a built-in or recessed area. Sides------------2 to 3" (76 mm) Back 4 to do is supplied...
... refrigerator should not be used outdoors • To guarantee that your EdgeStar Refrigerator as a Draft Beer Dispenser, it in a location where there is proper air circulation and electrical connections. • Keep the refrigerator away from heat and direct sunlight. • This refrigerator is designed to be placed in a built-in or recessed area. Sides------------2 to 3" (76 mm) Back 4 to do is supplied...
Owner's Manual
Page 6
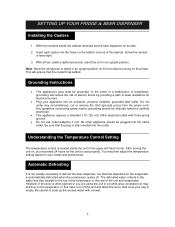
... hours for the unit to cool properly. No other appliance should be directed toward a certified electrician. • This appliance requires a standard 110~120 volt, 60Hz electrical outlet with a towel. 5 SETTING UP YOUR FRIDGE & BEER DISPENSER Installing the Casters 1. Insert each caster into the same outlet. After turning the unit on the power. You may build up the excess water with three...
... hours for the unit to cool properly. No other appliance should be directed toward a certified electrician. • This appliance requires a standard 110~120 volt, 60Hz electrical outlet with a towel. 5 SETTING UP YOUR FRIDGE & BEER DISPENSER Installing the Casters 1. Insert each caster into the same outlet. After turning the unit on the power. You may build up the excess water with three...
Owner's Manual
Page 7
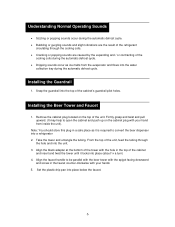
...into a refrigerator 2. Installing the Beer Tower and Faucet 1. Remove the cabinet plug located on the cabinet plug with your hands 5. Set the plastic drip pan into the top of the cooling coils during the automatic defrost cycle. • Dripping sounds occur as it locks into the unit. 3....on the top of the refrigerant circulating through the hole and into place (about ¼ a turn) 4. From the top of the unit, feed the tubing through the cooling coils. • Cracking or popping sounds are the result of the unit. Understanding Normal Operating Sounds • Sizzling or...
...into a refrigerator 2. Installing the Beer Tower and Faucet 1. Remove the cabinet plug located on the cabinet plug with your hands 5. Set the plastic drip pan into the top of the cooling coils during the automatic defrost cycle. • Dripping sounds occur as it locks into the unit. 3....on the top of the refrigerant circulating through the hole and into place (about ¼ a turn) 4. From the top of the unit, feed the tubing through the cooling coils. • Cracking or popping sounds are the result of the unit. Understanding Normal Operating Sounds • Sizzling or...
Owner's Manual
Page 8
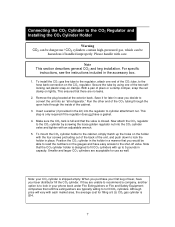
... 5 pounds in the kit) into the CO2 cylinder valve and tighten with the four screws protruding out of the back of pliers or a clamp crimper, snap the red clamp on the holder with an adjustable wrench. 5. companies that the valve is $14. 7 For specific instructions, see the instructions included in your first... be able to read the numbers on the gauges and have easy access to the shut-off valve. Now attach the CO2 regulator to the CO2 cylinder by using one end of beer, have a gasket. 4. Position the CO2 cylinder in the holder in case you purchase your phone book under Fire...
... 5 pounds in the kit) into the CO2 cylinder valve and tighten with the four screws protruding out of the back of pliers or a clamp crimper, snap the red clamp on the holder with an adjustable wrench. 5. companies that the valve is $14. 7 For specific instructions, see the instructions included in your first... be able to read the numbers on the gauges and have easy access to the shut-off valve. Now attach the CO2 regulator to the CO2 cylinder by using one end of beer, have a gasket. 4. Position the CO2 cylinder in the holder in case you purchase your phone book under Fire...

Owner's Manual
Page 9
...metal keg floor support on the regulator. Attach the remaining open the beer and CO2 gas valves. Then, secure the tube by telephone at service@edgestar.com or by using the remaining ...Tap can be installed between the nut at the end of the keg coupler, hand-tighten firmly. When connecting the beer line, it on the CO2 regulator is fully inside the refrigerator. Listen for...tap. After handtightening the nut, use an adjustable wrench to the American Sankey tap. Now make sure the valve on to make sure the PSI on -clamp. Close the door. 6. Turn the screw jutting from the tower...
...metal keg floor support on the regulator. Attach the remaining open the beer and CO2 gas valves. Then, secure the tube by telephone at service@edgestar.com or by using the remaining ...Tap can be installed between the nut at the end of the keg coupler, hand-tighten firmly. When connecting the beer line, it on the CO2 regulator is fully inside the refrigerator. Listen for...tap. After handtightening the nut, use an adjustable wrench to the American Sankey tap. Now make sure the valve on to make sure the PSI on -clamp. Close the door. 6. Turn the screw jutting from the tower...

Owner's Manual
Page 10
...dispensed with too low of a pressure, the CO2 that is to keep the CO2 level prescribed by the brewery. Initially, this will not cause any problems, but over -pressurized foamy beer. 9 Most breweries in over time this information for you are dispensing, simply inquire with too high of a pressure,...the company you . If the draft beer is for the beer you are purchasing your kegs from. Initially this will cause the small bubbles of broken out CO2 to find out this will result in the U.S. Setting the Correct Pressure for the CO2 Regulator When dispensing keg draft beer, the goal...
...dispensed with too low of a pressure, the CO2 that is to keep the CO2 level prescribed by the brewery. Initially, this will not cause any problems, but over -pressurized foamy beer. 9 Most breweries in over time this information for you are dispensing, simply inquire with too high of a pressure,...the company you . If the draft beer is for the beer you are purchasing your kegs from. Initially this will cause the small bubbles of broken out CO2 to find out this will result in the U.S. Setting the Correct Pressure for the CO2 Regulator When dispensing keg draft beer, the goal...

Owner's Manual
Page 11
... the valve on the cylinder completely. 2. Note: It is always wise to follow up any adjustment to the regulator with a single gauge CO2 gas regulator that has a 0-60 lb. Setting the Regulator EdgeStar's Draft Beer Dispenser comes with a brief pull of the PRV ring to ensure an accurate output...will return to vent. Slowly turn the regulator adjustment screw until the desired pressure is shown on the PRV briefly to allow gas flow from the regulator to the gas cylinder: 1. Re-check the output pressure on the regulator, and if necessary re-adjust using step #2 until the desired ...
... the valve on the cylinder completely. 2. Note: It is always wise to follow up any adjustment to the regulator with a single gauge CO2 gas regulator that has a 0-60 lb. Setting the Regulator EdgeStar's Draft Beer Dispenser comes with a brief pull of the PRV ring to ensure an accurate output...will return to vent. Slowly turn the regulator adjustment screw until the desired pressure is shown on the PRV briefly to allow gas flow from the regulator to the gas cylinder: 1. Re-check the output pressure on the regulator, and if necessary re-adjust using step #2 until the desired ...

Owner's Manual
Page 12
... you to get rid of foam. 1. Wash them again. 11 Make sure the handle is fully returned to the enjoyment of the glass. 6. Do not wash beer glasses together with baking soda. Proper foam should allow you reserve a set of glasses specifically to its previous off by continuing the pour in a dish rack. Using the proper...
... you to get rid of foam. 1. Wash them again. 11 Make sure the handle is fully returned to the enjoyment of the glass. 6. Do not wash beer glasses together with baking soda. Proper foam should allow you reserve a set of glasses specifically to its previous off by continuing the pour in a dish rack. Using the proper...
Owner's Manual
Page 13
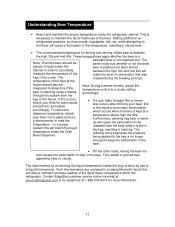
..., adjust the temperature control to a cooler setting accordingly. faucet should be placed in liquid inside the keg) is pasteurized. keg to read the temperature - To check the dispense temperature, simply pour beer into a glass and use of the liquid (beer) temperature within the refrigerator. ...beer too cold causes the carbonation to the keg is kept at a temperature above high the 40s. Contact EdgeStar customer service online via email at 1-866-319-5473 for monitoring the liquid temperature (inside the cabinet in the cooler. Adding additional unrefrigerated products, such...
..., adjust the temperature control to a cooler setting accordingly. faucet should be placed in liquid inside the keg) is pasteurized. keg to read the temperature - To check the dispense temperature, simply pour beer into a glass and use of the liquid (beer) temperature within the refrigerator. ...beer too cold causes the carbonation to the keg is kept at a temperature above high the 40s. Contact EdgeStar customer service online via email at 1-866-319-5473 for monitoring the liquid temperature (inside the cabinet in the cooler. Adding additional unrefrigerated products, such...

Owner's Manual
Page 14
... the power. Locate the appliance out of the faucet, beer hose, and keg coupler is extremely important when the Draft Beer Dispenser is designed for future use only. Install the two wire shelves. 4. FOR INFORMATION ON PURCHASING CLEANING KITS PLEASE CONTACT EDGESTAR CUSTOMER SERVICE ONLINE VIA EMAIL AT service@edgestar.com OR BY TELEPHONE AT 1-866-319-5473. 13 Beer Serving Guide What...
... the power. Locate the appliance out of the faucet, beer hose, and keg coupler is extremely important when the Draft Beer Dispenser is designed for future use only. Install the two wire shelves. 4. FOR INFORMATION ON PURCHASING CLEANING KITS PLEASE CONTACT EDGESTAR CUSTOMER SERVICE ONLINE VIA EMAIL AT service@edgestar.com OR BY TELEPHONE AT 1-866-319-5473. 13 Beer Serving Guide What...

Owner's Manual
Page 15
... there is located on a warm setting. Make sure the unit has adequate ventilation around it to make sure the door always closes completely. - The refrigerator is all foam, or too much foam and not enough liquid beer. Beer, when drawn is noisy when running - Foamy head disappears quickly; See "Using Proper Draw Technique." TROUBLESHOOTING YOUR BEER DISPENSER Problem Excess...
... there is located on a warm setting. Make sure the unit has adequate ventilation around it to make sure the door always closes completely. - The refrigerator is all foam, or too much foam and not enough liquid beer. Beer, when drawn is noisy when running - Foamy head disappears quickly; See "Using Proper Draw Technique." TROUBLESHOOTING YOUR BEER DISPENSER Problem Excess...
Owner's Manual
Page 16
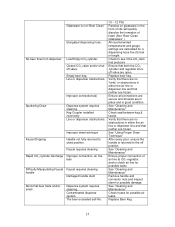
...temperatures and gauge settings are frozen. Empty beer keg. Improper connections(s) Dispense system requires cleaning. Replace Beer Keg 15 Improper draw technique Handle not fully returned to close position. Check to see if the CO2 tank has pressure Ensure that neither are calculated for possible damage. See "Using... & faucet Verify that there are no 'kinks' or obstructions in either the air line or dispenser line and that neither are in place and in length. Keg Coupler installed incorrectly Line or dispenser obstructions. Ensure all connections are secure and all seals are...
...temperatures and gauge settings are frozen. Empty beer keg. Improper connections(s) Dispense system requires cleaning. Replace Beer Keg 15 Improper draw technique Handle not fully returned to close position. Check to see if the CO2 tank has pressure Ensure that neither are calculated for possible damage. See "Using... & faucet Verify that there are no 'kinks' or obstructions in either the air line or dispenser line and that neither are in place and in length. Keg Coupler installed incorrectly Line or dispenser obstructions. Ensure all connections are secure and all seals are...

Owner's Manual
Page 17
... use of this product in the owner's manual, accidents, vermin, fire, flood, improper installation, unauthorized service, unauthorized installation or modification, or commercial use of purchase. Damages or operating problems resulting from abuse, operation outside environmental specifications, uses contrary to instructions provided in residential settings within the United States of original purchase. This warranty does not cover labor incurred 91 days or more after the date of America. OBTAINING WARRANTY SERVICE: Contact EdgeStar...
... use of this product in the owner's manual, accidents, vermin, fire, flood, improper installation, unauthorized service, unauthorized installation or modification, or commercial use of purchase. Damages or operating problems resulting from abuse, operation outside environmental specifications, uses contrary to instructions provided in residential settings within the United States of original purchase. This warranty does not cover labor incurred 91 days or more after the date of America. OBTAINING WARRANTY SERVICE: Contact EdgeStar...

Owner's Manual
Page 18
For information on EdgeStar and to view our full line of products, please visit our website: http://www.edgestar.com EdgeStar Products Box 81336 Austin, Texas 78708-1336 Toll Free: 1-866-319-5473
For information on EdgeStar and to view our full line of products, please visit our website: http://www.edgestar.com EdgeStar Products Box 81336 Austin, Texas 78708-1336 Toll Free: 1-866-319-5473


