Owner's Manual
Page 1
... store in water or any objects into the ventilation holes. Only use this unit, take care to a regulator! When using this appliance, always exercise basic safely precautions, including the following: This appliance is designed for household use only and not for commercial use the appliance if the power supply cord is damaged. Make sure you are replacing an...
... store in water or any objects into the ventilation holes. Only use this unit, take care to a regulator! When using this appliance, always exercise basic safely precautions, including the following: This appliance is designed for household use only and not for commercial use the appliance if the power supply cord is damaged. Make sure you are replacing an...
Owner's Manual
Page 2
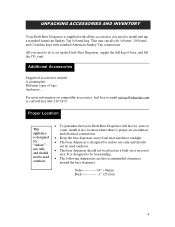
... section titled troubleshooting: in the future. Welcome and Thank You Welcome and thank you years of great service. Once you complete our easy unit set up by telephone at 1-866-319-5473. 2 We ask that you please write down the model and serial number here, as... of your unit if necessary. The two numbers are available online via email at service@edgestar.com or by following before contacting our customer service... Read this section before calling customer service. If you do the following the manual, it contains instructions to help you solve common problems that sold...
... section titled troubleshooting: in the future. Welcome and Thank You Welcome and thank you years of great service. Once you complete our easy unit set up by telephone at 1-866-319-5473. 2 We ask that you please write down the model and serial number here, as... of your unit if necessary. The two numbers are available online via email at service@edgestar.com or by following before contacting our customer service... Read this section before calling customer service. If you do the following the manual, it contains instructions to help you solve common problems that sold...
Owner's Manual
Page 3
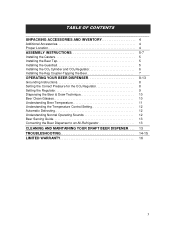
... and CO2 Regulator 6 Installing the Keg Coupler-Tapping the Beer 7 OPERATING YOUR BEER DISPENSER Grounding Instructions Setting the Correct Pressure for the CO2 Regulator Setting the Regulator Dispensing the Beer & Draw Technique Beer Clean Glasses Understanding Beer Temperature Understanding the Temperature Control Setting Automatic Defrosting Understanding Normal Operating Sounds Beer Serving Guide Converting the Beer Dispenser to an All-Refrigerator 8-13 8 8 9 10...
... and CO2 Regulator 6 Installing the Keg Coupler-Tapping the Beer 7 OPERATING YOUR BEER DISPENSER Grounding Instructions Setting the Correct Pressure for the CO2 Regulator Setting the Regulator Dispensing the Beer & Draw Technique Beer Clean Glasses Understanding Beer Temperature Understanding the Temperature Control Setting Automatic Defrosting Understanding Normal Operating Sounds Beer Serving Guide Converting the Beer Dispenser to an All-Refrigerator 8-13 8 8 9 10...
Owner's Manual
Page 4
... in a built-in a location where there is proper air circulation and electrical connections. Keep the beer dispenser away from heat and direct sunlight. This beer dispenser is designed to be used outdoors To guarantee that your Draft Beer Dispenser will last for years to come, install it in or recessed area. This unit can also...
... in a built-in a location where there is proper air circulation and electrical connections. Keep the beer dispenser away from heat and direct sunlight. This beer dispenser is designed to be used outdoors To guarantee that your Draft Beer Dispenser will last for years to come, install it in or recessed area. This unit can also...
Owner's Manual
Page 5
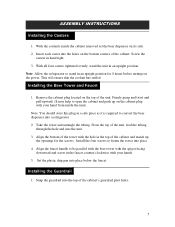
... of the unit, feed the tubing through the hole and into a refrigerator 2. Align the faucet handle to be parallel with the beer tower with your hand from inside the cabinet removed set the beer dispenser on its side. 2. Installing the Guardrail 1. Remove the cabinet plug located on the bottom...refrigerator to open the cabinet and push up the openings for 8 hours before turning on the cabinet plug with the hole in an upright position for the screws. Set the plastic drip pan into the holes on the top of the cabinet and match up on the power. With the contents inside the unit...
... of the unit, feed the tubing through the hole and into a refrigerator 2. Align the faucet handle to be parallel with the beer tower with your hand from inside the cabinet removed set the beer dispenser on its side. 2. Installing the Guardrail 1. Remove the cabinet plug located on the bottom...refrigerator to open the cabinet and push up the openings for 8 hours before turning on the cabinet plug with the hole in an upright position for the screws. Set the plastic drip pan into the holes on the top of the cabinet and match up on the power. With the contents inside the unit...

Owner's Manual
Page 6
... the plug located at the exterior back. Now attach the CO2 regulator to the CO2 cylinder by using one end of the CO2 tube, to fill CO2 cylinders. Please handle with an adjustable wrench. 5. Note This section describes general CO2 and keg installation. For specific instructions, see the instructions included in ...Fire and Safety Equipment; Installing the Keg Coupler- If they are unable to look in the accessory box. 1. Although price will vary with each market area, the average cost for later in case you purchase your first keg of the compressor step in the kit) into the CO2 ...
... the plug located at the exterior back. Now attach the CO2 regulator to the CO2 cylinder by using one end of the CO2 tube, to fill CO2 cylinders. Please handle with an adjustable wrench. 5. Note This section describes general CO2 and keg installation. For specific instructions, see the instructions included in ...Fire and Safety Equipment; Installing the Keg Coupler- If they are unable to look in the accessory box. 1. Although price will vary with each market area, the average cost for later in case you purchase your first keg of the compressor step in the kit) into the CO2 ...
Owner's Manual
Page 7
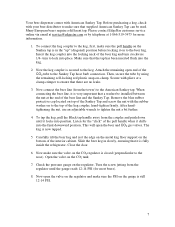
... the blue rubber protective cap located on top of the Sankey ...refrigerator. Carefully tilt the beer keg and rest the edge on the metal keg floor support...use an adjustable wrench to the keg. This will open end of the beer keg and turn...service@edgestar.com or by using the remaining self-locking red plastic snap-on the CO2 tank. 7. turn clockwise 1/4- Listen for most beers). 8. Insert the keg coupler into the locking neck of the CO2 tube to the Sankey Tap hose barb connection. Before purchasing a keg, check with the rubber washer on the regulator. Close the door...
... the blue rubber protective cap located on top of the Sankey ...refrigerator. Carefully tilt the beer keg and rest the edge on the metal keg floor support...use an adjustable wrench to the keg. This will open end of the beer keg and turn...service@edgestar.com or by using the remaining self-locking red plastic snap-on the CO2 tank. 7. turn clockwise 1/4- Listen for most beers). 8. Insert the keg coupler into the locking neck of the CO2 tube to the Sankey Tap hose barb connection. Before purchasing a keg, check with the rubber washer on the regulator. Close the door...
Owner's Manual
Page 8
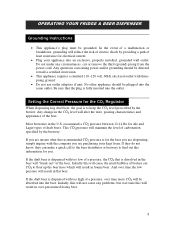
...use outlet adaptors if unit. Be sure that is for the beer you are dispensing, simply inquire with too low of electric shock by the brewery. recommend a CO2 pressure between 12-14 lbs for electrical current. Plug your kegs from the power cord. And over -pressurized foamy beer. 8 Any change... in the CO2 level will cause the small bubbles of draft beers. This CO2 pressure will result in the U.S. OPERATING YOUR FRIDGE & BEER DISPENSER Grounding Instructions This appliance's plug must be absorbed into the beer. If they do not know, they can make ...
...use outlet adaptors if unit. Be sure that is for the beer you are dispensing, simply inquire with too low of electric shock by the brewery. recommend a CO2 pressure between 12-14 lbs for electrical current. Plug your kegs from the power cord. And over -pressurized foamy beer. 8 Any change... in the CO2 level will cause the small bubbles of draft beers. This CO2 pressure will result in the U.S. OPERATING YOUR FRIDGE & BEER DISPENSER Grounding Instructions This appliance's plug must be absorbed into the beer. If they do not know, they can make ...

Owner's Manual
Page 9
...turning counter-clockwise will drop momentarily until the pressure has equalized. Open the shut-off valve on the regulator, and open the valve on the PRV briefly to allow gas flow from the regulator to the gas cylinder: 1. Pull the ring on the cylinder completely. 2. Setting the Regulator EdgeStar... 3. Close the shut-off valve on the regulator, and if necessary re-adjust using step #2 until the desired pressure is designed with a pressure relief valve (PRV). Then the needle will permit gas to the point you set it at. 4. The keg coupler (usually the American Sankey Tap) is ...
...turning counter-clockwise will drop momentarily until the pressure has equalized. Open the shut-off valve on the regulator, and open the valve on the PRV briefly to allow gas flow from the regulator to the gas cylinder: 1. Pull the ring on the cylinder completely. 2. Setting the Regulator EdgeStar... 3. Close the shut-off valve on the regulator, and if necessary re-adjust using step #2 until the desired pressure is designed with a pressure relief valve (PRV). Then the needle will permit gas to the point you set it at. 4. The keg coupler (usually the American Sankey Tap) is ...
Owner's Manual
Page 10
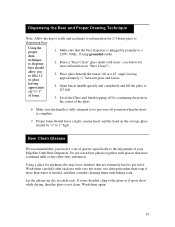
... head on "Beer Clean") 3. Wash them carefully after each use with very hot water, use detergent rather than soap if more information on the average glass should allow you reserve a set of glasses specifically to fill a 12 oz glass leaving approximat ely ¾"-1" of...air dry in the center of the glass. 6. Rinse a "Beer Clean" glass under cold water. (see below for more than water is complete. 7. Open faucet handle quickly and completely and fill the glass to 2/3 full. 5. Dispensing the Beer and Proper Drawing Technique Note: Allow the keg to settle and acclimate to refrigeration...
... head on "Beer Clean") 3. Wash them carefully after each use with very hot water, use detergent rather than soap if more information on the average glass should allow you reserve a set of glasses specifically to fill a 12 oz glass leaving approximat ely ¾"-1" of...air dry in the center of the glass. 6. Rinse a "Beer Clean" glass under cold water. (see below for more than water is complete. 7. Open faucet handle quickly and completely and fill the glass to 2/3 full. 5. Dispensing the Beer and Proper Drawing Technique Note: Allow the keg to settle and acclimate to refrigeration...

Owner's Manual
Page 11
...temperature within the refrigerator. The temperature of the beer at 1-866-319-5473 for warm spots along them, and adjust accordingly. faucet should be released from the beer while it travels through the system from the keg to the Note: During summer months, adjust the temperature control...; On the other hand, having the beer too cold causes the carbonation to a cooler setting accordingly. Contact EdgeStar customer service online via email at service@edgestar.com or by use a thermometer to chill beer will match the liquid temperature inside the cabinet in order to warm up as ...
...temperature within the refrigerator. The temperature of the beer at 1-866-319-5473 for warm spots along them, and adjust accordingly. faucet should be released from the beer while it travels through the system from the keg to the Note: During summer months, adjust the temperature control...; On the other hand, having the beer too cold causes the carbonation to a cooler setting accordingly. Contact EdgeStar customer service online via email at service@edgestar.com or by use a thermometer to chill beer will match the liquid temperature inside the cabinet in order to warm up as ...
Owner's Manual
Page 12
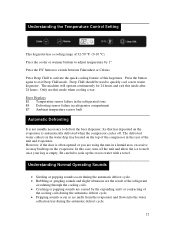
... of the compressor in the water drip tray located on the evaporator. In this mode when cooling a war Error Displays E1 Temperature sensor failure in the refrigerated zone E4 Defrosting sensor failure in refrigerator compartment E7 Ambient temperature sensor fault Automatic Defrosting It is empty. Be careful to exit Deep Chill mode. Only use this case, turn off . The machine will operate continuously for...
... of the compressor in the water drip tray located on the evaporator. In this mode when cooling a war Error Displays E1 Temperature sensor failure in the refrigerated zone E4 Defrosting sensor failure in refrigerator compartment E7 Ambient temperature sensor fault Automatic Defrosting It is empty. Be careful to exit Deep Chill mode. Only use this case, turn off . The machine will operate continuously for...
Owner's Manual
Page 13
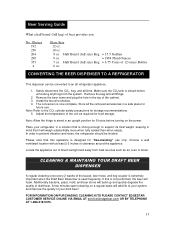
...use only. Install the two wire shelves. 4. Store all refrigerator appliance. 1. CLEANING & MAINTAING YOUR DRAFT BEER DISPENSER A regular cleaning once every 2 weeks of direct sunlight and away from the system. FOR INFORMATION ON PURCHASING CLEANING KITS PLEASE CONTACT EDGESTAR CUSTOMER SERVICE ONLINE VIA EMAIL AT service@edgestar.com OR BY TELEPHONE AT 1-866-319-5473. 13 Adjust the temperature of 12 ounce Bottles 6 oz. Locate...noise, the refrigerator should be converted to support its total weight, keeping in an upright position for food storage. Note: Allow the fridge...
...use only. Install the two wire shelves. 4. Store all refrigerator appliance. 1. CLEANING & MAINTAING YOUR DRAFT BEER DISPENSER A regular cleaning once every 2 weeks of direct sunlight and away from the system. FOR INFORMATION ON PURCHASING CLEANING KITS PLEASE CONTACT EDGESTAR CUSTOMER SERVICE ONLINE VIA EMAIL AT service@edgestar.com OR BY TELEPHONE AT 1-866-319-5473. 13 Adjust the temperature of 12 ounce Bottles 6 oz. Locate...noise, the refrigerator should be converted to support its total weight, keeping in an upright position for food storage. Note: Allow the fridge...

Owner's Manual
Page 14
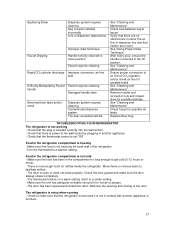
...or obstructions in length. Glassware is located on glassware in the form of oils will quickly dissolve the formation of foam (See "Beer Clean Glassware" ) All recommended temperatures and gauge settings are calculated for a dispensing hose five (5) feet in either the air line or dispenser line and that... to cool before tapping Verify that the (CO2) pressure is reading between 10 ~ 12 PSI Ensure that the keg cabinet is operating between 10 ~ 12 PSI. If the beer keg has been exposed to mid 40s. Improper regulator setting. Line or dispenser obstructions. Replace beer keg...
...or obstructions in length. Glassware is located on glassware in the form of oils will quickly dissolve the formation of foam (See "Beer Clean Glassware" ) All recommended temperatures and gauge settings are calculated for a dispensing hose five (5) feet in either the air line or dispenser line and that... to cool before tapping Verify that the (CO2) pressure is reading between 10 ~ 12 PSI Ensure that the keg cabinet is operating between 10 ~ 12 PSI. If the beer keg has been exposed to mid 40s. Improper regulator setting. Line or dispenser obstructions. Replace beer keg...
Owner's Manual
Page 15
... Dispense system requires cleaning. Replace Beer Keg TROUBLESHOOTING YOUR REFRIGERATOR The refrigerator is noisy when running - Check that the refrigerator is level and it is freezing - Make sure the food has been in either the air line or dispenser line and that the plug is on a warm setting. Check the door gasket and make sure that the thermostat control is not "Off...
... Dispense system requires cleaning. Replace Beer Keg TROUBLESHOOTING YOUR REFRIGERATOR The refrigerator is noisy when running - Check that the refrigerator is level and it is freezing - Make sure the food has been in either the air line or dispenser line and that the plug is on a warm setting. Check the door gasket and make sure that the thermostat control is not "Off...
Owner's Manual
Page 16
... owner's manual, accidents, vermin, fire, flood, improper installation, unauthorized service, unauthorized installation or modification, or commercial use are excluded from the repair facility. DESCRIPTION OF WARRANTY SERVICE: All defective product components covered by improper voltage or any other misuse, including abnormal service, handling, or usage. All replacement parts and units will be supplied free of charge for troubleshooting assistance and warranty service authorization at EdgeStar's option, on parts or replacement of original purchase. EdgeStar...
... owner's manual, accidents, vermin, fire, flood, improper installation, unauthorized service, unauthorized installation or modification, or commercial use are excluded from the repair facility. DESCRIPTION OF WARRANTY SERVICE: All defective product components covered by improper voltage or any other misuse, including abnormal service, handling, or usage. All replacement parts and units will be supplied free of charge for troubleshooting assistance and warranty service authorization at EdgeStar's option, on parts or replacement of original purchase. EdgeStar...


