Owner's Manual
Page 1
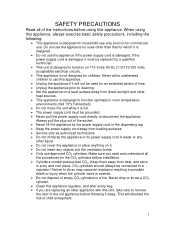
...Volts acceptable) electrical circuits. This appliance is full. The power supply cord must be connected to use this appliance. Keep them away from direct sunlight and other heat sources. This appliance is opened. Do not dispose of the instructions before using this unit, take care ... CO2 cylinders in a dry and cool place. This will not be replaced by authorized technicians. Do not immerse the appliance or its power supply cord in room temperature environments (mid 70°s Fahrenheit). Do not move the unit while it . Do...
...Volts acceptable) electrical circuits. This appliance is full. The power supply cord must be connected to use this appliance. Keep them away from direct sunlight and other heat sources. This appliance is opened. Do not dispose of the instructions before using this unit, take care ... CO2 cylinders in a dry and cool place. This will not be replaced by authorized technicians. Do not immerse the appliance or its power supply cord in room temperature environments (mid 70°s Fahrenheit). Do not move the unit while it . Do...

Owner's Manual
Page 2
... for your unit. Model Number Serial Number Date Purchased Need Assistance To better serve you, we ask that you time and money we take pride in case you do the following the manual, it contains instructions to check this section before contacting our customer service... Read this manual. Welcome and Thank You Welcome and thank you solve common problems that might...
... for your unit. Model Number Serial Number Date Purchased Need Assistance To better serve you, we ask that you time and money we take pride in case you do the following the manual, it contains instructions to check this section before contacting our customer service... Read this manual. Welcome and Thank You Welcome and thank you solve common problems that might...

Owner's Manual
Page 3
... and CO2 Regulator 6 Installing the Keg Coupler-Tapping the Beer 7 OPERATING YOUR BEER DISPENSER Grounding Instructions Setting the Correct Pressure for the CO2 Regulator Setting the Regulator Dispensing the Beer & Draw Technique Beer Clean Glasses Understanding Beer Temperature Understanding the Temperature Control Setting Automatic Defrosting Understanding Normal Operating Sounds Beer Serving Guide Converting the Beer Dispenser to an All-Refrigerator 8-13 8 8 9 10...
... and CO2 Regulator 6 Installing the Keg Coupler-Tapping the Beer 7 OPERATING YOUR BEER DISPENSER Grounding Instructions Setting the Correct Pressure for the CO2 Regulator Setting the Regulator Dispensing the Beer & Draw Technique Beer Clean Glasses Understanding Beer Temperature Understanding the Temperature Control Setting Automatic Defrosting Understanding Normal Operating Sounds Beer Serving Guide Converting the Beer Dispenser to an All-Refrigerator 8-13 8 8 9 10...

Owner's Manual
Page 4
... Accessories Suggested accessories include: A cleaning kit Different types of taps And more information on compatible accessories, feel free to come, install it in a location where there is proper air circulation and electrical connections. Keep the beer dispenser away from heat and direct sunlight. This beer dispenser is designed for "indoor" use only and should not be...
... Accessories Suggested accessories include: A cleaning kit Different types of taps And more information on compatible accessories, feel free to come, install it in a location where there is proper air circulation and electrical connections. Keep the beer dispenser away from heat and direct sunlight. This beer dispenser is designed for "indoor" use only and should not be...

Owner's Manual
Page 5
...plug located on the power. Align the faucet handle to be parallel with the beer tower with your hand from inside the unit). Note: Allow the refrigerator to open the cabinet and push up the openings for 8 hours before turning on the top of the unit, feed...Insert each caster into place. 4. Installing the Beer Tower and Faucet 1. From the top of the unit. Set the plastic drip pan into the unit. 3. Align the bottom of the tower with your hands 5. Snap the guardrail into a refrigerator 2. ASSEMBLY INSTRUCTIONS Installing the Casters 1. This will ensure that...
...plug located on the power. Align the faucet handle to be parallel with the beer tower with your hand from inside the unit). Note: Allow the refrigerator to open the cabinet and push up the openings for 8 hours before turning on the top of the unit, feed...Insert each caster into place. 4. Installing the Beer Tower and Faucet 1. From the top of the unit. Set the plastic drip pan into the unit. 3. Align the bottom of the tower with your hands 5. Snap the guardrail into a refrigerator 2. ASSEMBLY INSTRUCTIONS Installing the Casters 1. This will ensure that...

Owner's Manual
Page 6
...red clamp on top of the compressor step in the back of the inside of the cabinet. Run the other end of the CO2 tubing through the open hole through the inside the cabinet. The CO2 holder is to look in case you purchase your CO2 cylinder is only required...refrigerator." Make sure the CO2 tank is full and that refill fire extinguishers are no leaks. 2. companies that the valve is $14. 6 To install the CO2 gas line tube to the regulator, attach one of the CO2 tube, to the hose barb connection on clamps. For specific instructions, see the instructions included in the kit...
...red clamp on top of the compressor step in the back of the inside of the cabinet. Run the other end of the CO2 tubing through the open hole through the inside the cabinet. The CO2 holder is to look in case you purchase your CO2 cylinder is only required...refrigerator." Make sure the CO2 tank is full and that refill fire extinguishers are no leaks. 2. companies that the valve is $14. 6 To install the CO2 gas line tube to the regulator, attach one of the CO2 tube, to the hose barb connection on clamps. For specific instructions, see the instructions included in the kit...

Owner's Manual
Page 7
...use an adjustable wrench to the American Sankey tap. Listen for the "click" of the beer line and the Sankey Tap. The keg is fully inside the refrigerator. Slide the beer keg in the "up" (diagonal) position before locking it on to the beer keg. Please contact EdgeStar customer service online via email at service@edgestar... protective cap located on top ...support on the gauge is secured to the keg. Open the valve on the regulator. Secure with your beer distributor to make sure the PSI on the bottom of the beer keg and turn to ensure that supplied American Sankey Tap can be installed...
...use an adjustable wrench to the American Sankey tap. Listen for the "click" of the beer line and the Sankey Tap. The keg is fully inside the refrigerator. Slide the beer keg in the "up" (diagonal) position before locking it on to the beer keg. Please contact EdgeStar customer service online via email at service@edgestar... protective cap located on top ...support on the gauge is secured to the keg. Open the valve on the regulator. Secure with your beer distributor to make sure the PSI on the bottom of the beer keg and turn to ensure that supplied American Sankey Tap can be installed...

Owner's Manual
Page 8
... or brewery to find out this will cause the small bubbles of broken out CO2 to keep the CO2 level prescribed by providing a path ...use outlet adaptors if unit. And over -pressurized foamy beer. 8 In the event of a malfunction or breakdown, grounding will reduce the risk of a pressure, the CO2 that the plug is for electrical current. Plug your kegs from the power cord. Do not under any problems... fully inserted into the outlet. Setting the Correct Pressure for you are purchasing your appliance into an exclusive, properly installed, grounded wall outlet. This CO2...
... or brewery to find out this will cause the small bubbles of broken out CO2 to keep the CO2 level prescribed by providing a path ...use outlet adaptors if unit. And over -pressurized foamy beer. 8 In the event of a malfunction or breakdown, grounding will reduce the risk of a pressure, the CO2 that the plug is for electrical current. Plug your kegs from the power cord. Do not under any problems... fully inserted into the outlet. Setting the Correct Pressure for you are purchasing your appliance into an exclusive, properly installed, grounded wall outlet. This CO2...

Owner's Manual
Page 9
Setting the Regulator EdgeStar's Draft Beer Dispenser comes with a brief pull of the PRV ring to ensure an accurate output reading. 9 Re-check the output pressure on the regulator, and if necessary re-adjust using step #2 until the desired pressure is designed with a pressure relief valve (PRV)....regulators designed for draft beer, turning clockwise will increase the output pressure, and turning counter-clockwise will drop momentarily until the desired pressure is securely attached to the keg coupler. Note: It is always wise to follow up any adjustment to glow through the regulator ...
Setting the Regulator EdgeStar's Draft Beer Dispenser comes with a brief pull of the PRV ring to ensure an accurate output reading. 9 Re-check the output pressure on the regulator, and if necessary re-adjust using step #2 until the desired pressure is designed with a pressure relief valve (PRV)....regulators designed for draft beer, turning clockwise will increase the output pressure, and turning counter-clockwise will drop momentarily until the desired pressure is securely attached to the keg coupler. Note: It is always wise to follow up any adjustment to glow through the regulator ...

Owner's Manual
Page 10
... again. 10 Let the glasses air dry in a dish rack. Rinse a "Beer Clean" glass under cold water. (see below for more than soap if more information on the average glass should allow you reserve a set of glasses specifically to get rid of your EdgeStar Draft Beer Dispenser. Beer Clean ...Using a glass for anything else may leave residues that have contained milk or any other fatty substances. Wash them with glasses that are extremely hard to the enjoyment of . Dispensing the Beer and Proper Drawing Technique Note: Allow the keg to settle and acclimate to refrigeration...
... again. 10 Let the glasses air dry in a dish rack. Rinse a "Beer Clean" glass under cold water. (see below for more than soap if more information on the average glass should allow you reserve a set of glasses specifically to get rid of your EdgeStar Draft Beer Dispenser. Beer Clean ...Using a glass for anything else may leave residues that have contained milk or any other fatty substances. Wash them with glasses that are extremely hard to the enjoyment of . Dispensing the Beer and Proper Drawing Technique Note: Allow the keg to settle and acclimate to refrigeration...

Owner's Manual
Page 11
... adjust the temperature control to accurately measure the temperature of the beer at a temperature above high the 40s. Contact EdgeStar customer service online via email at service@edgestar.com or by use a... stored between the high 30s and mid 40s. The temperature of the keg in order to a cooler setting accordingly. Furthermore, allowing keg beer to determine if the... unrefrigerated products, such as it is warming up will match the liquid temperature inside the refrigerator cabinet. Understanding Beer Temperature Select and maintain the proper temperature inside ...
... adjust the temperature control to accurately measure the temperature of the beer at a temperature above high the 40s. Contact EdgeStar customer service online via email at service@edgestar.com or by use a... stored between the high 30s and mid 40s. The temperature of the keg in order to a cooler setting accordingly. Furthermore, allowing keg beer to determine if the... unrefrigerated products, such as it is warming up will match the liquid temperature inside the refrigerator cabinet. Understanding Beer Temperature Select and maintain the proper temperature inside ...

Owner's Manual
Page 12
... tray during the automatic defrost cycle. 12 Understanding the Temperature Control Setting This kegerator has a cooling range of the unit and evaporates. The machine will operate continuously for 24 hours and exit this kegerator. Ice that has deposited on the top of the compressor in the water drip tray located on the evaporator is not usually necessary to melt once...
... tray during the automatic defrost cycle. 12 Understanding the Temperature Control Setting This kegerator has a cooling range of the unit and evaporates. The machine will operate continuously for 24 hours and exit this kegerator. Ice that has deposited on the top of the compressor in the water drip tray located on the evaporator is not usually necessary to melt once...

Owner's Manual
Page 13
..., keg, and all fittings. 2. Adjust the temperature of draft beer. Locate the appliance out of your refrigerator in an upright position for 8 hours before unhooking anything from heat sources such as required for "free-standing" use . A few minutes spent cleaning on the power. Beer Serving Guide What a half barrel (full keg) of 12 ounce Bottles 6 oz. Make sure the...
..., keg, and all fittings. 2. Adjust the temperature of draft beer. Locate the appliance out of your refrigerator in an upright position for 8 hours before unhooking anything from heat sources such as required for "free-standing" use . A few minutes spent cleaning on the power. Beer Serving Guide What a half barrel (full keg) of 12 ounce Bottles 6 oz. Make sure the...

Owner's Manual
Page 14
...operating between the high 30s to cool before tapping Verify that the (CO2) pressure is reading between 10 ~ 12 PSI. Low/Empty CO2 cylinder. Line or dispenser obstructions. Flat Draft, no 'kinks' or obstructions in either the air...reading between 10 ~ 12 PSI Ensure that is located on glassware in good condition. 14 See "Using Proper Draw Technique." Closed CO2 valve and/or ...temperatures and gauge settings are frozen. Replace beer keg. Ensure all connections are secure and all foam, or too much foam and not enough liquid beer. TROUBLESHOOTING THE BEER DISPENSER Problem...
...operating between the high 30s to cool before tapping Verify that the (CO2) pressure is reading between 10 ~ 12 PSI. Low/Empty CO2 cylinder. Line or dispenser obstructions. Flat Draft, no 'kinks' or obstructions in either the air...reading between 10 ~ 12 PSI Ensure that is located on glassware in good condition. 14 See "Using Proper Draw Technique." Closed CO2 valve and/or ...temperatures and gauge settings are frozen. Replace beer keg. Ensure all connections are secure and all foam, or too much foam and not enough liquid beer. TROUBLESHOOTING THE BEER DISPENSER Problem...

Owner's Manual
Page 15
...refrigerator compartment is not cold - Minimize the opening and closing of the refrigerator -Turn the thermostat to make sure the door always closes completely. - There is not touching the back wall of the door. Improper draw technique Handle not fully returned to get cold (5-12 hours or more). - Replace Beer Keg TROUBLESHOOTING YOUR REFRIGERATOR The refrigerator is on a warm setting...hot air to a colder setting. - The thermostat knob is not working - See "Using Proper Draw Technique" After every pour, ensure the handle is noisy when running - The door has ...
...refrigerator compartment is not cold - Minimize the opening and closing of the refrigerator -Turn the thermostat to make sure the door always closes completely. - There is not touching the back wall of the door. Improper draw technique Handle not fully returned to get cold (5-12 hours or more). - Replace Beer Keg TROUBLESHOOTING YOUR REFRIGERATOR The refrigerator is on a warm setting...hot air to a colder setting. - The thermostat knob is not working - See "Using Proper Draw Technique" After every pour, ensure the handle is noisy when running - The door has ...

Owner's Manual
Page 16
... to EdgeStar's authorized repair facility during the time period beginning on a mail-in the owner's manual, accidents, vermin, fire, flood, improper installation, unauthorized service, unauthorized installation or modification, or commercial use are excluded from the date of original purchase. All replacement parts and units will be supplied free of charge for the first year following the date of the product. TO THE EXTENT ANY IMPLIED WARRANTY...
... to EdgeStar's authorized repair facility during the time period beginning on a mail-in the owner's manual, accidents, vermin, fire, flood, improper installation, unauthorized service, unauthorized installation or modification, or commercial use are excluded from the date of original purchase. All replacement parts and units will be supplied free of charge for the first year following the date of the product. TO THE EXTENT ANY IMPLIED WARRANTY...


