

Owner's Manual
Page 1
Built-In Kegerator BR7000SS Fridge for the KC7000SS Kegerator Owner's Manual For more information on other great EdgeStar products on the web, go to http://www.edgestar.com
Built-In Kegerator BR7000SS Fridge for the KC7000SS Kegerator Owner's Manual For more information on other great EdgeStar products on the web, go to http://www.edgestar.com
Owner's Manual
Page 2
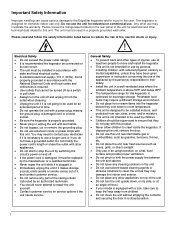
...may damage the interior and exterior. Do not place any cleaning solutions in accordance with a lock, take care to crawl inside the kegerator. Please read and follow the safety information listed below 95°F. The temperature range for use by children. Children should ..., or at least two people to be used in a closed position. i Important Safety Information Improper handling can cause serious damage to the EdgeStar kegerator and/or injury to reduce the risk of fire, electric shock or injury. If disposing the unit, remove the door. Do ...
...may damage the interior and exterior. Do not place any cleaning solutions in accordance with a lock, take care to crawl inside the kegerator. Please read and follow the safety information listed below 95°F. The temperature range for use by children. Children should ..., or at least two people to be used in a closed position. i Important Safety Information Improper handling can cause serious damage to the EdgeStar kegerator and/or injury to reduce the risk of fire, electric shock or injury. If disposing the unit, remove the door. Do ...

Owner's Manual
Page 3
......9 OPERATION...10 INSTALLATION CHECK LIST BEFORE OPERATION 10 USING THE TEMPERATURE CONTROL PANEL 10 NORMAL SOUNDS 11 DEFROSTING ...11 PREPARING THE KEGERATOR FOR STORAGE 11 CLEANING AND MAINTENANCE 12 EXTERIOR CLEANING 12 INTERIOR CLEANING 12 TROUBLESHOOTING 12 TROUBLESHOOTING CONTINUED 13 SPECIFICATIONS 14 First Time...to the product label on the back of all removed from transit. EdgeStar Built-in the future. Let the unit stand for at least 24 hours before you keep track of your kegerator for reference use . It is provided for the latest technical information. ...
......9 OPERATION...10 INSTALLATION CHECK LIST BEFORE OPERATION 10 USING THE TEMPERATURE CONTROL PANEL 10 NORMAL SOUNDS 11 DEFROSTING ...11 PREPARING THE KEGERATOR FOR STORAGE 11 CLEANING AND MAINTENANCE 12 EXTERIOR CLEANING 12 INTERIOR CLEANING 12 TROUBLESHOOTING 12 TROUBLESHOOTING CONTINUED 13 SPECIFICATIONS 14 First Time...to the product label on the back of all removed from transit. EdgeStar Built-in the future. Let the unit stand for at least 24 hours before you keep track of your kegerator for reference use . It is provided for the latest technical information. ...

Owner's Manual
Page 4
... Serial Number: Date of your purchase, and is also needed to -date information. If you need to safely transport your kegerator. We believe that your product will help you install, use and maintenance of this instruction manual carefully to help you diagnose and solve ... you need warranty service, our friendly customer service representatives are available via email at service@edgestar.com or by telephone at http://www.edgestar.com to register your unit and are glad you chose us on the back of this EdgeStar kegerator. Introduction Thank you for future reference.
... Serial Number: Date of your purchase, and is also needed to -date information. If you need to safely transport your kegerator. We believe that your product will help you install, use and maintenance of this instruction manual carefully to help you diagnose and solve ... you need warranty service, our friendly customer service representatives are available via email at service@edgestar.com or by telephone at http://www.edgestar.com to register your unit and are glad you chose us on the back of this EdgeStar kegerator. Introduction Thank you for future reference.

Owner's Manual
Page 5
Cabinet EdgeStar Built-in Kegerator Control Panel Opening for Dispense Tower Compressor Step Lock Leveling Foot Can be replaced with Fan Pipe For Cooling of Dispense Tower Parts Identification Front Vent Back View Tip: Gather the model and serial number from the product label and write them down before installing the kegerator. Front View LED Light Bar Internal Fan with casters Product Label Power Plug 2
Cabinet EdgeStar Built-in Kegerator Control Panel Opening for Dispense Tower Compressor Step Lock Leveling Foot Can be replaced with Fan Pipe For Cooling of Dispense Tower Parts Identification Front Vent Back View Tip: Gather the model and serial number from the product label and write them down before installing the kegerator. Front View LED Light Bar Internal Fan with casters Product Label Power Plug 2

Owner's Manual
Page 6
...Casters Includes 16 screws for installation 4 - Guard Rail Includes 4 small screws for installation 3 Installation Pegs NOTE: The type of kegerator you purchase will determine the type of accessories you will be based upon the type of standard accessories. Dispense Tower Screws For attaching... dispense tower to cabinet 1 - Stainless Steel Top Cover 4 - Standard Accessories: Accessories Your kegerator will come with a set of kegerator you receive for the dispense kit and Co2 tank will receive for the dispense kit. Drip Tray 1 - These ...
...Casters Includes 16 screws for installation 4 - Guard Rail Includes 4 small screws for installation 3 Installation Pegs NOTE: The type of kegerator you purchase will determine the type of accessories you will be based upon the type of standard accessories. Dispense Tower Screws For attaching... dispense tower to cabinet 1 - Stainless Steel Top Cover 4 - Standard Accessories: Accessories Your kegerator will come with a set of kegerator you receive for the dispense kit and Co2 tank will receive for the dispense kit. Drip Tray 1 - These ...

Owner's Manual
Page 7
... properly grounded, 3-prong wall receptacle installed by a switch or pull chain. It is important to make sure you move and install the kegerator. If a mating wall socket is not available, it is equipped with local electrical code requirements. Electrical Requirements ELECTRIC SHOCK HAZARD! ...result in back or other injury. To minimize possible shock hazard, the cord must be grounded. EdgeStar Built-in Kegerator Installing the Kegerator The kegerator should be installed in accordance with a power supply cord having a 3-prong grounding plug. Failure to move your...
... properly grounded, 3-prong wall receptacle installed by a switch or pull chain. It is important to make sure you move and install the kegerator. If a mating wall socket is not available, it is equipped with local electrical code requirements. Electrical Requirements ELECTRIC SHOCK HAZARD! ...result in back or other injury. To minimize possible shock hazard, the cord must be grounded. EdgeStar Built-in Kegerator Installing the Kegerator The kegerator should be installed in accordance with a power supply cord having a 3-prong grounding plug. Failure to move your...

Owner's Manual
Page 8
...Insert and tighten the screws to the screw hole openings. 4. To install the casters: 1. The front casters have a lever for the kegerator to level the kegerator. Place the top plate of the caster over the area of the unit. 2. If you are ready to work properly. IMPORTANT: Once ... like to the stainless steel door Installing the Casters This unit comes with four casters. CAUTION: Do not over the screw holes. 3. Leveling the Kegerator It is important for a brake lock. 3. Place a carpenter's level on the bottom of the handle hinges over -tighten the screws as follows:...
...Insert and tighten the screws to the screw hole openings. 4. To install the casters: 1. The front casters have a lever for the kegerator to level the kegerator. Place the top plate of the caster over the area of the unit. 2. If you are ready to work properly. IMPORTANT: Once ... like to the stainless steel door Installing the Casters This unit comes with four casters. CAUTION: Do not over the screw holes. 3. Leveling the Kegerator It is important for a brake lock. 3. Place a carpenter's level on the bottom of the handle hinges over -tighten the screws as follows:...

Owner's Manual
Page 9
... door by fastening the screws through the left hinge to the upper right corner. 4. Place the upper right hinge in a safe place in Kegerator 6 Carefully insert the door into the upper left hinge corner. Reversing the Door Swing Follow the instructions below to left swing: 1. To reverse... the door from the lower hinge. 2. Remove the plastic caps from the plastic bag that was included with the instruction manual. 5. EdgeStar Built-in case you begin, unplug the refrigerator. Carefully slide the bottom of the door forward and down, and place it . 3. Install the ...
... door by fastening the screws through the left hinge to the upper right corner. 4. Place the upper right hinge in a safe place in Kegerator 6 Carefully insert the door into the upper left hinge corner. Reversing the Door Swing Follow the instructions below to left swing: 1. To reverse... the door from the lower hinge. 2. Remove the plastic caps from the plastic bag that was included with the instruction manual. 5. EdgeStar Built-in case you begin, unplug the refrigerator. Carefully slide the bottom of the door forward and down, and place it . 3. Install the ...

Owner's Manual
Page 10
... the dispense kit installation guide to complete the full assembly of the cabinet. 2. Please follow the safety information referenced on the top of the kegerator. Place the cover on the Important Safety Information page in the four installation pegs on the pegs. 3. Place the guard rail onto the four...to collect any place you have installed the top cover. 2. These may need to the main cabinet. This will allow you to install the kegerator in order to hold into position. There are two pieces included for use the four installation pegs to hold glasses on top of the cover...
... the dispense kit installation guide to complete the full assembly of the cabinet. 2. Please follow the safety information referenced on the top of the kegerator. Place the cover on the Important Safety Information page in the four installation pegs on the pegs. 3. Place the guard rail onto the four...to collect any place you have installed the top cover. 2. These may need to the main cabinet. This will allow you to install the kegerator in order to hold into position. There are two pieces included for use the four installation pegs to hold glasses on top of the cover...

Owner's Manual
Page 11
...top cover, guard rail, drip tray, and installation pegs are aligned you will want to seal off a spot on the top of the kegerator. There is not sealed the cabinet will lose its cold air and will be level in order to work or cool as efficiently. Operation ...or cause other high heat sources. • Do not kink or pinch the power supply cord between the kegerator and wall or cabinet. EdgeStar Built-in Kegerator A built-in installation allows the kegerator to be installed in an area protected from the cabinet to the countertop. Enclose Space Between Cabinet and Countertop...
...top cover, guard rail, drip tray, and installation pegs are aligned you will want to seal off a spot on the top of the kegerator. There is not sealed the cabinet will lose its cold air and will be level in order to work or cool as efficiently. Operation ...or cause other high heat sources. • Do not kink or pinch the power supply cord between the kegerator and wall or cabinet. EdgeStar Built-in Kegerator A built-in installation allows the kegerator to be installed in an area protected from the cabinet to the countertop. Enclose Space Between Cabinet and Countertop...
Owner's Manual
Page 13
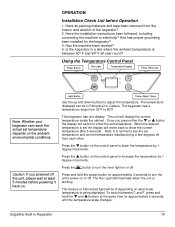
... temperature depends on . Press the button to show the set temperature and current temperature displays being displayed. EdgeStar Built-in Fahrenheit or Celsius. Adjust Up Note: Whether your kegerator can be lit depending on the control panel to 60°F. Caution: If you press either the or... button the display will be in Kegerator 10 This kegerator has a temperature range from 32°F to increase the temperature by 1 degree increments. Press the button on what scale temperature ...
... temperature depends on . Press the button to show the set temperature and current temperature displays being displayed. EdgeStar Built-in Fahrenheit or Celsius. Adjust Up Note: Whether your kegerator can be lit depending on the control panel to 60°F. Caution: If you press either the or... button the display will be in Kegerator 10 This kegerator has a temperature range from 32°F to increase the temperature by 1 degree increments. Press the button on what scale temperature ...

Owner's Manual
Page 14
... make sounds that under most refrigerating settings, the unit will automatically defrost under most ambient conditions. Preparing the Kegerator for Storage If the kegerator will be making them. Rattling noises may build up. Items stored on colder settings, some frost may come from the...frost build-up . IMPORTANT: • Do not touch the power plug when your kegerator. You may make a splashing sound. As each cycle ends, you . Normal Sounds Your new kegerator may want to take additional precautions such as possible and avoid opening the door unnecessarily...
... make sounds that under most refrigerating settings, the unit will automatically defrost under most ambient conditions. Preparing the Kegerator for Storage If the kegerator will be making them. Rattling noises may build up. Items stored on colder settings, some frost may come from the...frost build-up . IMPORTANT: • Do not touch the power plug when your kegerator. You may make a splashing sound. As each cycle ends, you . Normal Sounds Your new kegerator may want to take additional precautions such as possible and avoid opening the door unnecessarily...
Owner's Manual
Page 15
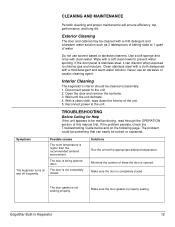
...the unit appears to 1 quart of the unit. 5. Make sure the door gasket is higher than the recommended ambient environment. EdgeStar Built-in Kegerator 12 Use a soft sponge and rinse with a mild detergent and warm water solution. Disconnect power to prevent water spotting. ... with a mild detergent and lukewarm water solution such as 2 tablespoons of baking soda to be solved or explained. Interior Cleaning The kegerator's interior should be something that can discolor when exposed to the unit. Wait until the unit defrosts. 4. Reconnect power to chlorine...
...the unit appears to 1 quart of the unit. 5. Make sure the door gasket is higher than the recommended ambient environment. EdgeStar Built-in Kegerator 12 Use a soft sponge and rinse with a mild detergent and warm water solution. Disconnect power to prevent water spotting. ... with a mild detergent and lukewarm water solution such as 2 tablespoons of baking soda to be solved or explained. Interior Cleaning The kegerator's interior should be something that can discolor when exposed to the unit. Wait until the unit defrosts. 4. Reconnect power to chlorine...

Owner's Manual
Page 16
...electrician to a heat source. The unit is not level or is Check to make sure that the kegerator is level, and that has sufficient amperage. The door will not reach the desired temperature The unit.... The door is being opened too frequently or for a long period of the kegerator The unit is not grounded is electrified. Make sure the door gasket is making strange noises Certain ...sounds are normal. sources. The kegerator is properly installed. 13 A house fuse has blown or Replace the broken fuse in to ...
...electrician to a heat source. The unit is not level or is Check to make sure that the kegerator is level, and that has sufficient amperage. The door will not reach the desired temperature The unit.... The door is being opened too frequently or for a long period of the kegerator The unit is not grounded is electrified. Make sure the door gasket is making strange noises Certain ...sounds are normal. sources. The kegerator is properly installed. 13 A house fuse has blown or Replace the broken fuse in to ...
Owner's Manual
Page 17
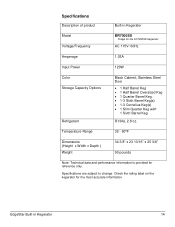
... 34 3/8" x 23 13/16" x 25 3/8" 90 pounds Note: Technical data and performance information is provided for the most accurate information. EdgeStar Built-in Kegerator Model Voltage/Frequency BR7000SS Fridge for the KC7000SS Kegerator AC 115V~60Hz Amperage 1.03A Input Power 120W Color Storage Capacity Options Refrigerant Black Cabinet; Specifications are subject to change. Check...
... 34 3/8" x 23 13/16" x 25 3/8" 90 pounds Note: Technical data and performance information is provided for the most accurate information. EdgeStar Built-in Kegerator Model Voltage/Frequency BR7000SS Fridge for the KC7000SS Kegerator AC 115V~60Hz Amperage 1.03A Input Power 120W Color Storage Capacity Options Refrigerant Black Cabinet; Specifications are subject to change. Check...
