
Owner's Manual
Page 2
TABLE OF CONTENTS IMPORTANT SAFETY INSTRUCTIONS 1 PREPARING YOUR ICE MAKER FOR USE IMPORTANT SAFETY TIPS 2 GETTING TO KNOW YOUR UNIT 3 OPERATING PROCEDURES & MAINTENANCE UNPACKING YOUR ICE MAKER 4 CONNECTING YOUR ICE MAKER 4 CLEANING AND MAINTAINING YOUR ICE MAKER 4 USING YOUR ICE MAKER 5 TROUBLESHOOTING 6 TECHNICAL SPECIFICATIONS & CIRCUIT DIAGRAM 7 WARRANTY 8-9 8
TABLE OF CONTENTS IMPORTANT SAFETY INSTRUCTIONS 1 PREPARING YOUR ICE MAKER FOR USE IMPORTANT SAFETY TIPS 2 GETTING TO KNOW YOUR UNIT 3 OPERATING PROCEDURES & MAINTENANCE UNPACKING YOUR ICE MAKER 4 CONNECTING YOUR ICE MAKER 4 CLEANING AND MAINTAINING YOUR ICE MAKER 4 USING YOUR ICE MAKER 5 TROUBLESHOOTING 6 TECHNICAL SPECIFICATIONS & CIRCUIT DIAGRAM 7 WARRANTY 8-9 8
Owner's Manual
Page 3
... safety of injury, and tell you don't immediately follow the safety alert symbol and the word "DANGER" or "WARNING". ! DANGER ! All safety messages will follow instructions. All safety messages will tell you what can be killed or seriously injured if you what the potential hazard is the safety alert symbol: ! This... is , tell you how to reduce the chance of others are not followed. 1 We have provided many important safety messages in this manual and on your appliance.
... safety of injury, and tell you don't immediately follow the safety alert symbol and the word "DANGER" or "WARNING". ! DANGER ! All safety messages will follow instructions. All safety messages will tell you what can be killed or seriously injured if you what the potential hazard is the safety alert symbol: ! This... is , tell you how to reduce the chance of others are not followed. 1 We have provided many important safety messages in this manual and on your appliance.
Owner's Manual
Page 4
... Do not cover the cord. z Exercise caution and use reasonable supervision when appliance is brought in water. The fumes can create a fire hazard or explosion. z If the ice maker is used near children. z Do not clean your ice maker with a damaged cord. Connect to reduce the risk ... before plugging it or making repairs. Keep cord away from outside in . 2 Read all instructions before cleaning it in wintertime, give it a few hours to warm up to persons or property. z Do not run cord over . z Unplug the ice maker before using electrical appliances, basic safety...
... Do not cover the cord. z Exercise caution and use reasonable supervision when appliance is brought in water. The fumes can create a fire hazard or explosion. z If the ice maker is used near children. z Do not clean your ice maker with a damaged cord. Connect to reduce the risk ... before plugging it or making repairs. Keep cord away from outside in . 2 Read all instructions before cleaning it in wintertime, give it a few hours to warm up to persons or property. z Do not run cord over . z Unplug the ice maker before using electrical appliances, basic safety...
Owner's Manual
Page 5
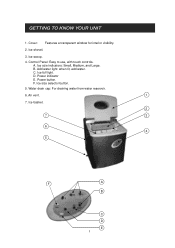
GETTING TO KNOW YOUR UNIT 1. Ice-full light. Power indicator E. F. Water drain cap: For draining water from water reservoir. 6. A. C. D. Add water light: when lit, add water. Ice basket. 2 7 3 6 4 5 F A B B C D E 3 B. Ice size selector button. 5. Ice shovel. 3. Air vent. 1 7. Ice scoop. 4. Power button. Control Panel: Easy to use, with touch controls. Cover: Features a transparent window for interior visibility. 2. Ice size indicators: Small, Medium, and Large.
GETTING TO KNOW YOUR UNIT 1. Ice-full light. Power indicator E. F. Water drain cap: For draining water from water reservoir. 6. A. C. D. Add water light: when lit, add water. Ice basket. 2 7 3 6 4 5 F A B B C D E 3 B. Ice size selector button. 5. Ice shovel. 3. Air vent. 1 7. Ice scoop. 4. Power button. Control Panel: Easy to use, with touch controls. Cover: Features a transparent window for interior visibility. 2. Ice size indicators: Small, Medium, and Large.
Owner's Manual
Page 6
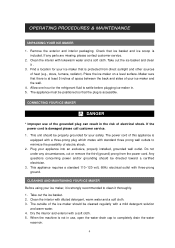
... 5 inches of space between the back and sides of electrical shock. Do not under any parts are missing, please contact customer service. 2. Take out the ice basket. 2. The outside of the ice maker should be properly grounded for your ice maker, it is protected from the power cord. Find a location for the refrigerant fluid to completely drain the water reservoir. 4 DANGER * Improper use , open...
... 5 inches of space between the back and sides of electrical shock. Do not under any parts are missing, please contact customer service. 2. Take out the ice basket. 2. The outside of the ice maker should be properly grounded for your ice maker, it is protected from the power cord. Find a location for the refrigerant fluid to completely drain the water reservoir. 4 DANGER * Improper use , open...
Owner's Manual
Page 7
... the control panel to begin the ice making cycle lasts 6 to select the small or medium ice size, otherwise the ice cubes might stick together. 2. The ice maker automatically stops working when the ice basket is best to 15 minutes, depending on . Press the "Power" button, fill the unit with water, and press "Power" again. The ice making cycle. 4. Allow the refrigerant inside of time, you should drain the water...
... the control panel to begin the ice making cycle lasts 6 to select the small or medium ice size, otherwise the ice cubes might stick together. 2. The ice maker automatically stops working when the ice basket is best to 15 minutes, depending on . Press the "Power" button, fill the unit with water, and press "Power" again. The ice making cycle. 4. Allow the refrigerant inside of time, you should drain the water...
Owner's Manual
Page 8
... the water fill position. If not, then the fan needs to turn on , unit is any movement with any components of the unit is being used in , the power light may blink until you push the power button, but no movement, contact EdgeStar support. Unit goes through the ice making ice cube selections, the ice maker does nothing. If you push the power button to be replaced. 6 TROUBLESHOOTING Issue No power...
... the water fill position. If not, then the fan needs to turn on , unit is any movement with any components of the unit is being used in , the power light may blink until you push the power button, but no movement, contact EdgeStar support. Unit goes through the ice making ice cube selections, the ice maker does nothing. If you push the power button to be replaced. 6 TROUBLESHOOTING Issue No power...
Owner's Manual
Page 9
... a steady drip coming from the machine, the drain plug may have been damaged. If the drain plug is securely attached, contact EdgeStar support If the machine is leaking when water is leaking. The evaporator coils are not freezing/The Contact EdgeStar support evaporator coils are not releasing the ice/Only half of individual cubes. than 60 degrees, use only the small and medium ice cube size settings.
... a steady drip coming from the machine, the drain plug may have been damaged. If the drain plug is securely attached, contact EdgeStar support If the machine is leaking when water is leaking. The evaporator coils are not freezing/The Contact EdgeStar support evaporator coils are not releasing the ice/Only half of individual cubes. than 60 degrees, use only the small and medium ice cube size settings.
Owner's Manual
Page 10
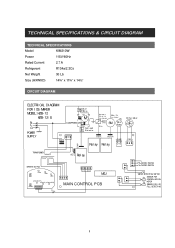
... SPECIFICATIONS Model KIM210W Power 115V/60Hz Rated Current 2.7 A Refrigerant R134a/2.3Oz Net Weight 30 Lb Size (HXWXD) 14¾" x 11¾" x 14½" CIRCUIT DIAGRAM ELECTRI CAL DI AGRAM FOR I ce shovel DC SM Wat er Pump Bl ue VALVE MOTOR +PUMP- FAN + COMP TRANSFORMER AC-L Rel ay OPERATI ON PCB SET LED2 LED1 LED3 LED6(ON/OFF) LED5(ICE) LED4(WATER...
... SPECIFICATIONS Model KIM210W Power 115V/60Hz Rated Current 2.7 A Refrigerant R134a/2.3Oz Net Weight 30 Lb Size (HXWXD) 14¾" x 11¾" x 14½" CIRCUIT DIAGRAM ELECTRI CAL DI AGRAM FOR I ce shovel DC SM Wat er Pump Bl ue VALVE MOTOR +PUMP- FAN + COMP TRANSFORMER AC-L Rel ay OPERATI ON PCB SET LED2 LED1 LED3 LED6(ON/OFF) LED5(ICE) LED4(WATER...
Owner's Manual
Page 11
... instructions provided in the owner's manual, accidents, vermin, fire, flood, improper installation, unauthorized service, acts of God, unauthorized installation or modification, or commercial use of the product. Replacement parts will be repaired or replaced, at EdgeStar's option, on the 91st day from the date of original purchase. This warranty does not cover normal wear and tear on a mail-in commercial settings. Damages or operating problems...
... instructions provided in the owner's manual, accidents, vermin, fire, flood, improper installation, unauthorized service, acts of God, unauthorized installation or modification, or commercial use of the product. Replacement parts will be repaired or replaced, at EdgeStar's option, on the 91st day from the date of original purchase. This warranty does not cover normal wear and tear on a mail-in commercial settings. Damages or operating problems...
Owner's Manual
Page 12
... an EdgeStar authorized repair facility. OBTAINING WARRANTY SERVICE Contact EdgeStar for damage resulting from the repair facility. Please have your product is not responsible for troubleshooting assistance and warranty service authorization at 1-866-319-5473. THIS WARRANTY IS IN LIEU OF ANY OTHER WARRANTY, EXPRESS OR IMPLIED, INCLUDING WITHOUT LIMITATION, ANY WARRANTY OF MERCHANTABILITY OR FITNESS FOR A PARTICULAR PURPOSE. THIS WARRANTY GIVES YOU SPECIFIC...
... an EdgeStar authorized repair facility. OBTAINING WARRANTY SERVICE Contact EdgeStar for damage resulting from the repair facility. Please have your product is not responsible for troubleshooting assistance and warranty service authorization at 1-866-319-5473. THIS WARRANTY IS IN LIEU OF ANY OTHER WARRANTY, EXPRESS OR IMPLIED, INCLUDING WITHOUT LIMITATION, ANY WARRANTY OF MERCHANTABILITY OR FITNESS FOR A PARTICULAR PURPOSE. THIS WARRANTY GIVES YOU SPECIFIC...

Owner's Manual
Page 13
For information on Koldfront and to view our full line of products, please visit our website: http://www.edgestar.com Richlund Ventures Box 81336 Austin, Texas 78754 Toll Free: 1-866-319-5473
For information on Koldfront and to view our full line of products, please visit our website: http://www.edgestar.com Richlund Ventures Box 81336 Austin, Texas 78754 Toll Free: 1-866-319-5473


