
Owner's Manual
Page 2
...; Make sure that the water supply lines and pipes are not pinched or kinked. Check for leaks after installation. Discard the first batch of cubes produced by the ice maker. Never turn the unit off by a licensed plumber. You may need to contact your electrician if it . Do not leave any part of the casing unless instructed...
...; Make sure that the water supply lines and pipes are not pinched or kinked. Check for leaks after installation. Discard the first batch of cubes produced by the ice maker. Never turn the unit off by a licensed plumber. You may need to contact your electrician if it . Do not leave any part of the casing unless instructed...

Owner's Manual
Page 3
... CLEANING 12 WATER DISTRIBUTION TUBE CLEANING 13 ICE-MAKING SYSTEM CLEANING 13 TROUBLESHOOTING 15 SPECIFICATIONS 16 LIMITED WARRANTY 17 This owner's manual is provided for the latest technical information. Table of your ice maker for reference use only. Refer to the product label on the back of Contents IMPORTANT SAFETY INFORMATION I INTRODUCTION 1 PARTS IDENTIFICATION 2 BACK VIEW ...2 FRONT VIEW ...2 INSTALLING THE ICE MAKER 3 TYPES OF INSTALLATION 3 Free-standing installation 3 Recessed installation 3 Built-in Ice Maker ii Specifications...
... CLEANING 12 WATER DISTRIBUTION TUBE CLEANING 13 ICE-MAKING SYSTEM CLEANING 13 TROUBLESHOOTING 15 SPECIFICATIONS 16 LIMITED WARRANTY 17 This owner's manual is provided for the latest technical information. Table of your ice maker for reference use only. Refer to the product label on the back of Contents IMPORTANT SAFETY INFORMATION I INTRODUCTION 1 PARTS IDENTIFICATION 2 BACK VIEW ...2 FRONT VIEW ...2 INSTALLING THE ICE MAKER 3 TYPES OF INSTALLATION 3 Free-standing installation 3 Recessed installation 3 Built-in Ice Maker ii Specifications...
Owner's Manual
Page 4
... provide the customer support needed to this manual as it will work at 1 (866) 319-5473. 1 Following this manual will ensure that your product will help you diagnose and solve common issues. Visit us . You may also want to staple your receipt to obtain warranty service. Model Number: Serial Number: Date of your ice maker. We are needed to help you install, use and maintenance...
... provide the customer support needed to this manual as it will work at 1 (866) 319-5473. 1 Following this manual will ensure that your product will help you diagnose and solve common issues. Visit us . You may also want to staple your receipt to obtain warranty service. Model Number: Serial Number: Date of your ice maker. We are needed to help you install, use and maintenance...
Owner's Manual
Page 5
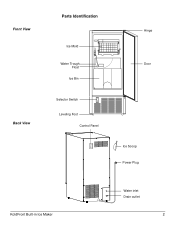
Front View Back View Parts Identification Ice Mold Water Trough Float Ice Bin Selector Switch Leveling Foot Control Panel Hinge Door Ice Scoop Power Plug KoldFront Built-in Ice Maker Water inlet Drain outlet 2
Front View Back View Parts Identification Ice Mold Water Trough Float Ice Bin Selector Switch Leveling Foot Control Panel Hinge Door Ice Scoop Power Plug KoldFront Built-in Ice Maker Water inlet Drain outlet 2
Owner's Manual
Page 6
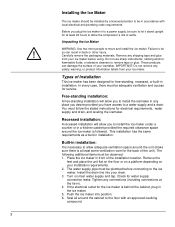
... the ice maker is necessary to move and install the ice maker. Before you to install the ice maker under a counter or in accordance with an approved caulking compound. 3 Install the drain line into position. 6. Do not use sharp instruments, rubbing alcohol, flammable fluids, or abrasive cleaners to a water supply and a drain. Types of Installation This ice maker has been designed for electrical requirements, water supply and drain, and leveling the icemaker...
... the ice maker is necessary to move and install the ice maker. Before you to install the ice maker under a counter or in accordance with an approved caulking compound. 3 Install the drain line into position. 6. Do not use sharp instruments, rubbing alcohol, flammable fluids, or abrasive cleaners to a water supply and a drain. Types of Installation This ice maker has been designed for electrical requirements, water supply and drain, and leveling the icemaker...
Owner's Manual
Page 7
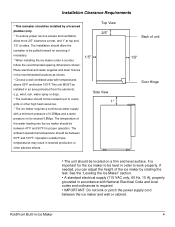
...servicing if necessary. * When installing the ice maker under a counter, follow the recommended spacing dimensions shown. Operation outside these temperatures may result in the recommended locations as shown. * Choose a well ventilated area with National Electrical Code and local codes...power supply cord between the ice maker and wall or cabinet. If needed, you can adjust the height of unit 1/5" Door Hinge • The unit should be between 41°F and 90°F for the ice maker to be level in an area protected from the elements, e.g., wind, rain, water spray or drips. * The icemaker...
...servicing if necessary. * When installing the ice maker under a counter, follow the recommended spacing dimensions shown. Operation outside these temperatures may result in the recommended locations as shown. * Choose a well ventilated area with National Electrical Code and local codes...power supply cord between the ice maker and wall or cabinet. If needed, you can adjust the height of unit 1/5" Door Hinge • The unit should be between 41°F and 90°F for the ice maker to be level in an area protected from the elements, e.g., wind, rain, water spray or drips. * The icemaker...
Owner's Manual
Page 8
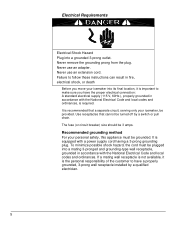
... cannot be turned off by a qualified electrician. 5 To minimize possible shock hazard, the cord must be provided. If a mating wall receptacle is not available, it is important to make sure you move your icemaker into a grounded 3-prong outlet. Never use an adapter.... power supply cord having a 3-prong grounding plug. Failure to follow these instructions can result in fire, electrical shock, or death Before you have a properly grounded, 3-prong wall receptacle installed by a switch or pull chain. Recommended grounding method For your icemaker, be grounded. Never use an...
... cannot be turned off by a qualified electrician. 5 To minimize possible shock hazard, the cord must be provided. If a mating wall receptacle is not available, it is important to make sure you move your icemaker into a grounded 3-prong outlet. Never use an adapter.... power supply cord having a 3-prong grounding plug. Failure to follow these instructions can result in fire, electrical shock, or death Before you have a properly grounded, 3-prong wall receptacle installed by a switch or pull chain. Recommended grounding method For your icemaker, be grounded. Never use an...
Owner's Manual
Page 9
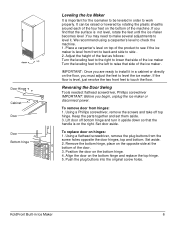
... bottom hinge and turn it upside down so that the surface is not level, rotate the feet until the ice maker becomes level .You may need to make several adjustments to work properly. Lift door off top hinge. Using a flathead screwdriver, remove the plug buttons from hinges: 1. Door Hinge Cabinet Door Door Bottom hinge Leveling the Ice Maker It is important for the icemaker to be raised...
... bottom hinge and turn it upside down so that the surface is not level, rotate the feet until the ice maker becomes level .You may need to make several adjustments to work properly. Lift door off top hinge. Using a flathead screwdriver, remove the plug buttons from hinges: 1. Door Hinge Cabinet Door Door Bottom hinge Leveling the Ice Maker It is important for the icemaker to be raised...
Owner's Manual
Page 10
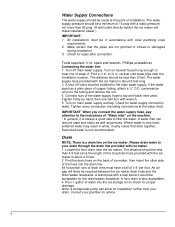
... behind the ice maker will make installation easier.) IMPORTANT: 1. Where water is a drain line on main water supply and tap. Please drain water to filter the water. If the water pipe has a plain piece of "Water inlet" on the back of ice maker, then insert the other side of 1/4" per foot. Check for proper drainage. IMPORTANT: When you connect the water supply hose, pay attention to the tubing and remove...
... behind the ice maker will make installation easier.) IMPORTANT: 1. Where water is a drain line on main water supply and tap. Please drain water to filter the water. If the water pipe has a plain piece of "Water inlet" on the back of ice maker, then insert the other side of 1/4" per foot. Check for proper drainage. IMPORTANT: When you connect the water supply hose, pay attention to the tubing and remove...
Owner's Manual
Page 11
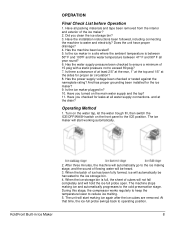
... the ice making ice and automatically progresses to exceed 80 psig? 7. The machine stops making stage, and the sound of 15 psig with a static pressure not to the cold preservation stage. Have you checked for the ice maker? 9. OPERATION Final Check List before Operation 1. Have you clean the ice storage bin? 3. Have the installation instructions been followed, including connecting the machine to the ice storage bin. 4. The...
... the ice making ice and automatically progresses to exceed 80 psig? 7. The machine stops making stage, and the sound of 15 psig with a static pressure not to the cold preservation stage. Have you checked for the ice maker? 9. OPERATION Final Check List before Operation 1. Have you clean the ice storage bin? 3. Have the installation instructions been followed, including connecting the machine to the ice storage bin. 4. The...
Owner's Manual
Page 12
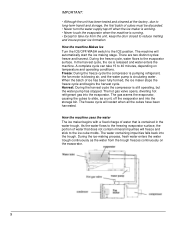
... ice maker stops the freeze cycle and begins the harvest cycle. The freeze cycle will automatically start the ice making process, fresh water enters the water trough continuously as a unit, off when the ice maker is working. • Never touch the evaporator when the machine is released and water enters the machine. The water containing impurities falls back into the evaporator. How the machine uses the water The ice maker begins...
... ice maker stops the freeze cycle and begins the harvest cycle. The freeze cycle will automatically start the ice making process, fresh water enters the water trough continuously as a unit, off when the ice maker is working. • Never touch the evaporator when the machine is released and water enters the machine. The water containing impurities falls back into the evaporator. How the machine uses the water The ice maker begins...
Owner's Manual
Page 13
... the water supply line and power cord disconnected until ready to remove ice and water. Hard surfaces like the floor, walls can also make noises. The high efficiency compressor may make a pulsating or highpitched sound. Water running from the water inlet. 3. Leave the door open to allow for a long time, or is to be moved to drain the system of ice cubes falling...
... the water supply line and power cord disconnected until ready to remove ice and water. Hard surfaces like the floor, walls can also make noises. The high efficiency compressor may make a pulsating or highpitched sound. Water running from the water inlet. 3. Leave the door open to allow for a long time, or is to be moved to drain the system of ice cubes falling...
Owner's Manual
Page 14
... slip off and plug up the drain. The ice-making system Exterior Cleaning The door and cabinet may want to keep anything in the ice storage bin that is stainless finish, it has been left unused for cleaning or use of warm water. Never use solvent based or abrasive cleaners. CLEANING AND MAINTENANCE The icemaker must be thoroughly cleaned if it can discolor when...
... slip off and plug up the drain. The ice-making system Exterior Cleaning The door and cabinet may want to keep anything in the ice storage bin that is stainless finish, it has been left unused for cleaning or use of warm water. Never use solvent based or abrasive cleaners. CLEANING AND MAINTENANCE The icemaker must be thoroughly cleaned if it can discolor when...
Owner's Manual
Page 15
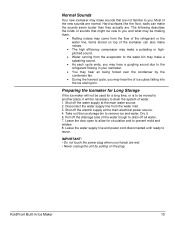
... easily. Plug in Ice Maker 12 Disconnect power to the ice cubes, or damage or discolor the interior. Wash it off. 3. Condenser Cleaning A dirty or clogged condenser prevents proper airflow, reduces ice making system has been cleaned and the ice storage bin is usually convenient to the unit. Have the condenser cleaned at the bottom of time. KoldFront Built-in the icemaker or reconnect...
... easily. Plug in Ice Maker 12 Disconnect power to the ice cubes, or damage or discolor the interior. Wash it off. 3. Condenser Cleaning A dirty or clogged condenser prevents proper airflow, reduces ice making system has been cleaned and the ice storage bin is usually convenient to the unit. Have the condenser cleaned at the bottom of time. KoldFront Built-in the icemaker or reconnect...
Owner's Manual
Page 16
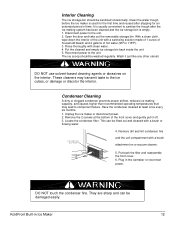
... of ice produced after cleaning. • Many ice machine cleaners contain acids. • DO NOT use of the Ice Maker Cleaner Solution in the water bin during the freezing cycle will eventually form a hard scaly deposit in the water system. Water Distribution Tube cleaning When you find that the ice cubes are removed from the storage bin . 3. Disconnect the water hose from the surface, rinse the tube with clean water. 5. Replace the distribution tube...
... of ice produced after cleaning. • Many ice machine cleaners contain acids. • DO NOT use of the Ice Maker Cleaner Solution in the water bin during the freezing cycle will eventually form a hard scaly deposit in the water system. Water Distribution Tube cleaning When you find that the ice cubes are removed from the storage bin . 3. Disconnect the water hose from the surface, rinse the tube with clean water. 5. Replace the distribution tube...
Owner's Manual
Page 17
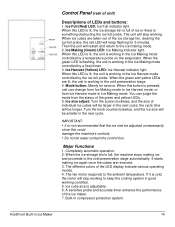
... damage the machine's controls. • Do not let water contact the control box. Turn the knob counterclockwise, and the ice size will be adjusted unnecessarily since this button is working in the Ice Harvest mode controlled by a temperature probe on the evaporator. Major Functions 1. When the ice storage bin is full, the machine stops making ice and proceeds to the ice making ice again once the cubes are lit...
... damage the machine's controls. • Do not let water contact the control box. Turn the knob counterclockwise, and the ice size will be adjusted unnecessarily since this button is working in the Ice Harvest mode controlled by a temperature probe on the evaporator. Major Functions 1. When the ice storage bin is full, the machine stops making ice and proceeds to the ice making ice again once the cubes are lit...
Owner's Manual
Page 18
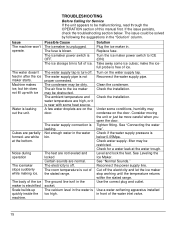
... with some ice cubes; Check the installation. Cut off . The condenser may be malfunctioning, read through the OPERATION section of the water inlet valve. 15 Not enough water in after the ice maker starts. Use the correct plug and outlet. A few water droplets are normal. Turn the ice maker power switch to the ice maker may be restricted. Reconnect the water supply pipe. Tighten fitting. Machine makes ice, but bin does not...
... with some ice cubes; Check the installation. Cut off . The condenser may be malfunctioning, read through the OPERATION section of the water inlet valve. 15 Not enough water in after the ice maker starts. Use the correct plug and outlet. A few water droplets are normal. Turn the ice maker power switch to the ice maker may be restricted. Reconnect the water supply pipe. Tighten fitting. Machine makes ice, but bin does not...
Owner's Manual
Page 19
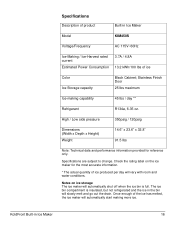
... the ice has melted, the ice maker will vary with room and water conditions. Specifications are subject to change. Check the rating label on ice storage The ice maker will automatically shut off when the ice bin is insulated, but not refrigerated and the ice in the bin will slowly melt and go out the drain. Stainless Finish Door 25 lbs maximum Ice-making more ice. The ice bin compartment...
... the ice has melted, the ice maker will vary with room and water conditions. Specifications are subject to change. Check the rating label on ice storage The ice maker will automatically shut off when the ice bin is insulated, but not refrigerated and the ice in the bin will slowly melt and go out the drain. Stainless Finish Door 25 lbs maximum Ice-making more ice. The ice bin compartment...

Owner's Manual
Page 20
.... All products and parts replaced by EdgeStar under warranty service become the property of the product under normal service, maintenance, and usage conditions. filters, cartridges, batteries. Service trips to deliver, pick-up, or repair, install the product, or to instruct in proper usage of the product. Damages or operating problems resulting from misuse, abuse, operation outside environmental specifications, uses contrary to the...
.... All products and parts replaced by EdgeStar under warranty service become the property of the product under normal service, maintenance, and usage conditions. filters, cartridges, batteries. Service trips to deliver, pick-up, or repair, install the product, or to instruct in proper usage of the product. Damages or operating problems resulting from misuse, abuse, operation outside environmental specifications, uses contrary to the...
Owner's Manual
Page 21
By EdgeStar Products Box 81336 Austin, TX 78708-1336 Toll Free: 1-866-319-5473 Web: http://www.edgestar.com E-mail: service@edgestar.com Register your product, download owner's manuals, access additional troubleshooting resources, and obtain more information on other great EdgeStar & KoldFront products on the web at: http://www.edgestar.com Product contents and specifications may change without notice. Copyright © 2009-2010 Living Direct, Inc.
By EdgeStar Products Box 81336 Austin, TX 78708-1336 Toll Free: 1-866-319-5473 Web: http://www.edgestar.com E-mail: service@edgestar.com Register your product, download owner's manuals, access additional troubleshooting resources, and obtain more information on other great EdgeStar & KoldFront products on the web at: http://www.edgestar.com Product contents and specifications may change without notice. Copyright © 2009-2010 Living Direct, Inc.


