Owner's Manual
Page 1
Owner's Manual Portable Air Conditioner This manual covers models: PAC801W, PAC1201W This manual contains important information regarding safety precautions, and the proper installation, use and maintenance of your portable air conditioner.
Owner's Manual Portable Air Conditioner This manual covers models: PAC801W, PAC1201W This manual contains important information regarding safety precautions, and the proper installation, use and maintenance of your portable air conditioner.

Owner's Manual
Page 2
... this product. Press the TEST button on how to be replaced by children. Press the RESET button to start using your portable air conditioner, follow the instructions below to play with the controls or drop any person sit on top of the unit. x Do not pull the unit by an authorized technician. x Do not operate the unit with household waste. x This unit is working properly: 1. Plug the power cord to the air conditioner...
... this product. Press the TEST button on how to be replaced by children. Press the RESET button to start using your portable air conditioner, follow the instructions below to play with the controls or drop any person sit on top of the unit. x Do not pull the unit by an authorized technician. x Do not operate the unit with household waste. x This unit is working properly: 1. Plug the power cord to the air conditioner...

Owner's Manual
Page 3
... EXHAUST HOSE 8 DRAINING THE UNIT 9 DIRECT DRAINAGE 9 MANUAL DRAIN ...9 CONTROL PANEL OVERVIEW 10 OPERATING THE CONTROL PANEL 11 POWER ...11 AUTO-RESTART 11 COOLING MODE 11 DEHUMIDIFYING MODE 11 AUTOMATIC MODE 11 FAN ONLY MODE 11 FAN BUTTON ...12 TIMER BUTTON 12 How to set the unit to automatically turn on 12 How to set the unit to automatically turn off 12 LED DISPLAY ...12 Error Codes 12 SWING BUTTON 12 SLEEP BUTTON 12 USING THE REMOTE CONTROL 13 INSTALLING THE BATTERIES 13 NORMAL SOUNDS 14 ENERGY SAVING GUIDE 14 MAINTENANCE 14 CLEANING THE UNIT 15 CLEANING...
... EXHAUST HOSE 8 DRAINING THE UNIT 9 DIRECT DRAINAGE 9 MANUAL DRAIN ...9 CONTROL PANEL OVERVIEW 10 OPERATING THE CONTROL PANEL 11 POWER ...11 AUTO-RESTART 11 COOLING MODE 11 DEHUMIDIFYING MODE 11 AUTOMATIC MODE 11 FAN ONLY MODE 11 FAN BUTTON ...12 TIMER BUTTON 12 How to set the unit to automatically turn on 12 How to set the unit to automatically turn off 12 LED DISPLAY ...12 Error Codes 12 SWING BUTTON 12 SLEEP BUTTON 12 USING THE REMOTE CONTROL 13 INSTALLING THE BATTERIES 13 NORMAL SOUNDS 14 ENERGY SAVING GUIDE 14 MAINTENANCE 14 CLEANING THE UNIT 15 CLEANING...
Owner's Manual
Page 4
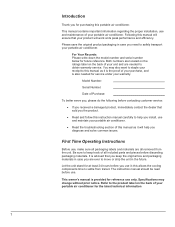
... the back of all removed from transit. Model Number: Serial Number: Date of your portable air conditioner. Specifications may also want to staple your receipt to this manual will ensure that sold you the product. Introduction Thank you for purchasing this instruction manual carefully to help you need to safely transport your portable air conditioner for the latest technical information 1 Both numbers are located on the ratings label on the back...
... the back of all removed from transit. Model Number: Serial Number: Date of your portable air conditioner. Specifications may also want to staple your receipt to this manual will ensure that sold you the product. Introduction Thank you for purchasing this instruction manual carefully to help you need to safely transport your portable air conditioner for the latest technical information 1 Both numbers are located on the ratings label on the back...

Owner's Manual
Page 5
Parts Identification Front View Window Plate with Hole Oval Window Kit Adapter Exhaust Hose Window Plate Control Panel Front Air Vent/ Louvers Handle Caster Back View Pre-filter Air Intake Exhaust Outlet Upper Drain Valve Air Intake/ Compressor pre-filter Lower Drain Valve Portable Air Conditioner 2
Parts Identification Front View Window Plate with Hole Oval Window Kit Adapter Exhaust Hose Window Plate Control Panel Front Air Vent/ Louvers Handle Caster Back View Pre-filter Air Intake Exhaust Outlet Upper Drain Valve Air Intake/ Compressor pre-filter Lower Drain Valve Portable Air Conditioner 2

Owner's Manual
Page 6
... replace the carbon filter every two to three months, or as needed. Filter frame Pre-filter Activated carbon filter Note: The size of the unit. Separate the filter frame from the air. Reattach the filter frame. 5. Insert the assembled pre-filter into the back of the carbon filter may vary. 3 2. Installing the Carbon Filter Your portable air conditioner ships with a pre-filter and an activated carbon filter. It is necessary to install the carbon filter...
... replace the carbon filter every two to three months, or as needed. Filter frame Pre-filter Activated carbon filter Note: The size of the unit. Separate the filter frame from the air. Reattach the filter frame. 5. Insert the assembled pre-filter into the back of the carbon filter may vary. 3 2. Installing the Carbon Filter Your portable air conditioner ships with a pre-filter and an activated carbon filter. It is necessary to install the carbon filter...
Owner's Manual
Page 7
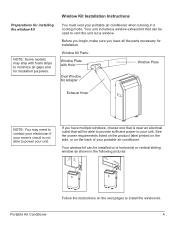
... cooling mode. See the power requirements listed on the product label printed on the side, or on the next pages to vent the unit out a window. Window Kit Installation Instructions You must vent your unit. Window Kit Parts: Window Plate with Hole Window Plate Oval Window Kit Adapter Exhaust Hose NOTE: You may ship with foam strips to your portable air conditioner. Your unit includes a window exhaust kit that is not able to power your portable air conditioner when running in the following pictures: Portable Air Conditioner Follow the instructions...
... cooling mode. See the power requirements listed on the product label printed on the side, or on the next pages to vent the unit out a window. Window Kit Installation Instructions You must vent your unit. Window Kit Parts: Window Plate with Hole Window Plate Oval Window Kit Adapter Exhaust Hose NOTE: You may ship with foam strips to your portable air conditioner. Your unit includes a window exhaust kit that is not able to power your portable air conditioner when running in the following pictures: Portable Air Conditioner Follow the instructions...

Owner's Manual
Page 9
Attach the oval adapter to the exhaust hose e 3. f 20" e 4. Roll the unit towards the window kit. Caution: The unit is at least 20 inches to a cabinet or used under a counter. Portable Air Conditioner 6 Leave a space that is designed to be used indoors and freestanding, and not be used outdoors, or be built-in to the wall. Extend the end of the exhaust hose B. Thread the duct connector onto the hose by turning it clockwise until it stops. Attaching the oval adapter to the hose: A.
Attach the oval adapter to the exhaust hose e 3. f 20" e 4. Roll the unit towards the window kit. Caution: The unit is at least 20 inches to a cabinet or used under a counter. Portable Air Conditioner 6 Leave a space that is designed to be used indoors and freestanding, and not be used outdoors, or be built-in to the wall. Extend the end of the exhaust hose B. Thread the duct connector onto the hose by turning it clockwise until it stops. Attaching the oval adapter to the hose: A.

Owner's Manual
Page 10
Connecting the exhaust hose to the window kit h 6. Push the oval adapter through the window kit hole until it snaps in your portable air conditioner and start using it. 7 After you have installed the exhaust hose and window kit, you can plug in place. Connecting the oval adapter to the unit g 5. Align the slots on the hose connector to the tabs and snap into the back of the unit.
Connecting the exhaust hose to the window kit h 6. Push the oval adapter through the window kit hole until it snaps in your portable air conditioner and start using it. 7 After you have installed the exhaust hose and window kit, you can plug in place. Connecting the oval adapter to the unit g 5. Align the slots on the hose connector to the tabs and snap into the back of the unit.

Owner's Manual
Page 11
... replace it with the portable air conditioner can radiate heat into account when deciding how to vent it is in Cooling Mode. Portable Air Conditioner 8 Do not lengthen the hose by adding additional hoses or attachments. The exhaust hose must remove the exhaust hose if the unit is collected from the air. Please take this air conditioner. Try to prevent any other hose. Notes about the Exhaust hose Your portable air conditioner is designed to exhaust condensate water that is in Fan Mode...
... replace it with the portable air conditioner can radiate heat into account when deciding how to vent it is in Cooling Mode. Portable Air Conditioner 8 Do not lengthen the hose by adding additional hoses or attachments. The exhaust hose must remove the exhaust hose if the unit is collected from the air. Please take this air conditioner. Try to prevent any other hose. Notes about the Exhaust hose Your portable air conditioner is designed to exhaust condensate water that is in Fan Mode...
Owner's Manual
Page 12
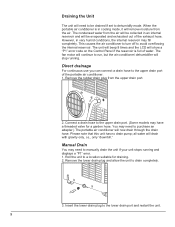
... dehumidify mode. The fan motor will continue to run, but the air conditioner/ dehumidifier will stop running and displays a "P1" error. 1. Remove the lower drain plug and allow the unit to avoid overflowing the internal reservoir. Direct drainage For continuous use you can connect a drain hose to the lower drain port and restart the unit. 9 Remove the rubber drain plug from the air. Insert the lower drain plug to the upper drain port of the portable air conditioner. 1. The condensed water...
... dehumidify mode. The fan motor will continue to run, but the air conditioner/ dehumidifier will stop running and displays a "P1" error. 1. Remove the lower drain plug and allow the unit to avoid overflowing the internal reservoir. Direct drainage For continuous use you can connect a drain hose to the lower drain port and restart the unit. 9 Remove the rubber drain plug from the air. Insert the lower drain plug to the upper drain port of the portable air conditioner. 1. The condensed water...

Owner's Manual
Page 13
... the remote control. Control Panel Overview Indicator Lights Up Button Down Button Swing Button LED Display Infrared Sensor A UT O HE AT C OOL DRY FAN SWING MODE FC TIME R ON TIME R OFF SLEEP FA N HI ME D LOW Mode Button Timer Button Power Sleep Fan Speed Button Button Button Button Power Mode Fan Timer ž Swing Sleep × (Up) Ø (Down) Function Powers the unit on what timer mode you set. Increases the set temperature in Cool Mode, and the number of hours when setting the timer. Used to swing automatically Enables the sleep function. Portable Air Conditioner...
... the remote control. Control Panel Overview Indicator Lights Up Button Down Button Swing Button LED Display Infrared Sensor A UT O HE AT C OOL DRY FAN SWING MODE FC TIME R ON TIME R OFF SLEEP FA N HI ME D LOW Mode Button Timer Button Power Sleep Fan Speed Button Button Button Button Power Mode Fan Timer ž Swing Sleep × (Up) Ø (Down) Function Powers the unit on what timer mode you set. Increases the set temperature in Cool Mode, and the number of hours when setting the timer. Used to swing automatically Enables the sleep function. Portable Air Conditioner...
Owner's Manual
Page 14
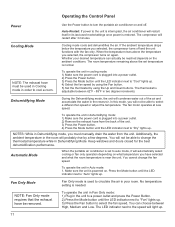
... to turn the portable air conditioner on what the room temperature is plugged into a power outlet. 2) Remove the exhaust hose from the unit. Operating the Control Panel Power Use the Power button to the speed will light up. 11 The thermostat is plugged into a power outlet. 2) Press the Power button. 3) Press the Mode button until the LED indicator next to change the fan speed. In this mode, you selected, the compressor turns off . No temperature setting is powered on again. To operate the unit in Dehumidifying Mode. The fan motor operates...
... to turn the portable air conditioner on what the room temperature is plugged into a power outlet. 2) Remove the exhaust hose from the unit. Operating the Control Panel Power Use the Power button to the speed will light up. 11 The thermostat is plugged into a power outlet. 2) Press the Power button. 3) Press the Mode button until the LED indicator next to change the fan speed. In this mode, you selected, the compressor turns off . No temperature setting is powered on again. To operate the unit in Dehumidifying Mode. The fan motor operates...
Owner's Manual
Page 15
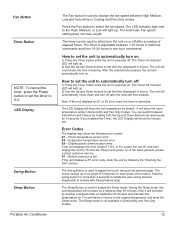
... the Timer button while the unit is powered off after the selected time elapses. You can be used to set the time (displayed in one hour increments. E2 - Press the Fan button to the original temperature and ends the Sleep mode. The timer is cancelled. The unit will light up to automatically turn on . Display panel communication error. If the issue persists, please contact customer service. If the unit displays a P1 error code, drain the unit by...
... the Timer button while the unit is powered off after the selected time elapses. You can be used to set the time (displayed in one hour increments. E2 - Press the Fan button to the original temperature and ends the Sleep mode. The timer is cancelled. The unit will light up to automatically turn on . Display panel communication error. If the issue persists, please contact customer service. If the unit displays a P1 error code, drain the unit by...
Owner's Manual
Page 16
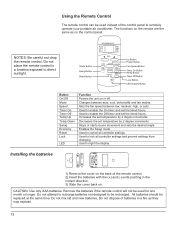
... Sleep mode Used to cancel all controller settings Used to lock all controller settings and prevent settings from changing Used to light the display Installing the batteries 1) Remove the cover on the back of the remote control. 2) Insert the batteries with the (+) and (-) ends pointing in a location exposed to direct sunlight. CAUTION: Use only AAA batteries. Do not mix old and new batteries. Sets the fan speed between auto, cool, dehumidify and fan modes. Used to enable the Off timer...
... Sleep mode Used to cancel all controller settings Used to lock all controller settings and prevent settings from changing Used to light the display Installing the batteries 1) Remove the cover on the back of the remote control. 2) Insert the batteries with the (+) and (-) ends pointing in a location exposed to direct sunlight. CAUTION: Use only AAA batteries. Do not mix old and new batteries. Sets the fan speed between auto, cool, dehumidify and fan modes. Used to enable the Off timer...
Owner's Manual
Page 17
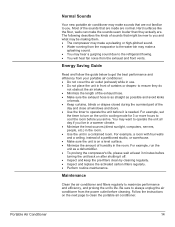
... air conditioner from your portable air conditioner: x Do not cover the air outlet (exhaust) while in use. to maximize performance and efficiency, and prolong the unit's life. x Minimize the heat sources (direct sunlight, computers, servers, people, etc.) in a contained room. x Use the unit in the room. x Make sure the unit is on after shutting it is as straight as a dehumidifier. x Inspect and replace the activated carbon filters regularly. Maintenance Clean the air conditioner...
... air conditioner from your portable air conditioner: x Do not cover the air outlet (exhaust) while in use. to maximize performance and efficiency, and prolong the unit's life. x Minimize the heat sources (direct sunlight, computers, servers, people, etc.) in a contained room. x Use the unit in the room. x Make sure the unit is on after shutting it is as straight as a dehumidifier. x Inspect and replace the activated carbon filters regularly. Maintenance Clean the air conditioner...

Owner's Manual
Page 18
..., or other cleaning solvents that may need to be using the unit for replacement filters. To clean the pre-filters, follow the instructions below 104°F). Allow the pre-filter to air dry in a dusty environment you are not going to clean it every 2-3 months or as needed . Warning: Never operate the unit without the filters. Never spray water directly on the coils inside the unit. 2) Power off the unit and remove the pre-filters. Lint...
..., or other cleaning solvents that may need to be using the unit for replacement filters. To clean the pre-filters, follow the instructions below 104°F). Allow the pre-filter to air dry in a dusty environment you are not going to clean it every 2-3 months or as needed . Warning: Never operate the unit without the filters. Never spray water directly on the coils inside the unit. 2) Power off the unit and remove the pre-filters. Lint...
Owner's Manual
Page 19
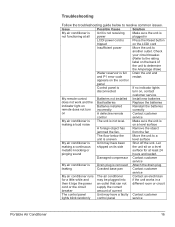
... the power an outlet that can not different room or circuit cord or the circuit supply the correct breaker amount of the unit to determine the Amperage draw) Water reservoir is full Drain the unit and and P1 error code restart appears on the control panel Control panel is If no indicator lights disconnected turn on, contact customer service My remote control Batteries not installed Install new batteries does not work and the Bad batteries Replace the...
... the power an outlet that can not different room or circuit cord or the circuit supply the correct breaker amount of the unit to determine the Amperage draw) Water reservoir is full Drain the unit and and P1 error code restart appears on the control panel Control panel is If no indicator lights disconnected turn on, contact customer service My remote control Batteries not installed Install new batteries does not work and the Bad batteries Replace the...
Owner's Manual
Page 20
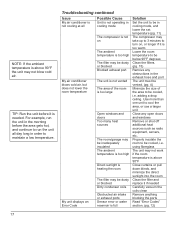
... Direct sunlight is heating the room The filter may be dusty or blocked Dirty condenser coils Obstructed air intake or exhaust ports Sensor error or water reservoir is full Solution Set the unit to cool the area, or use a larger unit Close any open doors and windows Remove or shut off additional heat sources such as radio equipment, servers, etc. using fiberglass The unit may not work if the room temperature is needed Carefully vacuum the coils clean Remove...
... Direct sunlight is heating the room The filter may be dusty or blocked Dirty condenser coils Obstructed air intake or exhaust ports Sensor error or water reservoir is full Solution Set the unit to cool the area, or use a larger unit Close any open doors and windows Remove or shut off additional heat sources such as radio equipment, servers, etc. using fiberglass The unit may not work if the room temperature is needed Carefully vacuum the coils clean Remove...
Owner's Manual
Page 22
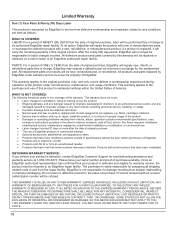
... charges incurred. This warranty does not cover: x Labor charges for warranty service, the product must be returned to an EdgeStar repair facility. x Service trips to deliver, pick-up, or repair, install the product, or to instruct in proper usage of EdgeStar products in the owner's manual, accidents, acts of EdgeStar. x The use of charge. x Products that have been modified to perform outside environmental specifications, uses contrary to instructions provided in commercial settings. NEITHER THE...
... charges incurred. This warranty does not cover: x Labor charges for warranty service, the product must be returned to an EdgeStar repair facility. x Service trips to deliver, pick-up, or repair, install the product, or to instruct in proper usage of EdgeStar products in the owner's manual, accidents, acts of EdgeStar. x The use of charge. x Products that have been modified to perform outside environmental specifications, uses contrary to instructions provided in commercial settings. NEITHER THE...


