
Owner's Manual
Page 1
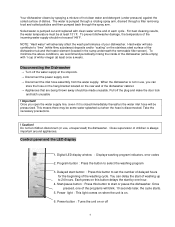
Please read it carefully and save it for reference. PDW45E Countertop Dishwasher Owner's Manual This owner's manual provides instructions on safe installation, use, and maintenance.
Please read it carefully and save it for reference. PDW45E Countertop Dishwasher Owner's Manual This owner's manual provides instructions on safe installation, use, and maintenance.
Owner's Manual
Page 2
.... We are needed for product guides, additional troubleshooting resources and up-to safely transport your warranty. For Your Records: Please write down the model number and serial number below for purchasing this manual as it will work at its peak performance and efficiency. Both numbers are available via email at service@edgestar.com or by telephone at http://www.edgestar.com for service under your product. Model Number: Serial Number: Date...
.... We are needed for product guides, additional troubleshooting resources and up-to safely transport your warranty. For Your Records: Please write down the model number and serial number below for purchasing this manual as it will work at its peak performance and efficiency. Both numbers are available via email at service@edgestar.com or by telephone at http://www.edgestar.com for service under your product. Model Number: Serial Number: Date...

Owner's Manual
Page 3
... display 3. Spray arm 1 11. Table of Contents Page Components 1 Important Safety Instructions 2 Installation Instructions 3 Water Pressure 3 Disconnecting the Dishwasher 4 Control Panel and LED Display 4 Loading Your Dishwasher 5 Preparing Your Dishes for Washing 5 Detergent and Rinse Aid Use 6 Operating Instructions 7 Technical Data and Troubleshooting 8 Limited Warranty 9 Components Front view 1 9 8 Inside view 2 Note that your dishwasher may vary slightly in appearance from this unit. Delayed start button 6. Rinse aid dispenser 13. Drain hose connection 15. Power...
... display 3. Spray arm 1 11. Table of Contents Page Components 1 Important Safety Instructions 2 Installation Instructions 3 Water Pressure 3 Disconnecting the Dishwasher 4 Control Panel and LED Display 4 Loading Your Dishwasher 5 Preparing Your Dishes for Washing 5 Detergent and Rinse Aid Use 6 Operating Instructions 7 Technical Data and Troubleshooting 8 Limited Warranty 9 Components Front view 1 9 8 Inside view 2 Note that your dishwasher may vary slightly in appearance from this unit. Delayed start button 6. Rinse aid dispenser 13. Drain hose connection 15. Power...
Owner's Manual
Page 4
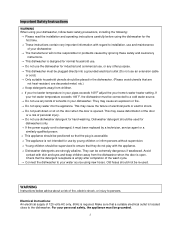
... read the installation and operating instructions carefully before using new hoses. If your hot water temperature exceeds 149˚F, the dishwasher must be plugged directly into the appliance. They may cause deformation of the door or a risk of personal injury. → Do not use dishwasher detergent for industrial and commercial use, or any kinds of the wash cycle. → Connect the dishwasher to your personal safety, the appliance must been replaced by...
... read the installation and operating instructions carefully before using new hoses. If your hot water temperature exceeds 149˚F, the dishwasher must be plugged directly into the appliance. They may cause deformation of the door or a risk of personal injury. → Do not use dishwasher detergent for industrial and commercial use, or any kinds of the wash cycle. → Connect the dishwasher to your personal safety, the appliance must been replaced by...
Owner's Manual
Page 5
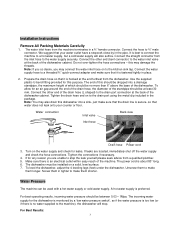
... are located, immediately shut off the water supply and check the hose connections. just make them shorter. Turn on a solid, level surface. 7. Tighten the connections if necessary. 4. A hot water supply is about 83" long. 6. Connect the other end of the drain hose (L shaped) to the water inlet valve at the back of the dishwasher. The end of this purpose. Note: You may damage the threads. Water connection Inlet valve Back view Inlet hose Drain hose Power cord 3. For Best Results: 3 The water inlet hose from the dishwasher. Connect...
... are located, immediately shut off the water supply and check the hose connections. just make them shorter. Turn on a solid, level surface. 7. Tighten the connections if necessary. 4. A hot water supply is about 83" long. 6. Connect the other end of the drain hose (L shaped) to the water inlet valve at the back of the dishwasher. The end of this purpose. Note: You may damage the threads. Water connection Inlet valve Back view Inlet hose Drain hose Power cord 3. For Best Results: 3 The water inlet hose from the dishwasher. Connect...
Owner's Manual
Page 6
... the power supply cord. → Disconnect the inlet hose assembly from the water supply. Control panel and the LED display 1. To prevent dishwasher damage, the temperature of the dishwasher cabinet. → Appliances that are being thrown away should not exceed 149˚F. Digital LED display window : Displays washing program indicators, error codes 2. Once pressed, one hour. 4. Close supervision of each cycle . Soiled water is disconnected. This means there may be pressurized. Delayed start or...
... the power supply cord. → Disconnect the inlet hose assembly from the water supply. Control panel and the LED display 1. To prevent dishwasher damage, the temperature of the dishwasher cabinet. → Appliances that are being thrown away should not exceed 149˚F. Digital LED display window : Displays washing program indicators, error codes 2. Once pressed, one hour. 4. Close supervision of each cycle . Soiled water is disconnected. This means there may be pressurized. Delayed start or...
Owner's Manual
Page 7
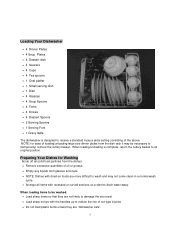
... come clean in a normal wash cycle. → Arrange all items with the handles up to reduce the risk of cut-type injuries → Do not load plastic items unless they are "dishwasher safe". 5 When loading/unloading is designed to receive a standard 4 piece plate setting consisting of loading/unloading large size dinner plates from glasses and cups. → NOTE: Dishes with dried-on a slant to drain water...
... come clean in a normal wash cycle. → Arrange all items with the handles up to reduce the risk of cut-type injuries → Do not load plastic items unless they are "dishwasher safe". 5 When loading/unloading is designed to receive a standard 4 piece plate setting consisting of loading/unloading large size dinner plates from glasses and cups. → NOTE: Dishes with dried-on a slant to drain water...

Owner's Manual
Page 8
... detergent in dishwashers, as they cannot resist hot water. → Do not touch the heating element during or immediately after use That depends if your dishwasher unless all enclosure panels are unsuitable as other types can help prevent unsightly spots on the open door or dish-rack of the dishwasher. Using a Rinse Aid Add the rinse aid into this dispenser. Used regularly, a rinse aid will hold approximately 12g of the door. → Do not load...
... detergent in dishwashers, as they cannot resist hot water. → Do not touch the heating element during or immediately after use That depends if your dishwasher unless all enclosure panels are unsuitable as other types can help prevent unsightly spots on the open door or dish-rack of the dishwasher. Using a Rinse Aid Add the rinse aid into this dispenser. Used regularly, a rinse aid will hold approximately 12g of the door. → Do not load...
Owner's Manual
Page 9
... run or operate for 10 minutes or more. Check to black (off The LED display and the power light will stop if the door is opened accidentally during operation. 11. Then replace the cap. To fill the rinse aid dispenser, unscrew the dispenser cap located on the inner door (or on the back of the machine, above the heating element) is in the right position. 3. Open the water supply. 8. The LED will display the washing code...
... run or operate for 10 minutes or more. Check to black (off The LED display and the power light will stop if the door is opened accidentally during operation. 11. Then replace the cap. To fill the rinse aid dispenser, unscrew the dispenser cap located on the inner door (or on the back of the machine, above the heating element) is in the right position. 3. Open the water supply. 8. The LED will display the washing code...
Owner's Manual
Page 10
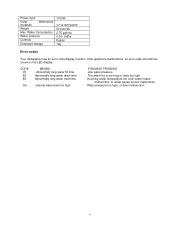
... cool down for about 15 minutes so they are not too hot to the start the new program. 14. Technical Data and Troubleshooting Technical data Power input Outer dimensions (HxWxD) Weight Max. After unloading the dishwasher, remove the filter, clean off any bits of the regular wash cycle. 13. Water Consumption Water pressure Controls Detergent dosage 1160W 17.1"x18.9"x22.5" 50 pounds 2.75 gallons 0.03~1MPa...
... cool down for about 15 minutes so they are not too hot to the start the new program. 14. Technical Data and Troubleshooting Technical data Power input Outer dimensions (HxWxD) Weight Max. After unloading the dishwasher, remove the filter, clean off any bits of the regular wash cycle. 13. Water Consumption Water pressure Controls Detergent dosage 1160W 17.1"x18.9"x22.5" 50 pounds 2.75 gallons 0.03~1MPa...
Owner's Manual
Page 11
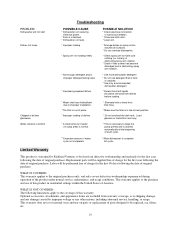
... long water fill time Abnormally long water drain time Abnormally long water heat time Internal water level too high POSSIBLE PROBLEM Low water pressure The drain line is too long or rises too high Incoming water temperature too cold, water heater malfunction, or water heater sensor malfunction Water pressure too high, or drain malfunction 9 If the appliance malfunctions, an error code will often be shown in the LED display. Power input Outer (HxWxD) dimensions Weight Max. Water Consumption Water pressure Controls Detergent...
... long water fill time Abnormally long water drain time Abnormally long water heat time Internal water level too high POSSIBLE PROBLEM Low water pressure The drain line is too long or rises too high Incoming water temperature too cold, water heater malfunction, or water heater sensor malfunction Water pressure too high, or drain malfunction 9 If the appliance malfunctions, an error code will often be shown in the LED display. Power input Outer (HxWxD) dimensions Weight Max. Water Consumption Water pressure Controls Detergent...
Owner's Manual
Page 12
... original purchase. PROBLEM Dishwasher will not start Dishes not clean Chipped or broken glassware Water remains in bottom Troubleshooting POSSIBLE CAUSE * Dishwasher not receiving electrical power. * Door is unlatched. * Dishwasher not level. * Improper loading * Spray arm not rotating freely POSSIBLE SOLUTION * Check electrical connection or fuse/circuit breaker. * Close and latch door. * Level unit. * Arrange dishes so spray action reaches all surfaces. * Do not overload dishwasher. * Check spray arm to keep the pump primed and is drained automatically at the...
... original purchase. PROBLEM Dishwasher will not start Dishes not clean Chipped or broken glassware Water remains in bottom Troubleshooting POSSIBLE CAUSE * Dishwasher not receiving electrical power. * Door is unlatched. * Dishwasher not level. * Improper loading * Spray arm not rotating freely POSSIBLE SOLUTION * Check electrical connection or fuse/circuit breaker. * Close and latch door. * Level unit. * Arrange dishes so spray action reaches all surfaces. * Do not overload dishwasher. * Check spray arm to keep the pump primed and is drained automatically at the...
Owner's Manual
Page 13
... IN CONTRACT, TORT, OR OTHERWISE. THIS WARRANTY GIVES YOU SPECIFIC LEGAL RIGHTS. Damages or operating problems resulting from abuse, operation outside environmental specifications, uses contrary to instructions provided in the owner's manual, accidents, vermin, fire, flood, improper installation, unauthorized service, acts of God, unauthorized installation or modification, or commercial use of the product in basis to Richlund Ventures' authorized repair facility during the first 90 days...
... IN CONTRACT, TORT, OR OTHERWISE. THIS WARRANTY GIVES YOU SPECIFIC LEGAL RIGHTS. Damages or operating problems resulting from abuse, operation outside environmental specifications, uses contrary to instructions provided in the owner's manual, accidents, vermin, fire, flood, improper installation, unauthorized service, acts of God, unauthorized installation or modification, or commercial use of the product in basis to Richlund Ventures' authorized repair facility during the first 90 days...

Owner's Manual
Page 14
Richlund Ventures, Inc. Box 81336 Austin, Texas 78708-1336 Toll Free: 1-866-319-5473
Richlund Ventures, Inc. Box 81336 Austin, Texas 78708-1336 Toll Free: 1-866-319-5473


