
Owner's Manual
Page 1
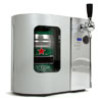
Mini Kegerator TBC50S Owner's Manual For more information on other great EdgeStar products on the web, go to http://www.edgestar.com
Mini Kegerator TBC50S Owner's Manual For more information on other great EdgeStar products on the web, go to http://www.edgestar.com

Owner's Manual
Page 2
..., snow, and/or moisture. This unit is not intended to be used for use extension cords or power strips with this unit. If the power cord is damaged, it must be installed in accordance with state and local electrical codes. Always turn the unit upside down, on its own circuit. The unit must be used by an authorized technician. Keep out of...
..., snow, and/or moisture. This unit is not intended to be used for use extension cords or power strips with this unit. If the power cord is damaged, it must be installed in accordance with state and local electrical codes. Always turn the unit upside down, on its own circuit. The unit must be used by an authorized technician. Keep out of...
Owner's Manual
Page 3
... KIT PART DESCRIPTIONS 6 NON-PRESSURIZED MINI KEG TAPPING INSTRUCTIONS 7 INSTALLING THE BEER LINE AND CONNECTING THE CO2 8 Connecting the CO2 9 REMOVING THE CO2 LINE AND MINI KEG 10 TIPS FOR BEST RESULTS 11 CLEANING AND MAINTENANCE 11 CLEANING THE LINES 11 CLEANING THE MINI KEGERATOR 11 IMPORTANT SAFEGUARDS 12 ADJUSTING THE TEMPERATURE 13 TROUBLESHOOTING 13 SPECIFICATIONS 14 EDGESTAR LIMITED WARRANTY 15 First Time Operating Instructions...
... KIT PART DESCRIPTIONS 6 NON-PRESSURIZED MINI KEG TAPPING INSTRUCTIONS 7 INSTALLING THE BEER LINE AND CONNECTING THE CO2 8 Connecting the CO2 9 REMOVING THE CO2 LINE AND MINI KEG 10 TIPS FOR BEST RESULTS 11 CLEANING AND MAINTENANCE 11 CLEANING THE LINES 11 CLEANING THE MINI KEGERATOR 11 IMPORTANT SAFEGUARDS 12 ADJUSTING THE TEMPERATURE 13 TROUBLESHOOTING 13 SPECIFICATIONS 14 EDGESTAR LIMITED WARRANTY 15 First Time Operating Instructions...

Owner's Manual
Page 4
... kit is also needed to this manual will ensure that relationship. You may also want to staple your product, download product guides, additional troubleshooting resources and up-to-date information. If you need to obtain warranty service. Model Number: Serial Number: Date of this EdgeStar mini kegerator. We will work at 1 (866) 319-5473. 1 For Your Records: Please write down the model number and serial number below for purchasing this product...
... kit is also needed to this manual will ensure that relationship. You may also want to staple your product, download product guides, additional troubleshooting resources and up-to-date information. If you need to obtain warranty service. Model Number: Serial Number: Date of this EdgeStar mini kegerator. We will work at 1 (866) 319-5473. 1 For Your Records: Please write down the model number and serial number below for purchasing this product...

Owner's Manual
Page 5
Three Quarter View Parts Identification See-through window Door Handle Top Dispenser Handle Side Access Door Regulator Window Digital Controls Drip tray assembly Optional Accessory Kit (Model: TBC50-ACC) (Sold separately) Cartridge Stand Regulator CO2 Adapter (Pierces CO2 Cartridge) EdgeStar Mini Kegerator Cleaning Bottle Non-Pressurized Tap Rubber Ring CO2 Releaser CO2 Cartridge Cartridge Holder 2
Three Quarter View Parts Identification See-through window Door Handle Top Dispenser Handle Side Access Door Regulator Window Digital Controls Drip tray assembly Optional Accessory Kit (Model: TBC50-ACC) (Sold separately) Cartridge Stand Regulator CO2 Adapter (Pierces CO2 Cartridge) EdgeStar Mini Kegerator Cleaning Bottle Non-Pressurized Tap Rubber Ring CO2 Releaser CO2 Cartridge Cartridge Holder 2

Owner's Manual
Page 6
...head. Install the dispenser handle by looking at the LED in the underside of the unit, and then plug the other end into your unit is powered up. Plug the power cord into the back of the main unit). With the optional upgrade kit, you clean the lines prior to tapping your mini kegerator.... mini keg. Heineken® brand DraughtKeg™ 5 Liter mini kegs are already pressurized and need no additional CO2 to make sure the unit is the most popular and widely-available 5 Liter mini keg. It will work best in a room temperature environment (70°F), away from your first mini keg...
...head. Install the dispenser handle by looking at the LED in the underside of the unit, and then plug the other end into your unit is powered up. Plug the power cord into the back of the main unit). With the optional upgrade kit, you clean the lines prior to tapping your mini kegerator.... mini keg. Heineken® brand DraughtKeg™ 5 Liter mini kegs are already pressurized and need no additional CO2 to make sure the unit is the most popular and widely-available 5 Liter mini keg. It will work best in a room temperature environment (70°F), away from your first mini keg...

Owner's Manual
Page 7
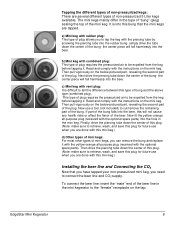
... the mini kegerator door by depressing the button located on the cold plate. If the light is good, then you may begin to ensure that the beer is slightly outside the unit. To put the mini keg on the upper right-hand side of 5-liter mini keg, here are the basic steps for all other brands) 4. this mini kegerator has a cooling plate...
... the mini kegerator door by depressing the button located on the cold plate. If the light is good, then you may begin to ensure that the beer is slightly outside the unit. To put the mini keg on the upper right-hand side of 5-liter mini keg, here are the basic steps for all other brands) 4. this mini kegerator has a cooling plate...
Owner's Manual
Page 8
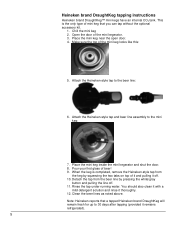
...button and pulling the line off . 10. Clean the beer lines as noted above. Chill the mini keg 2. Attach the Heineken-style tap to the mini keg: 7. Attach the Heineken-style tap and beer line assembly to the beer line: 6. Rinse the tap under running water. Place the mini keg inside the mini kegerator and shut the door... the mini keg looks like this: 5. When the keg is the only type of the mini kegerator. 3. Note: Heineken reports that you can tap without the optional accessory kit. 1. Heineken brand DraughtKeg tapping instructions Heineken brand DraughtKeg™ mini kegs ...
...button and pulling the line off . 10. Clean the beer lines as noted above. Chill the mini keg 2. Attach the Heineken-style tap to the mini keg: 7. Attach the Heineken-style tap and beer line assembly to the beer line: 6. Rinse the tap under running water. Place the mini keg inside the mini kegerator and shut the door... the mini keg looks like this: 5. When the keg is the only type of the mini kegerator. 3. Note: Heineken reports that you can tap without the optional accessory kit. 1. Heineken brand DraughtKeg tapping instructions Heineken brand DraughtKeg™ mini kegs ...

Owner's Manual
Page 9
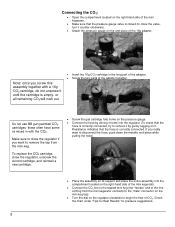
... Cartridges are located at the top. DO NOT over-tighten the CO2 components. EdgeStar Mini Kegerator 6 Beer and CO2 lines are under pressure. Once the mini-keg has been tapped, secure the tap assembly onto the top of the mini-keg using the cleaning bottle that it will...not need to pressurize your TBC50 manual for pressure 6 suggestions. 7 6. Once the adapter is screwed in, do not unscrew until the CO2 cartridge is to lubricate before tapping the mini- Non-pressurized Accessory Kit Part Descriptions The following section describes the parts of CO2. It is ...
... Cartridges are located at the top. DO NOT over-tighten the CO2 components. EdgeStar Mini Kegerator 6 Beer and CO2 lines are under pressure. Once the mini-keg has been tapped, secure the tap assembly onto the top of the mini-keg using the cleaning bottle that it will...not need to pressurize your TBC50 manual for pressure 6 suggestions. 7 6. Once the adapter is screwed in, do not unscrew until the CO2 cartridge is to lubricate before tapping the mini- Non-pressurized Accessory Kit Part Descriptions The following section describes the parts of CO2. It is ...
Owner's Manual
Page 10
... this case, with a little water prior to optional accessory kit (sold separately). though the kegs are shipped with minimal pressure inside to place an order for more information and/or to ensure the freshness of the beer, once they must use the optional accessory kit's non-pressurized mini keg tap, shown following instructions refer to tapping...
... this case, with a little water prior to optional accessory kit (sold separately). though the kegs are shipped with minimal pressure inside to place an order for more information and/or to ensure the freshness of the beer, once they must use the optional accessory kit's non-pressurized mini keg tap, shown following instructions refer to tapping...
Owner's Manual
Page 11
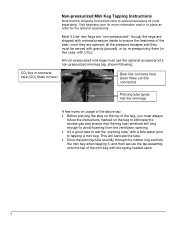
...cut/remove the remaining part of the bung- EdgeStar Mini Kegerator 8 a) Mini keg with this plug for future use when you can remove the bung and replace it . simply drive the tube down the center of the mini keg. Read and comply with the instructions on the below -pictured part, revealing the second part of non-pressurized ...to be expelled from the keg before tapping it with the yellow-orange all -purpose plug (received with this plug for future use a tool (not included) to retrieve, wash, and save this mini keg.) Installing the beer line and Connecting the CO2 Now that the...
...cut/remove the remaining part of the bung- EdgeStar Mini Kegerator 8 a) Mini keg with this plug for future use when you can remove the bung and replace it . simply drive the tube down the center of the mini keg. Read and comply with the instructions on the below -pictured part, revealing the second part of non-pressurized ...to be expelled from the keg before tapping it with the yellow-orange all -purpose plug (received with this plug for future use a tool (not included) to retrieve, wash, and save this mini keg.) Installing the beer line and Connecting the CO2 Now that the...
Owner's Manual
Page 12
..." connector on the mini keg tap) Turn the dial on the regulator clockwise to begin the flow of CO2. To replace the CO2 cartridge, close the valve, turn it counter-clockwise). Attach the pressure gauge on the end piece of the 16g adapter. Do not use BB gun/paintball CO2...place the entire assembly into the regulator (To check that the hose is empty- Connecting the CO2: Open the compartment located on the right-hand side of the mini kegerator. Make sure that the pressure gauge valve is closed (to close the regulator, unscrew the current cartridge, and...
..." connector on the mini keg tap) Turn the dial on the regulator clockwise to begin the flow of CO2. To replace the CO2 cartridge, close the valve, turn it counter-clockwise). Attach the pressure gauge on the end piece of the 16g adapter. Do not use BB gun/paintball CO2...place the entire assembly into the regulator (To check that the hose is empty- Connecting the CO2: Open the compartment located on the right-hand side of the mini kegerator. Make sure that the pressure gauge valve is closed (to close the regulator, unscrew the current cartridge, and...
Owner's Manual
Page 13
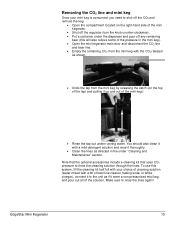
... as directed in the mini keg). Open the mini kegerator main door and disconnect the CO2 line and beer line. Empty the remaining CO2 from the mini keg by releasing the catch (on the right-hand side of the mini kegerator. Shut off the regulator (turn the ...out of the mini keg): Rinse the tap out under "Cleaning and Maintenance" section. Note that the optional accessories include a cleaning kit that uses CO2 pressure to rinse the lines again! EdgeStar Mini Kegerator 10 To use this will also relieve some of the pressure in the under running water.
... as directed in the mini keg). Open the mini kegerator main door and disconnect the CO2 line and beer line. Empty the remaining CO2 from the mini keg by releasing the catch (on the right-hand side of the mini kegerator. Shut off the regulator (turn the ...out of the mini keg): Rinse the tap out under "Cleaning and Maintenance" section. Note that the optional accessories include a cleaning kit that uses CO2 pressure to rinse the lines again! EdgeStar Mini Kegerator 10 To use this will also relieve some of the pressure in the under running water.

Owner's Manual
Page 14
...bottle. 5. Refill the squeeze bottle with water and repeat the above process with a mild detergent solution is suggested. 11 Rinsing the glasses with cold water prior to start the flow of cleaning solution. Here are clear of beer. Mix the mixture thoroughly. 2. Pull the dispenser handle towards you may adjust... - 1 bars Cleaning and Maintenance You should clean the lines after each mini keg, clean the lines. 1. Cleaning the Mini Kegerator For cleaning the other parts of the glass. 6. For best results, use clean glasses. Place a cup or bowl underneath the beer dispenser. 3....
...bottle. 5. Refill the squeeze bottle with water and repeat the above process with a mild detergent solution is suggested. 11 Rinsing the glasses with cold water prior to start the flow of cleaning solution. Here are clear of beer. Mix the mixture thoroughly. 2. Pull the dispenser handle towards you may adjust... - 1 bars Cleaning and Maintenance You should clean the lines after each mini keg, clean the lines. 1. Cleaning the Mini Kegerator For cleaning the other parts of the glass. 6. For best results, use clean glasses. Place a cup or bowl underneath the beer dispenser. 3....

Owner's Manual
Page 15
... to repair, adjust this appliance prior to use, and after every keg. Should it is full. The power supply cord must be grounded. Never pull the power supply cord directly to mid 70°s Fahrenheit). Do not move the unit while it not operate correctly, contact customer support. This appliance is damaged. Keep them away from heat, in room temperature...
... to repair, adjust this appliance prior to use, and after every keg. Should it is full. The power supply cord must be grounded. Never pull the power supply cord directly to mid 70°s Fahrenheit). Do not move the unit while it not operate correctly, contact customer support. This appliance is damaged. Keep them away from heat, in room temperature...

Owner's Manual
Page 16
... the problem persists, check the Troubleshooting Guide below. Solution Ensure the power outlet has power by 1 degree increments. While using the optional accessory kit, CO2 is pinching the rubber hose. Possible cause There is tripped. Hose not properly installed. Press the button on . Issue The mini kegerator does not turn on the control panel to a heat source. A house fuse has blown or Replace the broken fuse in to...
... the problem persists, check the Troubleshooting Guide below. Solution Ensure the power outlet has power by 1 degree increments. While using the optional accessory kit, CO2 is pinching the rubber hose. Possible cause There is tripped. Hose not properly installed. Press the button on . Issue The mini kegerator does not turn on the control panel to a heat source. A house fuse has blown or Replace the broken fuse in to...

Owner's Manual
Page 17
Specifications are subject to change. Check the rating label on the mini kegerator for reference only. EdgeStar Mini Kegerator 14 Specifications Description of product Model Mini Kegerator & 5L Draft Beer Dispenser TBC50S Voltage/Frequency AC 115V~60Hz Amperage 0.63 Amps Input Power 70 Watts Color Storage Capacity Metallic Silver with Chrome Accents One 5-liter Mini-keg Temperature Range 38-54ºF Dimensions (Height x Width x Depth ) Weight 14...
Specifications are subject to change. Check the rating label on the mini kegerator for reference only. EdgeStar Mini Kegerator 14 Specifications Description of product Model Mini Kegerator & 5L Draft Beer Dispenser TBC50S Voltage/Frequency AC 115V~60Hz Amperage 0.63 Amps Input Power 70 Watts Color Storage Capacity Metallic Silver with Chrome Accents One 5-liter Mini-keg Temperature Range 38-54ºF Dimensions (Height x Width x Depth ) Weight 14...
Owner's Manual
Page 18
..., EdgeStar will supply new, rebuilt, or refurbished parts free of parts designed to be replaced, e.g. This warranty does not cover: Labor charges for installation, setup or training to use the product. Shipping damage, and any damage caused by improper packaging for damage resulting from the date of original purchase, EdgeStar will repair the product with new or remanufactured parts, or exchange the defective product with serial numbers...
..., EdgeStar will supply new, rebuilt, or refurbished parts free of parts designed to be replaced, e.g. This warranty does not cover: Labor charges for installation, setup or training to use the product. Shipping damage, and any damage caused by improper packaging for damage resulting from the date of original purchase, EdgeStar will repair the product with new or remanufactured parts, or exchange the defective product with serial numbers...

Owner's Manual
Page 19
All rights reserved. EdgeStar Products Box 81336 Austin, TX 78708-1336 Toll Free: 1-866-319-5473 Web: http://www.edgestar.com E-mail: service@edgestar.com Register your product, download owner's manuals, access additional troubleshooting resources, and obtain more information on other great EdgeStar products on the web at: http://www.edgestar.com Product contents and specifications may change without notice. Copyright © 2010 Living Direct, Inc.
All rights reserved. EdgeStar Products Box 81336 Austin, TX 78708-1336 Toll Free: 1-866-319-5473 Web: http://www.edgestar.com E-mail: service@edgestar.com Register your product, download owner's manuals, access additional troubleshooting resources, and obtain more information on other great EdgeStar products on the web at: http://www.edgestar.com Product contents and specifications may change without notice. Copyright © 2010 Living Direct, Inc.


