

Owner's Manual
Page 1
Thermoelectric Wine Cooler TWR160S Owner's Manual For more information on other great Koldfront by EdgeStar products on the web, go to http://www.edgestar.com
Thermoelectric Wine Cooler TWR160S Owner's Manual For more information on other great Koldfront by EdgeStar products on the web, go to http://www.edgestar.com
Owner's Manual
Page 2
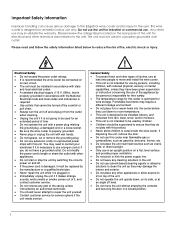
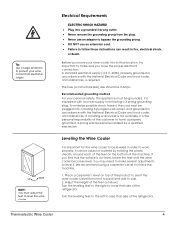
... use extension cords or unprotected power strips with a power plug missing the ground plug, a damaged cord or a loose socket. Be sure the wine cooler is not going to be used in a closed position. The unit must be installed in accordance with state and local electrical codes. A standard electrical supply (115 V, 60Hz), that is properly grounded in accordance with the National Electrical Code and local codes...
... use extension cords or unprotected power strips with a power plug missing the ground plug, a damaged cord or a loose socket. Be sure the wine cooler is not going to be used in a closed position. The unit must be installed in accordance with state and local electrical codes. A standard electrical supply (115 V, 60Hz), that is properly grounded in accordance with the National Electrical Code and local codes...
Owner's Manual
Page 3
...(WITHOUT DOOR 2 INSTALLING THE WINE COOLER 3 UNPACKING THE WINE COOLER 3 TYPE OF INSTALLATION 3 Free-standing installation 3 INSTALLATION CLEARANCE REQUIREMENTS 3 ELECTRICAL REQUIREMENTS 4 Recommended grounding method 4 LEVELING THE WINE COOLER 4 OPERATION...5 INSTALLATION CHECK LIST BEFORE OPERATION 5 ADJUSTING THE TEMPERATURE 5 NORMAL SOUNDS 6 DEFROSTING ...6 PREPARING THE WINE COOLER FOR STORAGE 6 CLEANING AND MAINTENANCE 7 EXTERIOR CLEANING 7 INTERIOR CLEANING 7 WATER PAN AND CONDENSATION 7 MAINTENANCE...8 TROUBLESHOOTING 9 SPECIFICATIONS 10 EDGESTAR LIMITED WARRANTY 11...
...(WITHOUT DOOR 2 INSTALLING THE WINE COOLER 3 UNPACKING THE WINE COOLER 3 TYPE OF INSTALLATION 3 Free-standing installation 3 INSTALLATION CLEARANCE REQUIREMENTS 3 ELECTRICAL REQUIREMENTS 4 Recommended grounding method 4 LEVELING THE WINE COOLER 4 OPERATION...5 INSTALLATION CHECK LIST BEFORE OPERATION 5 ADJUSTING THE TEMPERATURE 5 NORMAL SOUNDS 6 DEFROSTING ...6 PREPARING THE WINE COOLER FOR STORAGE 6 CLEANING AND MAINTENANCE 7 EXTERIOR CLEANING 7 INTERIOR CLEANING 7 WATER PAN AND CONDENSATION 7 MAINTENANCE...8 TROUBLESHOOTING 9 SPECIFICATIONS 10 EDGESTAR LIMITED WARRANTY 11...
Owner's Manual
Page 4
... and efficiency. This manual contains important information regarding the proper installation, use and maintain your wine cooler. For Your Records: Please write down the model number and serial number below for purchasing this manual as it is the proof of your unit and are located on the ratings label on the web at http://www.edgestar.com to register your product, download product guides, additional troubleshooting resources and up...
... and efficiency. This manual contains important information regarding the proper installation, use and maintain your wine cooler. For Your Records: Please write down the model number and serial number below for purchasing this manual as it is the proof of your unit and are located on the ratings label on the web at http://www.edgestar.com to register your product, download product guides, additional troubleshooting resources and up...

Owner's Manual
Page 5
Cabinet 5- Door 7- Thermoelectric Wine Cooler 9 10 2 Air Vent (vents are located on each side and in rear of unit) 2- Upper Hinge 6- Control Box (Light Switch and Temperature Dial) 10- Exterior View 1 2 3 4 Parts Identification 5 6 PART KEY 1- Interior Fan 9- Interior Light 8- Leveling Foot Interior View- (Without Door) 7 TIP: Gather the model and serial number from the product 8 label and write them down before loading the wine cooler. Chrome Shelves 3- Handle 4-
Cabinet 5- Door 7- Thermoelectric Wine Cooler 9 10 2 Air Vent (vents are located on each side and in rear of unit) 2- Upper Hinge 6- Control Box (Light Switch and Temperature Dial) 10- Exterior View 1 2 3 4 Parts Identification 5 6 PART KEY 1- Interior Fan 9- Interior Light 8- Leveling Foot Interior View- (Without Door) 7 TIP: Gather the model and serial number from the product 8 label and write them down before loading the wine cooler. Chrome Shelves 3- Handle 4-
Owner's Manual
Page 6
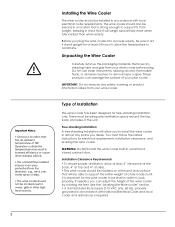
... a power supply, be placed in a location that it stand upright for the wine cooler to be installed in accordance with National Electrical Code and local codes and ordinances is strong enough to acclimate. Unpacking the Wine Cooler Carefully remove the packaging materials. Free-standing installation: A free-standing installation will be able to support the entire weight of 78F. Installing the Wine Cooler The wine cooler should be level in order to work...
... a power supply, be placed in a location that it stand upright for the wine cooler to be installed in accordance with National Electrical Code and local codes and ordinances is strong enough to acclimate. Unpacking the Wine Cooler Carefully remove the packaging materials. Free-standing installation: A free-standing installation will be able to support the entire weight of 78F. Installing the Wine Cooler The wine cooler should be level in order to work...
Owner's Manual
Page 7
... with a power supply cord having a 3-prong grounding plug. If you have a properly grounded, 3-prong wall receptacle installed by rotating the plastic sheaths around each of the feet on the bottom of the machine. Tip: Use a surge protector to protect your wine cooler into its final location, it is the personal responsibility of the product to see if the wine cooler is...
... with a power supply cord having a 3-prong grounding plug. If you have a properly grounded, 3-prong wall receptacle installed by rotating the plastic sheaths around each of the feet on the bottom of the machine. Tip: Use a surge protector to protect your wine cooler into its final location, it is the personal responsibility of the product to see if the wine cooler is...
Owner's Manual
Page 8
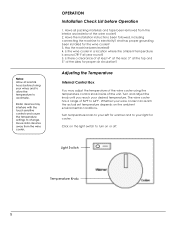
... on or off. OPERATION Installation Check List before storing your right for cooler. Move radio devices away from the interior and exterior of 52°F to electricity? Adjusting the Temperature Internal Control Box You may interfere with the touch sensitive controls and cause the temperature settings to change. Click on the light switch to acclimate. Whether your desired temperature. Turn temperature knob to your left for the wine cooler? 3.
... on or off. OPERATION Installation Check List before storing your right for cooler. Move radio devices away from the interior and exterior of 52°F to electricity? Adjusting the Temperature Internal Control Box You may interfere with the touch sensitive controls and cause the temperature settings to change. Click on the light switch to acclimate. Whether your desired temperature. Turn temperature knob to your left for the wine cooler? 3.
Owner's Manual
Page 9
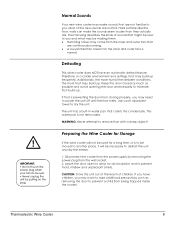
... dry the unit. Disconnect the cooler from the power supply by pulling on the plug. Most of children. Preparing the Wine Cooler for Storage If the wine cooler will be used for air circulation and to allow for a long time, or is not removable. Leave the door open to prevent mold, mildew and unpleasant smells. If frost is normal. The water pan is...
... dry the unit. Disconnect the cooler from the power supply by pulling on the plug. Most of children. Preparing the Wine Cooler for Storage If the wine cooler will be used for air circulation and to allow for a long time, or is not removable. Leave the door open to prevent mold, mildew and unpleasant smells. If frost is normal. The water pan is...
Owner's Manual
Page 10
... the unit. 7 Wait until the unit defrosts. 4. Never use solvent based or abrasive cleaners. Water Pan and Condensation Occasionally, the water pan may be cleaned with clean water. Do not use an abrasive or caustic cleaning agent. Wipe with a mild detergent and warm water solution. Interior Cleaning The wine cooler interior should be getting full, the do the following: 1. Reconnect power to...
... the unit. 7 Wait until the unit defrosts. 4. Never use solvent based or abrasive cleaners. Water Pan and Condensation Occasionally, the water pan may be cleaned with clean water. Do not use an abrasive or caustic cleaning agent. Wipe with a mild detergent and warm water solution. Interior Cleaning The wine cooler interior should be getting full, the do the following: 1. Reconnect power to...

Owner's Manual
Page 11
... to the unit. 2. Reinstall the rear cover. 5. Thermoelectric Wine Cooler 8 Disconnect power to gently clean the fan including the cooling fins and the circuit board as pictured below: (Rear of unit with cover removed) Circuit Board Fan with Cooling Fins 4. Reconnect power to always run your unit through a surge protector. NOTE: It is important to clean the internal components located to lengthen the life of your wine cooler. Maintenance It...
... to the unit. 2. Reinstall the rear cover. 5. Thermoelectric Wine Cooler 8 Disconnect power to gently clean the fan including the cooling fins and the circuit board as pictured below: (Rear of unit with cover removed) Circuit Board Fan with Cooling Fins 4. Reconnect power to always run your unit through a surge protector. NOTE: It is important to clean the internal components located to lengthen the life of your wine cooler. Maintenance It...

Owner's Manual
Page 12
... or reset the breaker. If the problem persists, check the Troubleshooting Guide below. Symptoms The wine cooler turns on and off frequently, or does not maintain the temperature. The unit is dirty. The door gasket is not grounded properly. The shelves are normal. There is properly installed. Plug the unit in your local electrician to be solved or explained. Make sure the door gasket is a power...
... or reset the breaker. If the problem persists, check the Troubleshooting Guide below. Symptoms The wine cooler turns on and off frequently, or does not maintain the temperature. The unit is dirty. The door gasket is not grounded properly. The shelves are normal. There is properly installed. Plug the unit in your local electrician to be solved or explained. Make sure the door gasket is a power...
Owner's Manual
Page 13
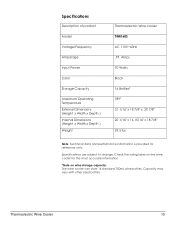
Specifications are subject to change. Capacity may vary with other sized bottles. Thermoelectric Wine Cooler 10 Check the rating label on the wine cooler for reference only. Specifications Description of product Model Voltage/Frequency Amperage Input Power Color Storage Capacity Maximum Operating Temperature External Dimensions (Height x Width x Depth ) Internal Dimensions (Height x Width x Depth ) Weight Thermoelectric Wine cooler TWR160S AC 115V~60Hz .95 Amps 70 Watts Black 16 Bottles* 78ºF 21 1/16" x 18 7/8" x 20...
Specifications are subject to change. Capacity may vary with other sized bottles. Thermoelectric Wine Cooler 10 Check the rating label on the wine cooler for reference only. Specifications Description of product Model Voltage/Frequency Amperage Input Power Color Storage Capacity Maximum Operating Temperature External Dimensions (Height x Width x Depth ) Internal Dimensions (Height x Width x Depth ) Weight Thermoelectric Wine cooler TWR160S AC 115V~60Hz .95 Amps 70 Watts Black 16 Bottles* 78ºF 21 1/16" x 18 7/8" x 20...
Owner's Manual
Page 14
... by EdgeStar to be free from defective workmanship and materials, subject to and from the repair facility. All products and parts replaced by this warranty. filters, cartridges, batteries. Service trips to deliver, pick-up, or repair, install the product, or to instruct in proper usage of the product. Damages or operating problems resulting from misuse, abuse, operation outside environmental specifications, uses contrary to instructions provided in the owner's manual, accidents...
... by EdgeStar to be free from defective workmanship and materials, subject to and from the repair facility. All products and parts replaced by this warranty. filters, cartridges, batteries. Service trips to deliver, pick-up, or repair, install the product, or to instruct in proper usage of the product. Damages or operating problems resulting from misuse, abuse, operation outside environmental specifications, uses contrary to instructions provided in the owner's manual, accidents...

Owner's Manual
Page 15
Copyright © 2014 Living Direct, Inc. By EdgeStar Products 500 N. Capital of TX Hwy, Bldg 5 Austin, TX 78746-3448 Toll Free: 1-866-319-5473 Web: http://www.edgestar.com E-mail: service@edgestar.com Register your product, download owner's manuals, access additional troubleshooting resources, and obtain more information on other great EdgeStar & Koldfront products on the web at: http://www.edgestar.com Product contents and specifications may change without notice.
Copyright © 2014 Living Direct, Inc. By EdgeStar Products 500 N. Capital of TX Hwy, Bldg 5 Austin, TX 78746-3448 Toll Free: 1-866-319-5473 Web: http://www.edgestar.com E-mail: service@edgestar.com Register your product, download owner's manuals, access additional troubleshooting resources, and obtain more information on other great EdgeStar & Koldfront products on the web at: http://www.edgestar.com Product contents and specifications may change without notice.


