
Owner's Manual
Page 1
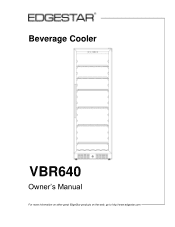
Beverage Cooler VBR640 Owner's Manual For more information on other great EdgeStar products on the web, go to http://www.edgestar.com
Beverage Cooler VBR640 Owner's Manual For more information on other great EdgeStar products on the web, go to http://www.edgestar.com
Owner's Manual
Page 2
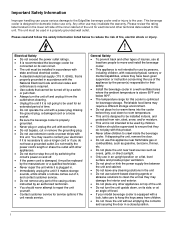
... protected from the outlet when cleaning. Unplug the unit if it , and contact customer service. Do not remove any other appliances. Do not start or stop the unit by switching the circuit's power on its own circuit. The unit must be installed in accordance with state and local electrical codes. A standard electrical supply (115 V, 60Hz), that is...
... protected from the outlet when cleaning. Unplug the unit if it , and contact customer service. Do not remove any other appliances. Do not start or stop the unit by switching the circuit's power on its own circuit. The unit must be installed in accordance with state and local electrical codes. A standard electrical supply (115 V, 60Hz), that is...

Owner's Manual
Page 3
...; Contact the EdgeStar Customer Service Department for anyone other than an Authorized Service Person to carry out servicing or repairs to this appliance. Take serious care when handling, moving and using the appliance to avoid either damaging the refrigerant tubing, or increasing the risk of a leak. Replacing component parts and servicing must be taken during transportation and set up . SAVE THESE INSTRUCTIONS - Care must be done...
...; Contact the EdgeStar Customer Service Department for anyone other than an Authorized Service Person to carry out servicing or repairs to this appliance. Take serious care when handling, moving and using the appliance to avoid either damaging the refrigerant tubing, or increasing the risk of a leak. Replacing component parts and servicing must be taken during transportation and set up . SAVE THESE INSTRUCTIONS - Care must be done...

Owner's Manual
Page 4
... installation 3 Built-in installation 3 ELECTRICAL REQUIREMENTS 5 Recommended grounding method 5 LEVELING THE BEVERAGE COOLER 5 INSTALLING AND REMOVING THE SHELVES 6 INSTALLING THE HANDLE 7 OPERATION...8 INSTALLATION CHECKLIST BEFORE OPERATION 8 USING THE TEMPERATURE CONTROL PANEL 8 NORMAL SOUNDS 10 DEFROSTING ...10 PREPARING THE BEVERAGE COOLER FOR STORAGE 10 CLEANING AND MAINTENANCE 11 EXTERIOR CLEANING 11 INTERIOR CLEANING 11 TROUBLESHOOTING 11 TROUBLESHOOTING CONTINUED 12 TROUBLESHOOTING CONTINUED 13 SPECIFICATIONS 14 First Time Operating Instructions Before use, make...
... installation 3 Built-in installation 3 ELECTRICAL REQUIREMENTS 5 Recommended grounding method 5 LEVELING THE BEVERAGE COOLER 5 INSTALLING AND REMOVING THE SHELVES 6 INSTALLING THE HANDLE 7 OPERATION...8 INSTALLATION CHECKLIST BEFORE OPERATION 8 USING THE TEMPERATURE CONTROL PANEL 8 NORMAL SOUNDS 10 DEFROSTING ...10 PREPARING THE BEVERAGE COOLER FOR STORAGE 10 CLEANING AND MAINTENANCE 11 EXTERIOR CLEANING 11 INTERIOR CLEANING 11 TROUBLESHOOTING 11 TROUBLESHOOTING CONTINUED 12 TROUBLESHOOTING CONTINUED 13 SPECIFICATIONS 14 First Time Operating Instructions Before use, make...

Owner's Manual
Page 5
... warranty. Both numbers are located on the rating label on the web at its peak performance and efficiency. We are needed for purchasing this manual as it will help you received a damaged product, immediately contact the retailer or dealer that your beverage cooler. Following this manual will work at http://www.edgestar.com to register your product, download product guides, additional troubleshooting...
... warranty. Both numbers are located on the rating label on the web at its peak performance and efficiency. We are needed for purchasing this manual as it will help you received a damaged product, immediately contact the retailer or dealer that your beverage cooler. Following this manual will work at http://www.edgestar.com to register your product, download product guides, additional troubleshooting...

Owner's Manual
Page 6
Front View Parts Identification Tip: Gather the model and serial number from the product label and write them down before installing the beverage cooler. EdgeStar Beverage Cooler 2
Front View Parts Identification Tip: Gather the model and serial number from the product label and write them down before installing the beverage cooler. EdgeStar Beverage Cooler 2
Owner's Manual
Page 7
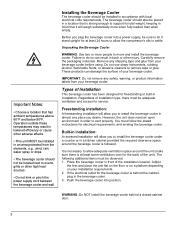
... following additional items must follow the stated instructions for at least some ventilation room for the beverage cooler is behind a closed cabinet door. 3 Types of the installation location. Push the beverage cooler into a power supply, be located next to install the beverage cooler in front of Installation This beverage cooler has been designed for service. Remove any safety, warning, or product information...
... following additional items must follow the stated instructions for at least some ventilation room for the beverage cooler is behind a closed cabinet door. 3 Types of the installation location. Push the beverage cooler into a power supply, be located next to install the beverage cooler in front of Installation This beverage cooler has been designed for service. Remove any safety, warning, or product information...

Owner's Manual
Page 8
... unit to work properly. If needed, you can adjust the height of unit Side View Door Hinge • The beverage cooler should allow at least 2/5" clearance at the back, 1/5" at top and 1/5" at sides. See the "Leveling the Beverage Cooler" section. • A standard electrical supply (115 VAC only, 60 Hz), properly grounded in accordance with National Electrical Code and local codes and ordinances...
... unit to work properly. If needed, you can adjust the height of unit Side View Door Hinge • The beverage cooler should allow at least 2/5" clearance at the back, 1/5" at top and 1/5" at sides. See the "Leveling the Beverage Cooler" section. • A standard electrical supply (115 VAC only, 60 Hz), properly grounded in accordance with National Electrical Code and local codes and ordinances...
Owner's Manual
Page 9
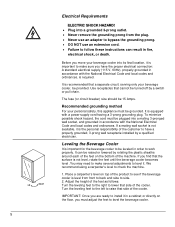
... around each of the feet on top of the customer to have the proper electrical connection: A standard electrical supply (115 V, 60Hz), properly grounded in accordance with the National Electrical Code and local codes and ordinances, is level from the plug. Never use an adapter to bypass the grounding prong. DO NOT use an extension cord. Failure to work properly. It can result...
... around each of the feet on top of the customer to have the proper electrical connection: A standard electrical supply (115 V, 60Hz), properly grounded in accordance with the National Electrical Code and local codes and ordinances, is level from the plug. Never use an adapter to bypass the grounding prong. DO NOT use an extension cord. Failure to work properly. It can result...
Owner's Manual
Page 10
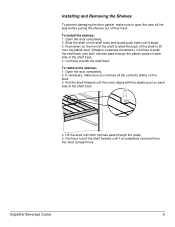
Installing and Removing the Shelves To prevent damaging the door gasket, make sure you remove all the way before pulling the shelves out of the shelf track. 4. Open the door completely. 2. Pull the shelf forward until it is completely removed from the inner compartment. Lift the shelf until both notches pass through the posts. 5. Continue to open the door all the contents sitting on each side of...
Installing and Removing the Shelves To prevent damaging the door gasket, make sure you remove all the way before pulling the shelves out of the shelf track. 4. Open the door completely. 2. Pull the shelf forward until it is completely removed from the inner compartment. Lift the shelf until both notches pass through the posts. 5. Continue to open the door all the contents sitting on each side of...
Owner's Manual
Page 11
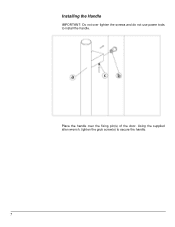
Installing the Handle IMPORTANT: Do not over the fixing pin(s) of the door. Using the supplied allen wrench, tighten the grub screw(s) to install the handle. Place the handle over tighten the screws and do not use power tools to secure the handle. 7
Installing the Handle IMPORTANT: Do not over the fixing pin(s) of the door. Using the supplied allen wrench, tighten the grub screw(s) to install the handle. Place the handle over tighten the screws and do not use power tools to secure the handle. 7
Owner's Manual
Page 12
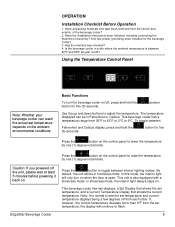
...;F all packing materials and tape been removed from each other. By default, the unit will continue to electricity? OPERATION Installation Checklist Before Operation 1. EdgeStar Beverage Cooler Press the button to see the set temperature depends on the control panel to adjust the temperature. In showcase mode, the interior light always stays on when the door is between interior lighting modes. If, however, the current temperature deviates more than 9°F from 36...
...;F all packing materials and tape been removed from each other. By default, the unit will continue to electricity? OPERATION Installation Checklist Before Operation 1. EdgeStar Beverage Cooler Press the button to see the set temperature depends on the control panel to adjust the temperature. In showcase mode, the interior light always stays on when the door is between interior lighting modes. If, however, the current temperature deviates more than 9°F from 36...
Owner's Manual
Page 13
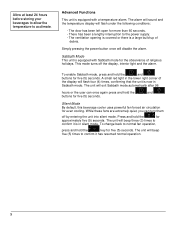
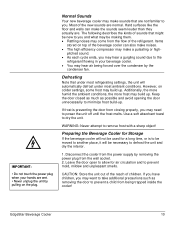
... hold the key for five (5) seconds. The door has been left open for even cooling. This mode turns off by entering the unit into silent mode. The unit will exit Sabbath mode automatically after 96 hours or the user can turn them off the display, interior light and the alarm. Sabbath Mode This unit is equipped with a temperature alarm. Allow at least 24 hours before storing your...
... hold the key for five (5) seconds. The door has been left open for even cooling. This mode turns off by entering the unit into silent mode. The unit will exit Sabbath mode automatically after 96 hours or the user can turn them off the display, interior light and the alarm. Sabbath Mode This unit is equipped with a temperature alarm. Allow at least 24 hours before storing your...
Owner's Manual
Page 14
... hear air being trapped inside the cooler! If frost is to be moved to another place, it will be making them. Rattling noises may come from closing properly, you may need to allow for a long time, or is preventing the door from the flow of sounds that under most refrigerating settings, the unit will not be used for air...
... hear air being trapped inside the cooler! If frost is to be moved to another place, it will be making them. Rattling noises may come from closing properly, you may need to allow for a long time, or is preventing the door from the flow of sounds that under most refrigerating settings, the unit will not be used for air...

Owner's Manual
Page 15
... lukewarm water solution such as 2 tablespoons of the unit. 5. Open the door and remove the contents and shelves. 3. Reinsert the shelves and beverages. 6. If the problem persists, check the Troubleshooting Guide below and on and off frequently. Solutions Run the cooler at the appropriate ambient temperature. Minimize the number of this manual first. Make sure the door is opened often. Requirements" section. 11 Exterior Cleaning The door and...
... lukewarm water solution such as 2 tablespoons of the unit. 5. Open the door and remove the contents and shelves. 3. Reinsert the shelves and beverages. 6. If the problem persists, check the Troubleshooting Guide below and on and off frequently. Solutions Run the cooler at the appropriate ambient temperature. Minimize the number of this manual first. Make sure the door is opened often. Requirements" section. 11 Exterior Cleaning The door and...

Owner's Manual
Page 16
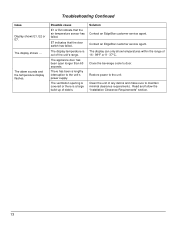
... close to test your fuse box or reset the the circuit breaker is forming in contact with another appliance. Though the unit uses an "auto-defrost" system, under certain conditions, manual defrosting may be required. The door gasket is not installed correctly. Make sure the door gasket is not level. The door is electrified. properly. Make sure the cooler is on a warmer temperature setting, minimizing the number of...
... close to test your fuse box or reset the the circuit breaker is forming in contact with another appliance. Though the unit uses an "auto-defrost" system, under certain conditions, manual defrosting may be required. The door gasket is not installed correctly. Make sure the door gasket is not level. The door is electrified. properly. Make sure the cooler is on a warmer temperature setting, minimizing the number of...
Owner's Manual
Page 17
... EdgeStar customer service agent. Clean the unit of 16 - 99°F or 9 - 37°C. Possible cause E1 or E2 indicate that the door switch has failed. Read and follow the "Installation Clearance Requirements" section. 13 The display temperature is a large build-up of the unit's range. Close the beverage cooler's door. Restore power to the unit's power supply. The alarm sounds and the temperature display flashes. The ventilation opening...
... EdgeStar customer service agent. Clean the unit of 16 - 99°F or 9 - 37°C. Possible cause E1 or E2 indicate that the door switch has failed. Read and follow the "Installation Clearance Requirements" section. 13 The display temperature is a large build-up of the unit's range. Close the beverage cooler's door. Restore power to the unit's power supply. The alarm sounds and the temperature display flashes. The ventilation opening...

Owner's Manual
Page 18
Stainless Steel Door R600a, 1.66 oz. 36 - 43ºF 69 5/8" x 23 1/2" x 24 1/4" 151 pounds Note: Technical data and performance information is provided for the most accurate information. EdgeStar Beverage Cooler 14 Check the rating label on the beverage cooler for reference only. Specifications are subject to change. Specifications Description of product Model Voltage/Frequency Amperage Input Power Color Refrigerant Temperature Range Dimensions (Height x Width x Depth ) Weight Beverage Cooler VBR640 AC 115V~60Hz 1.7A 180W White Cabinet;
Stainless Steel Door R600a, 1.66 oz. 36 - 43ºF 69 5/8" x 23 1/2" x 24 1/4" 151 pounds Note: Technical data and performance information is provided for the most accurate information. EdgeStar Beverage Cooler 14 Check the rating label on the beverage cooler for reference only. Specifications are subject to change. Specifications Description of product Model Voltage/Frequency Amperage Input Power Color Refrigerant Temperature Range Dimensions (Height x Width x Depth ) Weight Beverage Cooler VBR640 AC 115V~60Hz 1.7A 180W White Cabinet;

Owner's Manual
Page 19
... part free of charge, including labor, that have your model number, serial number and proof of this warranty. EdgeStar is subject to instruct in proper usage of the product. -Damages or operating problems resulting from misuse, abuse, operation outside of purchase. Labor will supply new, rebuilt or refurbished parts free of America. This warranty applies to the purchase and use . -Labor, service transportation and shipping charges for the removal and replacement...
... part free of charge, including labor, that have your model number, serial number and proof of this warranty. EdgeStar is subject to instruct in proper usage of the product. -Damages or operating problems resulting from misuse, abuse, operation outside of purchase. Labor will supply new, rebuilt or refurbished parts free of America. This warranty applies to the purchase and use . -Labor, service transportation and shipping charges for the removal and replacement...

Owner's Manual
Page 20
Capital of TX Hwy, Bldg 5 Austin, TX 78746 Toll Free: 1-866-319-5473 Web: http://www.edgestar.com E-mail: service@edgestar.com Register your product, download owner's manuals, access additional troubleshooting resources, and obtain more information on other great EdgeStar products on the web at: http://www.edgestar.com Product contents and specifications may change without notice. Copyright © 2014 Living Direct, Inc. All rights reserved. EdgeStar Products 500 N.
Capital of TX Hwy, Bldg 5 Austin, TX 78746 Toll Free: 1-866-319-5473 Web: http://www.edgestar.com E-mail: service@edgestar.com Register your product, download owner's manuals, access additional troubleshooting resources, and obtain more information on other great EdgeStar products on the web at: http://www.edgestar.com Product contents and specifications may change without notice. Copyright © 2014 Living Direct, Inc. All rights reserved. EdgeStar Products 500 N.


