
Quick Install Guide
Page 6
Please refer to "Universal Repeater" mode. 5 In the pop up window, enter the following is an example of the access point. This will open the access point's web management interface, which allows you to configure the functions and settings of how to set the access point to the user manual for more information about configuration; the following username and password: Username: admin Password: 1234 Click "Log In". 11. 10. Open your internet browser and enter http://192.168.2.1 in the address box.
Please refer to "Universal Repeater" mode. 5 In the pop up window, enter the following is an example of the access point. This will open the access point's web management interface, which allows you to configure the functions and settings of how to set the access point to the user manual for more information about configuration; the following username and password: Username: admin Password: 1234 Click "Log In". 11. 10. Open your internet browser and enter http://192.168.2.1 in the address box.
Quick Install Guide
Page 8
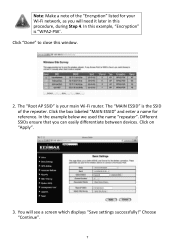
Note: Make a note of the repeater. In this window. 2. The "MAIN ESSID" is the SSID of the "Encryption" listed for reference. Choose "Continue". 7 You will need it later in this procedure, during Step 4. Click ...
Note: Make a note of the repeater. In this window. 2. The "MAIN ESSID" is the SSID of the "Encryption" listed for reference. Choose "Continue". 7 You will need it later in this procedure, during Step 4. Click ...
Manual
Page 3
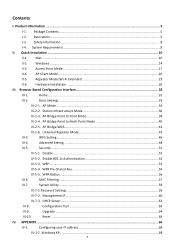
... Setting ...48 III-5. Enable 802.1x Authentication 52 III-5-3. MAC Filtering ...57 III-7. System Utility ...59 III-7-1.Password Settings ...59 III-7-2. Windows XP ...68 3 Package Contents...5 I -3. AP Bridge-WDS...41 III-2-6. WEP...53 III-5-4. WPA Radius ...56 III-6. Configuring your IP...-4. AP Mode ...34 III-2-2. WPA Pre-Shared Key 55 III-5-5. Configuration Tool...63 III-9. Contents I. Mac ...10 II-2. Windows ...14 II-3. Browser Based Configuration Interface 28 III-1. Reset ...65 IV. Upgrade ...64 III-10. Home...31 III-2. AP...
... Setting ...48 III-5. Enable 802.1x Authentication 52 III-5-3. MAC Filtering ...57 III-7. System Utility ...59 III-7-1.Password Settings ...59 III-7-2. Windows XP ...68 3 Package Contents...5 I -3. AP Bridge-WDS...41 III-2-6. WEP...53 III-5-4. WPA Radius ...56 III-6. Configuring your IP...-4. AP Mode ...34 III-2-2. WPA Pre-Shared Key 55 III-5-5. Configuration Tool...63 III-9. Contents I. Mac ...10 II-2. Windows ...14 II-3. Browser Based Configuration Interface 28 III-1. Reset ...65 IV. Upgrade ...64 III-10. Home...31 III-2. AP...

Manual
Page 4
How to Find your Network Security Key 78 IV-2-1. Mac ...80 IV-3. Windows Vista ...70 IV-1-3. Windows 7 & Windows Vista 78 IV-2-2. Glossary ...85 IV-5. Windows 7 ...71 IV-1-4. Troubleshooting ...83 IV-4. IV-1-2. Technical Support...88 4 Mac OS ...75 IV-2.
How to Find your Network Security Key 78 IV-2-1. Mac ...80 IV-3. Windows Vista ...70 IV-1-3. Windows 7 & Windows Vista 78 IV-2-2. Glossary ...85 IV-5. Windows 7 ...71 IV-1-4. Troubleshooting ...83 IV-4. IV-1-2. Technical Support...88 4 Mac OS ...75 IV-2.
Manual
Page 14
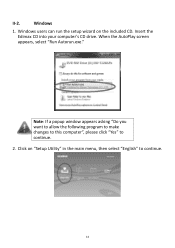
Windows users can run the setup wizard on "Setup Utility" in the main menu, then select "English" to continue. 2. Note: If a popup window appears asking "Do you want to allow the following program to make changes to this computer", please click "Yes" to continue. 14 Windows 1. Click on the included CD. Insert the Edimax CD into your computer's CD drive. When the AutoPlay screen appears, select "Run Autorun.exe." II-2.
Windows users can run the setup wizard on "Setup Utility" in the main menu, then select "English" to continue. 2. Note: If a popup window appears asking "Do you want to allow the following program to make changes to this computer", please click "Yes" to continue. 14 Windows 1. Click on the included CD. Insert the Edimax CD into your computer's CD drive. When the AutoPlay screen appears, select "Run Autorun.exe." II-2.

Manual
Page 29
You will see the browser based configuration interface home screen. 29 Windows: Mac: From here, you will then be prompted to enter the device's username and password. The default username is admin and the default password is 1234.
You will see the browser based configuration interface home screen. 29 Windows: Mac: From here, you will then be prompted to enter the device's username and password. The default username is admin and the default password is 1234.

Manual
Page 31
..., and the access point's IP and MAC address. 31 Security - System Utility - Home - WPS Setting - Home The Home page displays 10 categories in the main window. Basic Settings - III-4. III-5. III-8. Configuration Tool - Upgrade - III-10.
..., and the access point's IP and MAC address. 31 Security - System Utility - Home - WPS Setting - Home The Home page displays 10 categories in the main window. Basic Settings - III-4. III-5. III-8. Configuration Tool - Upgrade - III-10.

Manual
Page 36
... be able to allow or deny access points using the 36 If you to make further changes in the popup window to keep the information up-to-date. III-2-2. Clients new window will appear: Click "CONTINUE" to save changes. The device will restart itself. This gives these devices the capability to connect...
... be able to allow or deny access points using the 36 If you to make further changes in the popup window to keep the information up-to-date. III-2-2. Clients new window will appear: Click "CONTINUE" to save changes. The device will restart itself. This gives these devices the capability to connect...

Manual
Page 39
... to this device. The channel number must be same as the other wireless access point you 'll be able to connect to this device. A popup window with security options will appear: 39 By selecting different band settings, you wish to connect to. The following message will appear. Band Please select the...
... to this device. The channel number must be same as the other wireless access point you 'll be able to connect to this device. A popup window with security options will appear: 39 By selecting different band settings, you wish to connect to. The following message will appear. Band Please select the...

Manual
Page 41
Channel Number MAC address 1-4 Set Security 2.4GHz (G), only access points using the 802.11b and 802.11g bands will restart itself. Click this device. A popup window with security options will be able to connect to . III-2-5. If you select 2.4GHz (B+G), then only access points using the wireless band you wish to ...
Channel Number MAC address 1-4 Set Security 2.4GHz (G), only access points using the 802.11b and 802.11g bands will restart itself. Click this device. A popup window with security options will be able to connect to . III-2-5. If you select 2.4GHz (B+G), then only access points using the wireless band you wish to ...

Manual
Page 43
... device acts as the other wireless access points you to make further changes in the popup window to keep the information up to restart the device and implement any changes. The device will appear. A popup window with security options will restart itself. Click "APPLY" to 32 alphanumerical characters. The channel number must... this wireless link. You can input up -to-date. Please note that the ESSID is case sensitive. Click the "Show Active Clients" button and a new window will appear: Click "CONTINUE" to . This allows you wish to connect to save changes. III-2-6.
... device acts as the other wireless access points you to make further changes in the popup window to keep the information up to restart the device and implement any changes. The device will appear. A popup window with security options will restart itself. Click "APPLY" to 32 alphanumerical characters. The channel number must... this wireless link. You can input up -to-date. Please note that the ESSID is case sensitive. Click the "Show Active Clients" button and a new window will appear: Click "CONTINUE" to . This allows you wish to connect to save changes. III-2-6.
Manual
Page 45
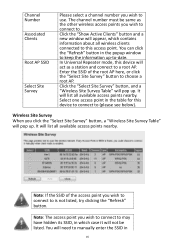
...other wireless access points you wish to connect to (please see below). You will pop up. You can click the "Refresh" button in the popup window to is not listed, try clicking the "Refresh" button. Wireless Site Survey When you wish to connect to keep the information up . Note: ...this device to connect to . The channel number must be listed. Select one access point in 45 Click the "Show Active Clients" button and a new window will appear, which case it will list all available access points nearby. Click the "Select Site Survey" button, and a "Wireless Site Survey Table" ...
...other wireless access points you wish to connect to (please see below). You will pop up. You can click the "Refresh" button in the popup window to is not listed, try clicking the "Refresh" button. Wireless Site Survey When you wish to connect to keep the information up . Note: ...this device to connect to . The channel number must be listed. Select one access point in 45 Click the "Show Active Clients" button and a new window will appear, which case it will list all available access points nearby. Click the "Select Site Survey" button, and a "Wireless Site Survey Table" ...
Manual
Page 63
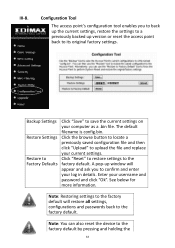
... settings to a previously backed up version or reset the access point back to its original factory settings. III-8. See below for more information. A pop-up window will restore all settings, configurations and passwords back to the factory default by pressing and holding the 63 Note: You can also reset the device...
... settings to a previously backed up version or reset the access point back to its original factory settings. III-8. See below for more information. A pop-up window will restore all settings, configurations and passwords back to the factory default by pressing and holding the 63 Note: You can also reset the device...
Manual
Page 64
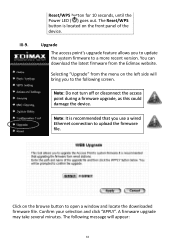
... The access point's upgrade feature allows you to update the system firmware to the following message will bring you use a wired Ethernet connection to open a window and locate the downloaded firmware file. Confirm your selection and click "APPLY". The Reset/WPS button is recommended that you to a more recent version. Selecting...
... The access point's upgrade feature allows you to update the system firmware to the following message will bring you use a wired Ethernet connection to open a window and locate the downloaded firmware file. Confirm your selection and click "APPLY". The Reset/WPS button is recommended that you to a more recent version. Selecting...

Manual
Page 66
Please click "Apply" to abort. You will ask you to reset. Windows: Mac: Click "OK" to continue, or "Cancel" to reset the device. Note: Do not turn off the Access point during the reset process. 66 A pop up window will see a warning that it may take a while for the access point to confirm, as shown below.
Please click "Apply" to abort. You will ask you to reset. Windows: Mac: Click "OK" to continue, or "Cancel" to reset the device. Note: Do not turn off the Access point during the reset process. 66 A pop up window will see a warning that it may take a while for the access point to confirm, as shown below.

Manual
Page 67
When the timer reaches zero and the reset is complete, please click "OK". You will count down from 30 seconds. Windows: Mac: Please click "OK" to the "Reset" page of the browser based configuration interface. 67 You will see the following screen while the system resets, the timer will return to start the reset process.
When the timer reaches zero and the reset is complete, please click "OK". You will count down from 30 seconds. Windows: Mac: Please click "OK" to the "Reset" page of the browser based configuration interface. 67 You will see the following screen while the system resets, the timer will return to start the reset process.

Manual
Page 68
...click "Control Panel". IV-1-1. After you access the browser based configuration interface, you wish to 192.168.2.10. APPENDIX IV-1. please follow the appropriate guide: - Windows Vista - So if it isn't already, then you may not be 192.168.2.x where x is a number in the same IP address subnet of your computer.... Double-click the "Network and Internet Connections" icon, followed by "Network Connections" and then double-click "Local Area Connection". The "Local Area Connection Status" window will not have to access the browser based configuration interface. IV...
...click "Control Panel". IV-1-1. After you access the browser based configuration interface, you wish to 192.168.2.10. APPENDIX IV-1. please follow the appropriate guide: - Windows Vista - So if it isn't already, then you may not be 192.168.2.x where x is a number in the same IP address subnet of your computer.... Double-click the "Network and Internet Connections" icon, followed by "Network Connections" and then double-click "Local Area Connection". The "Local Area Connection Status" window will not have to access the browser based configuration interface. IV...

Manual
Page 70
Windows Vista 1. Click "View Network Status and Tasks" and then click "Manage Network Connections". Select "Use the following IP address", and input the following values: IP address: 192.168.2.10 Subnet Mask: 255.255.255.0 Click 'OK' when finished. 70 Right-click "Local Area Network", and select "Properties". IV-1-2. Click the "Start" button, located in the lower-left corner of your computer, and then click "Control Panel". The "Local Area Connection Properties" window will appear, select "Internet Protocol Version 4 (TCP / IPv4)", and click "Properties". 2.
Windows Vista 1. Click "View Network Status and Tasks" and then click "Manage Network Connections". Select "Use the following IP address", and input the following values: IP address: 192.168.2.10 Subnet Mask: 255.255.255.0 Click 'OK' when finished. 70 Right-click "Local Area Network", and select "Properties". IV-1-2. Click the "Start" button, located in the lower-left corner of your computer, and then click "Control Panel". The "Local Area Connection Properties" window will appear, select "Internet Protocol Version 4 (TCP / IPv4)", and click "Properties". 2.

Manual
Page 71
Click the "Start" button, located in the lower-left corner of your computer, and then click "Control Panel". 71 Windows 7 1. IV-1-3.
Click the "Start" button, located in the lower-left corner of your computer, and then click "Control Panel". 71 Windows 7 1. IV-1-3.

Manual
Page 78
How to find your network security key, please follow the instructions appropriate for your network security key. IV-2-1. Windows 7 & Windows Vista 1. Click on "Network and Internet" in the left menu. 78 Note: If you are using Windows XP or earlier, please contact your ISP or router manufacturer to Find your Network Security Key To find your operating system. IV-2. Click on "Manage wireless networks" in the top menu. 2. Open "Control Panel" and click on "View network status and tasks" which is under the heading "Network and Sharing Center". 3.
How to find your network security key, please follow the instructions appropriate for your network security key. IV-2-1. Windows 7 & Windows Vista 1. Click on "Network and Internet" in the left menu. 78 Note: If you are using Windows XP or earlier, please contact your ISP or router manufacturer to Find your Network Security Key To find your operating system. IV-2. Click on "Manage wireless networks" in the top menu. 2. Open "Control Panel" and click on "View network status and tasks" which is under the heading "Network and Sharing Center". 3.