
Installation Guide
Page 2
... ...16 V-1. Disabling Network Adapters 21 V-1. VII-3-2. Driver Installation ...5 Driver Uninstallation...8 Windows XP/Vista/7 ...8 Windows 8/8.1...8 IV. Driver Uninstallation...15 V. Driver Installation ...16 V-1. Windows 8/8.1...23 VI-5. VII-4. Windows ...26 Mac: Connect to a Wi-Fi network 27 Mac: Wireless Utility...29 Link Status ...29 Profiles ...30 Available Network...32 WPS ...33 Information ...36 WPS Setup...36 Package Contents ...1 I -3. System Requirements...2 I -1. Driver Installation ...9 IV-2. Windows XP ...21 VI-2. Using The Adapter 26 VII...
... ...16 V-1. Disabling Network Adapters 21 V-1. VII-3-2. Driver Installation ...5 Driver Uninstallation...8 Windows XP/Vista/7 ...8 Windows 8/8.1...8 IV. Driver Uninstallation...15 V. Driver Installation ...16 V-1. Windows 8/8.1...23 VI-5. VII-4. Windows ...26 Mac: Connect to a Wi-Fi network 27 Mac: Wireless Utility...29 Link Status ...29 Profiles ...30 Available Network...32 WPS ...33 Information ...36 WPS Setup...36 Package Contents ...1 I -3. System Requirements...2 I -1. Driver Installation ...9 IV-2. Windows XP ...21 VI-2. Using The Adapter 26 VII...

Installation Guide
Page 5
.... Do not place the wireless apater in accordance with the wireless adapter, please contact your dealer of children. 4. Windows XP/Vista/7/8/8.1, Mac OS X 10.4 - 10.9, Linux - The wireless adapter is an electrical device and as a kitchen or bathroom. 3. The wireless adapter contains small parts that are no user-serviceable parts inside the wireless adapter. The wireless adapter is designed for any reason, stop using it becomes wet for indoor...
.... Do not place the wireless apater in accordance with the wireless adapter, please contact your dealer of children. 4. Windows XP/Vista/7/8/8.1, Mac OS X 10.4 - 10.9, Linux - The wireless adapter is an electrical device and as a kitchen or bathroom. 3. The wireless adapter contains small parts that are no user-serviceable parts inside the wireless adapter. The wireless adapter is designed for any reason, stop using it becomes wet for indoor...
Installation Guide
Page 6
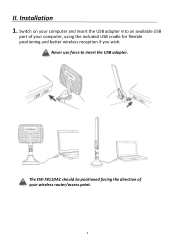
The EW-7811DAC should be positioned facing the direction of your wireless router/access point. 3 II. Never use force to insert the USB adapter. Switch on your computer and insert the USB adapter into an available USB port of your computer, using the included USB cradle for flexible positioning and better wireless reception if you wish. Installation 1.
The EW-7811DAC should be positioned facing the direction of your wireless router/access point. 3 II. Never use force to insert the USB adapter. Switch on your computer and insert the USB adapter into an available USB port of your computer, using the included USB cradle for flexible positioning and better wireless reception if you wish. Installation 1.
Installation Guide
Page 7
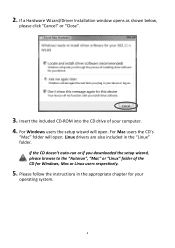
...'s "Mac" folder will open . 2. For Windows users the setup wizard will open . If a Hardware Wizard/Driver Installation window opens as shown below, please click "Cancel" or "Close". 3. Linux drivers are also included in the appropriate chapter for Windows, Mac or Linux users respectively. 5. If the CD doesn't auto-run or if you downloaded the setup wizard, please browse to the "Autorun", "Mac" or "Linux" folder of your operating system. 4 Please follow the instructions...
...'s "Mac" folder will open . 2. For Windows users the setup wizard will open . If a Hardware Wizard/Driver Installation window opens as shown below, please click "Cancel" or "Close". 3. Linux drivers are also included in the appropriate chapter for Windows, Mac or Linux users respectively. 5. If the CD doesn't auto-run or if you downloaded the setup wizard, please browse to the "Autorun", "Mac" or "Linux" folder of your operating system. 4 Please follow the instructions...

Installation Guide
Page 8
Driver Installation If the CD didn't auto-run, please open the "AutoRun" folder and execute "Autorun.exe" file to install the drivers for your EW-7811UAC/DAC. 5 III. Click "Install Driver" to start the setup wizard. 1. Click the EW-7811UAC or EW-7811DAC wireless USB adapter to continue. 2. Windows III-1.
Driver Installation If the CD didn't auto-run, please open the "AutoRun" folder and execute "Autorun.exe" file to install the drivers for your EW-7811UAC/DAC. 5 III. Click "Install Driver" to start the setup wizard. 1. Click the EW-7811UAC or EW-7811DAC wireless USB adapter to continue. 2. Windows III-1.

Installation Guide
Page 10
5. Disabling Network Adapters. Using The Adapter. 7 After you restart your computer, your EW-7811UAC/DAC will be installed and fully functional. For guidance on doing so, please refer to continue. 6. Click "Finish" to VII. Then, Windows users can use the wireless adapter, you will be asked to choose whether you wish to restart your computer. Please disable any other wireless adapters as usual. When the installation is complete you need to an available Wi-Fi network as described in VI. Before you can connect to restart your computer now or later.
5. Disabling Network Adapters. Using The Adapter. 7 After you restart your computer, your EW-7811UAC/DAC will be installed and fully functional. For guidance on doing so, please refer to continue. 6. Click "Finish" to VII. Then, Windows users can use the wireless adapter, you will be asked to choose whether you wish to restart your computer. Please disable any other wireless adapters as usual. When the installation is complete you need to an available Wi-Fi network as described in VI. Before you can connect to restart your computer now or later.

Installation Guide
Page 12
... the Apple logo in "System Preferences Network". Open the "Wlan_11ac_USB_MacOS10..." You can click "Print" or "Save" to continue. 9 Driver Installation Ensure you need to open the driver installation wizard. 2. Click "Continue" to proceed to "About This Mac". 1. Mac OS IV-1. To check your version of Mac OS X (10.4 - 10.9) and double click the "Installer.pkg" file to enable the wireless adapter in the top left corner of...
... the Apple logo in "System Preferences Network". Open the "Wlan_11ac_USB_MacOS10..." You can click "Print" or "Save" to continue. 9 Driver Installation Ensure you need to open the driver installation wizard. 2. Click "Continue" to proceed to "About This Mac". 1. Mac OS IV-1. To check your version of Mac OS X (10.4 - 10.9) and double click the "Installer.pkg" file to enable the wireless adapter in the top left corner of...

Installation Guide
Page 17
12. Go to a Wi-Fi network using the included utility software. Then Mac users can open , you need to your computer (after your Mac. 13. Using The Adapter. 14 Driver Installation Step 3. When the adapter is connected to activate the adapter in "System Preferences Network" as described in the bottom right corner of the "Network" panel. 14. If the utility doesn't open it from the "Applications" menu in IV-1. However if...
12. Go to a Wi-Fi network using the included utility software. Then Mac users can open , you need to your computer (after your Mac. 13. Using The Adapter. 14 Driver Installation Step 3. When the adapter is connected to activate the adapter in "System Preferences Network" as described in the bottom right corner of the "Network" panel. 14. If the utility doesn't open it from the "Applications" menu in IV-1. However if...
Installation Guide
Page 19
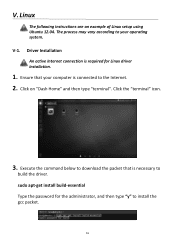
... packet. 16 Click the "terminal" icon. 3. Linux The following instructions are an example of Linux setup using Ubuntu 12.04. Execute the command below to download the packet that your operating system. sudo apt-get install build-essential Type the password for Linux driver installation. 1. V-1. Driver Installation An active Internet connection is connected to the Internet. 2. V. The process may vary according to your computer is...
... packet. 16 Click the "terminal" icon. 3. Linux The following instructions are an example of Linux setup using Ubuntu 12.04. Execute the command below to download the packet that your operating system. sudo apt-get install build-essential Type the password for Linux driver installation. 1. V-1. Driver Installation An active Internet connection is connected to the Internet. 2. V. The process may vary according to your computer is...
Installation Guide
Page 20
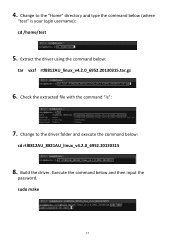
Build the driver. sudo make 17 Check the extracted file with the command "Is": 7. Change to the "Home" directory and type the command below : tar vxzf rtl8812AU_linux_v4.2.0_6952.20130315.tar.gz 6. Execute the command below : cd rtl8812AU_8821AU_linux_v4.2.0_6952.20130315 8. 4. Change to the driver folder and execute the command below and then input the password. Extract the driver using the command below (where "test" is your login username): cd /home/test 5.
Build the driver. sudo make 17 Check the extracted file with the command "Is": 7. Change to the "Home" directory and type the command below : tar vxzf rtl8812AU_linux_v4.2.0_6952.20130315.tar.gz 6. Execute the command below : cd rtl8812AU_8821AU_linux_v4.2.0_6952.20130315 8. 4. Change to the driver folder and execute the command below and then input the password. Extract the driver using the command below (where "test" is your login username): cd /home/test 5.

Installation Guide
Page 24
Disabling Network Adapters To ensure that your USB wireless adapter can function correctly, it is recommended that you can refer to do so, you disable any other existing wireless network adapters installed on your wireless adapter and then select "Disable". Windows Vista Go to Start > Control Panel > Network Connections. If you are unsure how to the user manual for your computer, or follow the guidance below. Click View network status and tasks > View Status and click Disable. 21 Right click your computer. Windows XP Go to Start > Control Panel. V-1. VI. VI-2.
Disabling Network Adapters To ensure that your USB wireless adapter can function correctly, it is recommended that you can refer to do so, you disable any other existing wireless network adapters installed on your wireless adapter and then select "Disable". Windows Vista Go to Start > Control Panel > Network Connections. If you are unsure how to the user manual for your computer, or follow the guidance below. Click View network status and tasks > View Status and click Disable. 21 Right click your computer. Windows XP Go to Start > Control Panel. V-1. VI. VI-2.

Installation Guide
Page 29
...-Fi network and then click "Connect". Mac users need to connect to enter it. 26 Using The Adapter After you have installed the driver and if necessary disabled other versions of Windows. 1. VII-1. Search for the SSID of how to a network". 2. If you will then be prompted to a Wi-Fi network using the included utility software, as usual (see VI. Windows Below is an example of your network, you set a password for other wireless adapters (see...
...-Fi network and then click "Connect". Mac users need to connect to enter it. 26 Using The Adapter After you have installed the driver and if necessary disabled other versions of Windows. 1. VII-1. Search for the SSID of how to a network". 2. If you will then be prompted to a Wi-Fi network using the included utility software, as usual (see VI. Windows Below is an example of your network, you set a password for other wireless adapters (see...

Installation Guide
Page 32
Link Status The "Link Status" page displays information about the current wireless connection. Turn Radio OFF Switch off the adapter's wireless radio. 29 Navigate the wireless utility using the menu across the top of the window. VII-3-1. VII-3. Mac: Wireless Utility The wireless utility offers features to monitor and configure your connection.
Link Status The "Link Status" page displays information about the current wireless connection. Turn Radio OFF Switch off the adapter's wireless radio. 29 Navigate the wireless utility using the menu across the top of the window. VII-3-1. VII-3. Mac: Wireless Utility The wireless utility offers features to monitor and configure your connection.
Installation Guide
Page 33
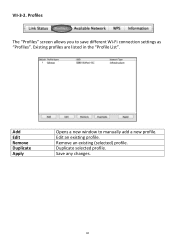
Existing profiles are listed in the "Profile List". Remove an existing (selected) profile. Save any changes. 30 Duplicate selected profile. VII-3-2. Edit an existing profile. Profiles The "Profiles" screen allows you to manually add a new profile. Add Edit Remove Duplicate Apply Opens a new window to save different Wi-Fi connection settings as "Profiles".
Existing profiles are listed in the "Profile List". Remove an existing (selected) profile. Save any changes. 30 Duplicate selected profile. VII-3-2. Edit an existing profile. Profiles The "Profiles" screen allows you to manually add a new profile. Add Edit Remove Duplicate Apply Opens a new window to save different Wi-Fi connection settings as "Profiles".
Installation Guide
Page 34
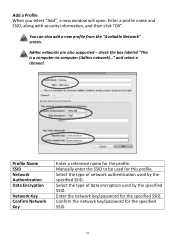
... Name SSID Network Authentication Data Encryption Network Key Confirm Network Key Enter a reference name for the specified SSID. Select the type of network authentication used by the specified SSID. AdHoc networks are also supported - Enter the network key/password for the profile. Manually enter the SSID to -computer (AdHoc network)..." check the box labeled "This is a computer-to be used by the specified SSID. Select the type of data encryption used for the specified SSID. 31 Add a Profile When you select "Add", a new window will open...
... Name SSID Network Authentication Data Encryption Network Key Confirm Network Key Enter a reference name for the specified SSID. Select the type of network authentication used by the specified SSID. AdHoc networks are also supported - Enter the network key/password for the profile. Manually enter the SSID to -computer (AdHoc network)..." check the box labeled "This is a computer-to be used by the specified SSID. Select the type of data encryption used for the specified SSID. 31 Add a Profile When you select "Add", a new window will open...

Installation Guide
Page 36
... about Wireless Protected Setup (WPS), including a list of a PIN code between WPS compatible devices. Instructions to set up PBC WPS and PIN code WPS are included below, followed by a description of WPS which can also be activated from a device's web user interface, and includes the use of available WPS access points. WPS Wi-Fi Protected Setup is activated in WPS button, which has the same effect as physically pushing the WPS button (known as PBC or "push button configuration"). When WPS is...
... about Wireless Protected Setup (WPS), including a list of a PIN code between WPS compatible devices. Instructions to set up PBC WPS and PIN code WPS are included below, followed by a description of WPS which can also be activated from a device's web user interface, and includes the use of available WPS access points. WPS Wi-Fi Protected Setup is activated in WPS button, which has the same effect as physically pushing the WPS button (known as PBC or "push button configuration"). When WPS is...
Installation Guide
Page 37
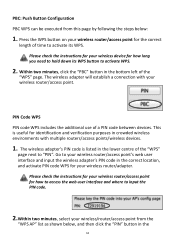
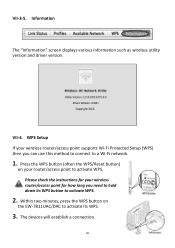
... Please check the instructions for your wireless router/access point for how to access the web user interface and where to input the PIN code. 2.Within two minutes, select your wireless device for your wireless router/adapter. The wireless adapter will establish a connection with multiple routers/access points/wireless devices. 1. PBC: Push Button Configuration PBC WPS can be executed from the "WPS AP" list as shown below : 1. PIN Code WPS PIN code WPS includes the additional use of the "WPS" page. Press the WPS button on your wireless router/access point. Go to activate...
... Please check the instructions for your wireless router/access point for how to access the web user interface and where to input the PIN code. 2.Within two minutes, select your wireless device for your wireless router/adapter. The wireless adapter will establish a connection with multiple routers/access points/wireless devices. 1. PBC: Push Button Configuration PBC WPS can be executed from the "WPS AP" list as shown below : 1. PIN Code WPS PIN code WPS includes the additional use of the "WPS" page. Press the WPS button on your wireless router/access point. Go to activate...
Installation Guide
Page 39
... WPS button to activate WPS. Please check the instructions for your wireless router/access point for how long you can use this method to connect to hold down its WPS. 3. Information The "Information" screen displays various information such as wireless utility version and driver version. VII-3-5. WPS Setup If your router/access point to activate WPS. 2. VII-4. Within two minutes, press the WPS button on your wireless router/access point supports Wi-Fi Protected Setup (WPS) then you need to a Wi-Fi network...
... WPS button to activate WPS. Please check the instructions for your wireless router/access point for how long you can use this method to connect to hold down its WPS. 3. Information The "Information" screen displays various information such as wireless utility version and driver version. VII-3-5. WPS Setup If your router/access point to activate WPS. 2. VII-4. Within two minutes, press the WPS button on your wireless router/access point supports Wi-Fi Protected Setup (WPS) then you need to a Wi-Fi network...
Installation Guide
Page 41
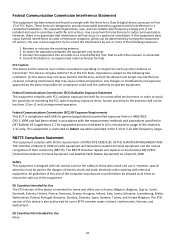
... SAR for help. Safety This equipment is restricted to 5.25 GHz frequency range. These limits are designed to the dangers of this device is subject to the following measures: 1. Operation is intended for Use The ETSI version of electric shock and static electricity when working with the utmost care for compliance could void the authority to radio communications...
... SAR for help. Safety This equipment is restricted to 5.25 GHz frequency range. These limits are designed to the dangers of this device is subject to the following measures: 1. Operation is intended for Use The ETSI version of electric shock and static electricity when working with the utmost care for compliance could void the authority to radio communications...

Installation Guide
Page 43
... our sole responsibility, that the equipment described below complies with the requirements of Signature: December 31st, 2013 Signature: Printed Name: Title: Albert Chang Director Edimax Technology Co., Ltd. 40 EN 301 489-17 V2.2.1 (2012-09); Am 1:2009; ETSI EN 301 893 V1.6.1 (2011-11) ...+A11:2009+A1:2010+A12:2011 Edimax Technology Co., Ltd. No. 3, Wu Chuan 3rd Road, Wu-Ku Industrial Park, New Taipei City, Taiwan Date of the European R&TTE directives. Equipment: AC600 Wi-Fi Dual-Band High Gain USB Adapter Model No.: EW-7811UAC/EW-7811DAC The following European standards for essential ...
... our sole responsibility, that the equipment described below complies with the requirements of Signature: December 31st, 2013 Signature: Printed Name: Title: Albert Chang Director Edimax Technology Co., Ltd. 40 EN 301 489-17 V2.2.1 (2012-09); Am 1:2009; ETSI EN 301 893 V1.6.1 (2011-11) ...+A11:2009+A1:2010+A12:2011 Edimax Technology Co., Ltd. No. 3, Wu Chuan 3rd Road, Wu-Ku Industrial Park, New Taipei City, Taiwan Date of the European R&TTE directives. Equipment: AC600 Wi-Fi Dual-Band High Gain USB Adapter Model No.: EW-7811UAC/EW-7811DAC The following European standards for essential ...


