User Manual
Page 2
... Code and LGPL Code licenses. Any software described in any form or by third parties, software code is . Copyright @ Edimax Technology Co., Ltd. The product you have purchased and the setup screen may be reproduced, transmitted, transcribed, stored in a retrieval system, or translated into any language or computer language, in this...
... Code and LGPL Code licenses. Any software described in any form or by third parties, software code is . Copyright @ Edimax Technology Co., Ltd. The product you have purchased and the setup screen may be reproduced, transmitted, transcribed, stored in a retrieval system, or translated into any language or computer language, in this...

User Manual
Page 3
.... Basic ...28 IV-1-1. Video Settings ...43 IV-2-2. Motion Detection...47 IV-3-2. Hardware Installation 9 II-1. III-1-2. EdiView Finder Network Camera Setup 11 Windows ...11 Mac ...17 Using EdiView Finder ...20 WPS (Wi-Fi Protected Setup 22 IV. Network ...28 IV-1-2. Computer ...34 IV-1-2-3. Bonjour ...42 IV-2. Night Vision...46 IV-3. Product Label ...7 I -1. Mounting...
.... Basic ...28 IV-1-1. Video Settings ...43 IV-2-2. Motion Detection...47 IV-3-2. Hardware Installation 9 II-1. III-1-2. EdiView Finder Network Camera Setup 11 Windows ...11 Mac ...17 Using EdiView Finder ...20 WPS (Wi-Fi Protected Setup 22 IV. Network ...28 IV-1-2. Computer ...34 IV-1-2-3. Bonjour ...42 IV-2. Night Vision...46 IV-3. Product Label ...7 I -1. Mounting...

User Manual
Page 9
... cable to connect the network camera's LAN port to a tripod using the mounting hole on the rear of the camera. II-2. Mounting Kit A stand for setup. 1. Secure the network camera to a wall: 2. II. The camera stand can also mount the network camera to a router/switch/access point's LAN port, as shown...
... cable to connect the network camera's LAN port to a tripod using the mounting hole on the rear of the camera. II-2. Mounting Kit A stand for setup. 1. Secure the network camera to a wall: 2. II. The camera stand can also mount the network camera to a router/switch/access point's LAN port, as shown...

User Manual
Page 10
Please refer to power on . Wait a moment for the camera to III. 2. Connect the power adapter to the network camera's power port and to setup your network camera. 10 The camera is ready when the green power LED displays on . Camera Setup & EdiView Finder to a power supply, as shown below. 3.
Please refer to power on . Wait a moment for the camera to III. 2. Connect the power adapter to the network camera's power port and to setup your network camera. 10 The camera is ready when the green power LED displays on . Camera Setup & EdiView Finder to a power supply, as shown below. 3.

User Manual
Page 11
..., you can view the camera's live stream and further configure the camera if you need (see VII). EdiView Finder Network Camera Setup Ensure your computer is connected to the same router as an alternative method to connect your network camera to your wireless network. Windows 1. Click... "Setup Utility" to install the EdiView Finder software utility. 11 Click "Next" and follow the instructions below for Windows or Mac in III-1....
..., you can view the camera's live stream and further configure the camera if you need (see VII). EdiView Finder Network Camera Setup Ensure your computer is connected to the same router as an alternative method to connect your network camera to your wireless network. Windows 1. Click... "Setup Utility" to install the EdiView Finder software utility. 11 Click "Next" and follow the instructions below for Windows or Mac in III-1....
User Manual
Page 13
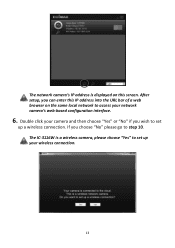
The network camera's IP address is a wireless camera, please choose "Yes" to set up your network camera's web-based configuration interface. 6. Double click your camera and then choose "Yes" or "No" if you wish to set up a wireless connection. The IC-3116W is displayed on the same local network to step 10. If you can enter this IP address into the URL bar of a web browser on this screen. After setup, you choose "No" please go to access your wireless connection. 13
The network camera's IP address is a wireless camera, please choose "Yes" to set up your network camera's web-based configuration interface. 6. Double click your camera and then choose "Yes" or "No" if you wish to set up a wireless connection. The IC-3116W is displayed on the same local network to step 10. If you can enter this IP address into the URL bar of a web browser on this screen. After setup, you choose "No" please go to access your wireless connection. 13

User Manual
Page 16
Click "OK" and a preview window showing a live stream from your camera may open. 16 The camera is complete. The next screen will indicate that setup is operational and ready for use. 11.
Click "OK" and a preview window showing a live stream from your camera may open. 16 The camera is complete. The next screen will indicate that setup is operational and ready for use. 11.
User Manual
Page 18
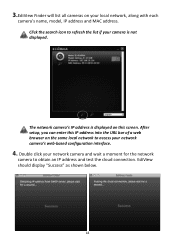
... MAC address. Double click your network camera and wait a moment for the network camera to obtain an IP address and test the cloud connection. After setup, you can enter this screen. EdiView should display "Success" as shown below. 18 3.EdiView Finder will list all cameras on the same local network to...
... MAC address. Double click your network camera and wait a moment for the network camera to obtain an IP address and test the cloud connection. After setup, you can enter this screen. EdiView should display "Success" as shown below. 18 3.EdiView Finder will list all cameras on the same local network to...

User Manual
Page 19
The camera is complete. Click "Next" to your camera. The password will indicate that setup is operational and ready to be used later to log in to continue. 13. The next screen will be configured for your camera remotely via its cloud ID, web interface or via the EdiView smartphone app. To setup your camera may open. 14. Enter a name and password for a wireless connection. Click "Finish" and a preview window showing a live stream from your network camera's wireless connection, please follow IV- 1-2. Wireless. 19 12.
The camera is complete. Click "Next" to your camera. The password will indicate that setup is operational and ready to be used later to log in to continue. 13. The next screen will be configured for your camera remotely via its cloud ID, web interface or via the EdiView smartphone app. To setup your camera may open. 14. Enter a name and password for a wireless connection. Click "Finish" and a preview window showing a live stream from your network camera's wireless connection, please follow IV- 1-2. Wireless. 19 12.

User Manual
Page 22
... 2 - 5 seconds to activate WPS. Take care not to establish a secure wireless connection between your network camera and your network camera (see I-6.) 3. WPS (Wi-Fi Protected Setup) The WPS button is active. The green LAN LED will establish a secure wireless connection. 22 The devices will flash slowly to indicate that WPS is...
... 2 - 5 seconds to activate WPS. Take care not to establish a secure wireless connection between your network camera and your network camera (see I-6.) 3. WPS (Wi-Fi Protected Setup) The WPS button is active. The green LAN LED will establish a secure wireless connection. 22 The devices will flash slowly to indicate that WPS is...

User Manual
Page 26
The enlarged/zoomed view will be displayed in the top right corner and use the menu down the left side to navigate to zoom on. Select "Setup" in the main window. 5. Adjust the level of zoom from 100% to 400% using the "Zoom Factor" slide bar and move the green box to the section of the image you wish to the network camera's various settings. Each menu item is described in the following chapters. 26
The enlarged/zoomed view will be displayed in the top right corner and use the menu down the left side to navigate to zoom on. Select "Setup" in the main window. 5. Adjust the level of zoom from 100% to 400% using the "Zoom Factor" slide bar and move the green box to the section of the image you wish to the network camera's various settings. Each menu item is described in the following chapters. 26
User Manual
Page 30
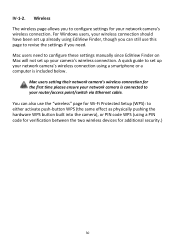
... connection should have been set up your network camera's wireless connection. Mac users need . You can still use the "wireless" page for Wi-Fi Protected Setup (WPS): to either activate push-button WPS (the same effect as physically pushing the hardware WPS button built into the camera), or PIN code WPS...
... connection should have been set up your network camera's wireless connection. Mac users need . You can still use the "wireless" page for Wi-Fi Protected Setup (WPS): to either activate push-button WPS (the same effect as physically pushing the hardware WPS button built into the camera), or PIN code WPS...

User Manual
Page 35
WPS WPS (Wi-Fi Protected Setup) is a quick and easy way to activate PIN code WPS. Enter the SSID you wish to connect to and click "Start PIN" to set up ...
WPS WPS (Wi-Fi Protected Setup) is a quick and easy way to activate PIN code WPS. Enter the SSID you wish to connect to and click "Start PIN" to set up ...

User Manual
Page 40
Remove selected user. Add a new user. Enable or disable anonymous login. Authority Add Modify Remove Anonymous Login Select the user's authority: Operators can view video and configure all settings, while guests can only view video. Anonymous login allows anyone to login to setup a remote video server. 40 This function is useful if you want to the network camera and view images. Save the changes to an existing, selected user.
Remove selected user. Add a new user. Enable or disable anonymous login. Authority Add Modify Remove Anonymous Login Select the user's authority: Operators can view video and configure all settings, while guests can only view video. Anonymous login allows anyone to login to setup a remote video server. 40 This function is useful if you want to the network camera and view images. Save the changes to an existing, selected user.

User Manual
Page 66
... software. 66 VI. 16 Channel Viewer for Windows The included 16 channel viewing software provides powerful access to your CD-ROM drive and if the setup utility does not automatically open, please locate and open the "Autorun.exe" file in the "Autorun" folder. 2.
... software. 66 VI. 16 Channel Viewer for Windows The included 16 channel viewing software provides powerful access to your CD-ROM drive and if the setup utility does not automatically open, please locate and open the "Autorun.exe" file in the "Autorun" folder. 2.

User Manual
Page 76
VI-3-1-2. Scheduled Recording In this tab, you can setup scheduled video recording, so you can record the video captured by all cameras you have according to a pre-defined schedule. 76
VI-3-1-2. Scheduled Recording In this tab, you can setup scheduled video recording, so you can record the video captured by all cameras you have according to a pre-defined schedule. 76

Installation Guide
Page 2
..., or its dealer) assumes the entire cost of all rights reserved. Edimax Technology Co., Ltd. Any software described in the contents hereof without notice. The product you have purchased and the setup screen may be reproduced, transmitted, transcribed, stored in a retrieval system,... or translated into any incidental or consequential damages resulting from Edimax Technology Co., Ltd. The software and specifications are trademarks and...
..., or its dealer) assumes the entire cost of all rights reserved. Edimax Technology Co., Ltd. Any software described in the contents hereof without notice. The product you have purchased and the setup screen may be reproduced, transmitted, transcribed, stored in a retrieval system,... or translated into any incidental or consequential damages resulting from Edimax Technology Co., Ltd. The software and specifications are trademarks and...

Installation Guide
Page 3
Package Contents 4 I -5. Myedimax.com 23 III-5. Camera Setup 8 III-1. WPS (Wi-Fi Protected Setup 16 III-3. Computer 21 III-4. Product Label 6 I -2. Reset 6 II. Hardware Installation 7 III. Web-Based Management Interface 17 III-3-1. EdiView App 25 3 Back Panel 4 I -4. Windows 8 III-1-2. Wireless Settings 19 III-3-1-1. LED Status 5 I -3. I -1. Product Information 4 I . Installing & Using EdiView Finder 8 III-1-1. Mac 13 III-2. Smartphone 19 III-3-1-2.
Package Contents 4 I -5. Myedimax.com 23 III-5. Camera Setup 8 III-1. WPS (Wi-Fi Protected Setup 16 III-3. Computer 21 III-4. Product Label 6 I -2. Reset 6 II. Hardware Installation 7 III. Web-Based Management Interface 17 III-3-1. EdiView App 25 3 Back Panel 4 I -4. Windows 8 III-1-2. Wireless Settings 19 III-3-1-1. LED Status 5 I -3. I -1. Product Information 4 I . Installing & Using EdiView Finder 8 III-1-1. Mac 13 III-2. Smartphone 19 III-3-1-2.

Installation Guide
Page 7
... camera is ready when the green power LED displays on. Wait a moment for setup. 1. LED Status). 7 Camera Setup to power on (see I-3. If the network camera cannot connect to III. Use an Ethernet cable to connect the network camera's LAN port to ensure ...
... camera is ready when the green power LED displays on. Wait a moment for setup. 1. LED Status). 7 Camera Setup to power on (see I-3. If the network camera cannot connect to III. Use an Ethernet cable to connect the network camera's LAN port to ensure ...
Installation Guide
Page 8
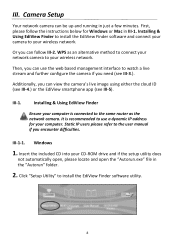
Installing & Using EdiView Finder to install the EdiView Finder software and connect your camera to your CD-ROM drive and if the setup utility does not automatically open, please locate and open the "Autorun.exe" file in the "Autorun" folder. 2. Or you can follow the instructions...your computer is recommended to use the web based management interface to your computer. III-1-1. Windows 1. III. Click "Setup Utility" to the user manual if you need (see III-5). Camera Setup Your network camera can use a dynamic IP address for Windows or Mac in just a few minutes. WPS as ...
Installing & Using EdiView Finder to install the EdiView Finder software and connect your camera to your CD-ROM drive and if the setup utility does not automatically open, please locate and open the "Autorun.exe" file in the "Autorun" folder. 2. Or you can follow the instructions...your computer is recommended to use the web based management interface to your computer. III-1-1. Windows 1. III. Click "Setup Utility" to the user manual if you need (see III-5). Camera Setup Your network camera can use a dynamic IP address for Windows or Mac in just a few minutes. WPS as ...
