
Quick Install Guide
Page 4
... an ideal product for missing contents. 2. Product Information Thank you start to use this IP camera, please check the package contents. It can view and control remotely via a browser or Edimax utility to claim for all kinds of the above . System Requirement System requirement for purchasing... 5 Ethernet Cable One Quick Installation Guide One CD (Including Manual/Utility/Multi-Language QIG) Two Antenna (IC-7000PTn V2 only) If any of video surveillance purposes, like home/office safety, kid/pet monitoring, and remote video acquire etc. Before you for PC...
... an ideal product for missing contents. 2. Product Information Thank you start to use this IP camera, please check the package contents. It can view and control remotely via a browser or Edimax utility to claim for all kinds of the above . System Requirement System requirement for purchasing... 5 Ethernet Cable One Quick Installation Guide One CD (Including Manual/Utility/Multi-Language QIG) Two Antenna (IC-7000PTn V2 only) If any of video surveillance purposes, like home/office safety, kid/pet monitoring, and remote video acquire etc. Before you for PC...

Quick Install Guide
Page 5
Plug the power adapter to wall socket and connect the power connector to the power jack located at the back of this step if you use IC-7000PTn V2 with wireless LAN only. 2. 4. NOTE: Skip this IP camera. Connect the Ethernet cable to your local area network, and connect the other end to set the camera up: 1. Hardware Installation Please follow the following instructions to the LAN jack of the IP camera.
Plug the power adapter to wall socket and connect the power connector to the power jack located at the back of this step if you use IC-7000PTn V2 with wireless LAN only. 2. 4. NOTE: Skip this IP camera. Connect the Ethernet cable to your local area network, and connect the other end to set the camera up: 1. Hardware Installation Please follow the following instructions to the LAN jack of the IP camera.

Quick Install Guide
Page 6
3. Connect the antennas to the antenna base (for IC-7000PTn V2 only) located at the bottom of the IP camera. 4. Place the IP camera at a secure place, and point the camera to the place you wish to monitor. If you wish to hang the camera on the ceiling or wall, please use the tripod connector (located at the back of the IP camera as shown on the below) to secure the camera.
3. Connect the antennas to the antenna base (for IC-7000PTn V2 only) located at the bottom of the IP camera. 4. Place the IP camera at a secure place, and point the camera to the place you wish to monitor. If you wish to hang the camera on the ceiling or wall, please use the tripod connector (located at the back of the IP camera as shown on the below) to secure the camera.

Quick Install Guide
Page 7
... in the CD. 2. The following installation steps are similar. 1. The "Autorun.exe" program should be executed automatically. Insert the CD shipped along with the IP Internet Camera into your CD-ROM drive. 5. The Install Wizard will show four selections, select the program you quickly through the Installation process. The installation procedures in...
... in the CD. 2. The following installation steps are similar. 1. The "Autorun.exe" program should be executed automatically. Insert the CD shipped along with the IP Internet Camera into your CD-ROM drive. 5. The Install Wizard will show four selections, select the program you quickly through the Installation process. The installation procedures in...

Quick Install Guide
Page 10
If you have Windows Defender or other 3rd party firewall software, you may see the following or similar message, Please click „Unblock‟ to let IP camera Utility pass the firewall, or the IP camera utility may not be able to complete the software installation. 8. Click „Finish‟ to function properly 7.
If you have Windows Defender or other 3rd party firewall software, you may see the following or similar message, Please click „Unblock‟ to let IP camera Utility pass the firewall, or the IP camera utility may not be able to complete the software installation. 8. Click „Finish‟ to function properly 7.

Quick Install Guide
Page 11
When the installation is completed, the system will be created: Admin Utility and Uninstall. On the first page, the cameras found in the network are listed in „All Programs‟ will auto run the „Administrator Utility‟. A new folder named „IP Camera‟ in the window. Choose the one you want to configure and click „Configure Camera‟ icon to the IP camera and use these 2 utilities to connect to proceed. You can use the functions of the camera without web browser. 10. 9.
When the installation is completed, the system will be created: Admin Utility and Uninstall. On the first page, the cameras found in the network are listed in „All Programs‟ will auto run the „Administrator Utility‟. A new folder named „IP Camera‟ in the window. Choose the one you want to configure and click „Configure Camera‟ icon to the IP camera and use these 2 utilities to connect to proceed. You can use the functions of the camera without web browser. 10. 9.

Quick Install Guide
Page 12
...8223; (you can accept the suggested value or enter the value manually. The wizard program will detect the IP address status of your network automatically and suggest a free IP address for both the camera and the PC. You‟ll be correct, or you enter the value manually, please be aware that... the „Subnet Mask‟ must be prompted to the IP camera. The IP address setting must be the same for the IP Camera by DHCP. You can not change it), and the default password is working through the network (TCP...
...8223; (you can accept the suggested value or enter the value manually. The wizard program will detect the IP address status of your network automatically and suggest a free IP address for both the camera and the PC. You‟ll be correct, or you enter the value manually, please be aware that... the „Subnet Mask‟ must be prompted to the IP camera. The IP address setting must be the same for the IP Camera by DHCP. You can not change it), and the default password is working through the network (TCP...

Quick Install Guide
Page 14
When you see the images captured by the IP camera now. For advanced functions, please refer to install required ActiveX control. You should be able to see this message, click ‟Install‟ to instructions given in user manual (on supplied CD-ROM)
When you see the images captured by the IP camera now. For advanced functions, please refer to install required ActiveX control. You should be able to see this message, click ‟Install‟ to instructions given in user manual (on supplied CD-ROM)
Datasheet
Page 1
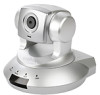
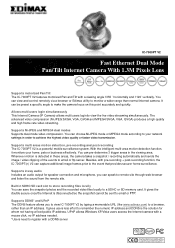
... order to your home, pets or business effectively. Allows multi users login simultaneously This Internet Camera (IP Camera) allows multi users login to monitor a wider range than an IP address. With the intelligent multi-area motion detection function, it monitors your network settings in SDHC...SDHC or SD memory card. IC-7000PT V2 Fast Ethernet Dual Mode Pan/Tilt Internet Camera With 1.3M Pixels Lens Supports motorized Pan/Tilt The IC-7000PT V2 features motorized Pan and Tilt with a DDNS server You can view and control remotely via a browser or Edimax utility to view the live ...
... order to your home, pets or business effectively. Allows multi users login simultaneously This Internet Camera (IP Camera) allows multi users login to monitor a wider range than an IP address. With the intelligent multi-area motion detection function, it monitors your network settings in SDHC...SDHC or SD memory card. IC-7000PT V2 Fast Ethernet Dual Mode Pan/Tilt Internet Camera With 1.3M Pixels Lens Supports motorized Pan/Tilt The IC-7000PT V2 features motorized Pan and Tilt with a DDNS server You can view and control remotely via a browser or Edimax utility to view the live ...

CE DoC
Page 1
... described below complies with the requirements of Signature : September 18,2009 Signature : OL(A-r" Printed Name Title : Luke Kuo Director Edimax Technology CO., LTD. Equipment Model No. Report No. : Fast Ethernet Pan/Tilt IP Camera : IC-7000PT / IC-7000PT V2 • EC891304-02 The following European standards for essential requirements have been followed: European Standard EN 55022:2006 Class..., IEC 61000-4-4:2004, IEC 61000-4-5:1995/A1:2000, IEC 61000-4-6:1996/A1:2000, IEC 61000-4-8:1993/A1:2000, IEC 61000-4-11:1994/A1:2000) CE Edimax Technology Co., Ltd.
... described below complies with the requirements of Signature : September 18,2009 Signature : OL(A-r" Printed Name Title : Luke Kuo Director Edimax Technology CO., LTD. Equipment Model No. Report No. : Fast Ethernet Pan/Tilt IP Camera : IC-7000PT / IC-7000PT V2 • EC891304-02 The following European standards for essential requirements have been followed: European Standard EN 55022:2006 Class..., IEC 61000-4-4:2004, IEC 61000-4-5:1995/A1:2000, IEC 61000-4-6:1996/A1:2000, IEC 61000-4-8:1993/A1:2000, IEC 61000-4-11:1994/A1:2000) CE Edimax Technology Co., Ltd.
