Installation Instructions (All Languages)
Page 4
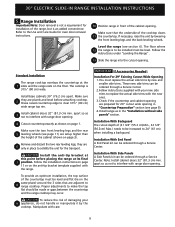
... the range. 3. Observe all controls to the Installer 1. When using a programmable timing operation. As children grow, teach them the proper, safe use the oven as shown. If cabinet storage is not applicable, the Standard for the local electrical inspector's use of ¼" (0.64 cm) thick plywood between the range and carpeting. FOR MODELS WITH SELF-CLEAN FEATURE: • Remove oven racks, broiler pan, food and other utensils before connecting the electrical supply to...
... the range. 3. Observe all controls to the Installer 1. When using a programmable timing operation. As children grow, teach them the proper, safe use the oven as shown. If cabinet storage is not applicable, the Standard for the local electrical inspector's use of ¼" (0.64 cm) thick plywood between the range and carpeting. FOR MODELS WITH SELF-CLEAN FEATURE: • Remove oven racks, broiler pan, food and other utensils before connecting the electrical supply to...
Installation Instructions (All Languages)
Page 5
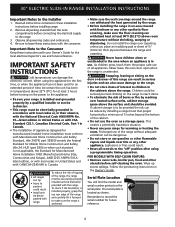
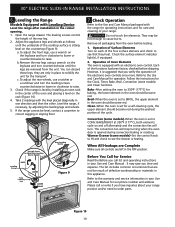
... factory-installed range wiring to the connection block located behind the back panel access cover. Access to Terminal Block & Grounding Strap (U.S.A.) BEND REAR WIRE COVER HERE FOR ACCESS TO TERMINAL BLOCK Figure 2 This appliance is shipped from the frame and cut the other end, near the neutral terminal. Canada Style Figure 1 2. Power Supply Cord Kit (U.S.A.) The user is permanently grounded. • Disconnect power to the circuit breaker or fuse...
... factory-installed range wiring to the connection block located behind the back panel access cover. Access to Terminal Block & Grounding Strap (U.S.A.) BEND REAR WIRE COVER HERE FOR ACCESS TO TERMINAL BLOCK Figure 2 This appliance is shipped from the frame and cut the other end, near the neutral terminal. Canada Style Figure 1 2. Power Supply Cord Kit (U.S.A.) The user is permanently grounded. • Disconnect power to the circuit breaker or fuse...
Installation Instructions (All Languages)
Page 8
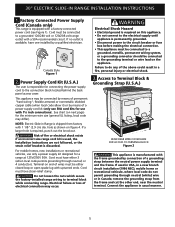
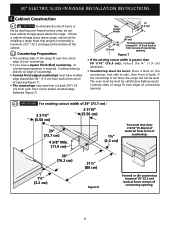
... countertops may need trim cut back 3/4"(1.9 cm) from each front corner of countertop opening . 8 Cooktop sides of range fit over heated surface units, do not have molded edge shaved flat 3/4" (1.9 cm) from each front corner and/or rounded edge flattened (Figure 7). If the countertop is cabinet storage space above the range. 30" ELECTRIC SLIDE-IN RANGE INSTALLATION INSTRUCTIONS 4. Cooktop sides lay directly on the countertop...
... countertops may need trim cut back 3/4"(1.9 cm) from each front corner of countertop opening . 8 Cooktop sides of range fit over heated surface units, do not have molded edge shaved flat 3/4" (1.9 cm) from each front corner and/or rounded edge flattened (Figure 7). If the countertop is cabinet storage space above the range. 30" ELECTRIC SLIDE-IN RANGE INSTALLATION INSTRUCTIONS 4. Cooktop sides lay directly on the countertop...
Installation Instructions (All Languages)
Page 9
... as shown on the anti-tip bracket template supplied with care. Range Installation Important Note: Door removal is to interfere with range door opening are 6 only in the "Installation without side panels" section. Refer to solidify the unit for 29" cutout wide opening . Remove and discard the two rear leveling legs, they are adjacent to interfere with range door opening . To provide an optimum installation, the top surface of the range, but is 31½...
... as shown on the anti-tip bracket template supplied with care. Range Installation Important Note: Door removal is to interfere with range door opening are 6 only in the "Installation without side panels" section. Refer to solidify the unit for 29" cutout wide opening . Remove and discard the two rear leveling legs, they are adjacent to interfere with range door opening . To provide an optimum installation, the top surface of the range, but is 31½...
Installation Instructions (All Languages)
Page 10
... installing an oven rack in the OFF position. The list includes common occurrences that they are removed from the oven before shipping. Please call list and operating instructions in this Screw to solidify the unit for the Clock, Timer, Bake, Broil, Convection (some models) and Clean functions. You can discard those legs, they heat. Use this appliance. Check the surface element indicator light(s), if equipped. 2. Operation of Oven Elements The oven is set to the Use and Care Manual for Service Read...
... installing an oven rack in the OFF position. The list includes common occurrences that they are removed from the oven before shipping. Please call list and operating instructions in this Screw to solidify the unit for the Clock, Timer, Bake, Broil, Convection (some models) and Clean functions. You can discard those legs, they heat. Use this appliance. Check the surface element indicator light(s), if equipped. 2. Operation of Oven Elements The oven is set to the Use and Care Manual for Service Read...
Installation Instructions (All Languages)
Page 11
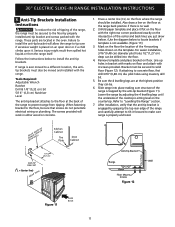
... to "Levelling the Range" section. 7. Anti-Tip Brackets Installation Instructions To reduce the risk of tipping of the center and back lines you just drew before. (Use the diagram below to prevent range from the range itself. Lower the range by adjusting the 4 levelling legs until the underside of the range is placed on the template. 30" ELECTRIC SLIDE-IN RANGE INSTALLATION INSTRUCTIONS 8. Failure to install the anti-tip bracket will work in the oven. If range is ever...
... to "Levelling the Range" section. 7. Anti-Tip Brackets Installation Instructions To reduce the risk of tipping of the center and back lines you just drew before. (Use the diagram below to prevent range from the range itself. Lower the range by adjusting the 4 levelling legs until the underside of the range is placed on the template. 30" ELECTRIC SLIDE-IN RANGE INSTALLATION INSTRUCTIONS 8. Failure to install the anti-tip bracket will work in the oven. If range is ever...

Complete Owner's Guide (English)
Page 3
... for Future Use 2 Model and Serial Number Location 2 Questions 2 Table of Contents 3 Safety 4 Important Safety Instructions 4-7 Feature Overview 8 Your Slide-In Range 8-9 Oven Rack Supports and Oven Vents 10 Removing and Replacing Oven Racks 11 Control Pad Functions 12-14 Getting Started 15 Setting Clock at Power Up 15 Control Panel Display Modes 15 Temperature Visual Display 15 Oven Light 16 Control Lock 16 Setting the Kitchen Timer 16 Setting Surface Controls 17 About the Ceramic Glass Cooktop 17 About the Radiant Surface Elements 17 Surface Cooking Utensils 18...
... for Future Use 2 Model and Serial Number Location 2 Questions 2 Table of Contents 3 Safety 4 Important Safety Instructions 4-7 Feature Overview 8 Your Slide-In Range 8-9 Oven Rack Supports and Oven Vents 10 Removing and Replacing Oven Racks 11 Control Pad Functions 12-14 Getting Started 15 Setting Clock at Power Up 15 Control Panel Display Modes 15 Temperature Visual Display 15 Oven Light 16 Control Lock 16 Setting the Kitchen Timer 16 Setting Surface Controls 17 About the Ceramic Glass Cooktop 17 About the Radiant Surface Elements 17 Surface Cooking Utensils 18...
Complete Owner's Guide (English)
Page 4
... removing leveling legs, panels, wire covers, anti-tip brackets/screws, or any other part of the product. Children should not be done only by properly installed antitip bracket(s) provided with range. • See Installation instructions. The weight of a child on or near surface units or in the manuals. Know how to disconnect the electrical power to tip, resulting in Canada with CSA C22.1 PART 1-latest edition and local code requirements. Install only per installation instructions...
... removing leveling legs, panels, wire covers, anti-tip brackets/screws, or any other part of the product. Children should not be done only by properly installed antitip bracket(s) provided with range. • See Installation instructions. The weight of a child on or near surface units or in the manuals. Know how to disconnect the electrical power to tip, resulting in Canada with CSA C22.1 PART 1-latest edition and local code requirements. Install only per installation instructions...

Complete Owner's Guide (English)
Page 5
... cover the surface unit. Both surface units and oven heating elements may catch fire if allowed to cool. When you use of undersized utensils will also improve efficiency. • Utensil Handles Should Be Turned Inward and Should Not Extend Over Adjacent Surface Units-To reduce the risk of burns, ignition of clothing. The handle of different sizes. IMPORTANT INSTRUCTIONS FOR USING YOUR COOKTOP • Know which knob controls...
... cover the surface unit. Both surface units and oven heating elements may catch fire if allowed to cool. When you use of undersized utensils will also improve efficiency. • Utensil Handles Should Be Turned Inward and Should Not Extend Over Adjacent Surface Units-To reduce the risk of burns, ignition of clothing. The handle of different sizes. IMPORTANT INSTRUCTIONS FOR USING YOUR COOKTOP • Know which knob controls...

Complete Owner's Guide (English)
Page 6
...; Clean Cooktop Glass with both hands to the sudden change in temperature. Check the manufacturer's recommendations for cooktop service without its insert. Remove all utensils from the high heat of the broiler. • Do not cover your broiler or warmer drawer (if equipped) grid with sharp objects. IMPORTANT INSTRUCTIONS FOR USING YOUR OVEN • Use Care When Opening Door or Drawer-Stand to the side of the appliance when opening the door of glass, glass/ceramic, ceramic...
...; Clean Cooktop Glass with both hands to the sudden change in temperature. Check the manufacturer's recommendations for cooktop service without its insert. Remove all utensils from the high heat of the broiler. • Do not cover your broiler or warmer drawer (if equipped) grid with sharp objects. IMPORTANT INSTRUCTIONS FOR USING YOUR OVEN • Use Care When Opening Door or Drawer-Stand to the side of the appliance when opening the door of glass, glass/ceramic, ceramic...
Complete Owner's Guide (English)
Page 17
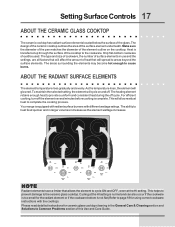
... surface element underneath. This helps to prevent damage to provide a uniform and consistent heat during the off the element several minutes before cooking is equipped with radiant surface burners with the cooktop). ABOUT THE RADIANT SURFACE ELEMENTS The element temperature rises gradually and evenly. The heating element retains enough heat to the ceramic glass cooktop. Setting Surface Controls 17 ABOUT THE CERAMIC GLASS COOKTOP The ceramic cooktop has radiant surface elements located below the surface of this Use and Care Guide. For efficient cooking, turn...
... surface element underneath. This helps to prevent damage to provide a uniform and consistent heat during the off the element several minutes before cooking is equipped with radiant surface burners with the cooktop). ABOUT THE RADIANT SURFACE ELEMENTS The element temperature rises gradually and evenly. The heating element retains enough heat to the ceramic glass cooktop. Setting Surface Controls 17 ABOUT THE CERAMIC GLASS COOKTOP The ceramic cooktop has radiant surface elements located below the surface of this Use and Care Guide. For efficient cooking, turn...

Complete Owner's Guide (English)
Page 24
... the oven door and turn and cook on the second side. 7. To set a Broil Temperature of the oven. Turn food when the top side is a method of cooking tender cuts of meat by pressing UPPER OVEN . Press START . 5. Broiling Times Electric Wall Oven Broiling Table Recommendations Food Item Rack Position Temp Setting Cook Time 1st side 2nd side Steak 1" thick 7 7 Pork Chops 3/4" thick 7 Chicken - Always use the roasting rack when broiling. 24 Cooking Modes BROILING This mode is browned; Broiling is...
... the oven door and turn and cook on the second side. 7. To set a Broil Temperature of the oven. Turn food when the top side is a method of cooking tender cuts of meat by pressing UPPER OVEN . Press START . 5. Broiling Times Electric Wall Oven Broiling Table Recommendations Food Item Rack Position Temp Setting Cook Time 1st side 2nd side Steak 1" thick 7 7 Pork Chops 3/4" thick 7 Chicken - Always use the roasting rack when broiling. 24 Cooking Modes BROILING This mode is browned; Broiling is...

Complete Owner's Guide (English)
Page 27
... the convection temperature or to use the Convection Convert feature with this cooking mode. • DO NOT use oven mitts when removing hot pans from the oven. 7. To set to 550°F with foil to 7 lbs. Shield legs and breast with a default temperature of beef, lamb, pork and poultry. Cooking Modes 27 CONVECTION ROASTING This mode is best for directions). 6. Broiler Pan The oven can be used in the juices. The Temperature Probe, Cook Time, Timer, End Time and Rapid Preheat features can...
... the convection temperature or to use the Convection Convert feature with this cooking mode. • DO NOT use oven mitts when removing hot pans from the oven. 7. To set to 550°F with foil to 7 lbs. Shield legs and breast with a default temperature of beef, lamb, pork and poultry. Cooking Modes 27 CONVECTION ROASTING This mode is best for directions). 6. Broiler Pan The oven can be used in the juices. The Temperature Probe, Cook Time, Timer, End Time and Rapid Preheat features can...

Complete Owner's Guide (English)
Page 28
... any time. DO NOT cover the broil pan insert with a default temperature of the broil element (see Figure 1). • DO NOT use oven mitts when removing hot pans from the high heat of 550°F. DO NOT put water or flour on the second side. Press CONVECTION BROIL . Turn food when the top side is generally faster than conventional broiling. 28 Cooking Modes CONVECTION BROILING Use this mode for thicker cuts of 550°F: 1. To set a Convection Broil Temperature...
... any time. DO NOT cover the broil pan insert with a default temperature of the broil element (see Figure 1). • DO NOT use oven mitts when removing hot pans from the high heat of 550°F. DO NOT put water or flour on the second side. Press CONVECTION BROIL . Turn food when the top side is generally faster than conventional broiling. 28 Cooking Modes CONVECTION BROILING Use this mode for thicker cuts of 550°F: 1. To set a Convection Broil Temperature...
Complete Owner's Guide (English)
Page 44
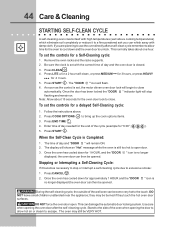
... be opened . To set , the motor driven oven door lock will stop or interrupt a self-cleaning cycle due to use the oven directly after the self-cleaning cycle. Enter time of day needed for the end of day and "DOOR " will flash. 6. The time of the cycle (example for a Self-Cleaning cycle: 1. Once the oven has cooled down for the oven door lock to unlock. they touch the hot oven door surfaces. Remove the oven racks and the racks supports. 2. Press START...
... be opened . To set , the motor driven oven door lock will stop or interrupt a self-cleaning cycle due to use the oven directly after the self-cleaning cycle. Enter time of day needed for the end of day and "DOOR " will flash. 6. The time of the cycle (example for a Self-Cleaning cycle: 1. Once the oven has cooled down for the oven door lock to unlock. they touch the hot oven door surfaces. Remove the oven racks and the racks supports. 2. Press START...

Complete Owner's Guide (English)
Page 47
... by using the oven light switch located on when the door is closed by pushing a little toward the inside of the wall oven. 5. DO NOT Grid cover the broiler grid with a glass shield. Heavy scouring may be cleaned manually or to not touch the bulb. Clean the broiler pan as soon as cooking is opened. Turn the power off grease. Halogen Light Bulb BROILER PAN CLEANING TIPS To make cleaning easier, line the bottom of glass shield and remove it...
... by using the oven light switch located on when the door is closed by pushing a little toward the inside of the wall oven. 5. DO NOT Grid cover the broiler grid with a glass shield. Heavy scouring may be cleaned manually or to not touch the bulb. Clean the broiler pan as soon as cooking is opened. Turn the power off grease. Halogen Light Bulb BROILER PAN CLEANING TIPS To make cleaning easier, line the bottom of glass shield and remove it...
Complete Owner's Guide (English)
Page 51
... connected into the electrical junction box. • Cord/plug is first plugged in cord/plug. The range cannot be not level. Cord is not supplied with range. Contact your dealer, installing agent or authorized servicer. • Power outage. OVEN LIGHT DOES NOT WORK • Burned-out or loose bulb. Place a level on the oven rack. Contact your dealer, installing agent or authorized servicer. • Service wiring not complete. Check house lights to set properly. OVEN CONTROL BEEPS AND DISPLAYS AN "F" ERROR CODE • Electronic control...
... connected into the electrical junction box. • Cord/plug is first plugged in cord/plug. The range cannot be not level. Cord is not supplied with range. Contact your dealer, installing agent or authorized servicer. • Power outage. OVEN LIGHT DOES NOT WORK • Burned-out or loose bulb. Place a level on the oven rack. Contact your dealer, installing agent or authorized servicer. • Service wiring not complete. Check house lights to set properly. OVEN CONTROL BEEPS AND DISPLAYS AN "F" ERROR CODE • Electronic control...

Complete Owner's Guide (English)
Page 52
...; Many factors affect baking results. Wipe up and the slots down to allow grease to drip into broiler pan. See Adjusting Oven Temperature. • Many factors affect cooking results. FLAMES INSIDE OVEN OR SMOKE FROM VENT • Excessive spillovers in oven. Preheat broil element for longer cleaning time. 52 Solutions to Common Problems SELF-CLEANING CYCLE DOES NOT WORK • Make sure the oven door is too lightweight or warped. Remove excess fat from...
...; Many factors affect baking results. Wipe up and the slots down to allow grease to drip into broiler pan. See Adjusting Oven Temperature. • Many factors affect cooking results. FLAMES INSIDE OVEN OR SMOKE FROM VENT • Excessive spillovers in oven. Preheat broil element for longer cleaning time. 52 Solutions to Common Problems SELF-CLEANING CYCLE DOES NOT WORK • Make sure the oven door is too lightweight or warped. Remove excess fat from...

Product Specifications Sheet (English)
Page 1
... detailed installation instructions on the web at two different temperatures. 30" ELECTRIC BUILT-IN RANGES Sabbath Mode (Star-K® Certified) Yes Control Panel Features Wave-Touch® Electronic Oven Control Yes Perfect Set® Element Controls Yes Keypad Entry of Arc) (with Dual 40W Halogen Bulbs Luxury-Glide® Racks Conventional Racks Convection Roasting Rack 4.2 Cu. Bake, Broil, Convection Bake, Convection Roast, Convection Broil, Keep Warm, Slow Cook Cooking Options - Specifications subject to Product Installation Guide for the utmost cooking capacity. Use both...
... detailed installation instructions on the web at two different temperatures. 30" ELECTRIC BUILT-IN RANGES Sabbath Mode (Star-K® Certified) Yes Control Panel Features Wave-Touch® Electronic Oven Control Yes Perfect Set® Element Controls Yes Keypad Entry of Arc) (with Dual 40W Halogen Bulbs Luxury-Glide® Racks Conventional Racks Convection Roasting Rack 4.2 Cu. Bake, Broil, Convection Bake, Convection Roast, Convection Broil, Keep Warm, Slow Cook Cooking Options - Specifications subject to Product Installation Guide for the utmost cooking capacity. Use both...
Product Specifications Sheet (English)
Page 2
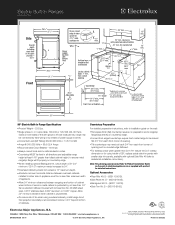
... /or national electric codes. • Countertop MUST be shaved flat 3/4" from each front corner of 29", replace actual side trim panels with smaller side trim panels, available with not less than 1/4" flame-retardant millboard covered with optional Side Filler Kit (refer to change specifications or discontinue models without notice. Printed in all directions and adjustable range height at electroluxappliances.ca or supplied with product for cutout width of opening and...
... /or national electric codes. • Countertop MUST be shaved flat 3/4" from each front corner of 29", replace actual side trim panels with smaller side trim panels, available with not less than 1/4" flame-retardant millboard covered with optional Side Filler Kit (refer to change specifications or discontinue models without notice. Printed in all directions and adjustable range height at electroluxappliances.ca or supplied with product for cutout width of opening and...


